Enhance your Magento store performance with Amazon CloudFront
Your website's success and a quality user browsing experience are directly proportional to the rate and speed at which your Magento website loads.
A slow and unresponsive Magento e-commerce website equals low sales and revenue, as your users may get impatient, abandoning your site before it even loads completely.
On the other hand, a responsive, quick, and secure website attracts more customers, boosting the website traffic, increasing sales and the total revenue of your Magento store.
For improving your website's performance, a content delivery network (CDN) is an ideal and the best approach.
Amazon CloudFront is the fastest CDN web service available to improve your website's performance by securely delivering applications, static and dynamic data, APIs, multimedia, and videos to customers worldwide with high transfer speed and low latency.
Configuring a Content Delivery Network (CDN) like Amazon CloudFront Magento can speed up your website's overall performance, improving customer experience at low and effective costs.**

Amazon CloudFront Significance
Amazon CloudFront works with AWS, providing e-commerce merchants a reliable way to distribute the content of your Magento website worldwide.
Amazon CloudFront speeds up the static files' delivery as they are cached and served from edge locations.
Amazon CloudFront makes this delivery possible through globally located data centers called edge locations You can configure your e-commerce website's traffic that needs to be distributed over these globally distributed data centers or edge networks by setting up an Amazon CloudFront Distribution.
Suppose your customer from America requests a site or data in Asia, in that case, Amazon CloudFront routes that request to the nearest edge locations, which are already cached, and then deliver it to the client with high transfer speed and best possible performance.
Along with this, Amazon CloudFront offers several features and optimization options. Let us have a look at each one of them.
Key features of Amazon CloudFront and why use it with Magento?
Amazon CloudFront offers excellent features as a Cloud Delivery Network (CDN). AWS Data Transfer.
Global
Amazon CloudFront's global edge network makes it possible for low latency, reliability, and high throughput connectivity.
It uses a global network of over 225 points of presence, including 215+ edge locations and 12 regional mid-tier caches within 88 cities across 45 countries.
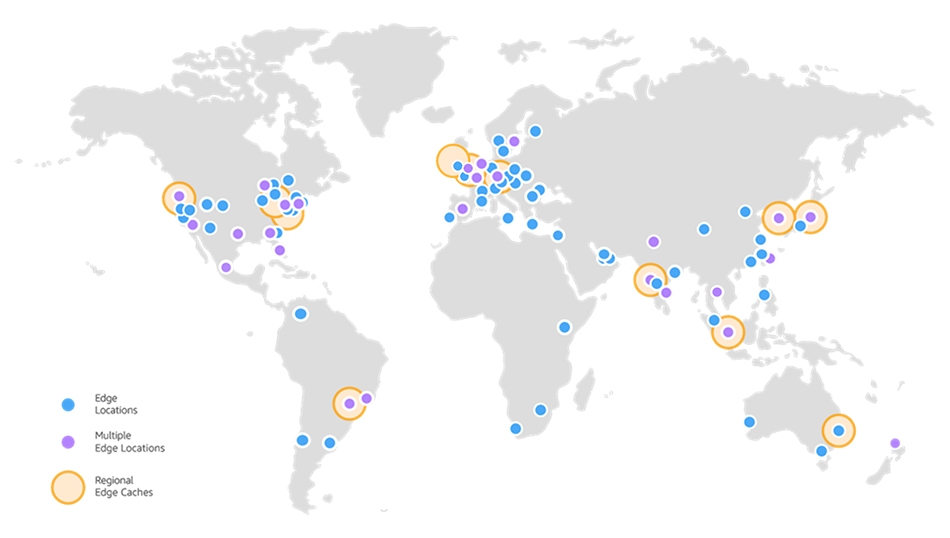
This vast global network and Amazon CloudFront's intelligent software assure that there will always be an edge location nearby any of your clients. The intelligent software makes it possible to deliver content to users worldwide through the location that provides high performance and is the closest to them.
Security
Amazon CloudFront provides a highly reliable, scalable, and high-performance security parameter for all your content and applications by offering various privacy and encryption features.
Amazon CloudFront, along with AWS Shield, AWS WAF, and Amazon Route 53, provides layered and flexible security against several attacks.
Speed
The high data transfer rate of AWS will make it possible for your website to load in a blink of an eye.
Cost-effective
The flexible pricing structure makes Amazon CloudFront even more reliable.
No minimum fee is involved, and customer benefits from pay-as-you-go pricing, enabling them to pay only for the services they use.
To increase responsiveness, you can even customize or configure the AWS CloudFront.
Learn more about the Amazon CloudFront pricing.
Amazon CloudFront's new technologies and optimization options
Amazon CloudFront continuously keeps implementing new technologies to make them available to their users in their internet communication protocols.
You don't have to configure technologies such as TLS session resumption, OCSP Stapling, TCP fast open, request collapsing, and S2N on your own as they are enabled by default.
To activate a specific CloudFront Distribution of your choice, you can choose the following optimizations:
1. Enable HTTP/2:
This optimization allows you to use the same TCP connection and the same domain so you can download all your website's components. When you enable this, there's no need for you to implement domain sharding, reducing the no. of DNS resolutions required for your users.
2. Enable HTTP to HTTPS redirection:
When you enable this optimization at the edge, you can save a round trip to the origin.
3. Fine-tune origin timeouts:
CloudFront makes it possible for you to configure two timeouts for optimizing the connection to your origin.
The read timeout, of default value 30 seconds, signifies the total time for which the Amazon CloudFront waits for a response from custom origins. Even though the default value for read timeout is 30 seconds, you can set a higher read timeout if specific actions on your website require a more considerable processing time on the backend. For example, the payment procedure of an item/order.
The keep-alive idle timeout, of the default value of 5 seconds, signifies the maximum time for which the CloudFront will keep the idle connection with your origin server before the connection is closed. If your origin server supports it, you can also configure a higher keep-alive idle timeout for up to 60 seconds. This configuration is useful when you need to serve dynamic content over Amazon CloudFront. You can avoid creating a new connection always, even though all the requests are forwarded to the origin.
Setting up Amazon CloudFront CDN in Magento
Follow this step-by-step procedure for Amazon CloudFront set up in your Magento 2.
Step 1: Log in to AWS console
Sign In/Sign Up on your AWS account.
Access Amazon CloudFront via AWS Management Console.
Go to CloudFront > Distributions & click on Create Distributions.
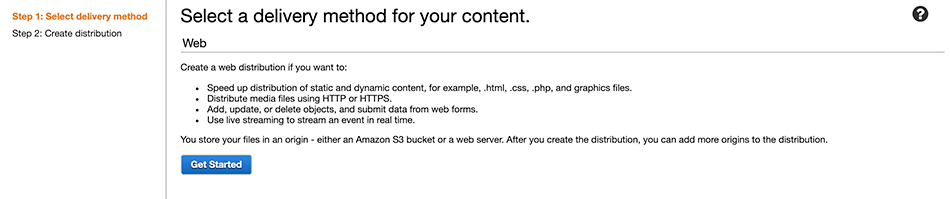
Click on Select a Delivery Method for your content for your Web, and click on Get Started.
Step 2: Set up Distributions
Setting up distributions in Amazon CloudFront is technically the first step of the procedure.
You can edit the General settings as per your needs and requirements.
Distribution settings
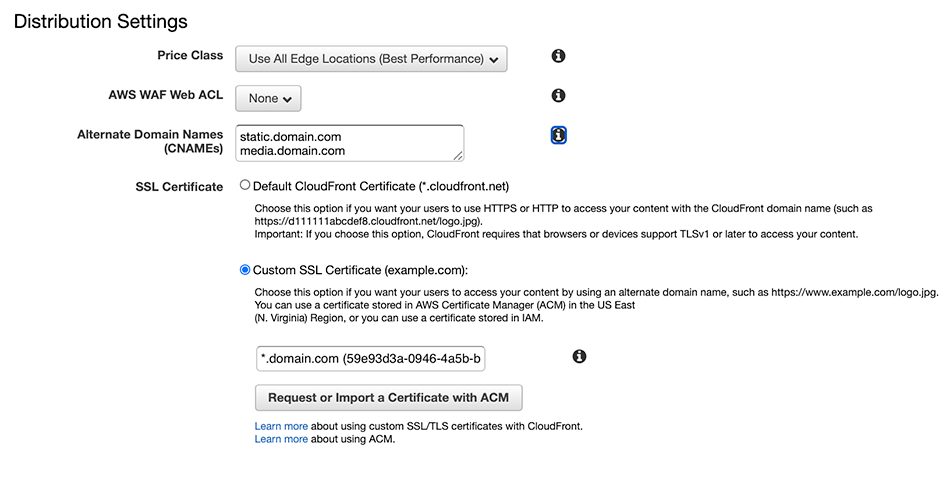
As you can see in the distribution settings, you can choose the Price class, AWS WAF Web ACL, and add alternate domain names.
Amazon CloudFront uses its certificate, so you can even leave them all as the default values.
If you would like to go for an alternate domain name, you must edit the following in Distribution Settings: Alternate Domain Names (CNAMEs): static.domain.com, media.domain.com SSL Certificate: Custom SSL Certificate (example.com): Choose the certificate for that domain name.
You can use the default CloudFront's domain like "dxvge123487.cloudfront.net".
Or you can import your own SSL certificate and use a custom CDN URL such as "https://xyz.yoursite.com."
Alternate Domain Names (CNAMES):
You can use CNAMES if you want to customize URLs for your content.
If you would like to use your own domain name, such as static.domain.com or media.domain.com, instead of the cloudfront.net domain name, you can add an alternate domain name to your distribution. If you would like to use your own domain name, such as static.domain.com or media.domain.com, instead of the cloudfront.net domain name, you can add an alternate domain name to your distribution. This setup can be efficiently managed using Distribution Management Software for better control and scalability.
If you configure CNAME as "cdn.yoursite.com," then you can serve the static or media content with "http://cdn.yoursite.com/image.jpg" URL, instead of "http://www.yoursite.com/image.jpg." To implement it, you need to make proper configuration in the server Backend.
To insert an alternate domain name (CNAME) to a CloudFront distribution, you need to attach a trusted certificate that validates your authorization to use the domain name.
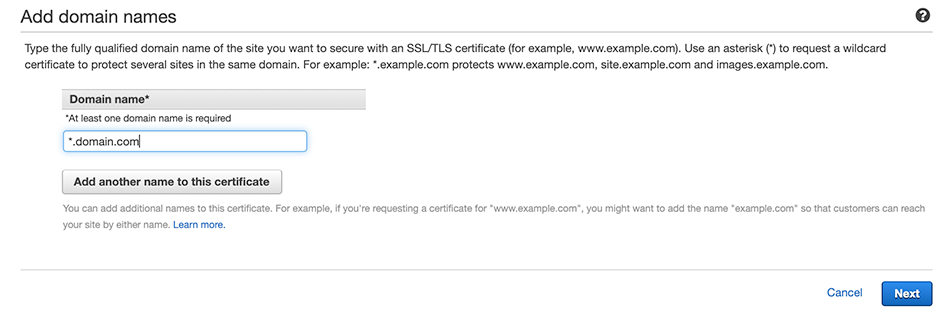
Issuing Certificate:
- Navigate to AWS Certificate Manager to add a certificate and click on the request a certificate and request a public certificate and enter the domain of the certificate you want to add.
-
Click on Next and select DNS validation. Now, click on Review and Confirm and request.
-
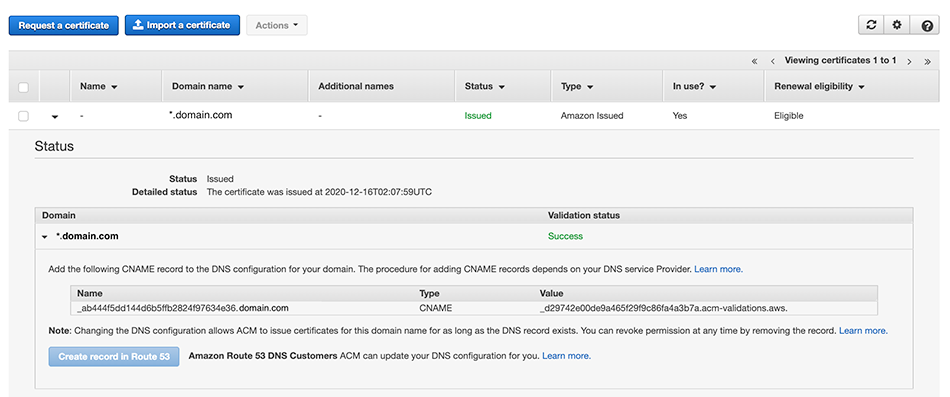
Once the request has been sent for the certificate; you need to add the CNAME record to your domain's DNS configuration.
Domain Name:
Here Amazon generates the domain name for you, for example, "xyz.cloudfront.net."
DNS Configuration:
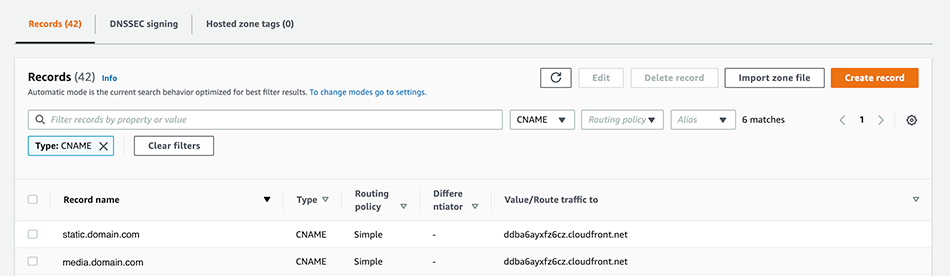
When you configure an alternate domain name in the CloudFront distribution, you need to create a CNAME record of the alternate domain name pointing to CloudFront distribution.
For Example static.domain.com -->> CNAME -->> ddba6ayxfz6cz.cloudfront.net
Verification:
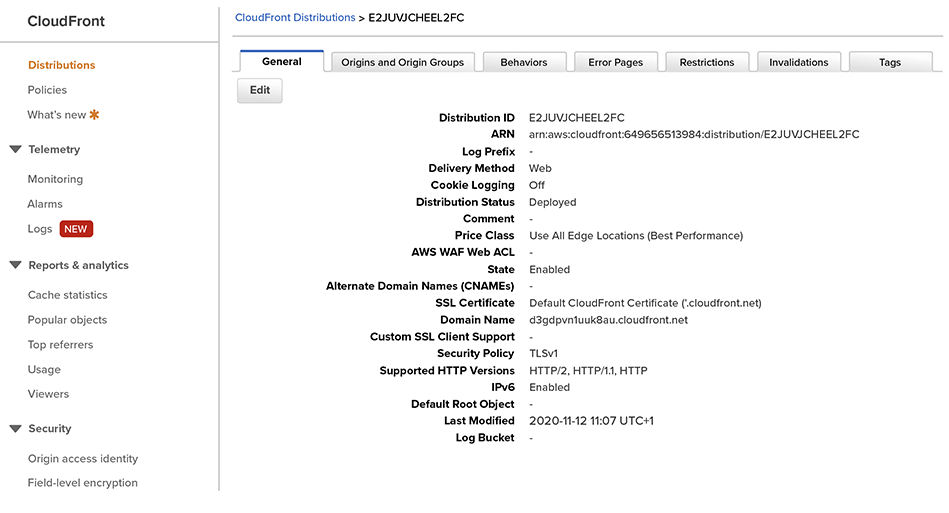
- Wait until the Status of the distribution we just created is Deployed.
Below is an example of a custom distribution with Domain Name:

Below is an example of a custom distribution with CNAME:

- To verify it, take any static or media URL from your website.
For example, "https://www.domain.name/path/to/image.png" and replace the website domain name with the CDN distribution.
As "https://d2loj73necr1vm.cloudfront.net/path/to/image.png/" or "https://media.domain.com/path/to/image.png," in case of the alternate domain.
Now open the CDN URL "https://d2loj73necr1vm.cloudfront.net/path/to/image.png/" to verify the correct image is loading.
Step 3: Origins
Now it's time to set origins.
Origins are where you can store the original versions of your web content. Amazon CloudFront accesses the web content from your origins, which is then served to the viewers. Every origin is either an HTTP server or an Amazon S3 bucket.
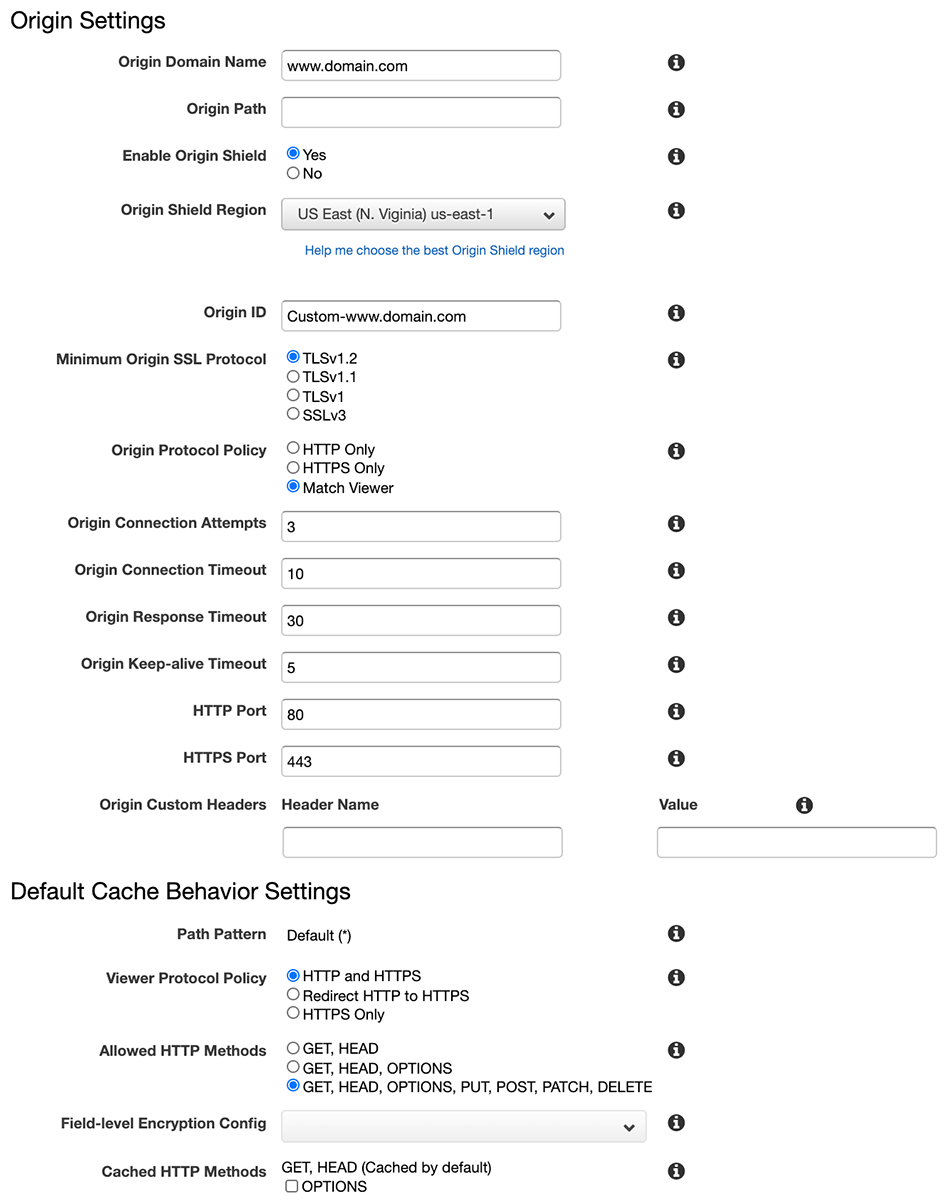
- Origin Domain Name: Origin Domain Name is your source domain name.
- Origin Path: This is optional and is usually empty.
- Enable Origin Shield: Yes
- Origin Shield Region: Select the appropriate region that suits you best.
- Origin ID: Here, you specify any ID by yourself for easy identification of the origin. It can be like your CDN Domain name, or it will be automatically filled.
- Minimum Origin SSL Protocol: TLSv1.2
- Origin Protocol Policy: Match Viewer
Origin Shield: Origin Shield, a centralized caching layer, helps increase your cache hit ratio to reduce your origin load. Once you use Origin Shield, all the requests from all the CloudFront's caching layers to your origin go through the Origin Shield, increasing the chances of a cache hit. CloudFront is capable of retrieving each object with a single origin request from Origin Shield to your origin, and all other CloudFront cache layers (e.g., Edge locations ) can retrieve the object from Origin Shield.
Step 4: Default Cache Behaviour Settings
The next thing is to set the behaviors. While using CDN, you might get an error like a Cross-Origin request Blocked on your website. To deal with such errors and to get them fixed, behavior configuration is required.
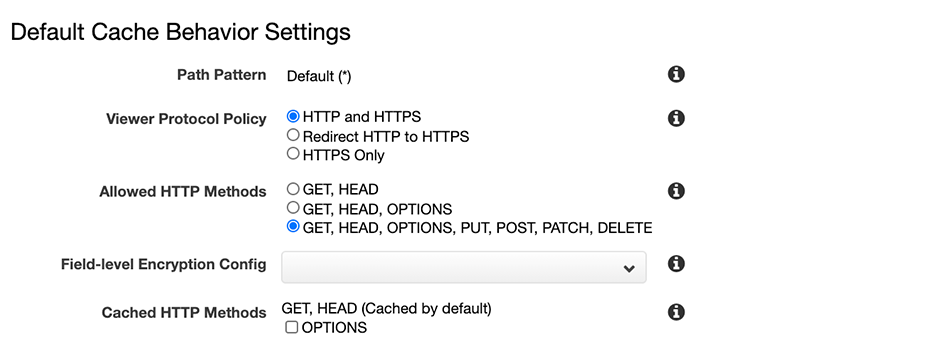
Path pattern: A path pattern (for example, images/*.jpg) specifies which requests you want this cache behavior to apply to.
The default cache behavior only allows a path pattern of * (forward all requests to the origin specified by Origin).
To change the behavior or the routing for other requests (for example, *.jpg), add more cache behaviors after creating the distribution.
Viewer Protocol Policy: It allows you to access your web content using either HTTP or HTTPS, specify HTTP and HTTPS.
Allowed HTTP Methods: You can select the list of HTTP methods to allow for this cache behavior. For example: GET, HEAD, OPTIONS, PUT, POST, PATCH, DELETE.
Step 5: Invalidations
You can create an Invalidation to remove cached objects from the CloudFront edge locations.
If you want to eliminate a file before it expires from the Amazon CloudFront edge cache, you can either:
- Invalidate file from the edge cache. CloudFront returns to the origin of the file and fetches its latest version when a viewer requests a file.
- Use file versioning. You can use this to serve a different version of the file of a different name. Refer to Updating Existing Files Using Versioned File Names for more information.
Important note: it is not possible to invalidate objects served by RTMP Distribution.
You can either specify the individual file paths or a path ending with the * wildcard, which might apply to one or multiple files for file invalidation. For example,
- /images/image1.jpg
- /images/image1*
- /images/*
Step 6: Create Distributions
Click on "Create Distributions."
CloudFront will generate a domain for your use.
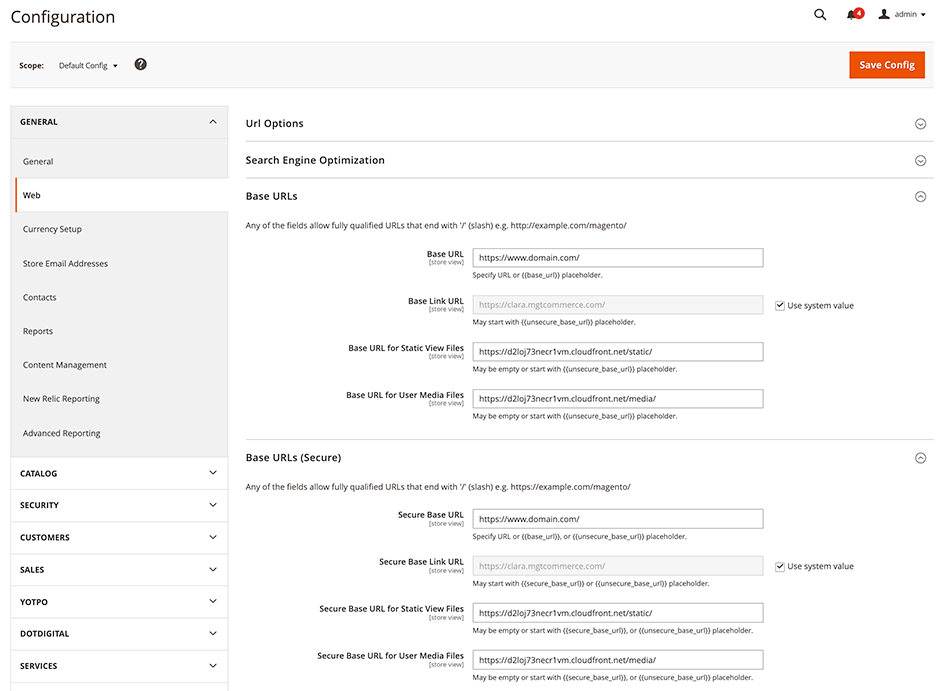
Step 7: Configuring Magento
Once the Amazon CloudFront is set up, it is now time to configure Magento. Magento configuration is really easy. It hardly takes a few minutes, as all you have to do is configure Magento 2's URL.
Login to the Magento Backend and then go to Stores -> Configuration -> General -> Web
Change the media and static URLs to use the Domain Name or the CNAME of the CloudFront in secure and insecure URLs.
Example with the Domain Name:
Example with the CNAME:
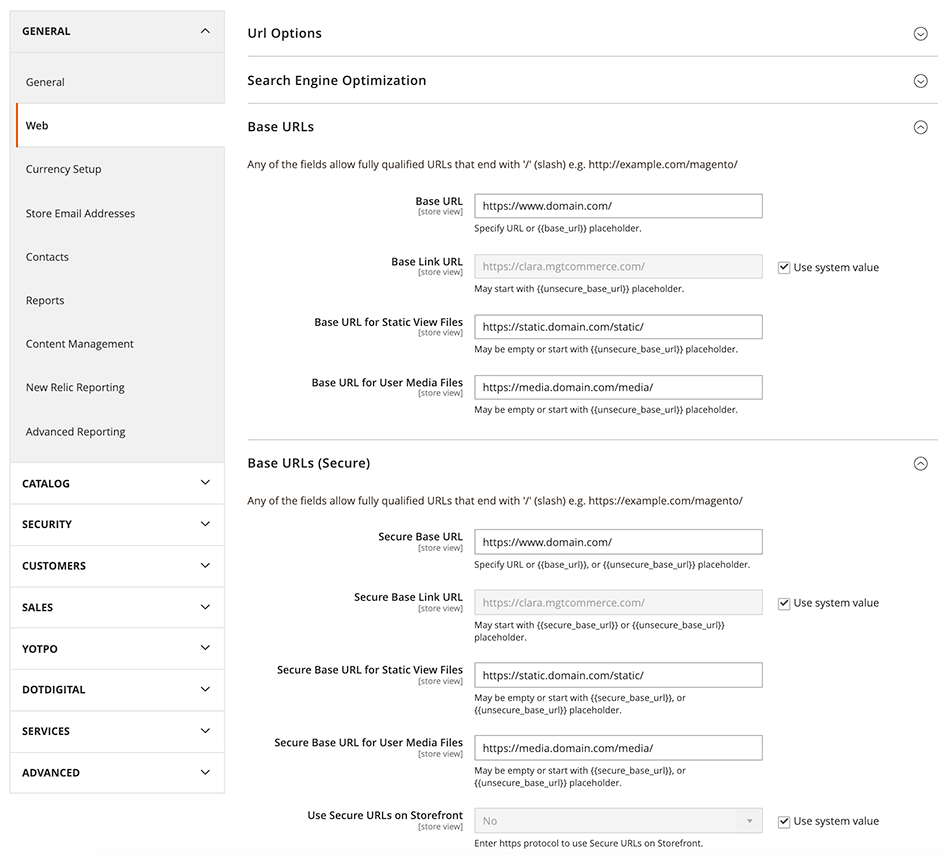
Select your website URL from the drop-down and modify fields where you wish to set CDN URL. Save all your settings, and your website is ready to test.
Step 8: Test
To verify if your website uses Amazon CloudFront CDN, open your website on Chrome and press CTRL+U to view the source code.
If you find ".cloudfront.net" or "cdn.yourwebsite.com" domains and all the content of your website is loaded properly, it means that you have configured CDN correctly.
You can clear all the caches if the images are not loading or the website is not working correctly. And if you can see all the images, that means the website is working fine.
You can use 'Inspect' to see if there are any errors generated in the console.
Improving the cache hit ratio
Maximizing the amount of content delivered from the CloudFront Cache is an essential feature for your website's better performance optimization. This is nothing but the cache hit ratio.
You can improve the caching for the content of your website by following the below-mentioned practices:
- You can create a specific cache behavior in Amazon CloudFront to match certain URLs whose response varies based on cookie, header, or query string values and configure the forwarded values accordingly.
- Instead of forwarding all cookies, query strings, or headers, it is better to forward only a whitelist of specific cookies, headers, and query strings that actually matter to your origin.
- Leverage the headers sent to origin by Amazon CloudFront.
- Normalize values that you need to forward with multiple variations using Lambda@Edge to minimize the total no. of unique variations. This feature allows the code to run closer to the users, reduce latency, and improve performance.
Conclusion
CloudFront Business Impact
Complete ROI picture for Magento merchants worldwide
Enterprise Adoption
Companies trust CloudFront
Cost Efficiency
No minimum fees required
Performance
Immediate response times
SEO Impact
Higher search rankings
Business Benefits
Technical Advantages
CloudFront Impact on E-commerce Success
Suppose you want your application or e-commerce website to reach consumers across the globe and improve its overall speed and performance. In that case, Amazon CloudFront with Magento is the best solution for you.
There are multiple benefits to avail from Amazon CloudFront being the fastest CDN, including
- High performance.
- Increased reliability.
- Cost-effective services.
- Immediate website response whenever a user searches for any information.
- High conversion rates.
- Additional advanced security features.
- Improved SEO rankings because of the increased speed.
- Detailed analytics.
- Protection against several unethical attacks.
- Managed traffic spikes due to the distributed network traffic across all servers.
We discussed everything about Amazon CloudFront, its huge significance, excellent features, and installation.
EndNote
> 50000 companies today reportedly use Amazon CloudFront.
Join the bandwagon and get more success on your Magento e-commerce website by configuring it with the Amazon CloudFront to avail of its smart and exceptional features and services.
Contact us and try out our free demo. We would like to hear from you.