
12 Steps to Configure, Integrate, and Set Up Magento Wishlist
[Updated on April 23, 2025] Want to boost customer loyalty and increase sales with a wishlist feature in your store? Magento Wishlists do more than store products. They serve as conversion tools, featuring guest access, user lists, and smart notifications.
This tutorial will cover how to set up and configure Magento wishlists.
Key Takeaways
- Magento wishlists serve as powerful conversion tools, extending beyond saving products.
- A simple 12-step configuration process works with the latest Magento 2.4.8 and PHP 8.3.
- Advanced features include various wishlists, guest access, and sharing options.
- Strategic wishlist placement improves SEO and drives more sales opportunities.
- Integration with GraphQL enables headless commerce and mobile app features.
- SEO work on wishlist pages can enhance visibility and increase traffic to your store.
What are Magento Wishlists?
A wishlist in the Magento platform is a built-in Magento feature. It allows customers to save products they like for future reference or to check out.
Customers can add items to their wishlists from the product detail page. The list appears in their customer account dashboard. This option helps customers locate the items they need during checkout. It also lets store owners see which products their users desire the most.
Once logged into your e-commerce site, customers will find a “My Wish List” option in the sidebar. Clicking it opens their wishlist, where they’ll see three action buttons:
- Update Wish List
- Share Wish List
- Add All to Cart
These options help users edit their wishlist/share it with others/view everything. To share a wishlist, customers can enter email addresses & include a personalized message.
How Does a Wishlist in Magento Work?
When a user selects "Add to Wishlist" under the 'Product Detail' section, the item gets set up on their wishlist. The list is present in the customer's account dashboard. Shoppers can see their saved items here & add them to their carts when ready. They can email their wishlists to friends via the 'Share Wishlist' button.
- Store owners can set the "number of emails" allowed for sharing. They can:
- Choose the "email address".
- Select the "email sender" from the settings configuration in the Magento Admin Panel.
The entire process uses AJAX technology. This technique updates web pages without requiring the whole page to get loaded. As a result, everything gets updated without needing to reload the page.
12 Steps to Set Up Wishlists in Magento 2
- Log in to your Magento 2 store admin panel.
- Click the 'Stores' tab on the left menu.
- From the drop-down list, click 'Configuration'.
- Find 'Customers' in the left column on the new page.
- Click it, then click "Wishlist".
- You will see many options. To enable wishlists, set 'Enabled' to "Yes".

- Consider the following 3 main options:
- General Options
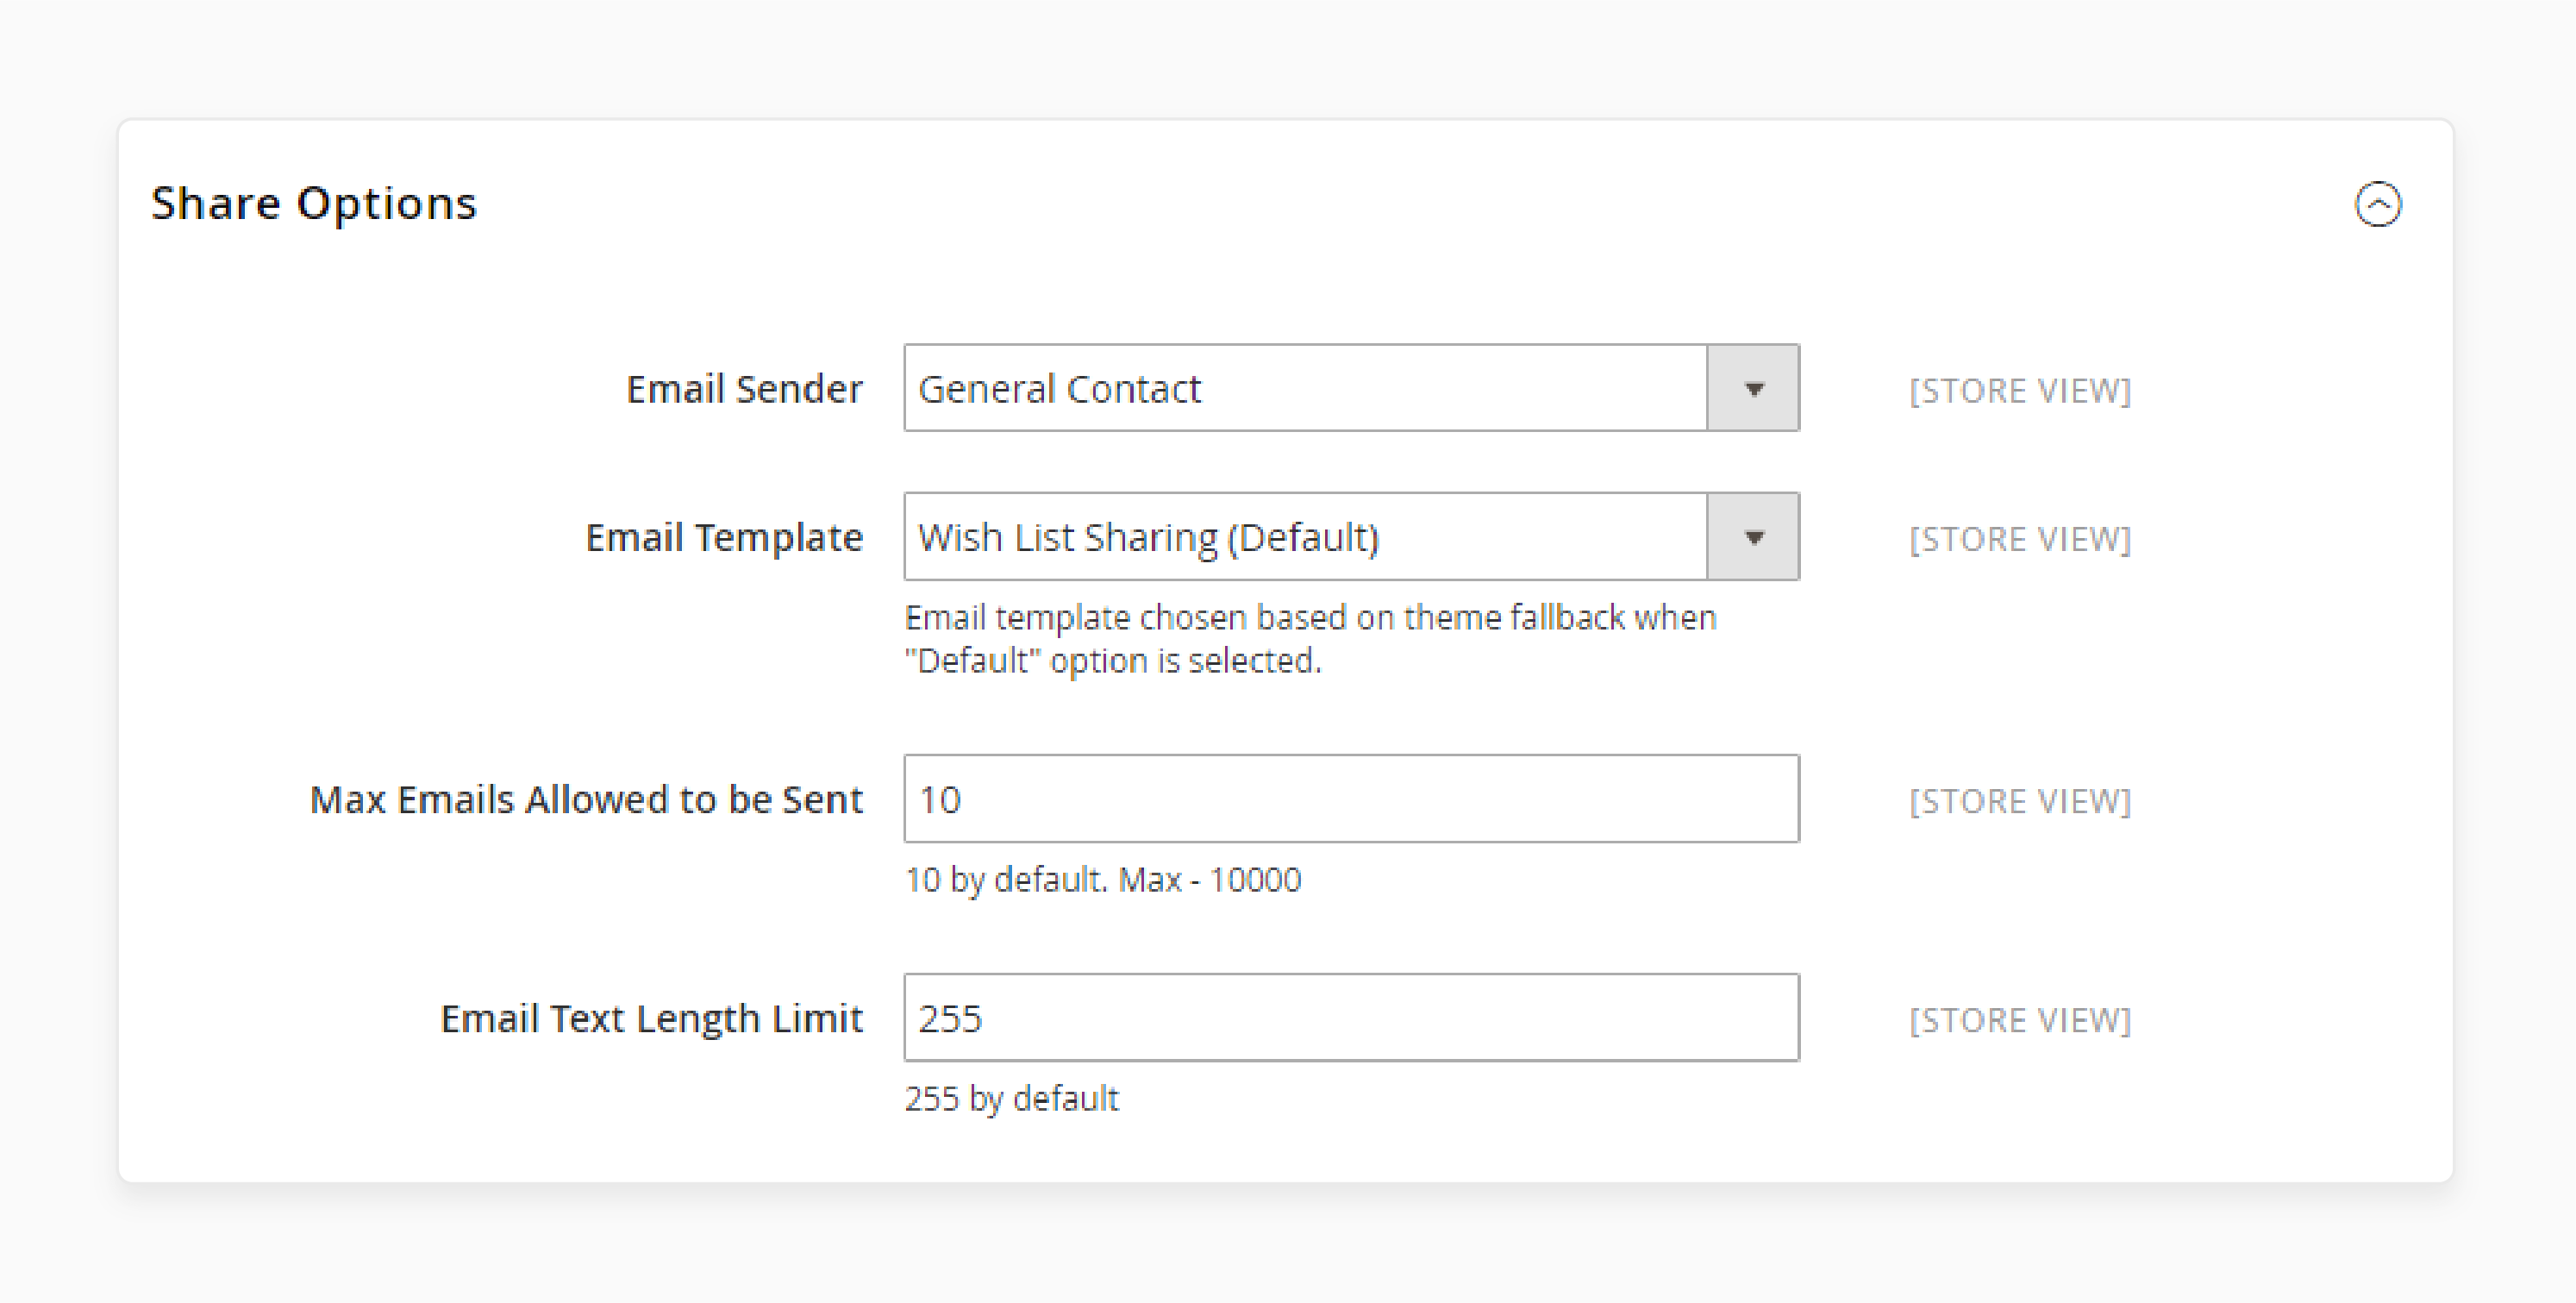
- Share Options
- My Wish List Link

- In the General Option, you can enable 'Wishlists' and specify the "number of lists" you will allow.
- In Share Options, you can set the "Max Number of Emails" available at once. The number of items per email is under the 'Email Text Length Limit'. Choose numbers that work for your store.
- The 'My Wish List Link' section allows you to display the wishlist link in various parts of your site. Click "Display Wish List Summary" if you want the link to appear in the customer account dashboard.
- Click "Save Config" at the top right to save your changes.
- Test your store's wishlist to ensure everything works across all devices.
Note: These steps are compatible with Magento 2.4.8 and later versions. It supports PHP 8.3 and Hyvä themes, a popular Magento frontend framework.
Top 3 Advanced Wishlist Functions in Magento 2
1. Plugin Features for Magento 2 Wishlists
You can add these third-party plugins with more wishlist features for Magento 2:
- Wishlists: Let customers create & manage wishlists, allowing them to sort products by purpose.
- Share with friends: Let customers share wishlists through email and social media.
- Custom Email Templates: Create email templates with your store's branding. Also, add messages for shared wishlists.
- Comments: Customers can add notes to their product wishlists. It helps them remember why they liked particular items.
- Show item count: Displays the "no. of items in a wishlist", saving customers from checking the full page.
- Email sharing limits: Set the "max number of emails" a customer can send at once to prevent spam.
- Custom display: Add links and images to your theme so customers can find wish lists from any page on your site.
- Cross-site lists: Add items from other stores to one wishlist, simplifying product comparison.
- Cart syncing: Update the wishlist when customers add items to their cart.
- Guest wishlists: Allow visitors without accounts to create wishlists. Their picks then get saved in cookies, and they can join their account later if they register.
- Auto-alerts: Get emails for wishlist items on sale/app messages for items that return to stock.
2. Better for SEO
Wishlist pages can help your store show up in search results. Try these SEO tactics for your Magento 2 wishlist pages:
- Add rich snippets: Use schema markup to show "ratings" and "product status" in search results. These pages get more clicks from potential customers.
- Add canonical tags: Prevent duplicate content issues on similar wishlist pages.
- Better URLs: Create wishlist URLs that include "product details" and "relevant keywords".
- Auto meta tags: Use the Magento 2 SEO Suite to generate meta tags for pages based on the products they contain.
- Write original content: Add descriptions to wishlist category pages to make them unique.
- Add breadcrumbs: Place clear navigation paths on wishlist pages. These paths enhance both the browsing experience and SEO performance.
These changes increase search traffic. They help your pages appear in featured snippets when you use question-based headings.
3. GraphQL for More Wishlist Features
Magento 2.4.8 introduces GraphQL, a query language for APIs for wishlists. This approach separates the frontend and backend. It allows developers to create, manage, and share wishlists through APIs. It also works well with mobile apps and headless commerce.
With GraphQL, developers can:
- Make custom wishlist screens for mobile apps.
- Connect wishlists to other services.
- Build shopping experiences using wishlist data.
- Set up headless commerce with complete wishlist functions.
4 Advanced Methods to Boost the Wishlist Storefront Experience in Magento 2
Method 1: Create Wishlists
Customers can create wishlists in the following four ways:
- Navigate to 'My Wish List'.
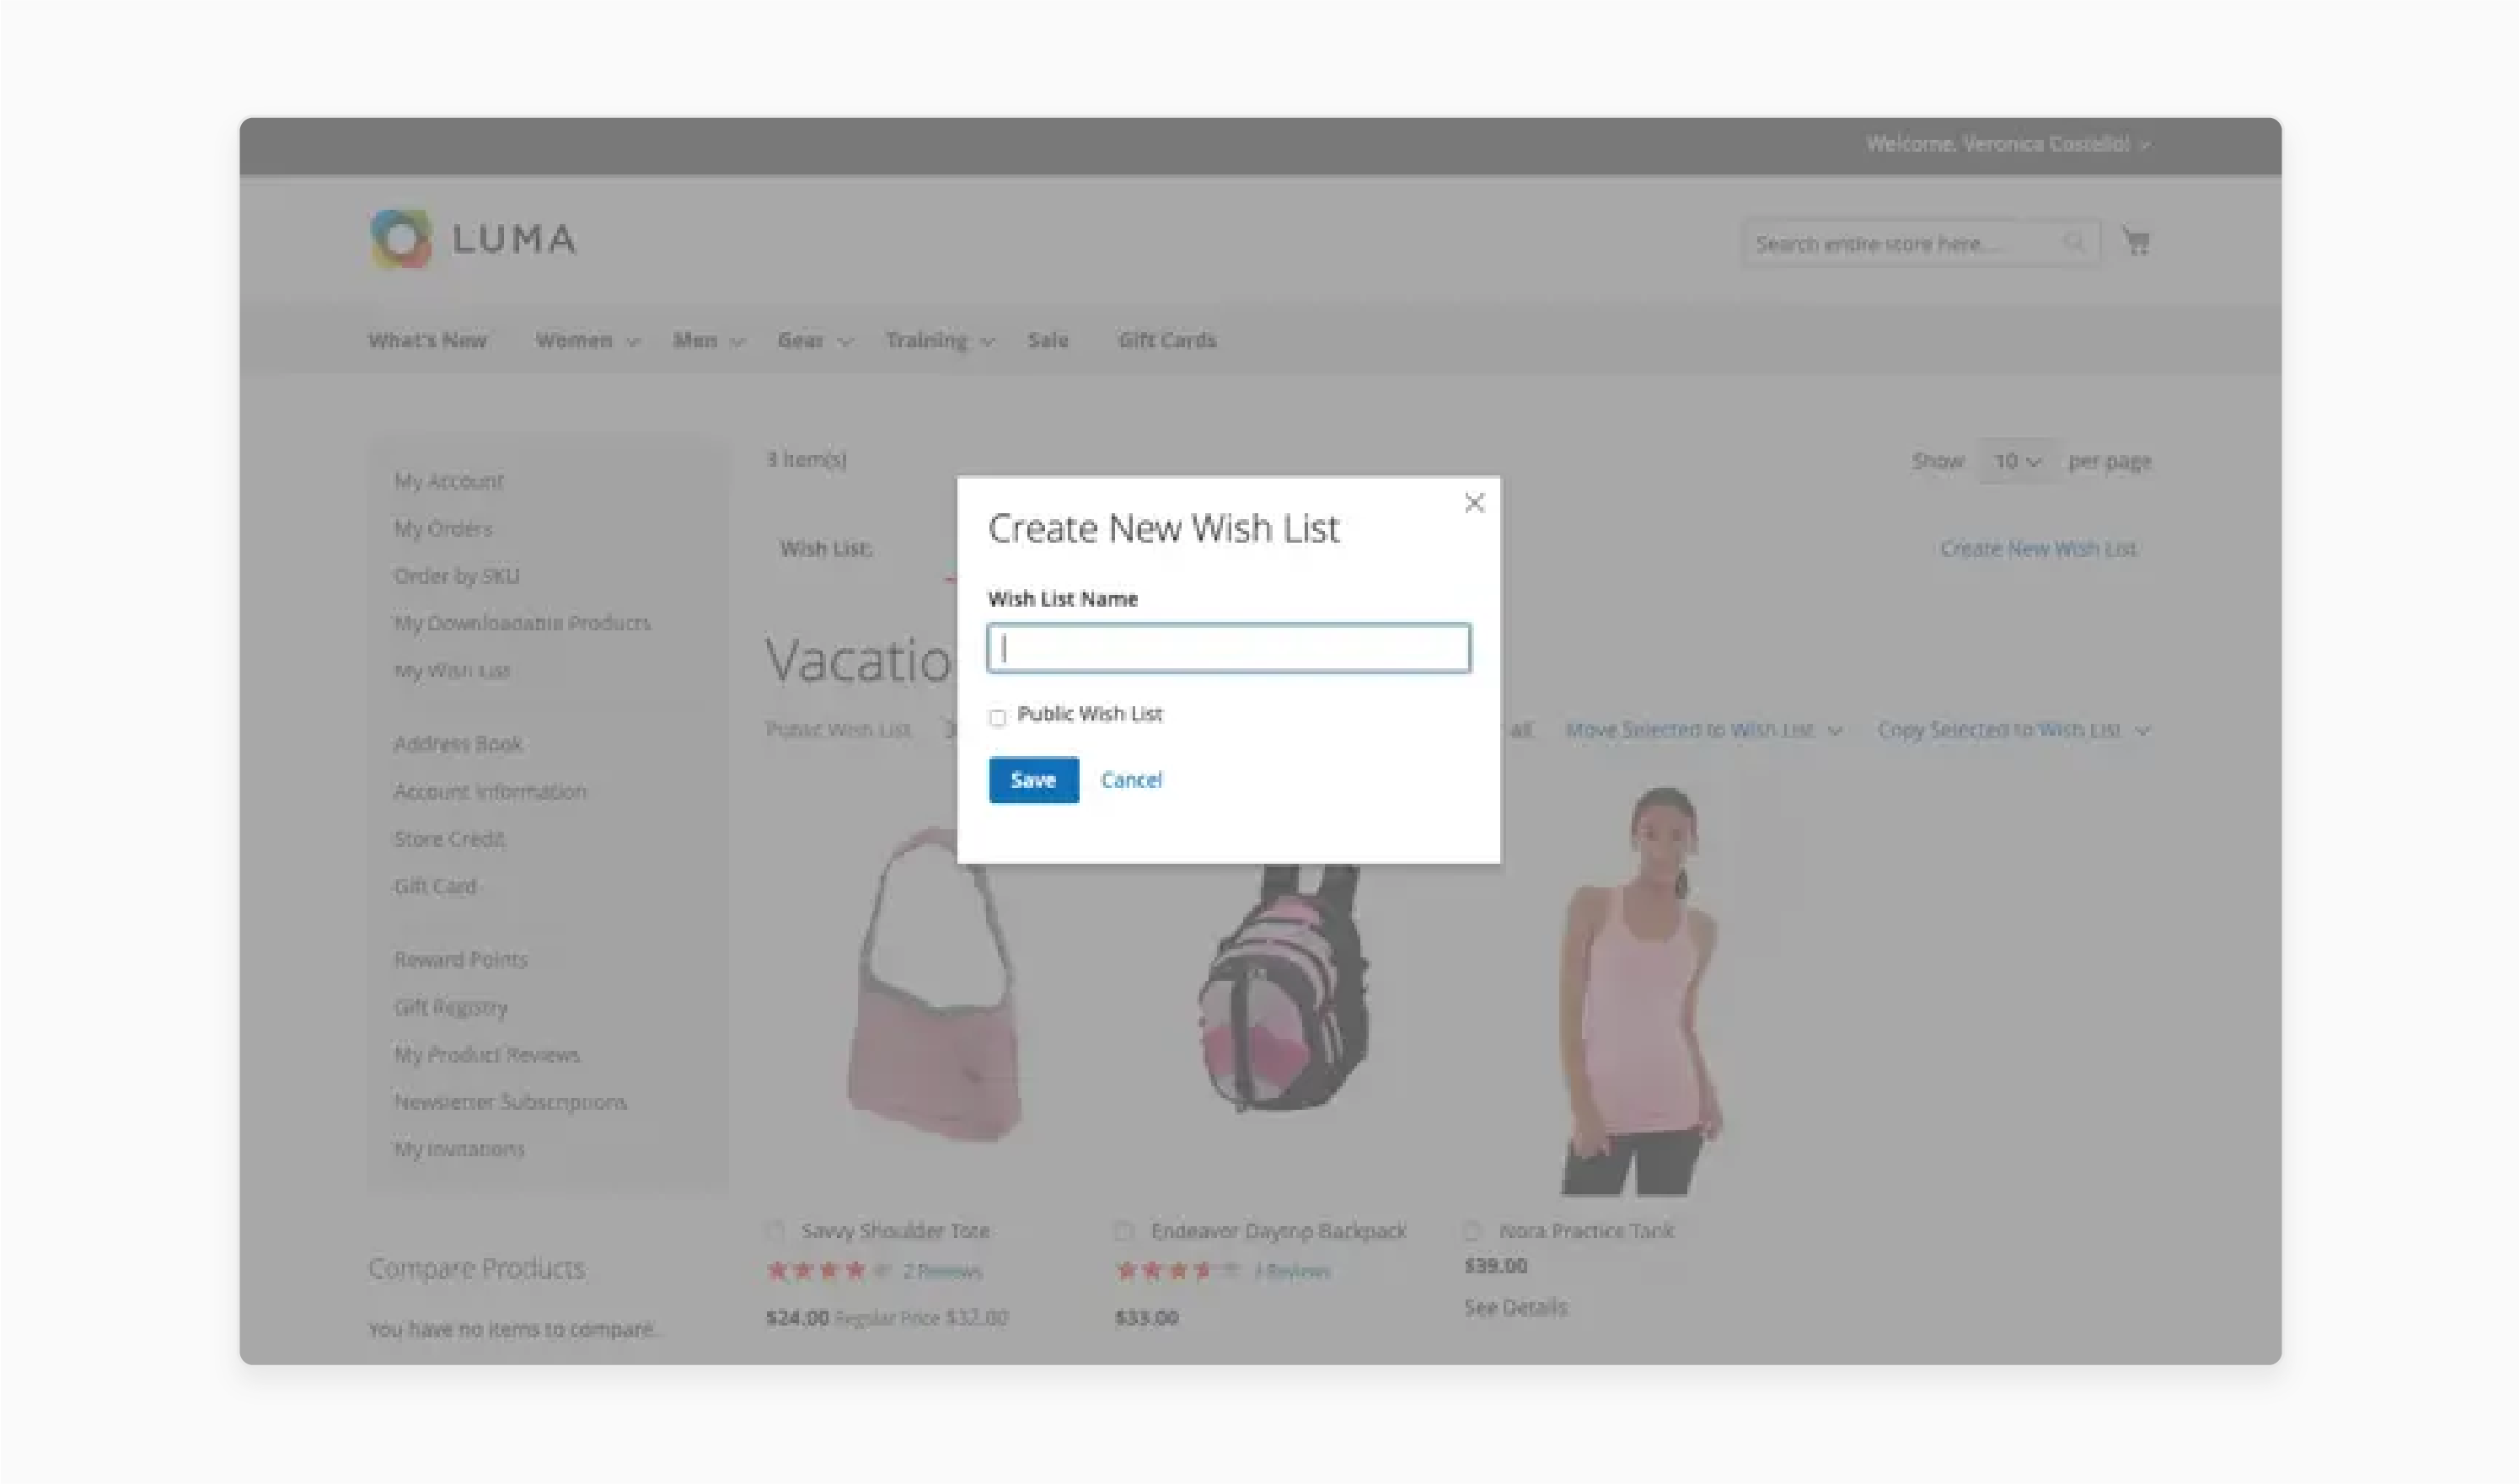
- Click 'Create New Wish List', name the wishlist, make it public, and then click 'Save'.
- Hover over a "product".
- Click the" dropdown" next to 'Add to Wish List'.
- Select "Create New Wish List," name it, and choose visibility.
- Then, click "Save."
- Select the arrow next to 'Add to Wish List' on the 'Product' page.
- Select "Create New Wish List".
- Then, fill out the details and save.
- Under a product in the cart, click the dropdown next to "Move to Wishlist".
- Select "Create New Wish List".
- Complete the form and then click 'Save'.
Wishlist Actions
- Hover over an item and click "Edit".
- Then, adjust the product page and click "Update Wish List".
- Select the quantity and click 'Add to Cart' (for 'individual' items or 'Add All to Cart' for the entire list).
- Use the comment box below each product.
Method 2: Share Wishlists
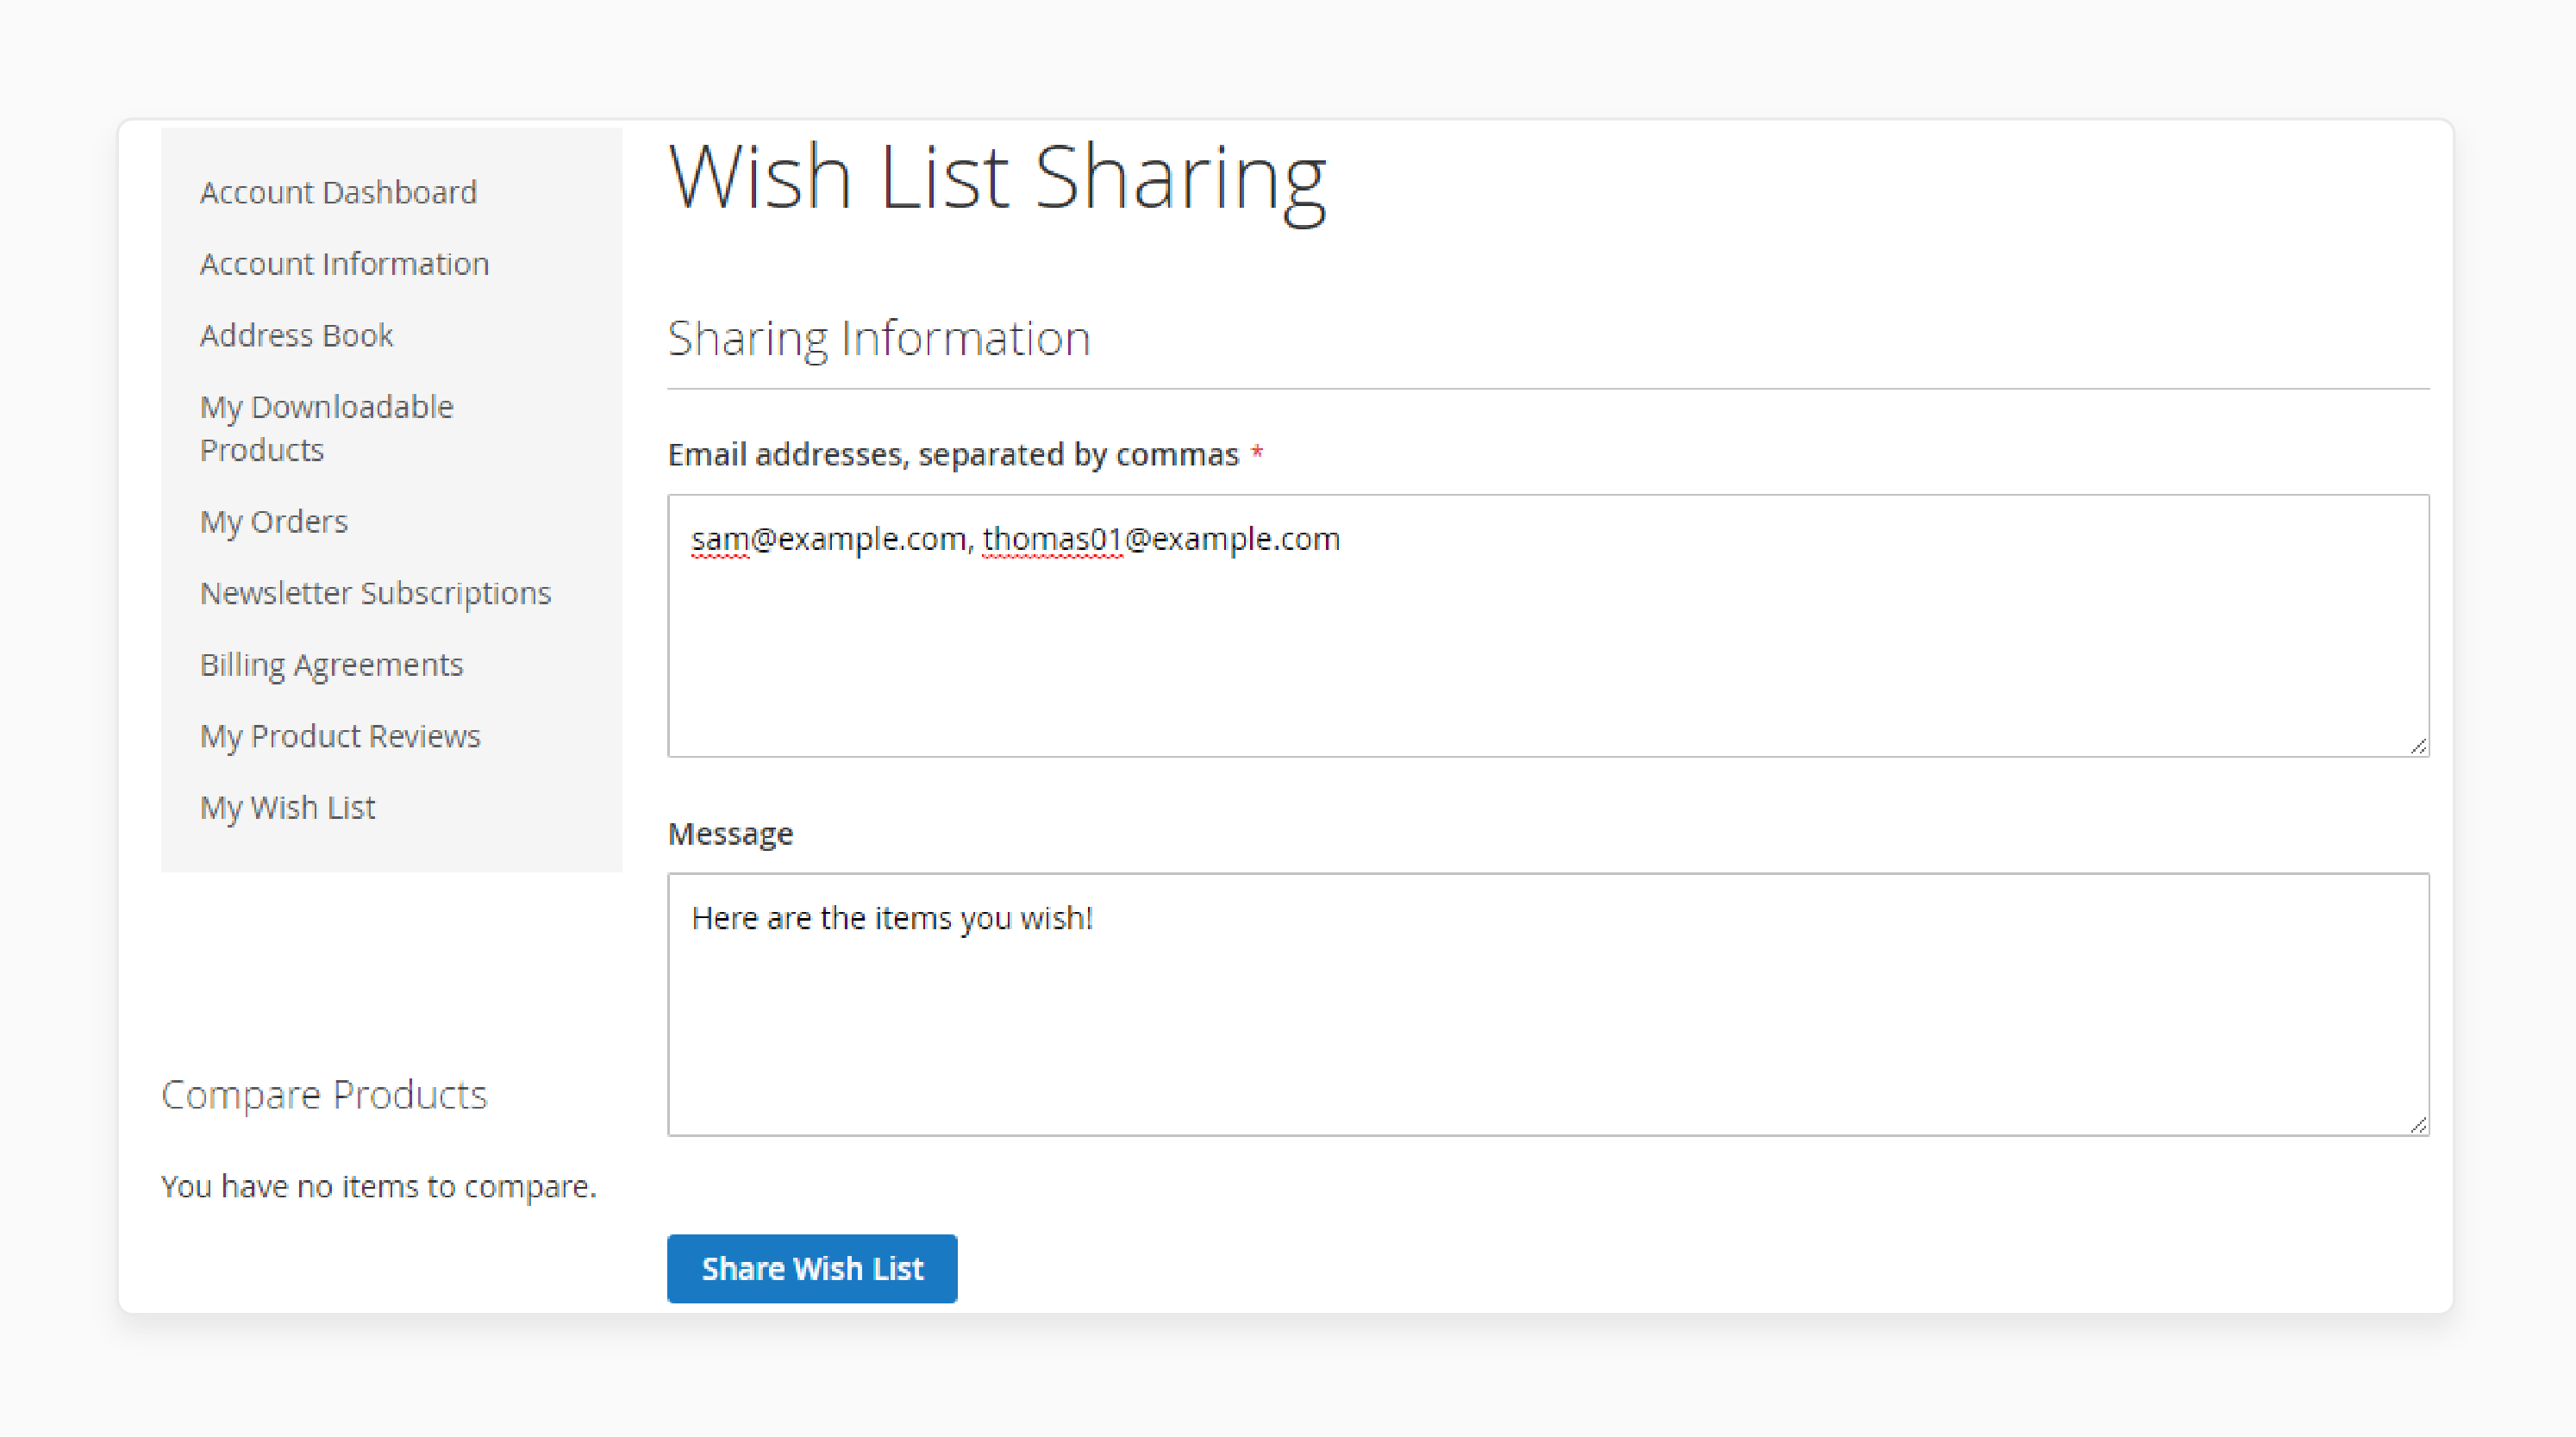
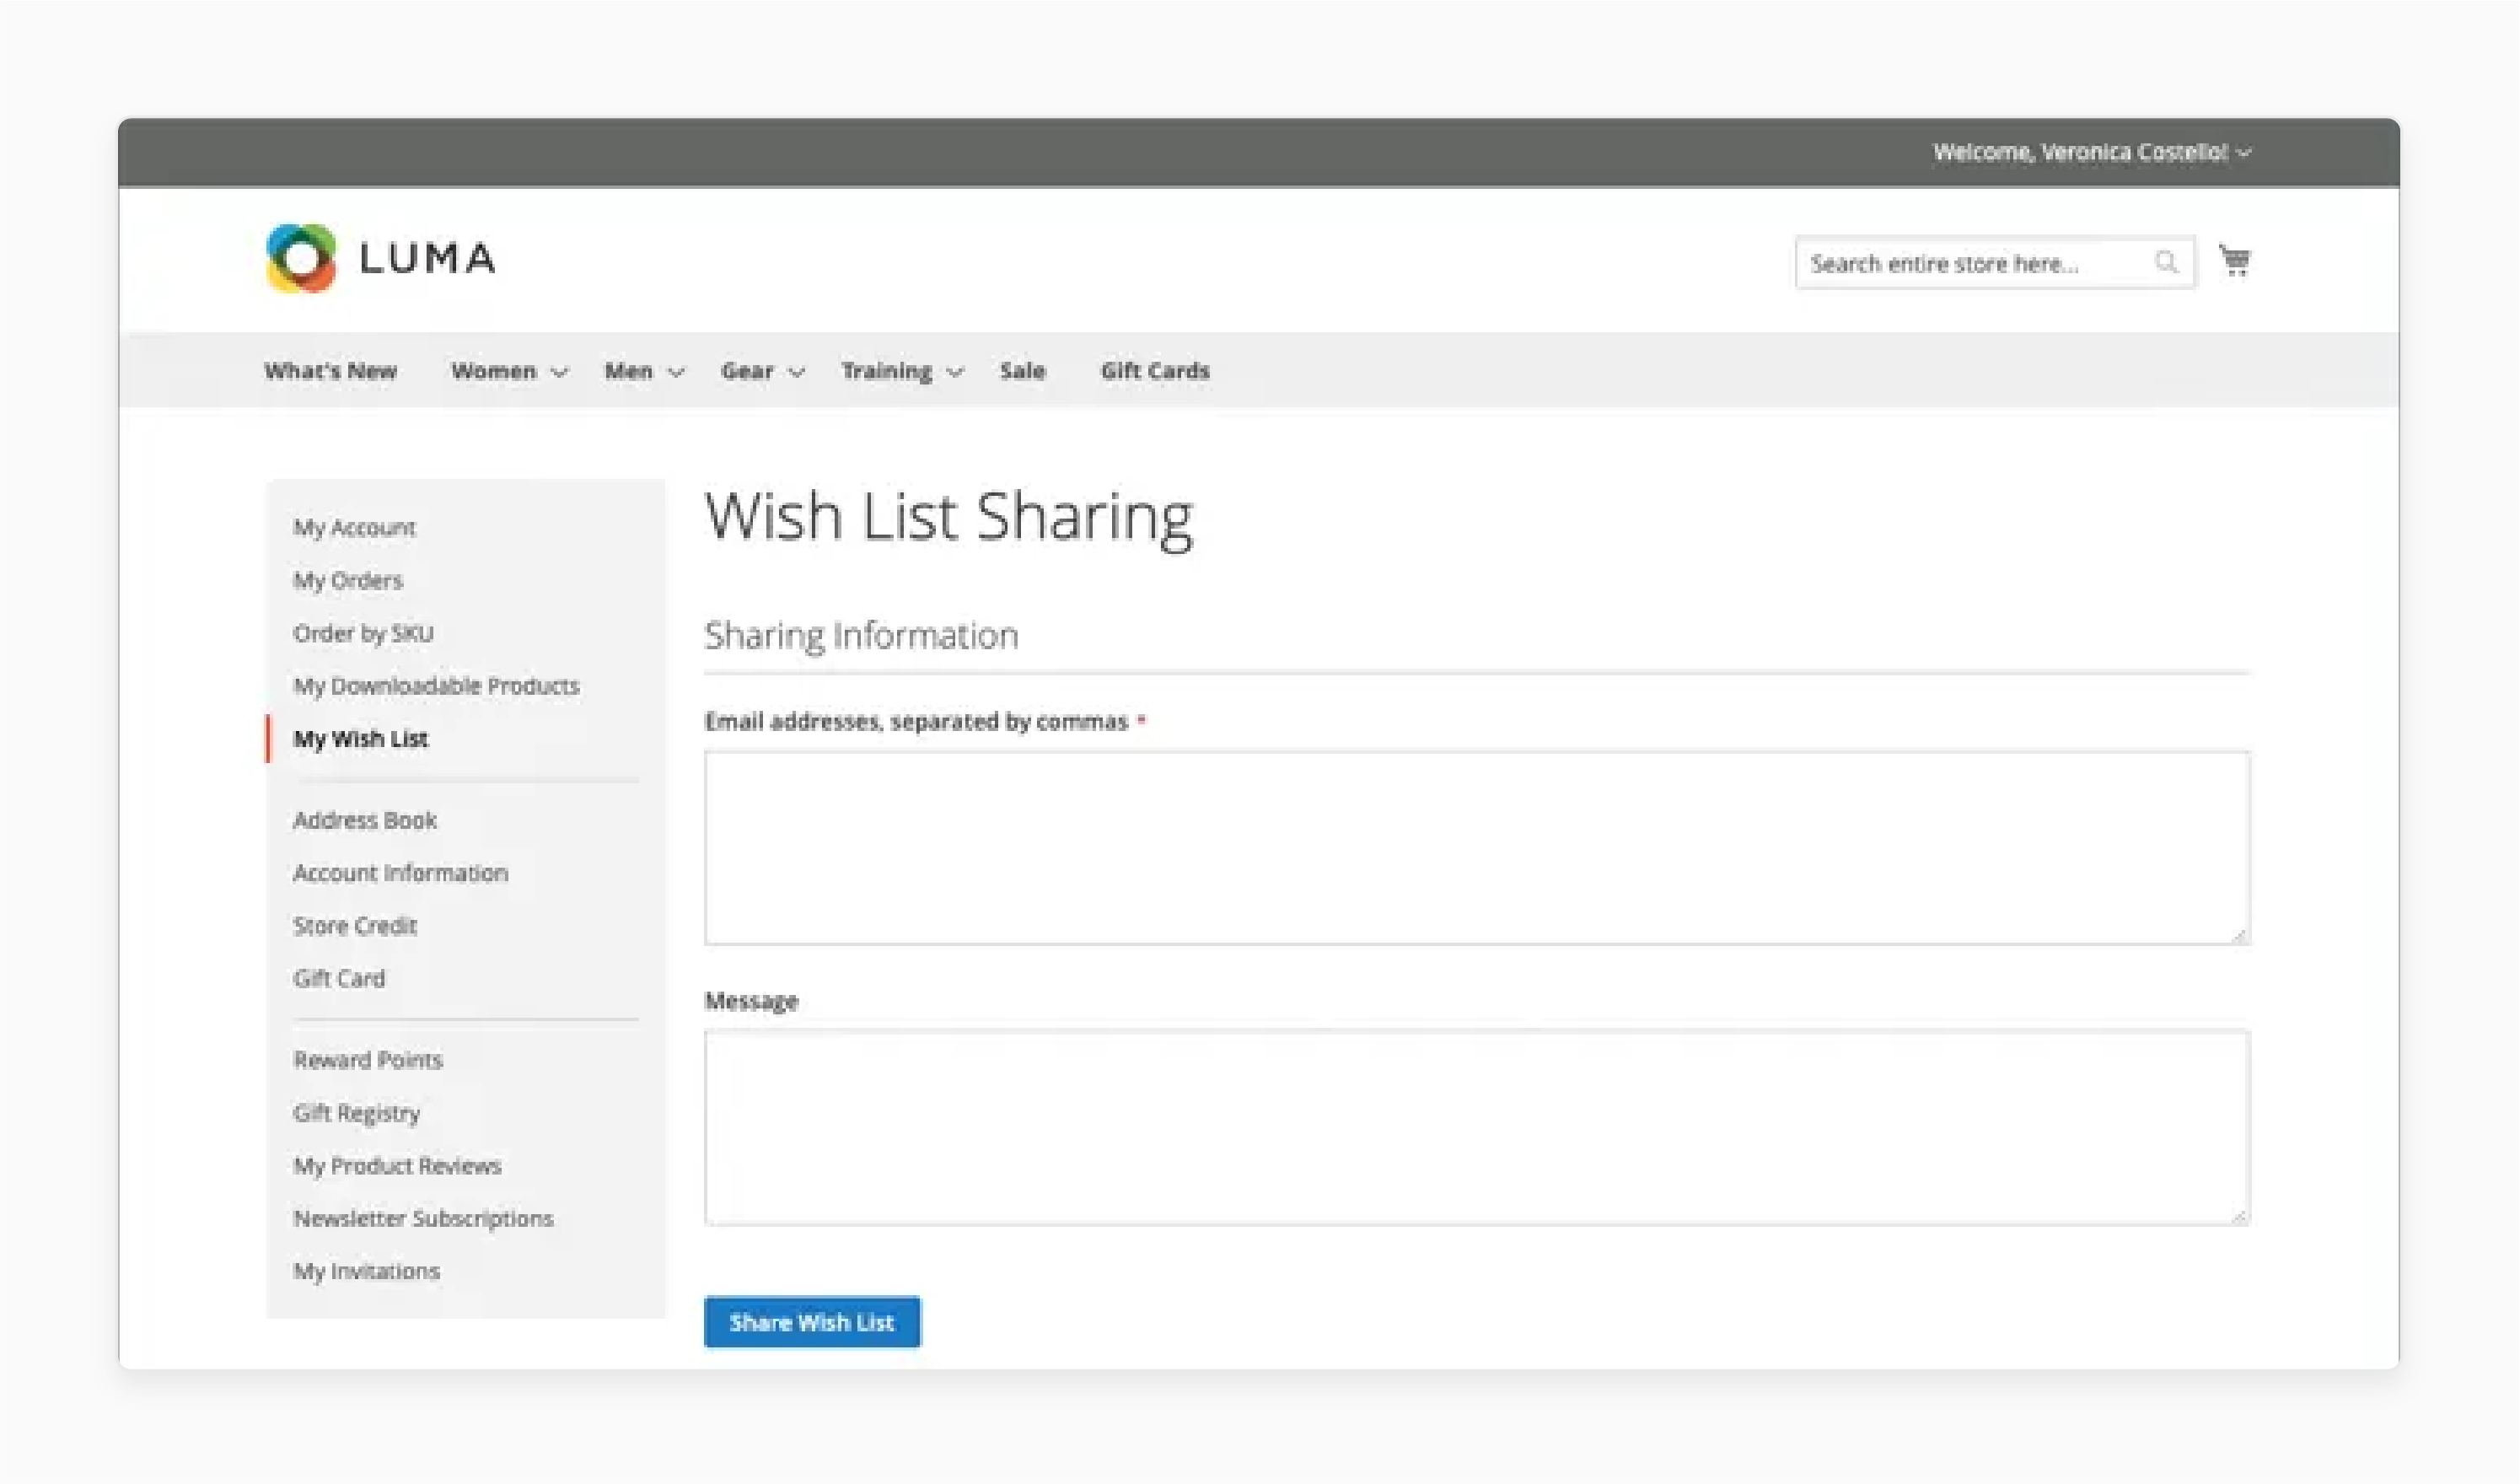
- Click 'Share Wish List'.
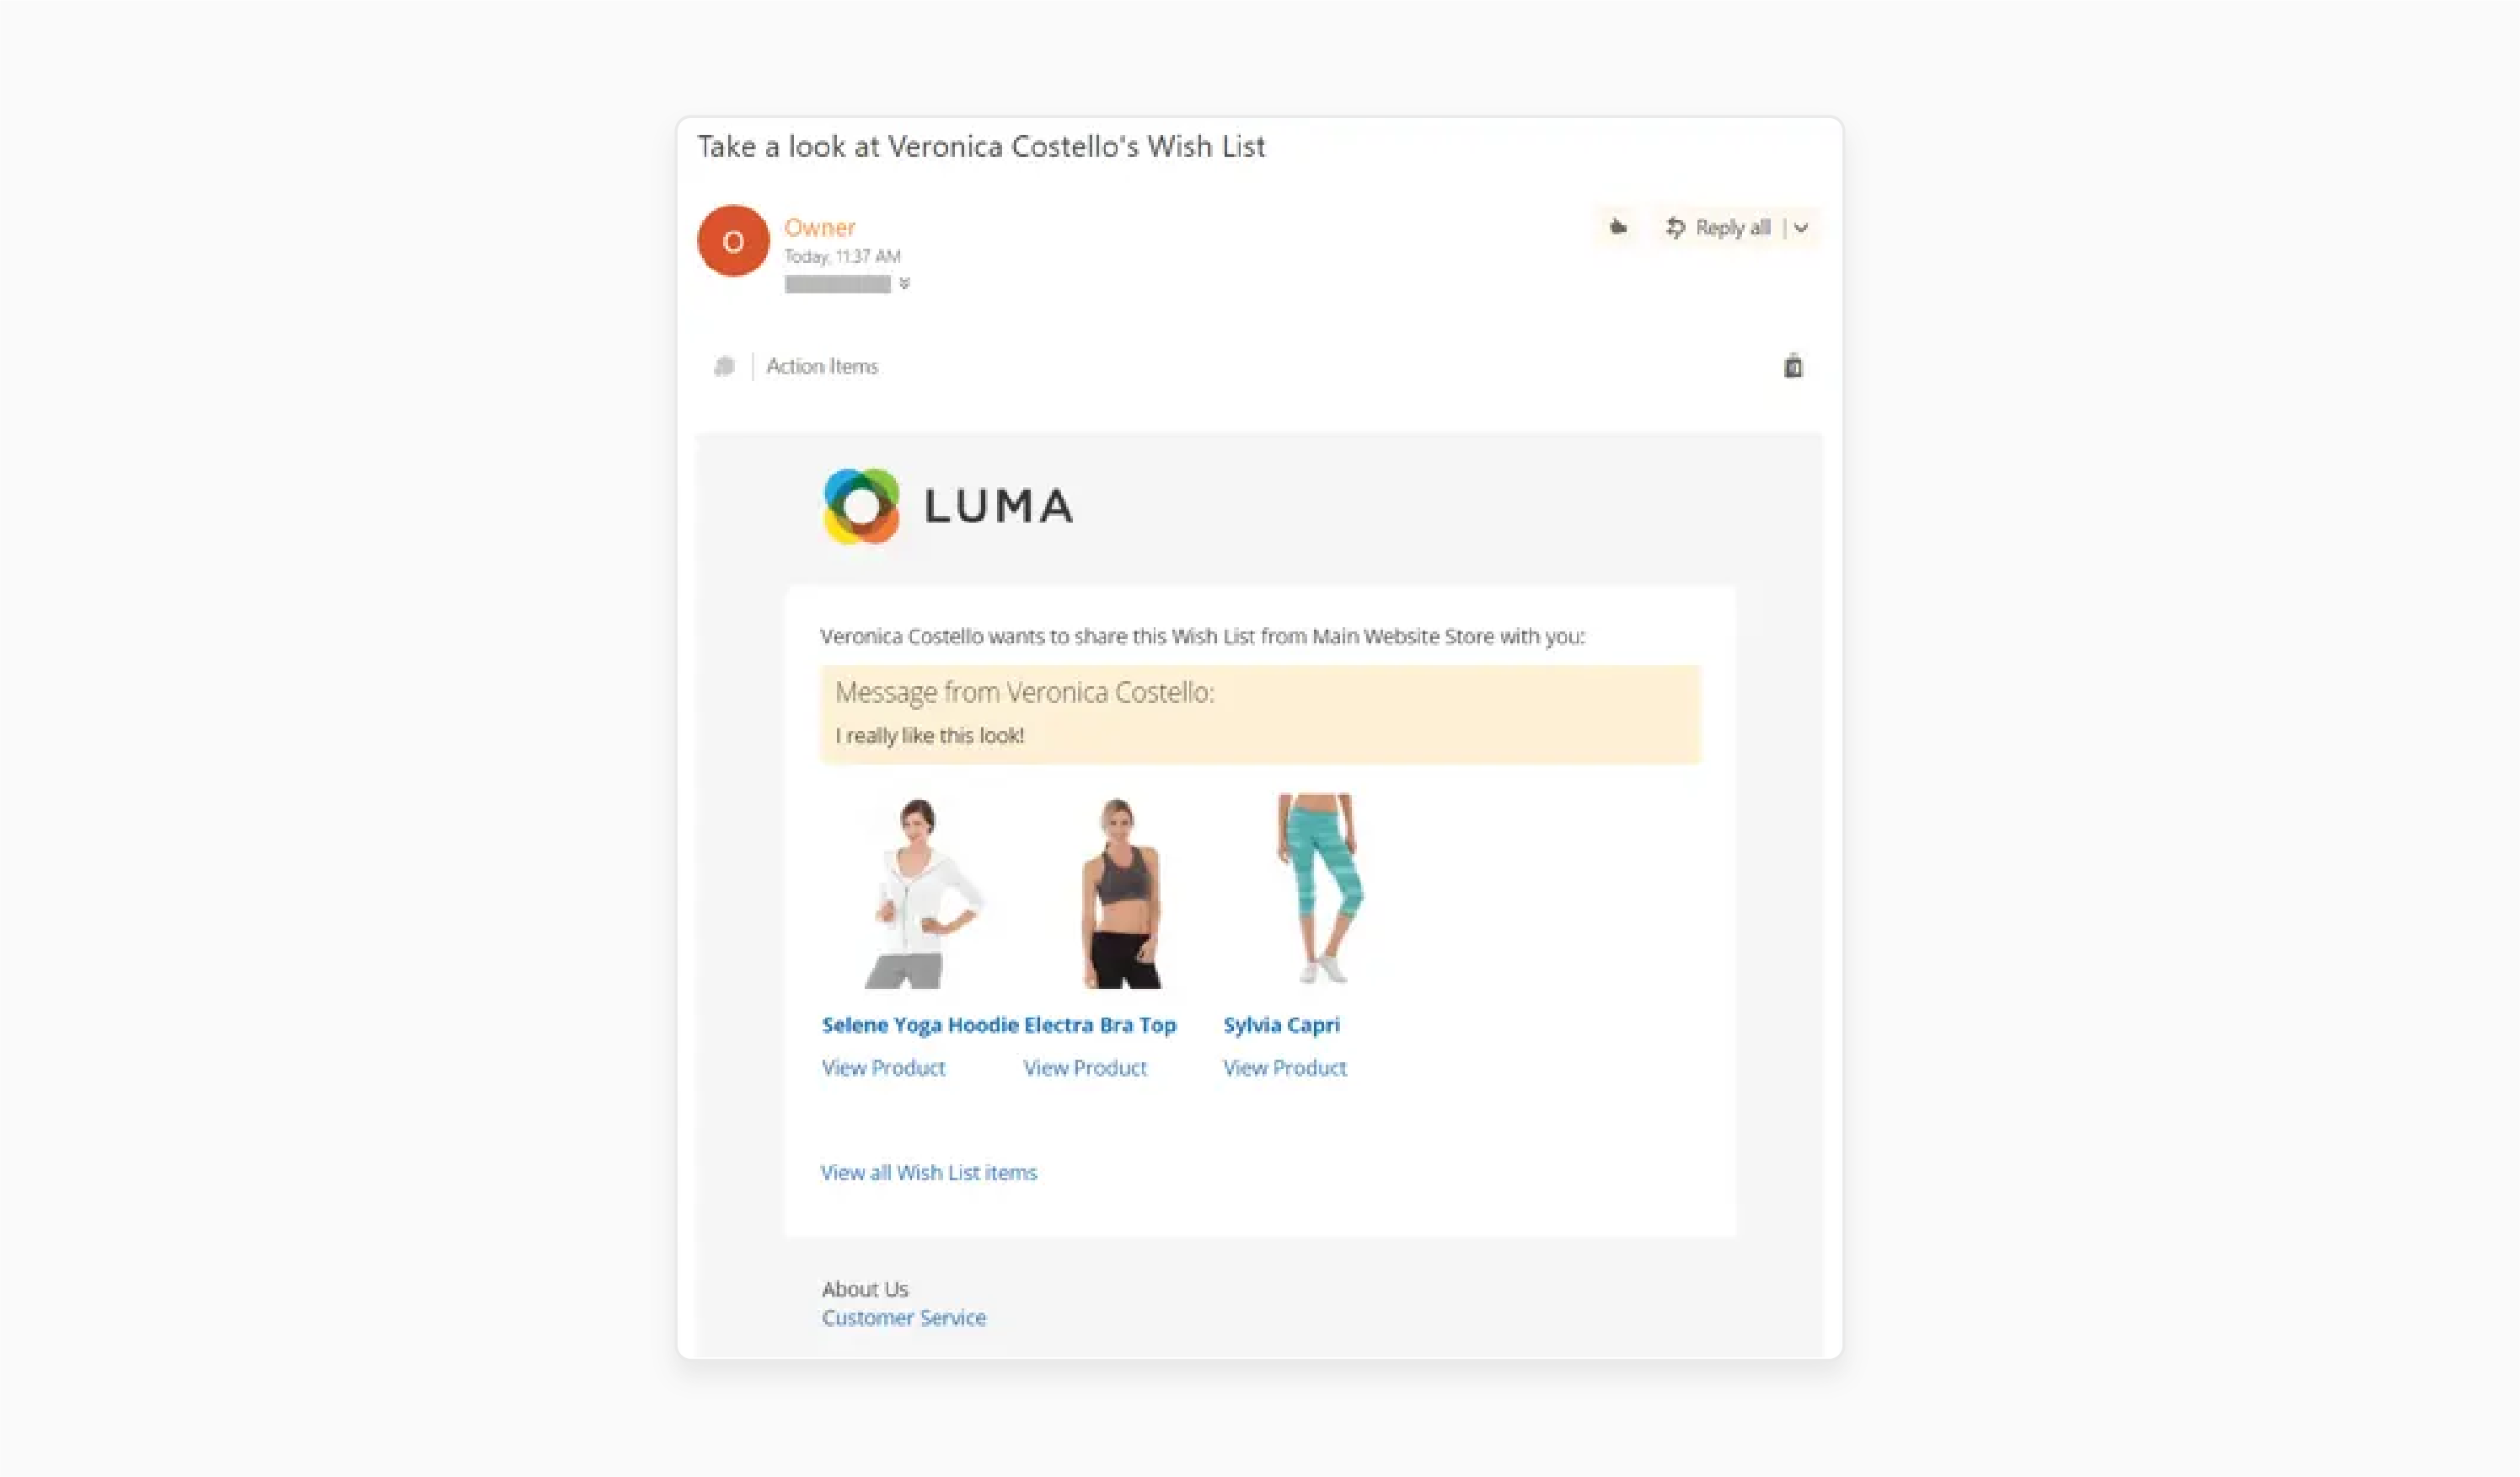
- Enter recipient emails (comma-separated), add a message, and click 'Share Wish List'.
- Shared wishlists include product thumbnails and direct store links.
Method 3: Manage Wishlists
- Select products, click 'Move Selected to Wish List', and choose or create another list.
- Copy items using 'Copy Selected to Wish List'.
- Open the wishlist, click "Delete Wish List", and confirm the action.
Method 4: Discover Public Wishlists
If the 'Wish List Search widget' is set up:
- Customers can search by the "name" or "email" of the wishlist owner.
- Only public wishlists appear in search results.
- Users can view items, add them to their wishlist, or move them to their cart.
Emerging Trends and Recent Developments in Magento Wishlist
| Trend/Feature | What’s New & Why It Matters | Key Magento Wishlist Features | Impact on Store & Customers |
|---|---|---|---|
| Guest Wishlists | No account needed. Guests can save products and link them to their accounts later. | - Save wishlists via cookies. - Merge with the account after registration. - Set up a flexible display (e.g., a popup or sidebar). |
- Lower friction - More engagement - Higher conversions |
| Several Wishlists | Users want to organize, not save. Unlimited lists for different occasions or needs. | - Create, rename, or delete wishlists. - Organize by "event" or "category". - Share with friends/family. |
- Personalization - Better organization - Social sharing |
| Smart & AJAX Wishlists | No more page reloads. Add to wishlist anywhere, instant visual feedback. | - Add AJAX to the wishlist. - Configure visual cues (icon color). - Set up a quick sign-in pop-up. |
- Efficient UX - Faster, less annoying - More usage |
| Automated Wishlist Notifications & Analytics | Stores use reminders and analytics to recover lost sales and target offers. | - Automate emails (e.g., "price drop", "back in stock"). - Schedule custom reminders. - Set up real-time analytics. |
- More purchases - Data-driven marketing - Higher loyalty |
| Enhanced Admin Controls & API Support | Admins get more control and integration options. REST & GraphQL support for deep data use. | - Edit, move, or delete wishlist items. - Configure detailed reports. - Set up API integration (marketing, CRM). |
- Better insights - Smoother ops - Personalized promos |
| Real-Time Product Updates | Wishlists update for price, stock, and offers. | - Auto-update for price and stock changes. - Personalize special offer alerts. |
- Customers stay informed - Drives urgency |
| Priority & Sorting Features | Customers can assess and sort wishlist items by what matters to them. | - Set priority levels ("high"/"med"/"low"). - Sort by "price", "name", and "date". |
- Easier management - More likely to check out |
| Rewards & Gamification | Stores reward wishlist actions with points or perks. | - Set up loyalty points for wishlist use. - Gamify incentives. |
- Increases wishlist adoption - Boosts retention |
| Dynamic Wishlist Suggestions | AI/ML suggests related products based on wishlist content. | - Add “You May Also Like” sections. - Set up cross-sell and upsell recommendations. |
- Higher AOV - Smarter shopping |
| Wishlist Import/Export | Power users can export wishlists for planning or re-uploading at a later time. | - Export to CSV/PDF. - Import saved wishlists. |
- B2B/pro buyers love it - Collaborative shopping |
FAQs
1. How do I configure wishlists in Magento?
Go to Stores > Configuration > Customers > Wish List. Set Enabled to Yes, and then select your sharing options.
2. Can customers create several wishlists in Magento 2?
Yes. In Magento 2.4.8, the "Wishlists" feature is available in the settings. Users can name each list, add products, and remove products as needed.
3. How can a single customer account share wishlists with others in Magento 2?
A single customer can click "Share Wishlist" in their account dashboard. They can then send the wishlist link by email or social media.
4. Can customers manage their privacy settings for wish list items in Magento?
Yes. Customers can set their wishlist items as public or private in Magento 2. It allows them to control who sees their lists.
5. How can I find and manage the wish list link section in Magento?
The wish list link is in the customer account dashboard under 'My Wish List'. Users can manage items, move them between lists, add them to the cart, and share lists by email.
6. Can wishlists improve my Magento store’s conversion rates?
Yes, according to industry data, wishlists can raise conversion rates. They can reduce cart abandonment and allow for timely reminders. This process enables the creation of targeted marketing based on saved products.
Summary
Setting up Magento wishlists enhances the shopping experience for your customers, thereby:
- Enabling customers to save and share their desired products.
- Increasing customer loyalty and sales.
- Using Magento extensions for wishlists, guest access, and SEO enhancements to boost sales.
- Making your Magento store run better.
- Allowing customers to save products they want for later.
- Setting up and using Magento wishlists for your online store.
- Enabling Magento 2.4.8 to add wishlist functions through GraphQL integration.
Explore Magento hosting plans to ensure your store's wishlist functions on all devices.
[Updated on April 23, 2025]


