
Setup Magento 2 Local Development Environment with Docker
The MGT Development Environment is a Local Development Environment based on Docker. It makes the development of Magento and other PHP applications easier.
The environment is free and easy to develop & deploy. It is reliable and can be up and running in no time.
The environment is compatible with Mac, Windows, and Linux operating systems.
The advantages of Docker compose are performance, portability, and scalability.
The Docker environment tends to be more helpful when you are working in a team. You can set up your local machine and start developing quickly.
How to Set up MGT Development Environment with Docker?
The following steps guide you on:
- How to manually prepare your local environment*.
- Installing Magento 2.
- How to get running with Magento development.
1. Prepare for Local Environment Set Up
In this step, you need to set up a Magento Commerce Account. (Skip this step if you already have an account)
Once you log in, get your Authentication Keys (Access Keys) from the existing Magento Marketplace.
2. Magento Prerequisites (Install Docker)
A guide to installing and running the Docker Desktop version.
1. Install the latest version of Docker Desktop on your system.
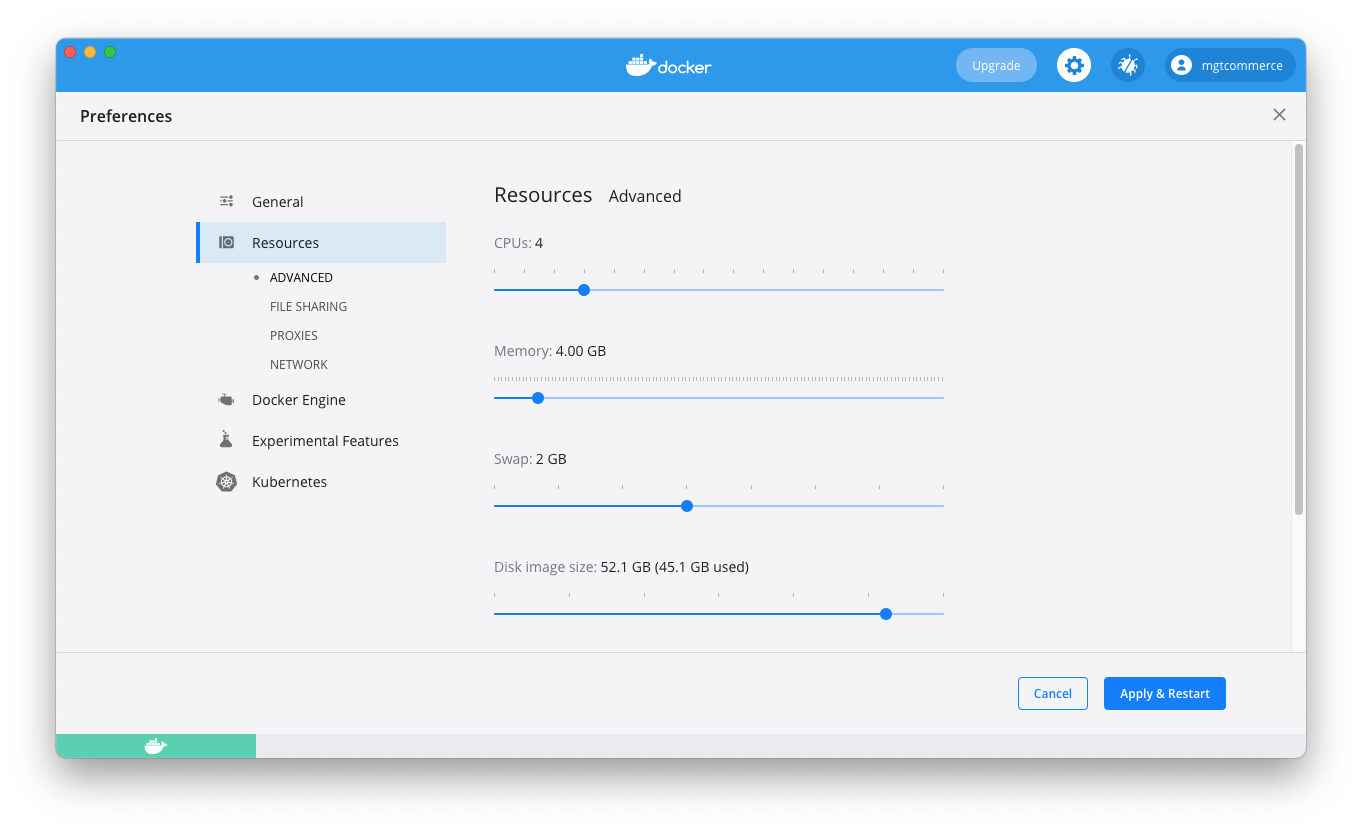
2. Once installation is done open Docker Desktop. Click on Settings in the top right corner.
Now, assign the following resources:
- CPUs: 4
- Memory: 4 GB
- Swap: 2 GB
Click on Apply & Restart once the resources are assigned.
3. Now, create the Docker Container from the MGT commerce image and run it using the following command:
docker run -d --net=bridge -v /var/lib/mysql -v /home/cloudpanel --restart=always --privileged -h mgt-dev --name mgt-dev -it -p 80:80 -p 443:443 -p 8443:8443 -p 22:22 -p 3306:3306 -p 9200:9200 -p 15672:15672 mgtcommerce/mgt-dev:v2
WARNING: Do not change the hostname mgt-dev as it would result in the RabbitMQ service not working.
4. Open a browser and enter the following URL to access the MGT Development Environment:
https://127.0.0.1:8443
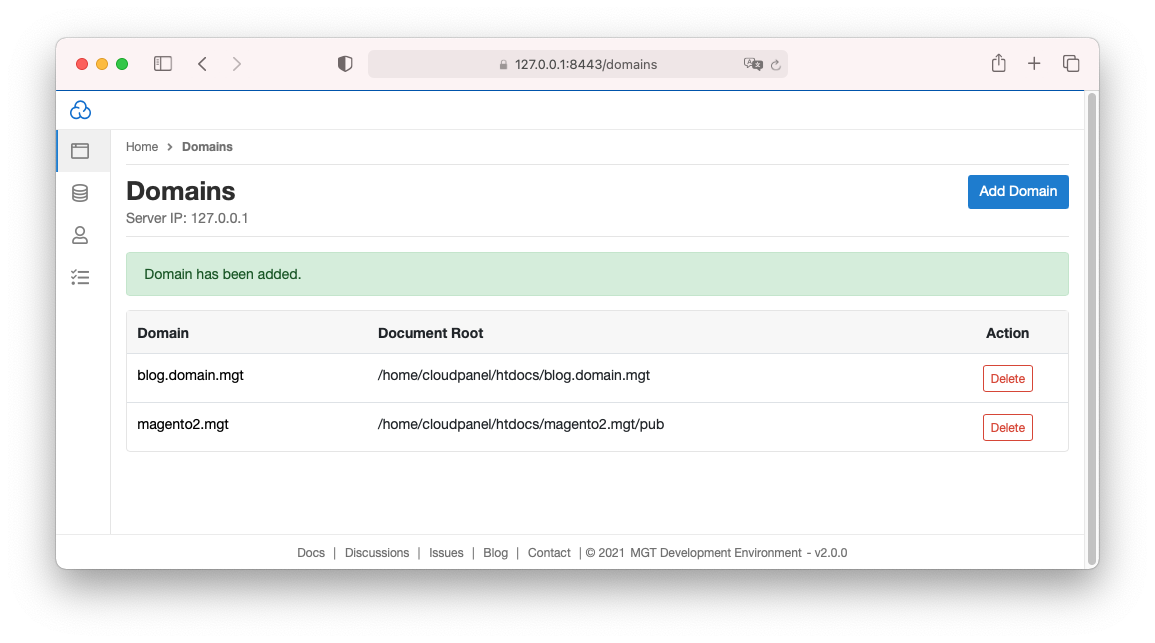
As shown in the dashboard below, you can add or delete Domains, SSH Users, and databases.
Also, you can control all the settings like Vhost, PHP settings, etc.
3. Using SSH keys inside Docker Container
Here, you can access the running Docker Container using SSH.
To connect via SSH, run the following command:
ssh root@127.0.0.1
Once you run the command, it will ask for the user and the password. Use the following credentials:
- user: root
- password: root
MySQL: To connect to MySQL from your host system. Run the following command:
mysql -h127.0.0.1 -uroot -proot
NOTE: The root password for MySQL is root.
4. Domains
- Add Domains
Step 1. To add a Domain, go to Home, click on Domains and then click on the Add Domain button in the top-right corner.
Step 2. Enter the Domain Name (magento2.mgt)
Step 3. Add the Document root.
Document Root should be (magento2.mgt/pub). In the Document Root column, you can select if it is for Magento 1 or Magento 2, or any other default site.
For Magento 2 - (Document Root should be magento2.mgt/pub) Document Root: /home/cloudpanel/htdocs/magento2.mgt/pub
For Magento 1 - (Document Root should be magento2.mgt) Document Root: /home/cloudpanel/htdocs/magento2.mgt
Step 4. Select the vhost template based on your requirement (Magento 1/ Magento 2).
Step 5. Add PHP Version
Add PHP Version in the form as shown below. The default PHP version is PHP v7.4 You can choose (PHPv7.1 - 7.4 and PHPv8.0)
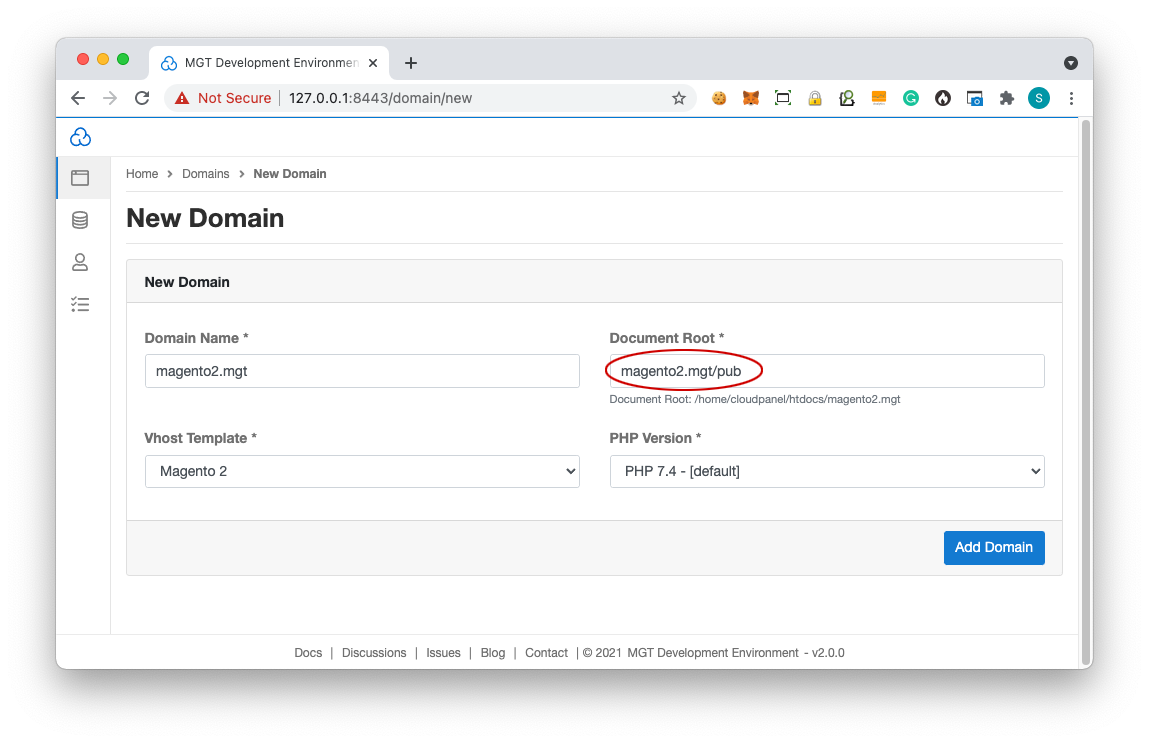
Step 6. Once you enter the details, click on Add Domain to create a Domain.
- Delete a Domain:
Only the NGINX, vhost, and PHP log directories are deleted. The Document Root Directory will not delete when you delete the Domain.
- Domain Settings:
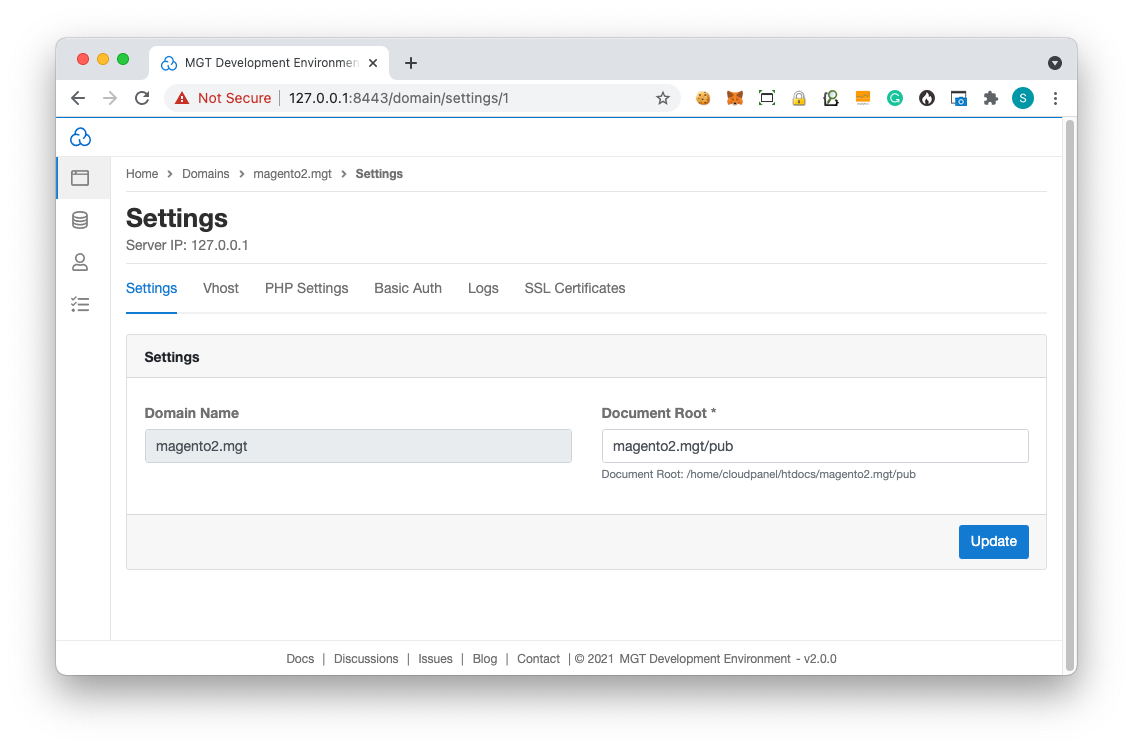
In the Settings of your Domain, you can change the Document Root for your Domain.
For example, you can change the Document Root for your Domain if the name of the root directory changes or if you want to select a different document root.
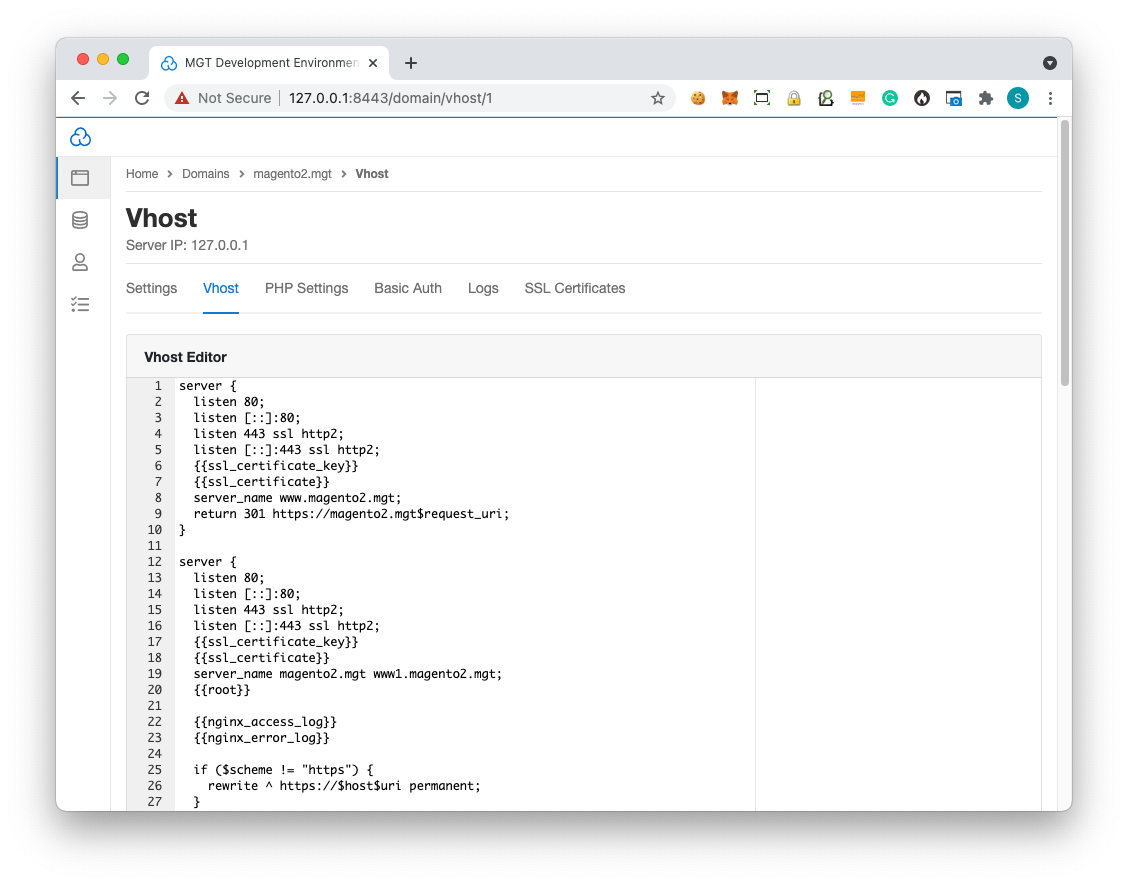
- Vhost Editor
Go to the Home. Click on Domains and select your Domain. Open Settings and click on Vhost. Here, you can modify the NGINX Vhost to redirect, deny access for specific directories, etc.
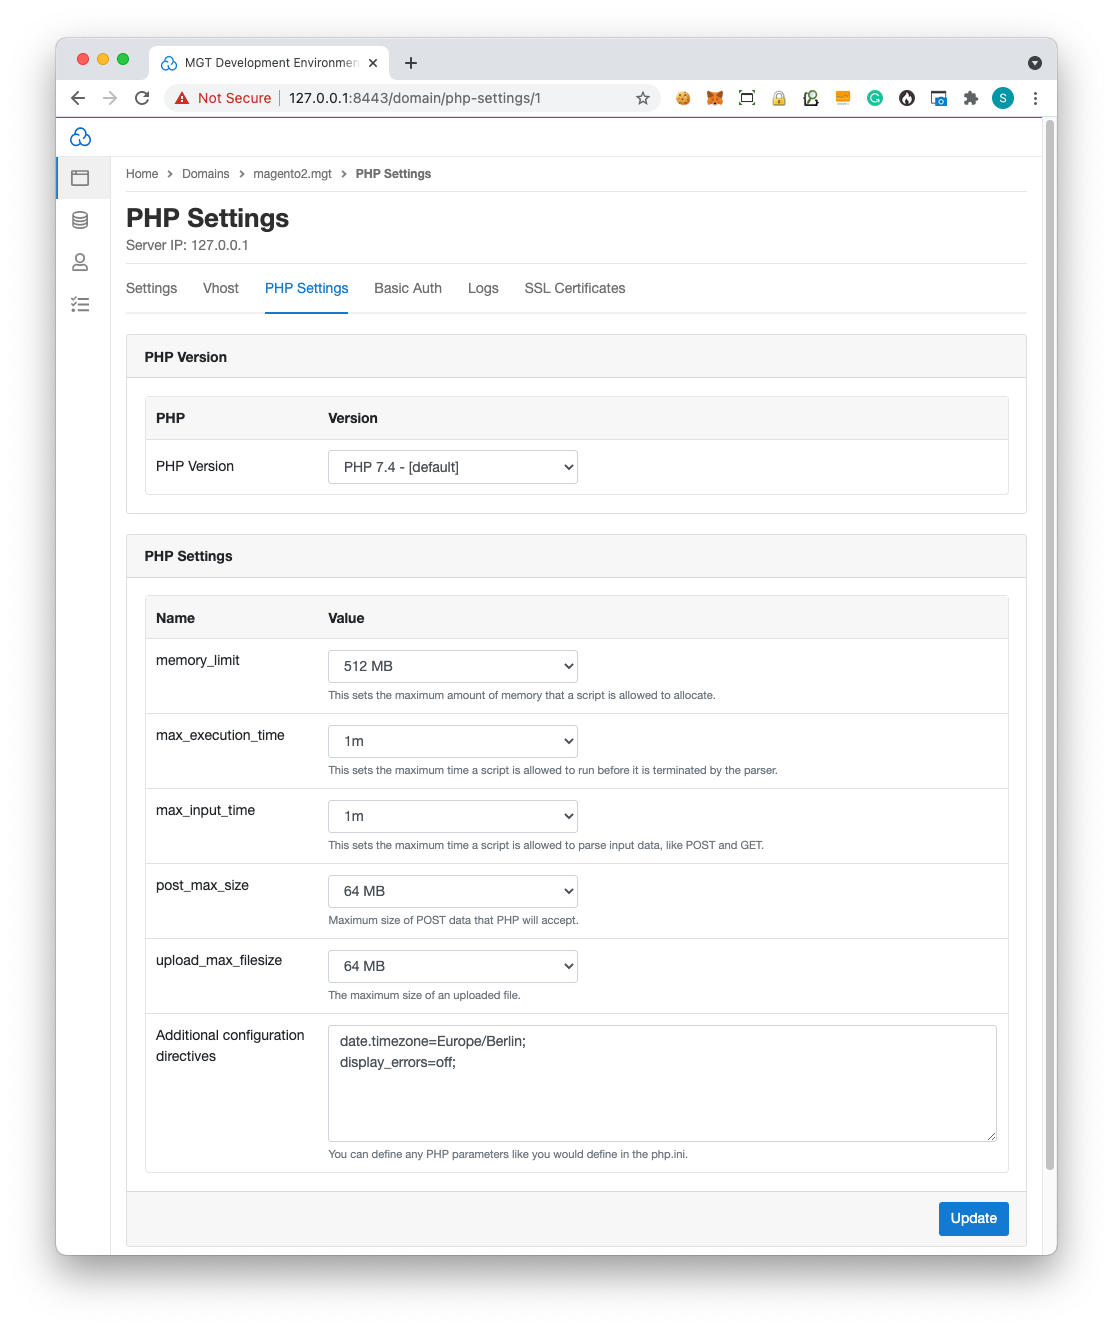
- PHP Settings
In the PHP Settings tab, you can modify the PHP version.
You can also customize other settings such as:
- memory_limit
- max_execution_time
- max_input_time
- post_max_size
- upload_max_filesize
Other parameter values can also be changed by overwriting them in the Additional Configuration Directives.
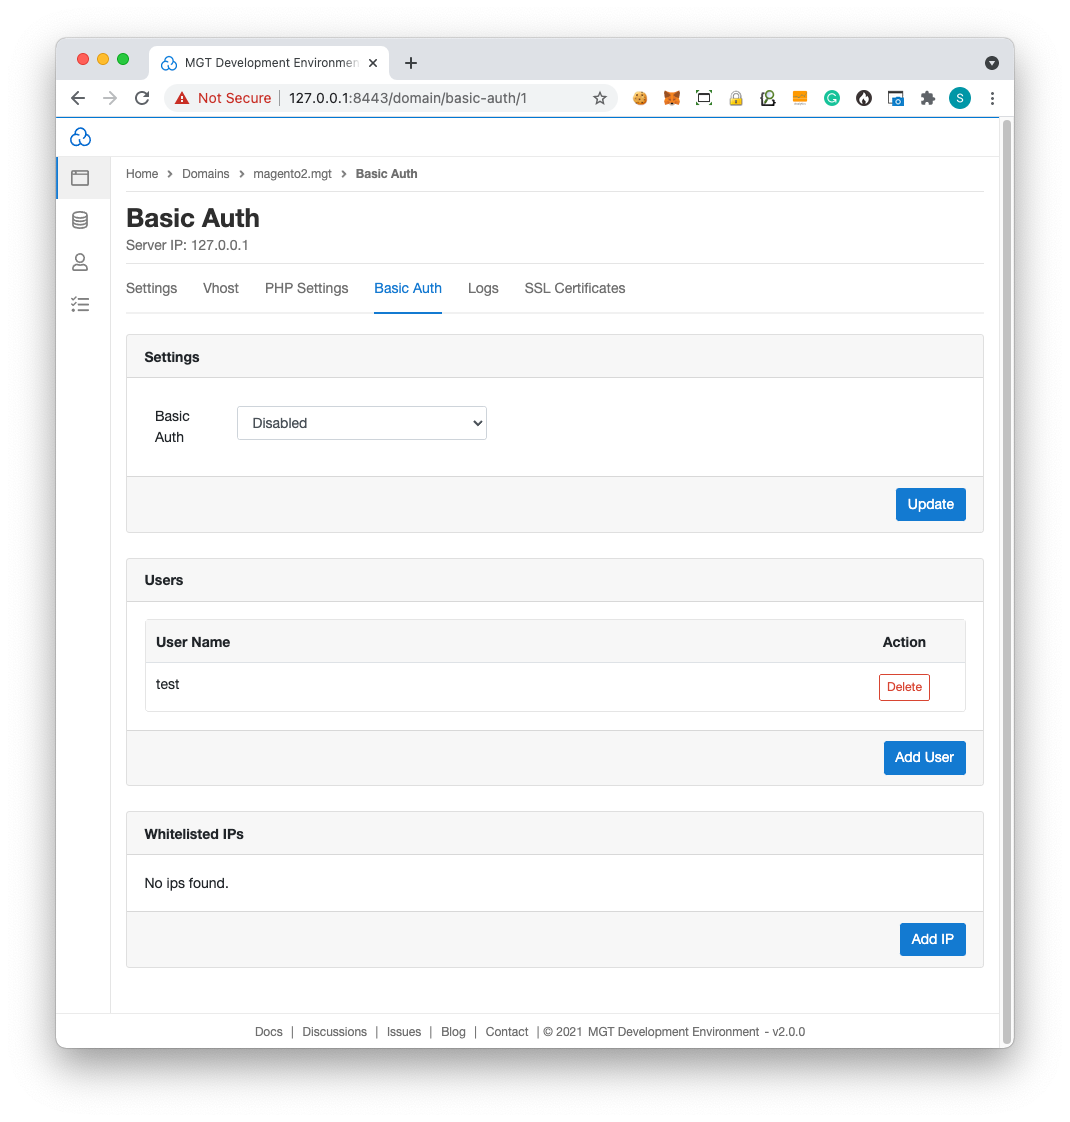
- Basic Auth
In the Basic Auth, you can Enable or Disable Basic Auth. You can also customize the Basic Auth Credentials like Username and Password.
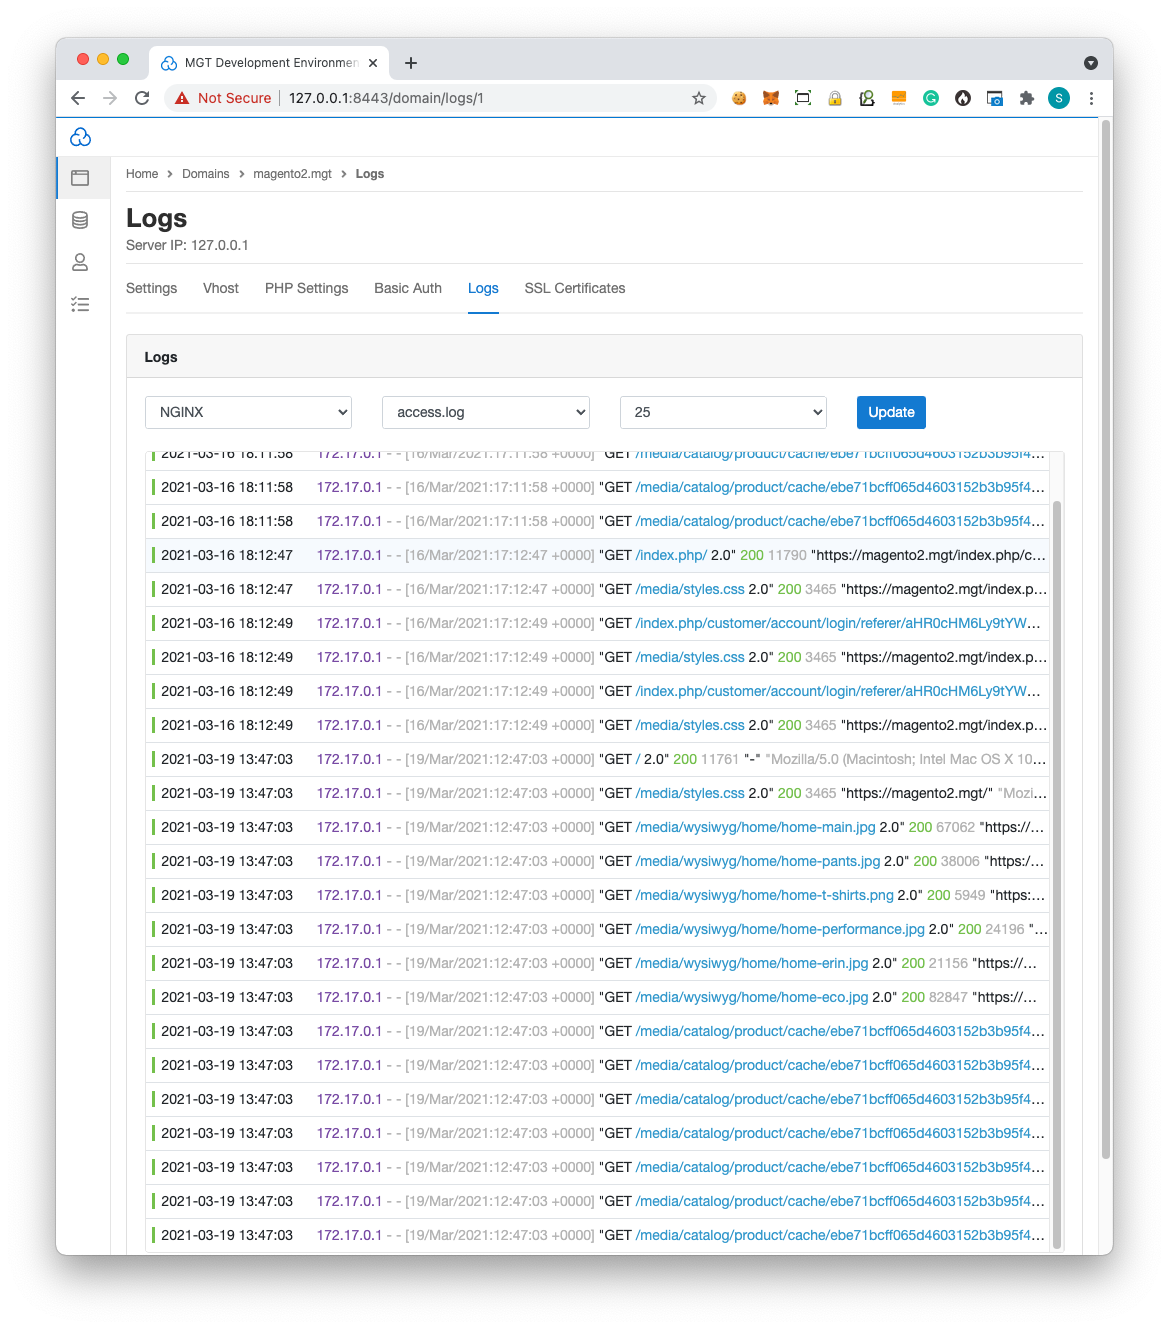
- Logs
In logs, you can view the NGINX Access and Error Logs and the PHP Error Logs.
Developers who like the command line can find the logs in the directories below:
- NGINX
Access Log: /home/cloudpanel/logs/domain.com/nginx/access.log
Error Logs: /home/cloudpanel/logs/domain.com/nginx/error.log
- PHP
Error Log: /home/cloudpanel/logs/domain.com/php/error.log
To see the last 100 lines of your PHP Error Log, you can use the tail command:
tail -f /home/cloudpanel/logs/domain.com/php/error.log -n100
5. Databases
In this step, you can Add and Manage Databases.
- Add Database
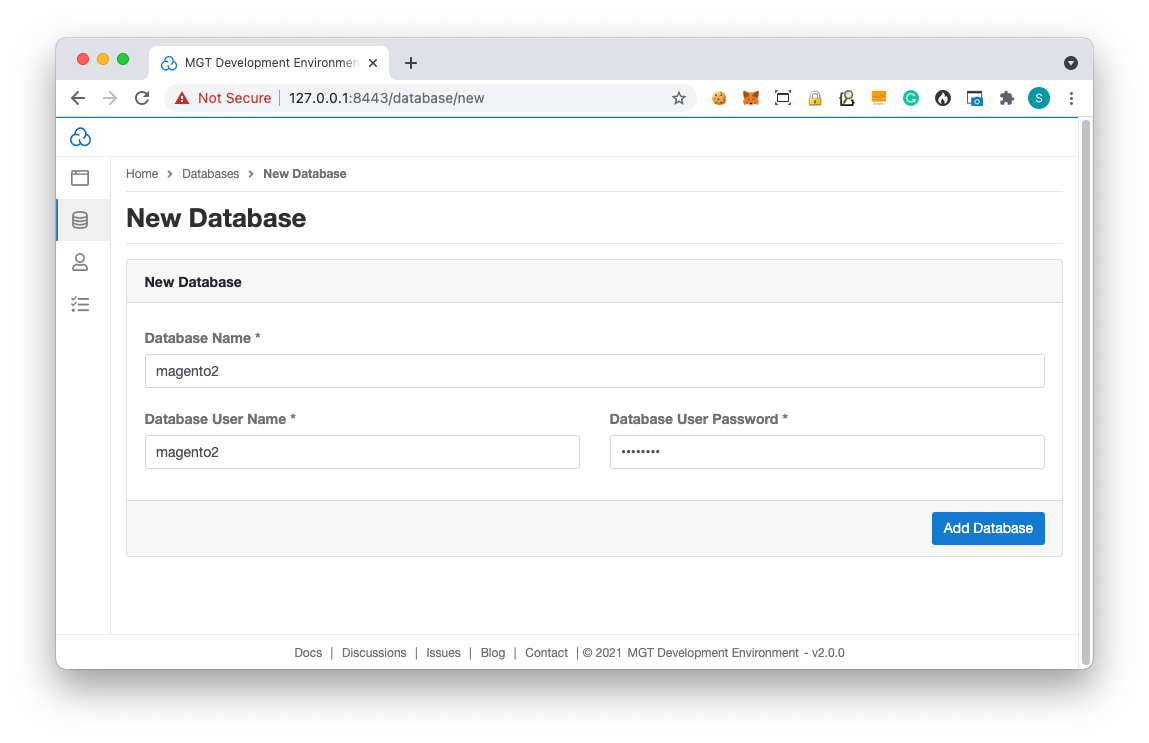
Click on Add Database
Enter the Database Name, Database User Name, and Database User Password. And click on Add Database.
NOTE: The Master Database Credentials are:
Host: 127.0.0.1
Username: root
Password: root
- Manage Databases
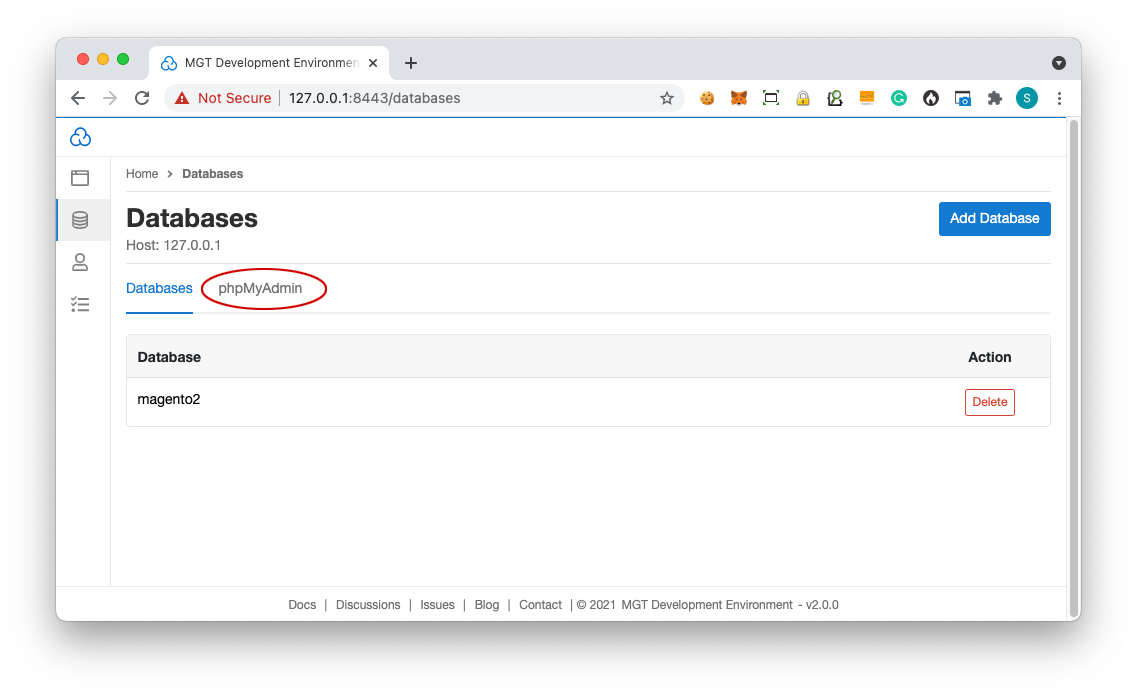
With phpMyAdmin, we can manage all the Databases. On Database Overview, click on phpMyAdmin to manage all of your Databases.
- Import/Export a Database Dump
Using the following command, you can Import a Database Dump.
mysql -h127.0.0.1 -uroot -proot magento2 < dump.sql
And using the following command, you can Export a Database Dump.
mysqldump -h127.0.0.1 -uroot -proot --opt --single-transaction --quick magento2 > dump.sql
NOTE: Replace magento2 with your Database name.
6. Email Services
When you run a Docker Container, the service postfix does not auto-start. So if you want to send emails, you need a postfix service to be running.
This step starts the postfix service using the following command:
supervisorctl start postfix
NOTE: The emails might be marked as spam and can be found in the spam folder.
7. Services and Logs
All the services such as PHP-FPM, NGINX, Varnish, MySQL, and Elasticsearch are managed through Supervisord.
The services start with the start of the container, except postfix.
- Use the following command to see the status, PID, and uptime of all the services.
supervisorctl
- You can start, stop, or restart a particular service using the supervisorctl command in the following way:
supervisorctl restart varnish
8. Install Magento 2
We will install Magento 2 via Composer with Magento Authentication Keys.
Login into the Docker Container through SSH:
ssh root@127.0.0.1
password: root
Delete the magento2.mgt directory using the following command:
rm -rf /home/cloudpanel/htdocs/magento2.mgt/
Now, we will install Magento 2 via Composer.
Before you run the composer command, keep your Magento Authentication Keys ready:
cd /home/cloudpanel/htdocs/
php7.4 /usr/local/bin/composer create-project
--repository-url=https://repo.magento.com/
magento/project-community-edition magento2.mgt
Go to the installation directory and execute the setup::install script from Magento:
cd /home/cloudpanel/htdocs/magento2.mgt/
NOTE: You can edit the parameters such as key, db-host, db-name, etc., as per your needs.
php7.4 bin/magento setup:install --backend-frontname='admin'
--key='18Av6ITivOZG3gwY1DhMDWtlLfx1spLP' --session-save='files'
--db-host='127.0.0.1'
--db-name='magento2' --db-user='magento2'
--db-password='magento2' --base-url='https://magento2.mgt/'
--base-url-secure='https://magento2.mgt/'
--admin-user='admin' --admin-password='!admin123!'
--admin-email='john@doe.com'
--admin-firstname='John' --admin-lastname='Doe'
Now, disable the Two-Factor Authentication so we can log in to the Magento Backend without an OTP:
php7.4 bin/magento module:disable Magento_TwoFactorAuth
Reset the permissions:
chmod -R 777 /home/cloudpanel/htdocs/magento2.mgt/
NOTE: We do not recommend permissions 777 for production server environments.
9. Edit the Host File
Edit the host file and point magento2.mgt to
127.0.0.1
- For Linux and macOS:
sudo nano /etc/hosts
Add the following line at the end of the file:
127.0.0.1 magento2.mgt
- For Windows:
Run Notepad as administrator and open the following file:
C:\Windows\System32\Drivers\etc\hosts
Add the following at the end of the file: 127.0.0.1 magento2.mgt
Conclusion
The installation of Magento 2 is done!
You can access the Frontend and Backend of Magento 2 using the following URLs:
Frontend: https://magento2.mgt/
Backend: https://magento2.mgt/admin/
NOTE: Username: admin Password: !admin123!
We hope you found this tutorial helpful for setting up the MGT Development Environment.
Feel free to connect with our support team if you face any difficulties.


