Magento 2 Change Logo from the Admin Account
The Magento 2 change logo feature offers the advantage of creating brand awareness. Using a strategically planned logo creates a powerful brand representation. It also helps popularize your business among people, as most people associate logos with brand names. In this post, we’ll show you how to upload and change your Magento website’s logo and theme.
Key Takeaways
-
Learn how to change your Magento website's logo to create a strong brand identity.
-
Discover the ideal locations for your brand logo in Magento 2.
-
Find solutions to common issues when updating your brand logo in Magento.
-
Explore the steps to upload and adjust your logo in the Magento admin panel.
-
Understand the importance of using a well-designed logo for brand awareness.
Steps to Change Logo in Magento 2
1. Uploading your Logo
The default Magento logo in the sample data is an SVG file. However, Magento allows uploading a GIF, PNG, JPG, or SVG file type. You can upload a logo to your Magento site from the admin panel.
By default, the logo image resides in the following location:
app/design/frontend/[vendor]/[theme]/web/images/logo.svg
The image file in the above server location will be used as the theme logo.
The size of your brand logo may vary depending on the theme you choose for your website. You must know the size of the logo or theme image(s). Right-click the image and inspect the element to view the properties like size and location of the logo image.
2. Changing Default Theme
-
Log in to your Magento admin panel.
-
Go to Stores and click Content.
-
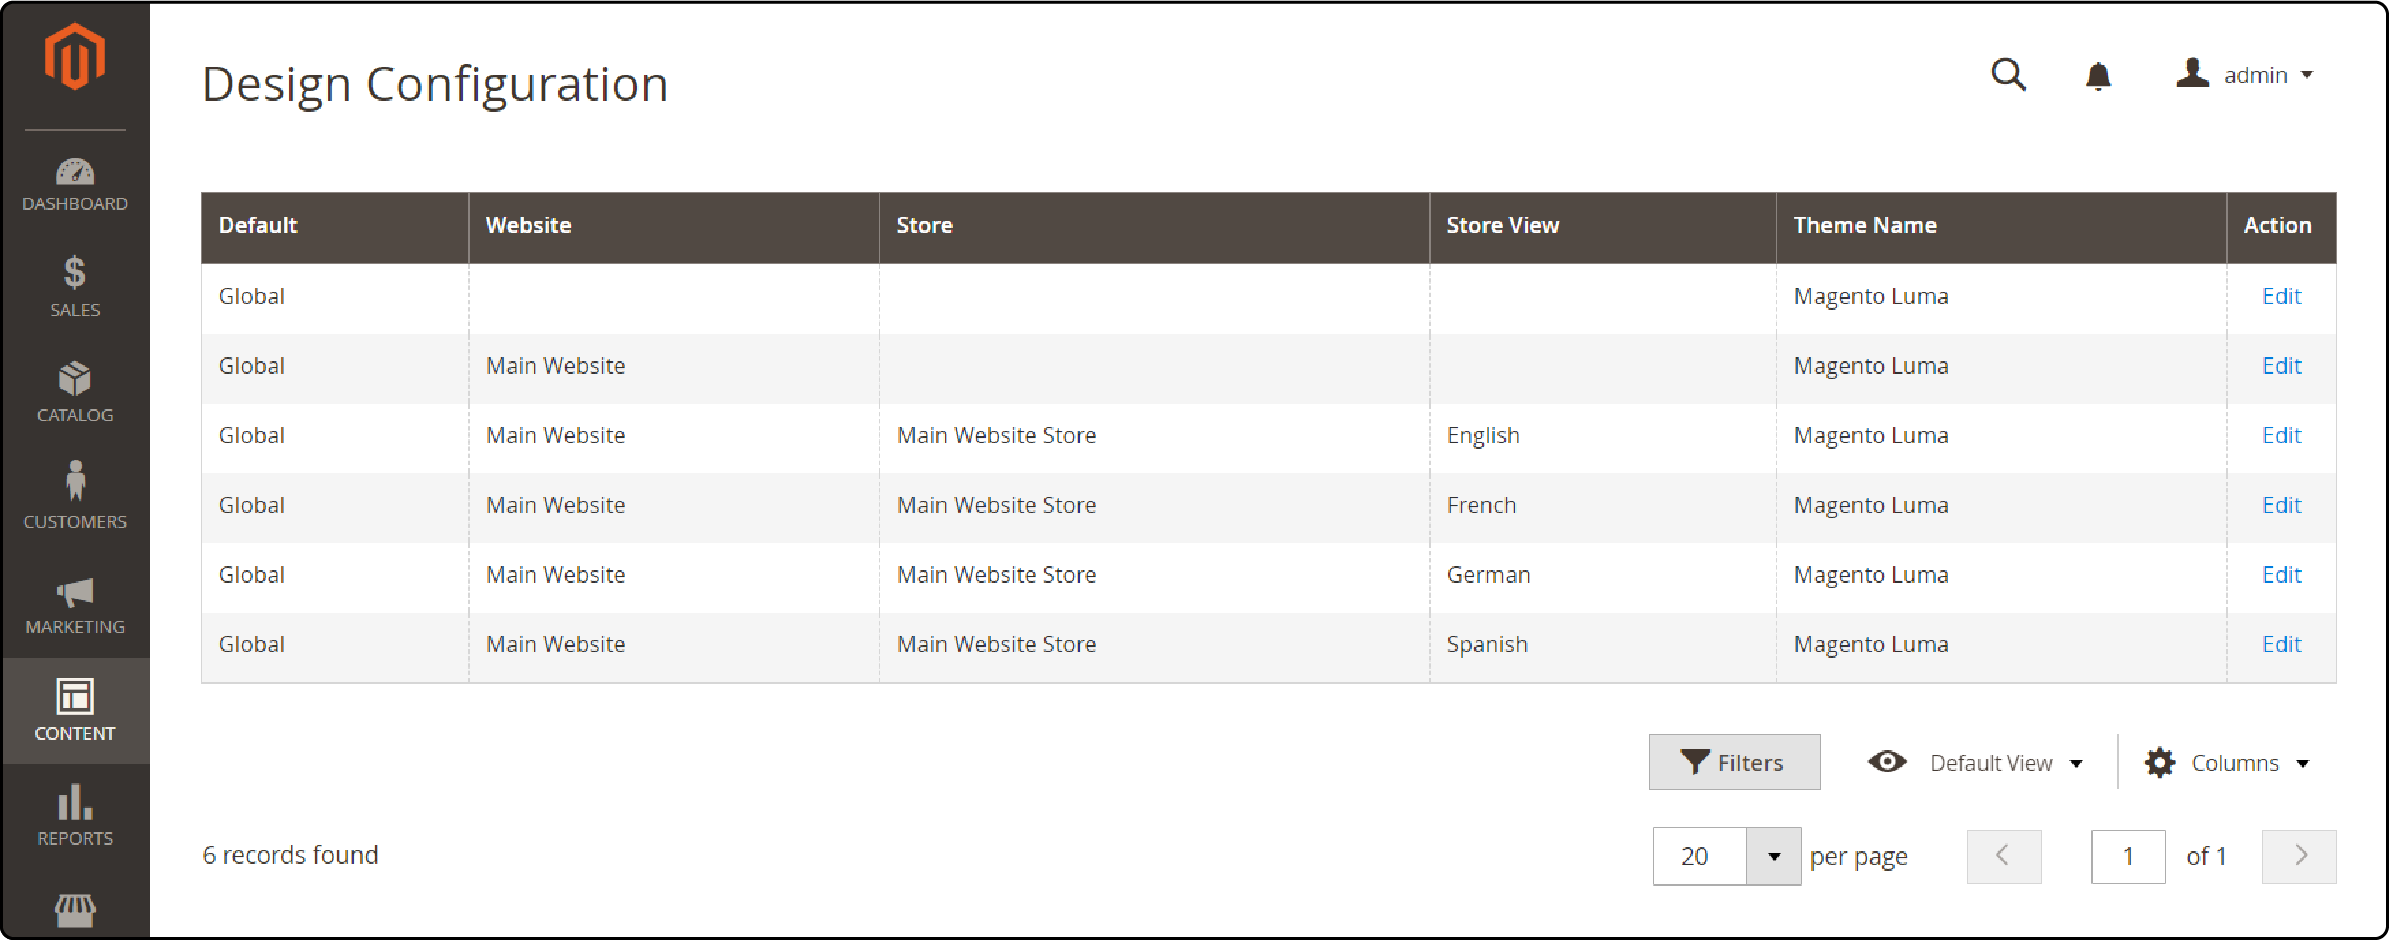
Under the Design section, Expand the configuration tab. Now, you can access the design configuration panel.
-
You will find the ‘Applied theme’ dropdown menu. Choose a desired theme from the menu.

- Click the Save Configuration button to apply the changes.
3. Upload FrontEnd Logo in Magento 2
Master the 12-Step Logo Upload Journey
From Admin Login to Perfect Brand Display in Magento 2
Total Steps Required
Complete workflow from login to configuration save
Step-by-Step Process Flow
Initial Setup
Store Selection
Logo Configuration
SEO & Finalization
Pro Tips for Success
After choosing the desired theme, add a logo to your Magento site. The default logo image is saved as an SVG file in Magento 2. The following steps will help upload a logo image for Magento 2.1.x and 2.2.x:
-
Log in to your Magento admin panel.
-
Go to Stores and click Content.
-
Under the Design section, Expand the Configuration tab. Now, you can access the Design Configuration panel.
-
If your Magento 2 platform has more than one store, set the configuration to ‘Store View’ from the upper-left corner to the view. Then, clear the checkbox after each field. It ensures that new values can be entered.

-
Select the website to add/ change the logo and click ‘edit.’
-
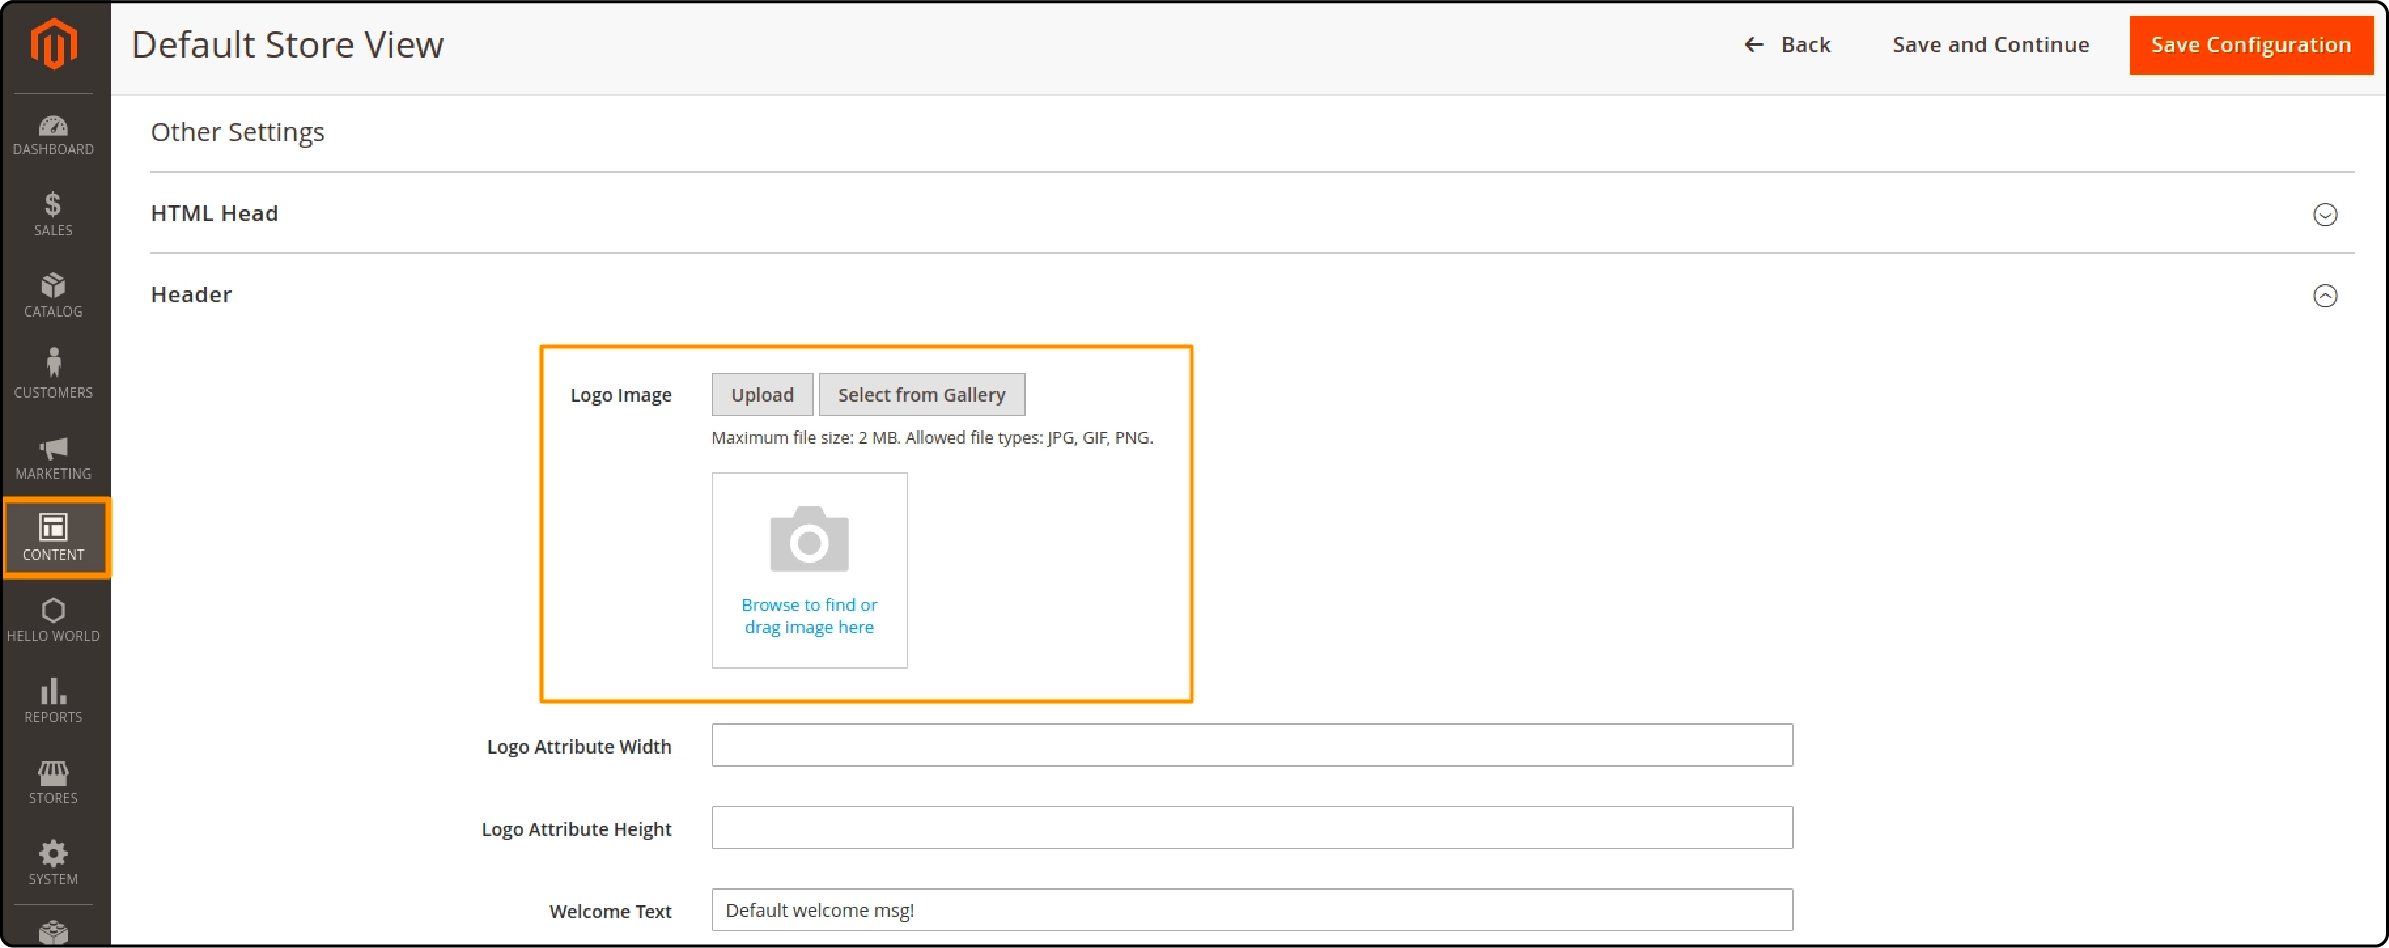
Under ‘other settings,’ find and expand the ‘Header’ section.
-
Next, click the ‘Choose file’ option and upload a new site logo. (you can pick the logo file from your computer.)

-
Add the Logo Image Width and Logo Image Height.
-
In the ‘Welcome Text’ field, add a welcome message (or leave it blank).
-
Add the logo image Alt text. It helps web crawlers understand what’s in the image.
-
Set the ‘translate title’ menu to ‘yes.’
-
Once you make the changes, click the Save configuration button.
Where can you add the Brand Logo in Magento 2?
5 Strategic Logo Placements That Amplify Your Brand Power
Transform every customer touchpoint into a branding opportunity
Your brand logo in Magento 2 is an essential element of your website's design. It helps to create a professional perspective for your business while making your brand recognizable. You can use your brand logo in various areas of your Magento 2 store and reinforce your brand identity.
One of the key areas to use your brand logo is in the header section of your website. It is usually the top part of the webpage where the navigation menu is located. Placing your logo on the header ensures its visibility.
You can also use your brand logo on the login page. It will provide a consistent branding experience for users when they access their accounts.

A brand logo also appears on emails, newsletters, and other promotional material sent to your customers. Adding a logo to your promotional materials ensures customers recognize and connect with your brand through the visual representation. You can also use a brand logo on PDF invoices and other sales documents.
Troubleshooting Logo Changes in Magento 2
Avoid These 3 Logo Killers: Technical Specs
Check your logo against these specs - 70% of issues start here
Technical Specifications
Supported File Formats
SVG recommended: 60-80% smaller files with perfect scalability
Maximum File Size
Applies to header logo uploads
Upload Locations Required
Header Logo
Variable size
Favicon
16x16 or 32x32
Email Templates
Custom size
Invoices
Print optimized
Use SVG Format for Optimal Results
SVG ensures your logo remains sharp and clear, regardless of size and location. Perfect for retina displays and responsive designs.
Some common issues you may encounter when changing the logo in Magento 2 are:
-
Incorrect image size: Ensure that the logo image meets the specified width and height requirements to avoid distortion or cropping on the website.
-
Incompatible file format: Always use a supported format such as JPEG or PNG for the logo image.
-
Improper logo placement: If you need help, check for any conflicting customizations or theme settings.
FAQs
1. How can I change the default logo in Magento 2?
The default logo will be uploaded from the admin panel in Magento 2. To upload or change the logo image for the Magento frontend:
- Find the "Content" section on the admin panel.
- Choose "Configuration" for your current theme.
- Upload your logo image in PNG, GIF, JPEG, or SVG format.
2. Will changing the logo in the header of my Magento 2 store increase brand awareness?
Changing the site logo in the header offers the potential of a marketing tool. A well-designed logo image helps increase awareness among your website visitors and customers. The logo placed in the upper-left corner of your online store can help customers relate to your brand.
3. Are there different size requirements for using a business logo?
Yes. The logos used for the favicon, newsletter email templates, and invoices have different sizes. You must upload them separately and ensure a proper Magento 2 default logo for various purposes. You can upload a maximum of 2MB file for the default logo in the header. The store’s theme determines other logo image sizes.
4. Can I upload an SVG logo in Magento 2, and does it affect the image quality?
Yes. Saving your new logo as an SVG file is ideal. It ensures your site logo remains sharp and clear, regardless of size and location.
5. What is the default theme in Magento 2 and can I change the current theme on my Magento site?
When you install the Magento platform, Magento Blank or Magento Luma is the default theme. If you want to change your store’s theme, adjusting the Magento backend settings will help.
Summary
The Magento 2 change logo feature helps ensure optimal display of the logo image on your website. It makes identifying your website from others easier for customers and increases the awareness of your brand. Use a high-quality image that accurately represents your brand, and trust the power of your logo.
While high-quality images are essential, they can impact your Magento site’s speed. Choose a reliable Magento hosting service to keep your website’s performance top-notch.


