
Magento 2 Customer Groups: Enhancing Your E-commerce Experience
How can Magento 2 customer groups revolutionize your online store? Dive into this tutorial to discover the secrets behind creating targeted marketing, personalized promotions, and intelligent tax management.
Harness the power of well-organized customer segments. Stay tuned for the game-changing strategies you've been waiting for!
Key Takeaways
-
Learn how to create and manage customer groups in Magento 2 for better customer segmentation.
-
Discover the benefits of targeted marketing and personalized promotions for specific customer groups.
-
Understand the importance of assigning suitable tax classes to customer groups for accurate tax calculations.
-
Explore how to create cart price rules and apply them to selected customer groups for tailored offers.
-
Enhance customer satisfaction and loyalty by addressing their unique needs and preferences.
How to Make Customer Groups in Magento 2
Customer segmentation is essential for managing an online store well. By making customer groups, you can focus on specific customers and give them exceptional shopping experiences, promotions, and discounts.
Why Customer Segmentation is Important
When you put your customers into different groups, you can better understand their needs and likes. It helps you make your marketing better. Some benefits of creating customer groups in your Magento 2 store are:
-
Special promotions and offers Give special deals and discounts to specific customer groups to make them more likely to buy something.
-
Better customer service Understand the needs of different customer groups and help them with their unique problems.
-
Smarter inventory management Know what customer groups need and change your inventory to meet their needs.
-
Better reporting Look at your store's performance by looking at your customer data in groups and making intelligent business decisions.
How to Make a New Customer Group in Magento 2?
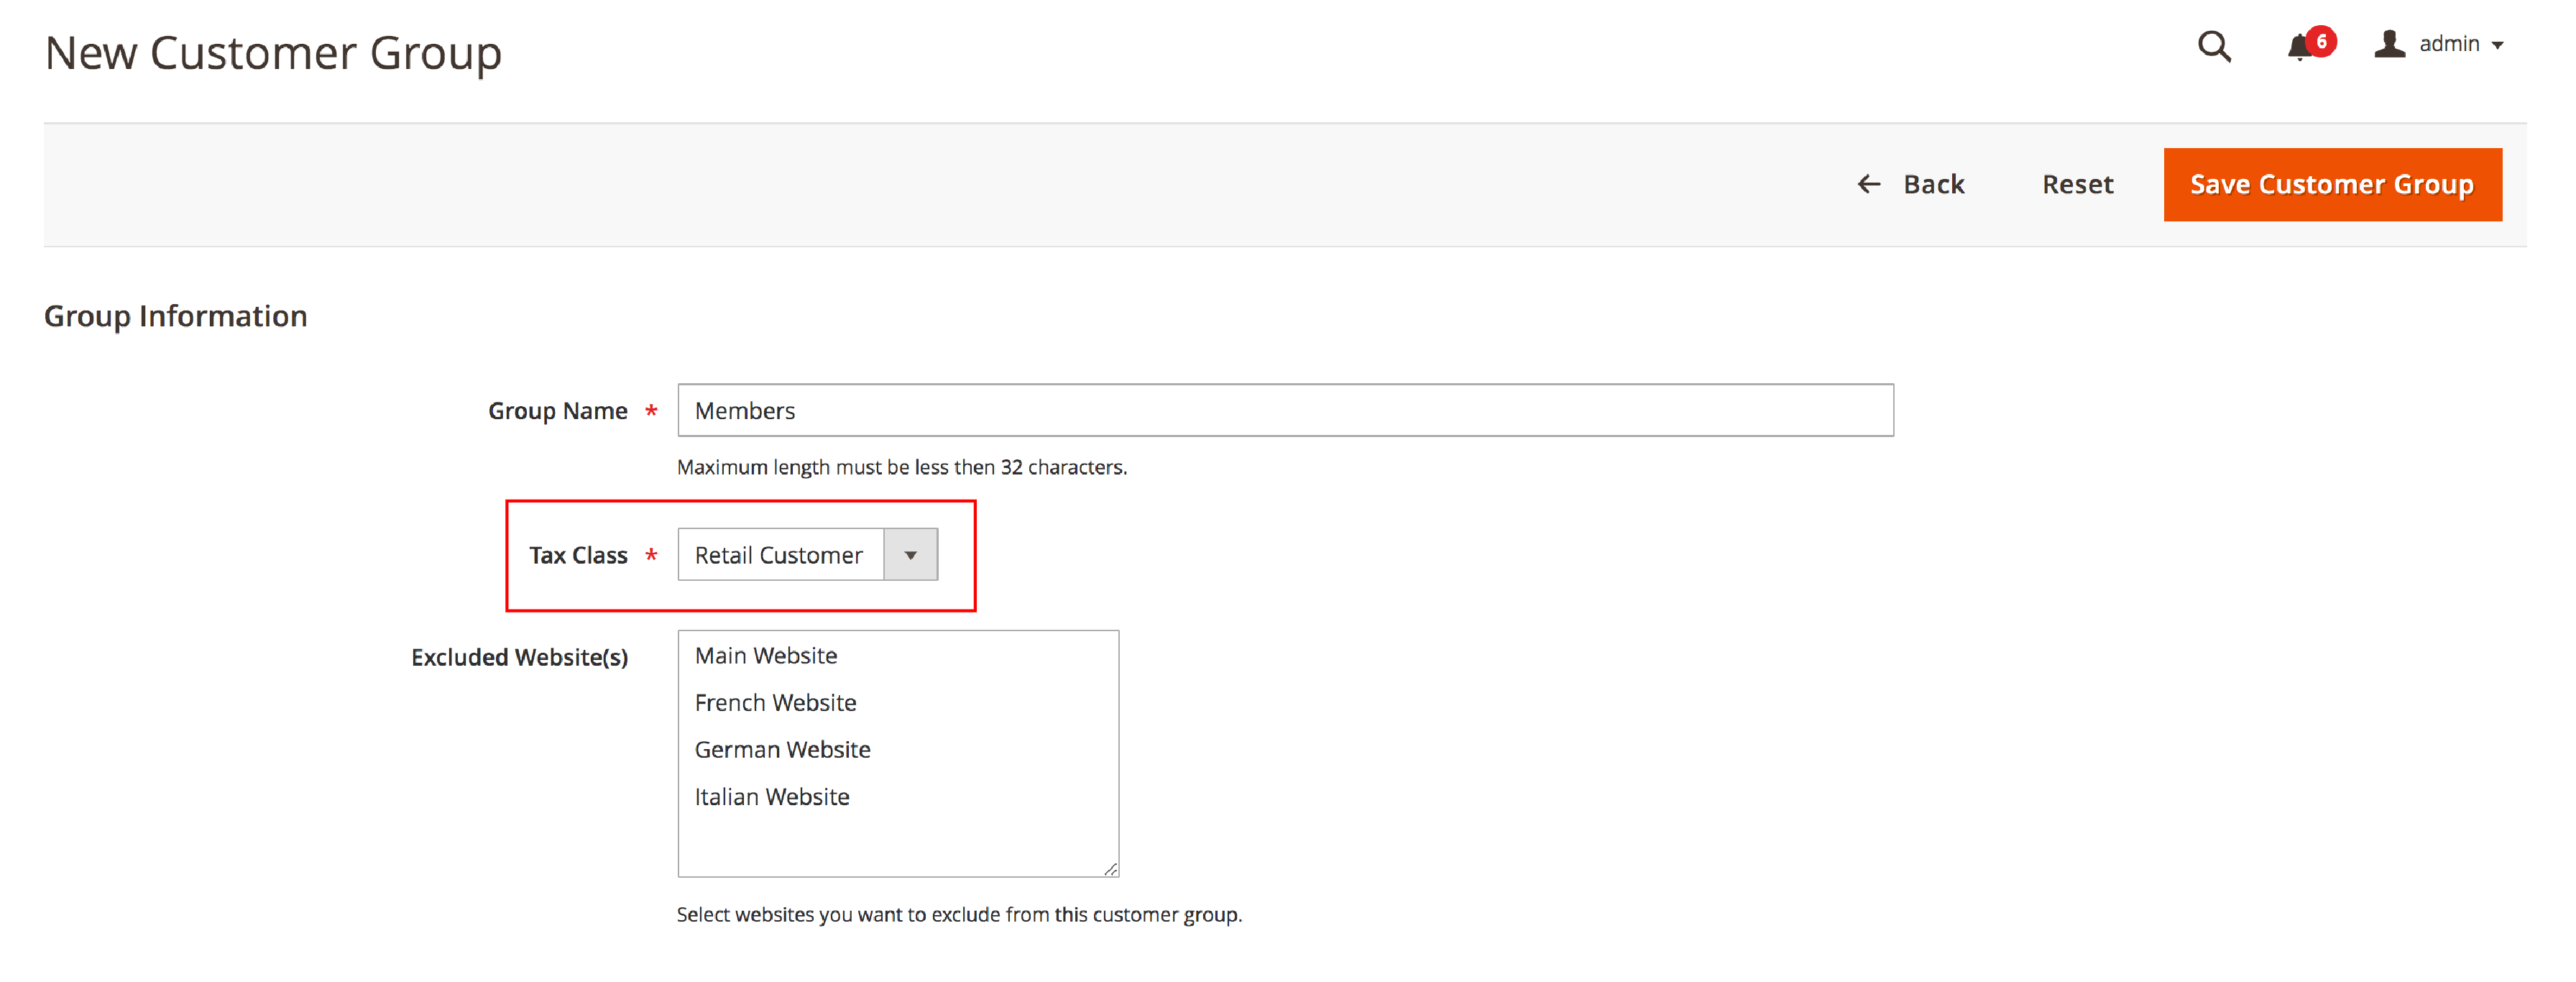
Making a customer group in Magento 2 is easy. Follow these steps to add a new customer group:
- Log in to the Magento 2 Admin Panel.
- Go to Customers > Customer Groups.
- Click on the Add New Customer Group button.
- Give the new customer group a good Group Name.
- Pick the right Tax Class for the group. This decides the tax rates for customers in this group.
- Click the Save Customer Group button to make a new group.
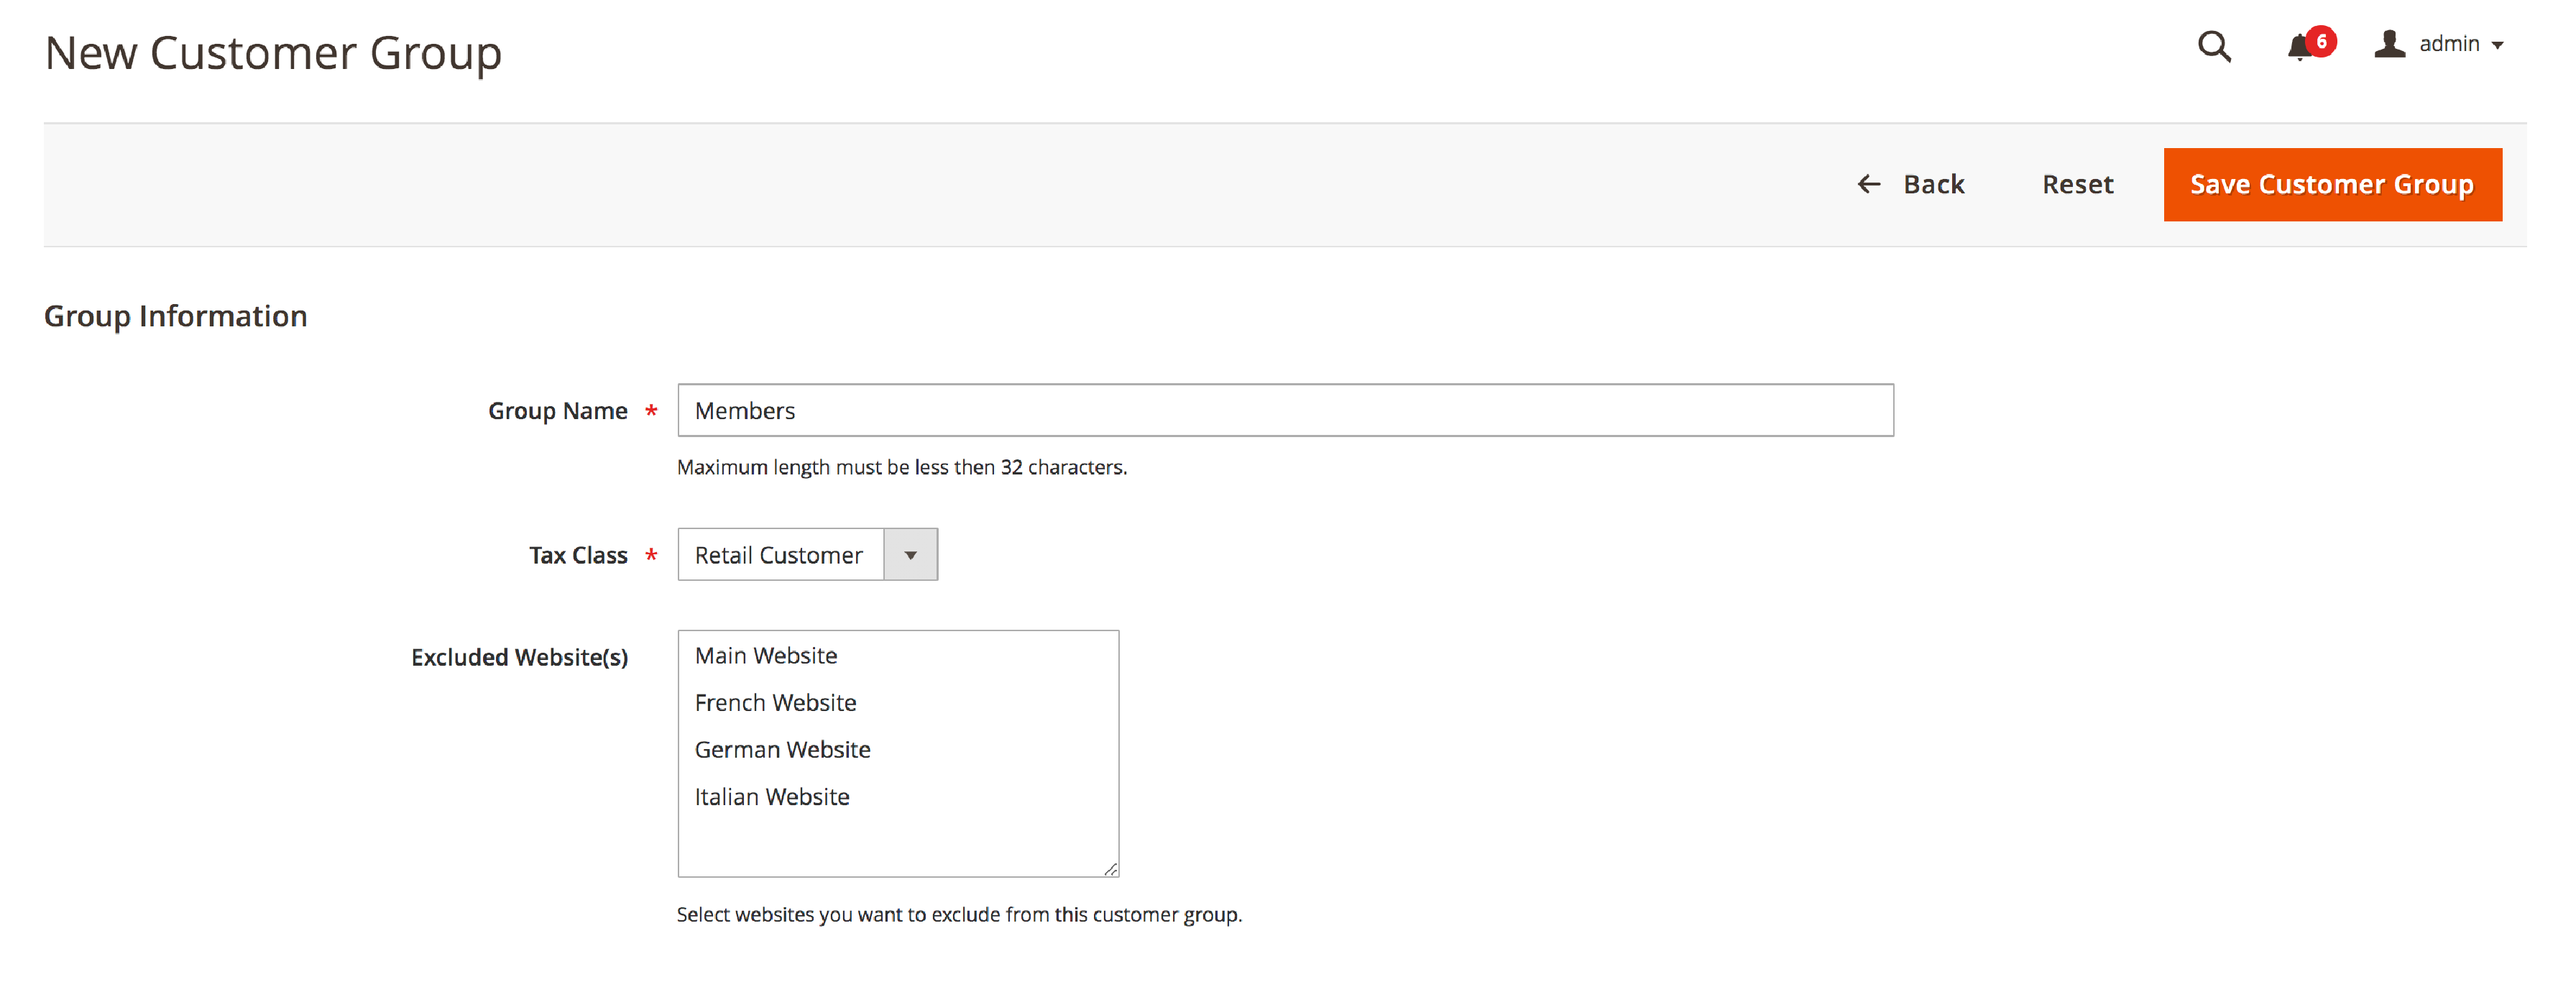
Once you have made a customer group, you can put customers in it. You can do this by hand or using rules based on customer details. It lets you focus on certain parts of your customer base with unique marketing and promotions.
How to Manage Customer Accounts in Magento 2 Admin Panel
With Magento 2, you can easily manage customer accounts and organize your customer base for better marketing and promotions.
How to Access Customer Accounts in Magento 2
To access and manage customer accounts in Magento 2, follow these easy steps:
- Log in to the Magento 2 admin panel.
- Go to Customers > All Customers on the left sidebar.
- You will see a list of registered customer accounts here. You can use the search filters and sorting options to find specific customers.
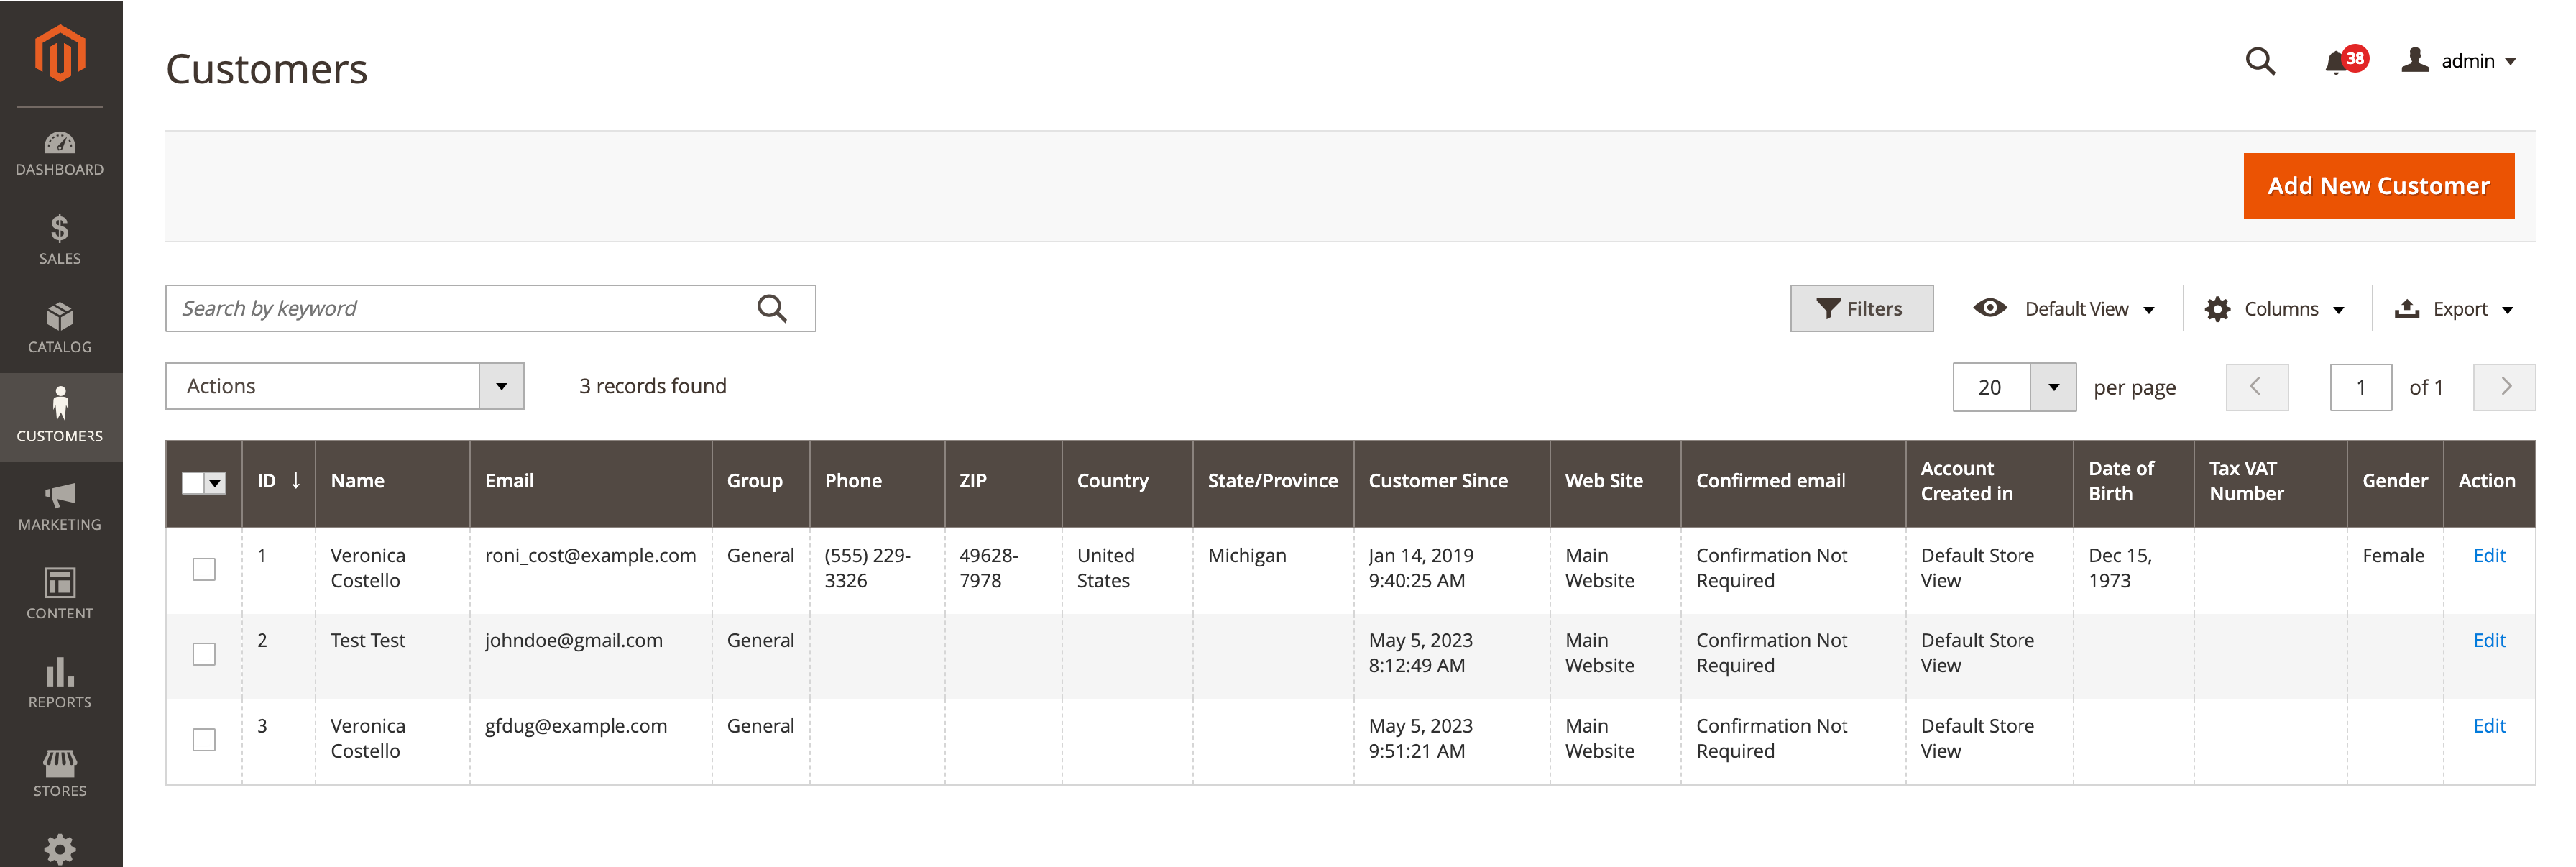
How to Update Customer Account Information
When looking at the Customers > All Customers list, you can update the information for each customer account. To do this:
- Click on the customer's name in the list.
- Update the information you need in the Account Information and Addresses tabs.
- Click the Save Customer button to save the changes.
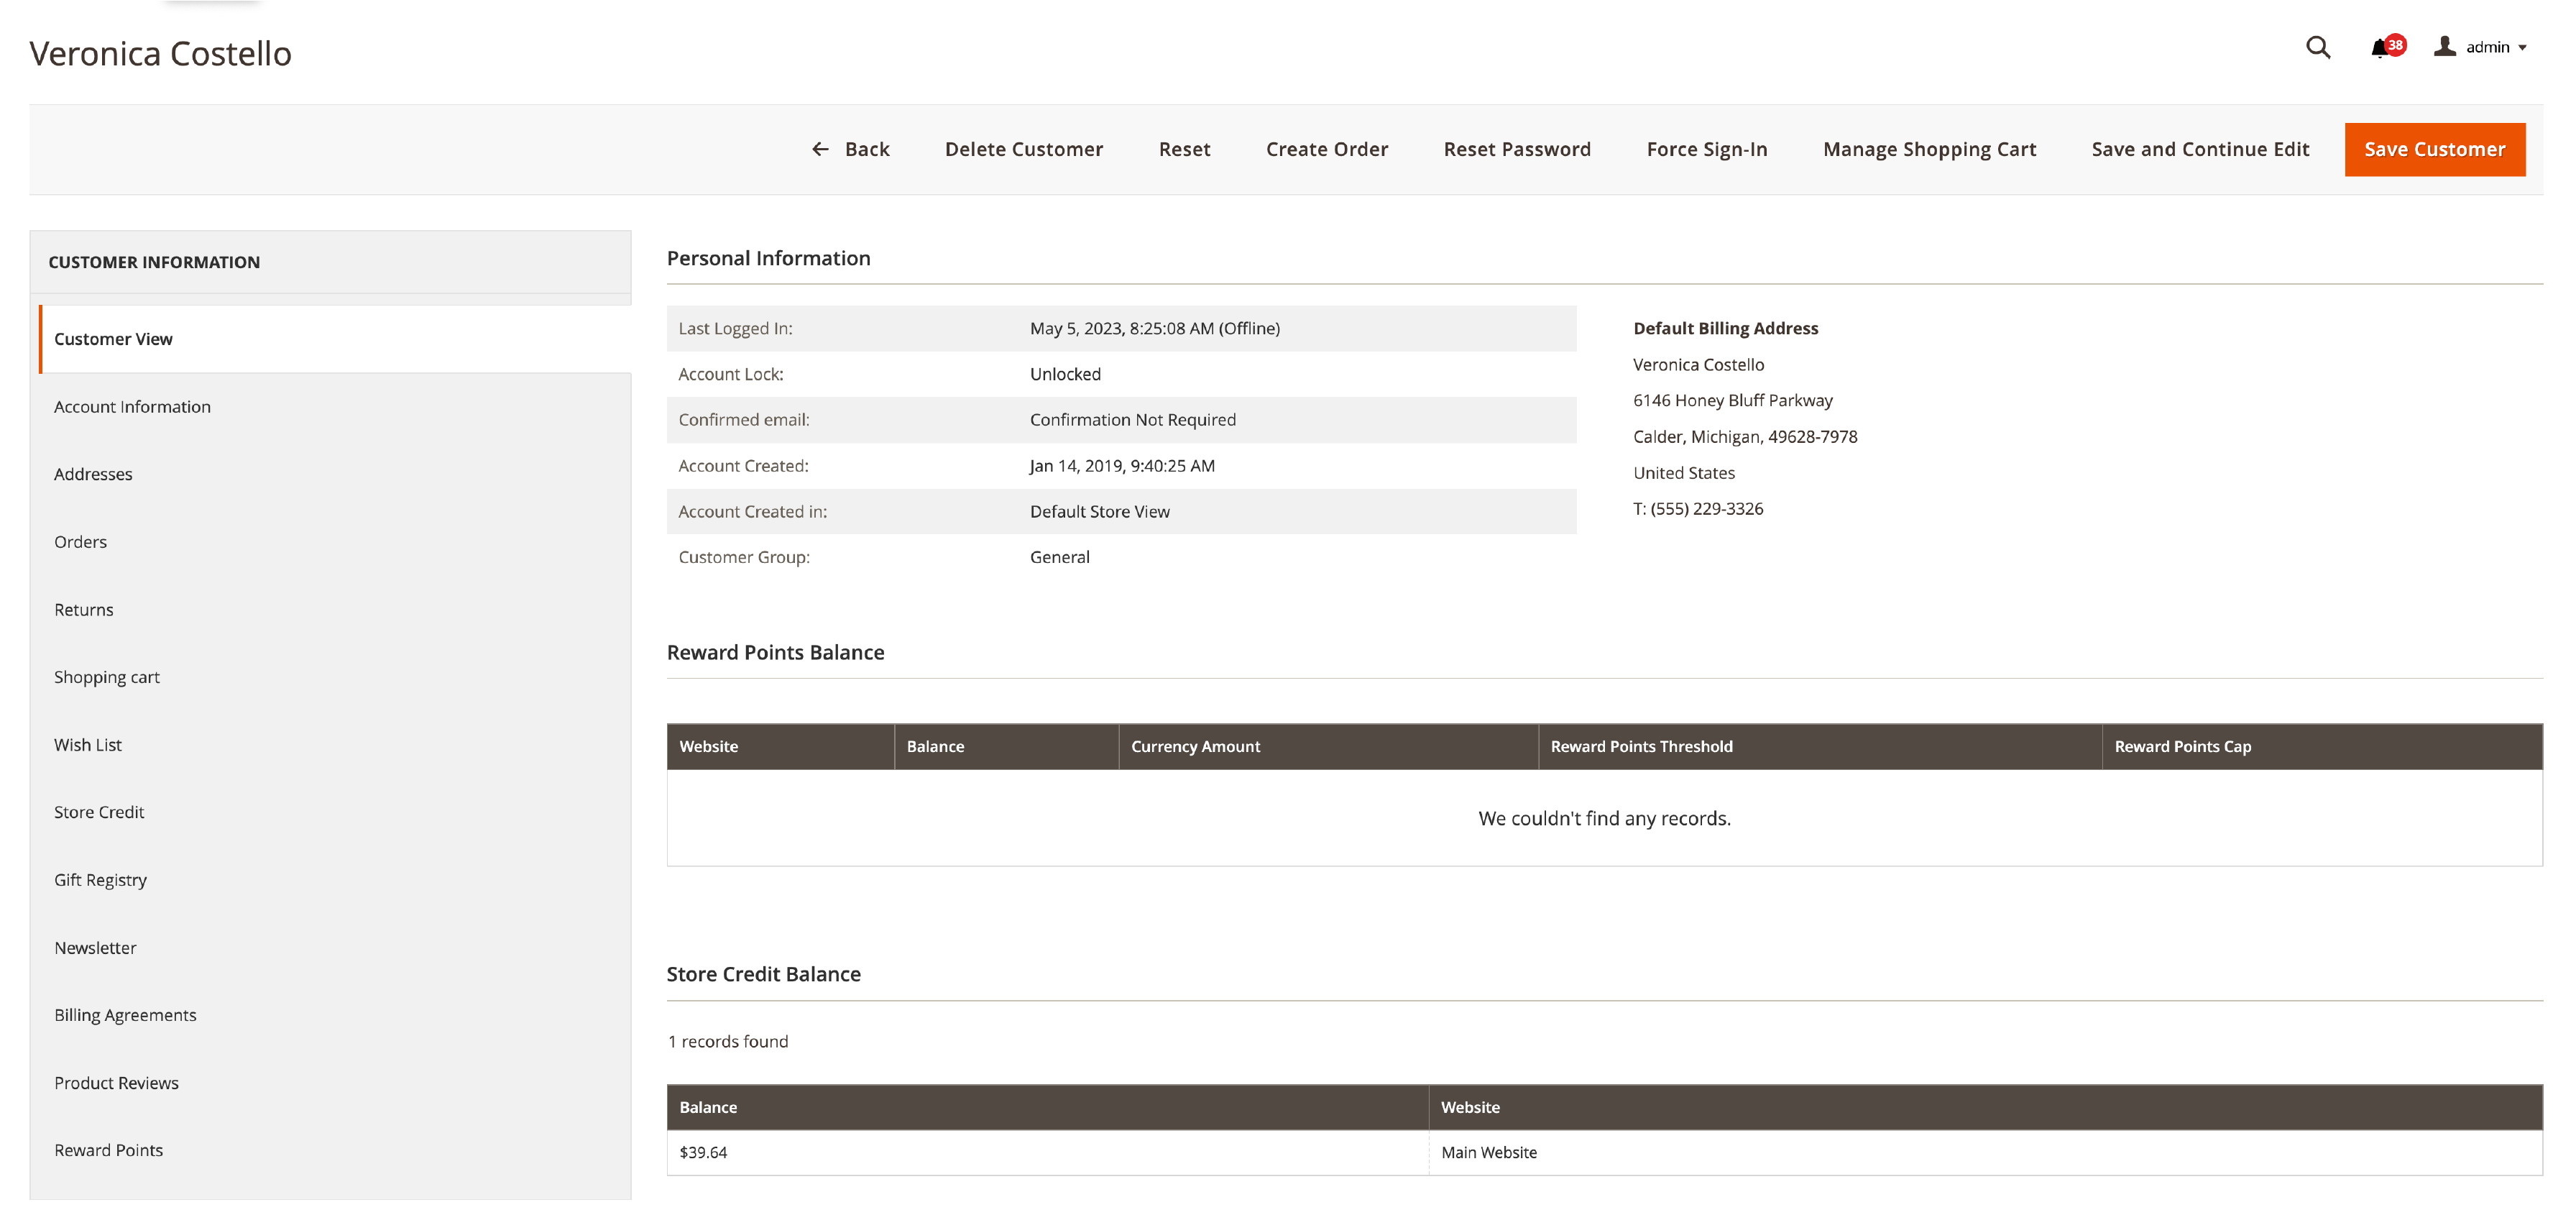
How to Assign a Customer Group
Putting a customer group with each account helps you better organize your customer base. This way, you can focus on specific groups with marketing and promotions. To assign a customer group:
- Find the Account Information tab when editing a customer account.
- Find the Group field and pick a customer group from the drop-down menu.
- Click the Save Customer button to save the changes.
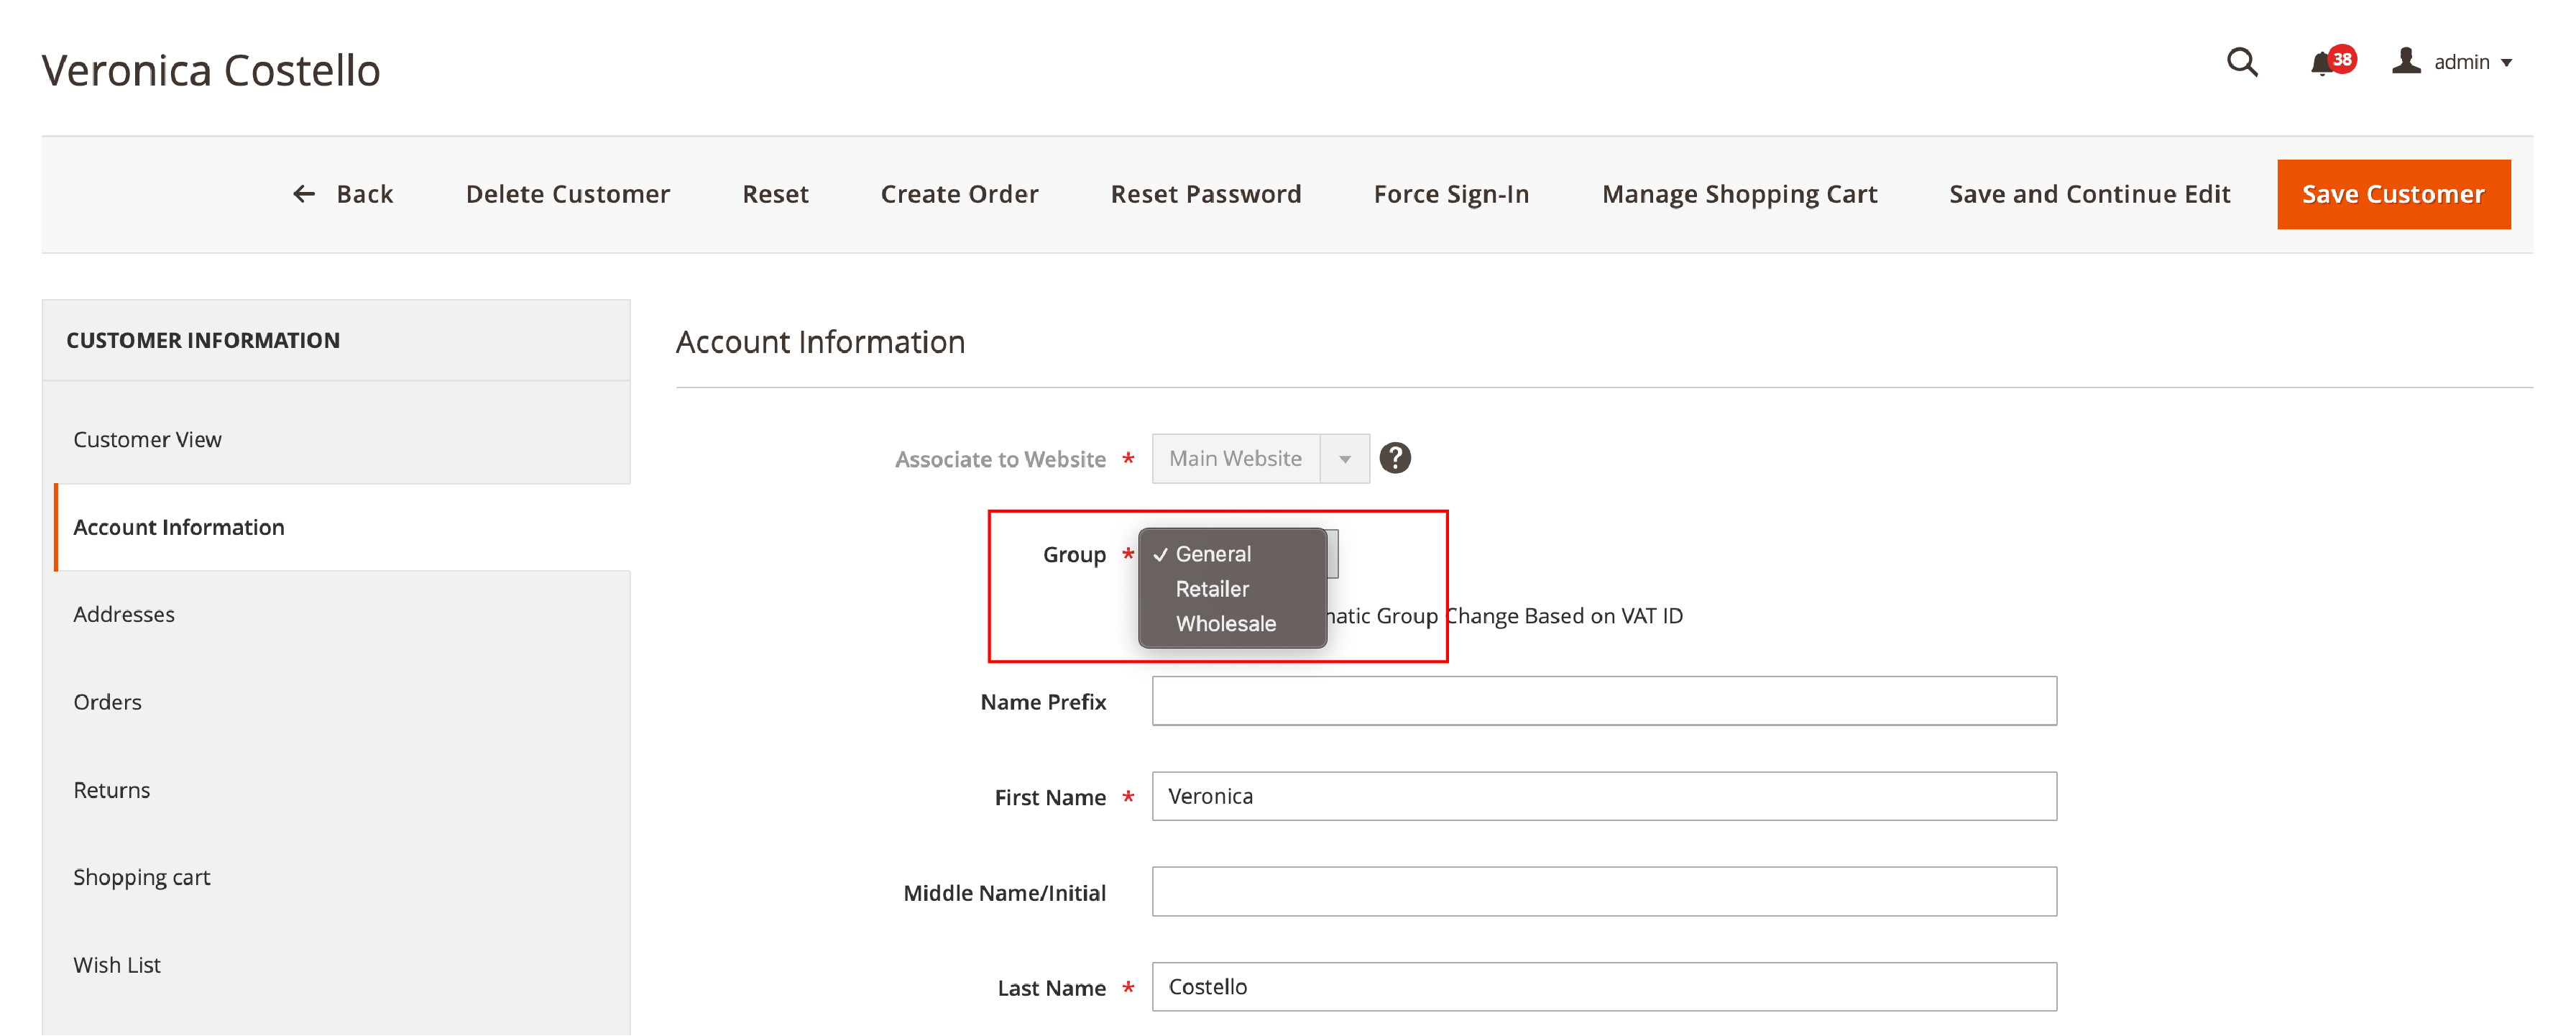
You can make and manage customer groups by going to Customers > Customer Groups in the Magento 2 admin panel.
Why Organizing the Customer Base Matters?
Organizing your customer base by putting customer groups with each account can improve your marketing and promotions. By dividing your customers into groups, you can:
- Give special promotions and discounts to specific groups.
- Send personalized emails based on what customers like and do.
- Look at how customers spend money and change your offerings to fit them.
- Make customers happier and more loyal by helping them with their specific needs and likes.
Default Magento Customer Groups and Tax Classes
A critical part of Magento 2 is its default customer groups and the tax classes that go with them. We will cover the default customer groups in Magento 2, and the tax classes that go with them.
Default Customer Groups in Magento 2
Magento 2 has four default customer groups. They are:
- General
- Wholesale
- Retailer
- Not Logged In
Each customer group is for different types of customers. They have different prices and tax rules. Store owners can also make their customer groups for special needs.
Tax Classes That Go With Each Group
Each default customer group has a tax class that goes with it. This tells the system the tax rules for the customers in that group. Magento 2 has three default tax classes:
- Taxable Goods
- Shipping
- Non-Taxable Goods
It is essential to put the suitable tax class with each customer group. This makes sure the system calculates taxes correctly.
Why Add the Right Tax Classes with Customer Groups?
Adding a suitable tax class with a customer group is essential for many reasons:
- Makes sure the system calculates taxes correctly based on where the customer is and what they are buying.
- Follows tax rules and laws, so there are no legal problems.
- Makes pricing clear for customers so they trust the shopping experience more.
- Go to the Customer Groups section in the Magento 2 admin panel to put a tax class with a customer group.
- Click the Add New button and pick the tax class you want for the new group.
- Once you've selected one, click Save Customer Group to finish the changes.
How to Create Cart Price Rules
Follow these steps to make a new cart price rule in Magento 2:
-
Log in to your Magento 2 admin panel.
-
Go to Marketing > Promotions > Cart Price Rules.
-
Click on the "Add New Rule" button.
-
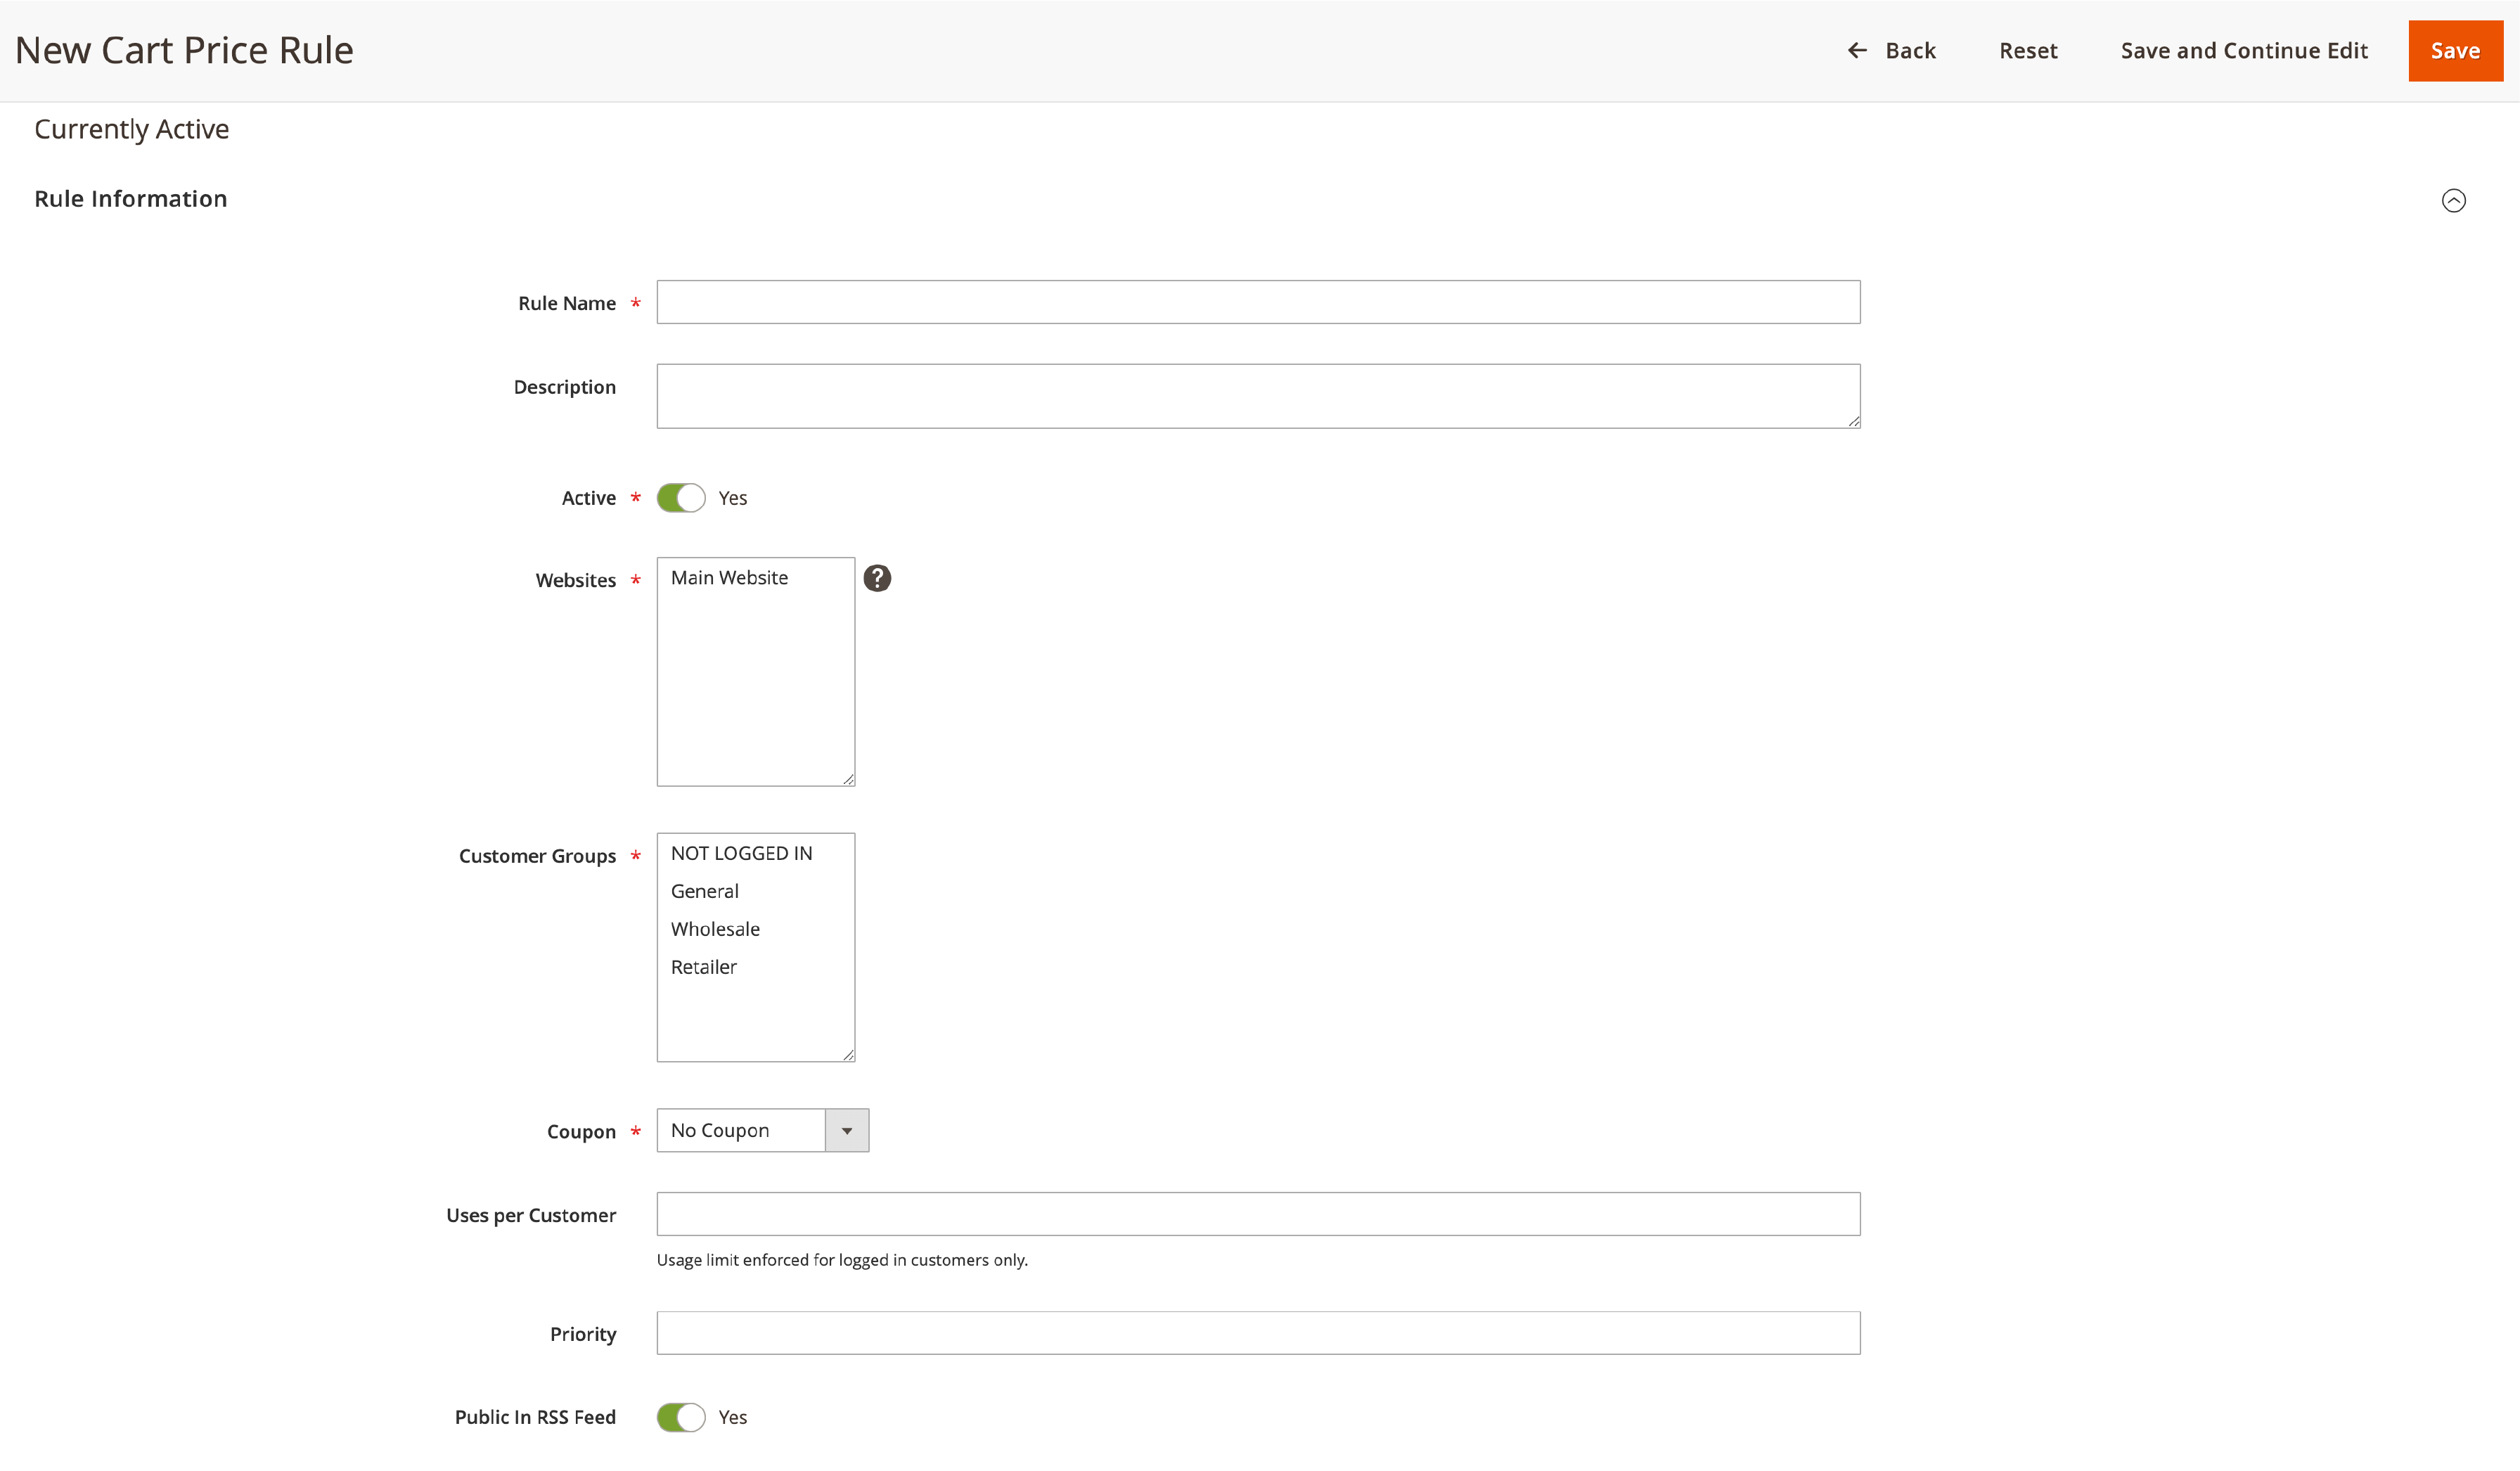
Fill in the needed fields, like Rule Name, Description, and Priority. Ensure the "Active" field is "Yes".
-
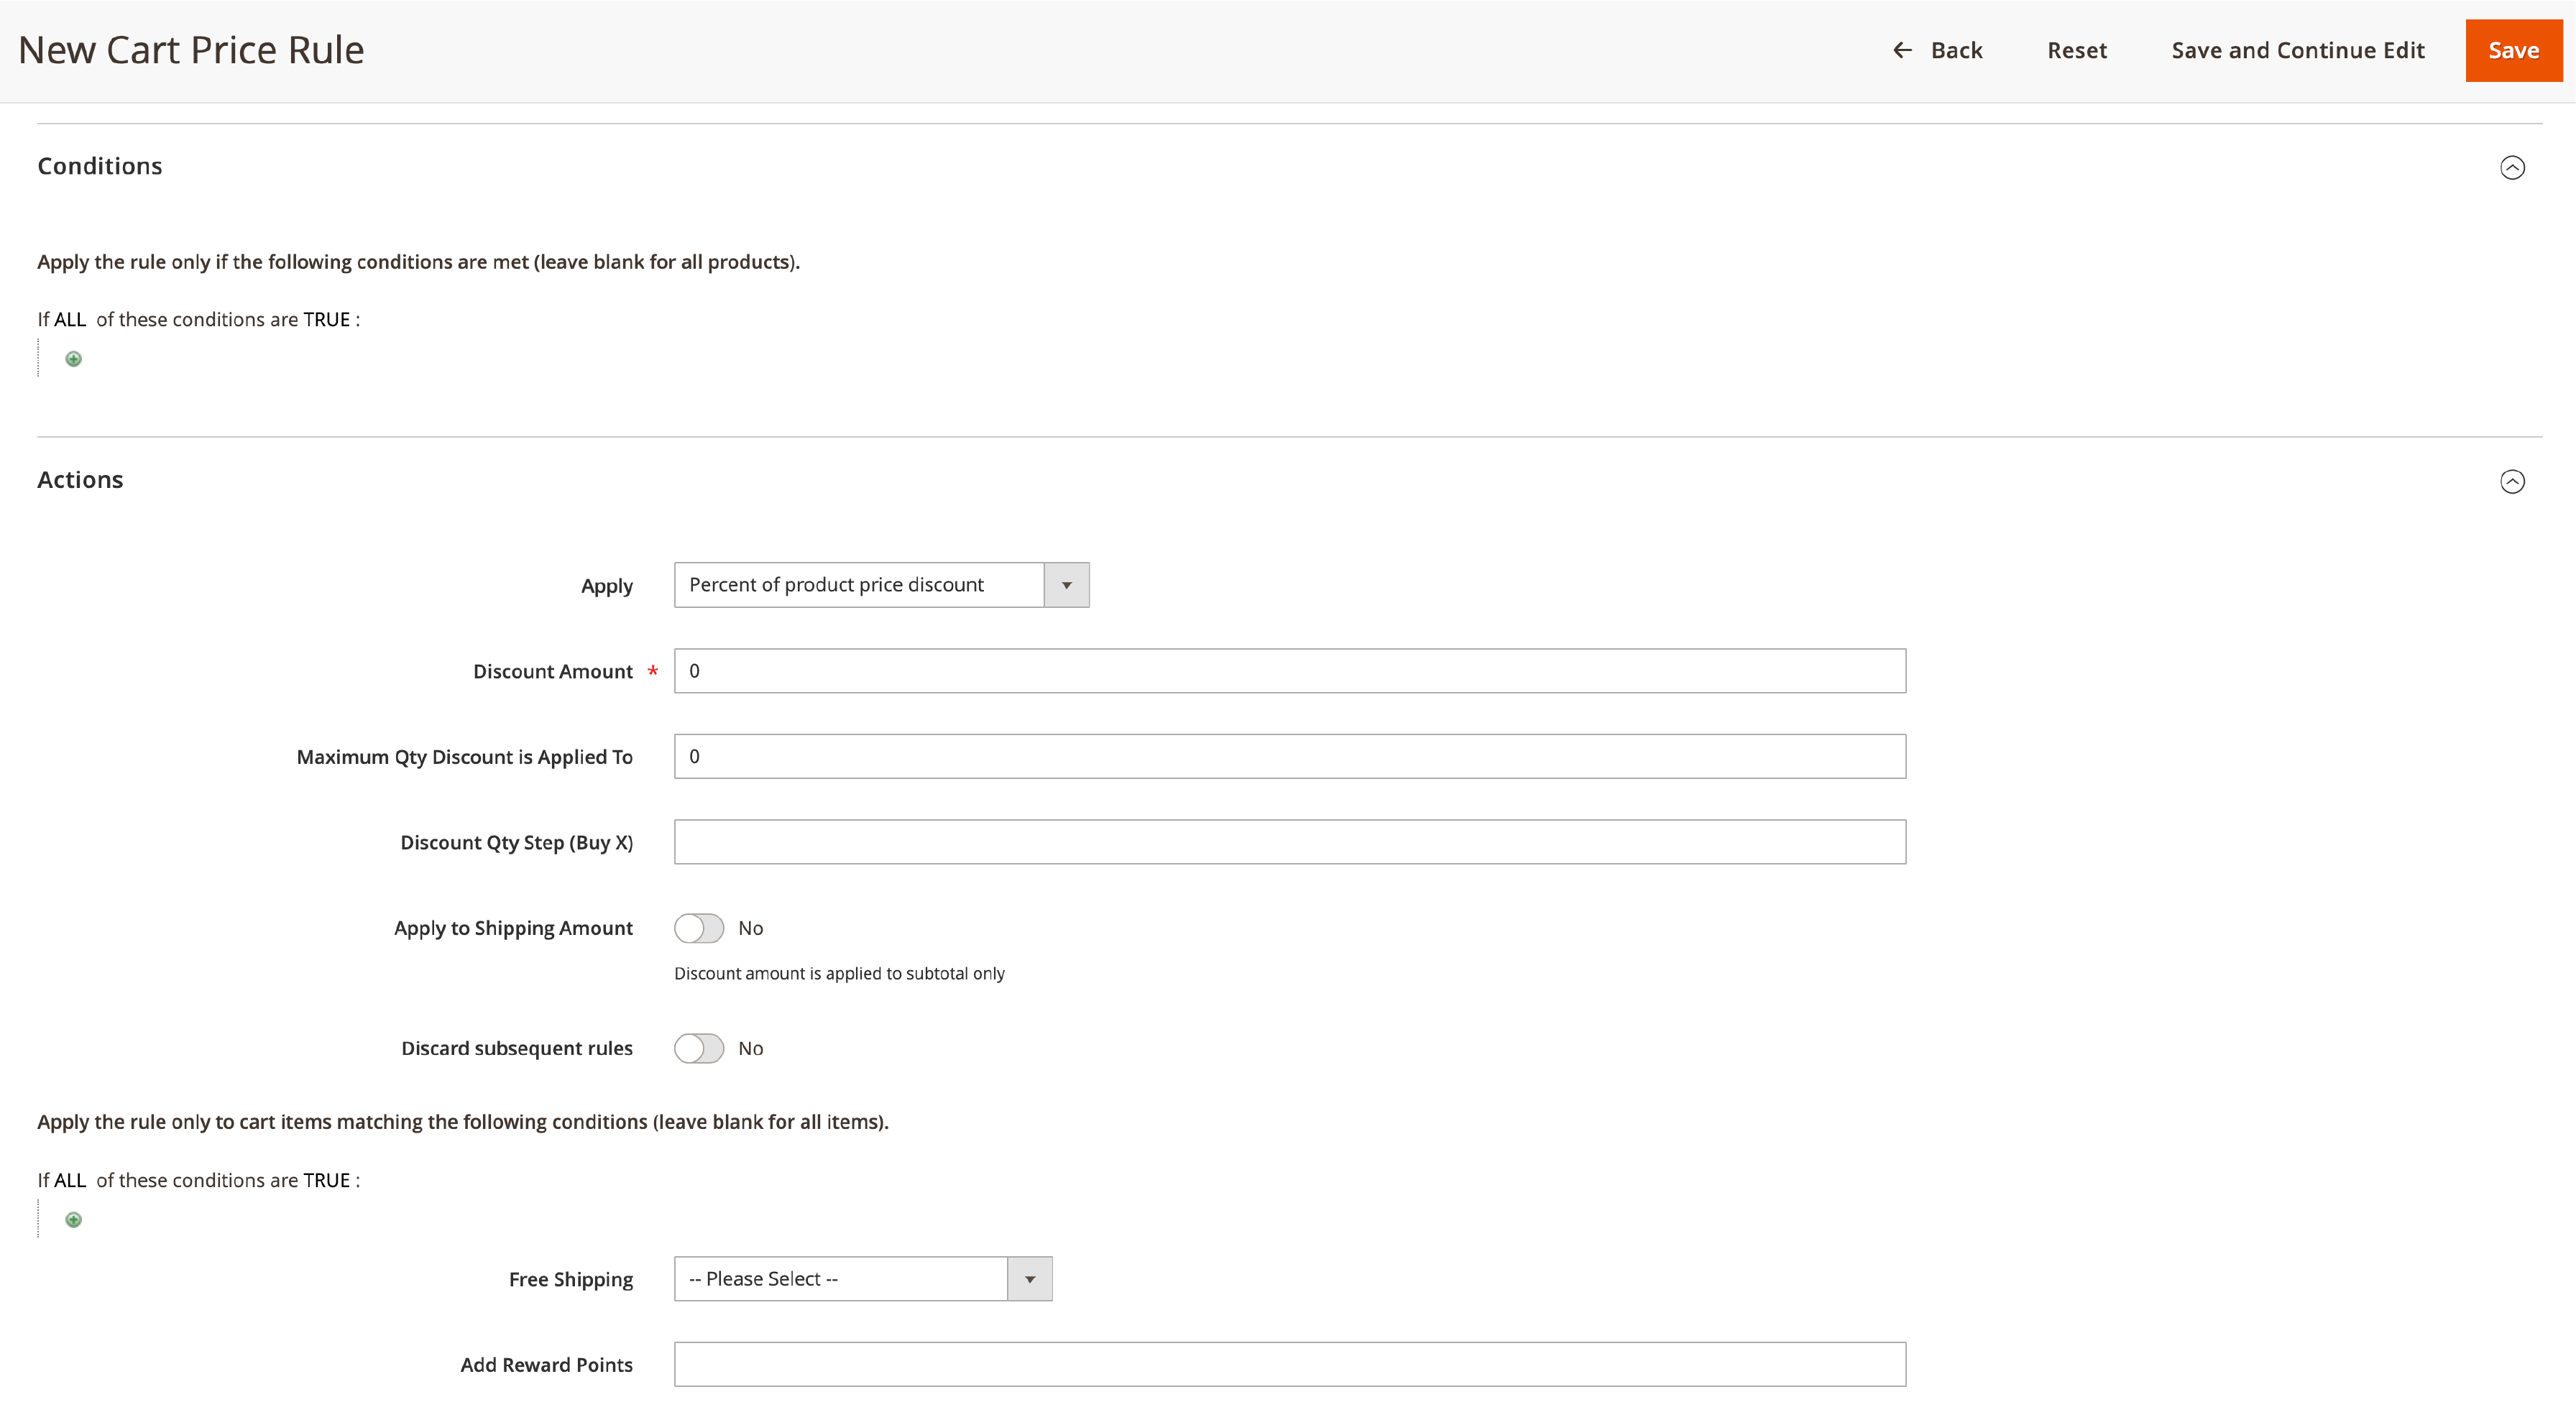
In the "Conditions" tab, set the conditions that must be met for the rule to work. It includes the total amount in the cart or specific product details.
-
In the "Actions" tab, pick the kind of discount you want to give. It can be a fixed amount discount or a percentage discount.
-
Write the discount amount, and if needed, the maximum quantity of items the discount can be used for.
How to Use Cart Price Rules for Customer Groups
To use cart price rules for specific customer groups, follow these steps:
-
In the "Rule Information" part of the cart price rule, find the "Customer Groups" field.
-
Pick the customer groups you want the rule to work for. Hold the CTRL key (or CMD on Mac) to pick more than one group.
-
Save your changes by clicking the "Save" button.

Managing Customer Groups in Magento 2 the Right Way
By putting customers into specific groups, businesses can change their marketing plans and offer to fit each group's preferences.
Customer Segmentation and Focused Marketing
With Magento 2, you can create and manage customer groups. It can be based on customer information such as demographics, what they bought before, and what they like to shop for. It lets you split your customer base into groups and focus marketing plans on certain groups.
Smart Tax Management
Another good thing about managing customer groups in Magento 2 is using different tax rates and rules for each group. It can help you follow tax rules and make tax management easier. For example, you can make tax-free customer groups or use special tax rates for customers in some places. It ensures tax calculations are correct and lowers the risk of tax problems.
Summary
The Magento 2 customer groups guide has covered everything from creating customer segments and smart tax management to targeted marketing strategies. By utilizing customer groups effectively, online businesses can provide personalized promotions and enhance customer service.
Eager to learn more about optimizing your eCommerce store? Don't miss out on our Magento tutorials for additional insights and tips!


