
Magento 2 Email Settings: Easy Step-by-Step Tutorial
Magento 2 email settings are designed to facilitate email communication within the Magento ecommerce platform. These settings are used to customize and optimize your email interactions. It ensures you maintain efficient and reliable communication with your customers and stakeholders.
In this guide, we'll simplify configuring SMTP in Magento 2. Follow easy tutorial to ensure you correctly set up your email settings. We also cover the purpose and significance of key email settings in Magento 2.
Key Takeaways
-
Understand the importance of Magento 2 Email Settings for optimizing your online store's email communication and customer engagement.
-
Learn how to configure SMTP email settings in Magento 2 email settings to keep your sales email up-to-date.
-
Manage various aspects of Magento 2 Email Settings and configure general settings to customize your email setup.
-
Discover techniques for effective email management, including blacklisting unwanted email addresses.
-
Understand the significance of SPF record configuration for improved emailing and reduced spam flags by recipient servers.
-
Learn how to set up Magento 2 Email SMTP for enhanced email functionality in your online store.
Steps to Configure SMTP in Magento 2 Email Settings
In three simple steps, you can complete configuring SMTP in Magento 2 Email Settings.
Step 1: Create an Email Address For your Website Domain
Setting up an email address for your domain is the initial step. You can accomplish it by following these simple steps:
-
Visit your domain host's control panel.
-
Locate and select Email Accounts or Mail.
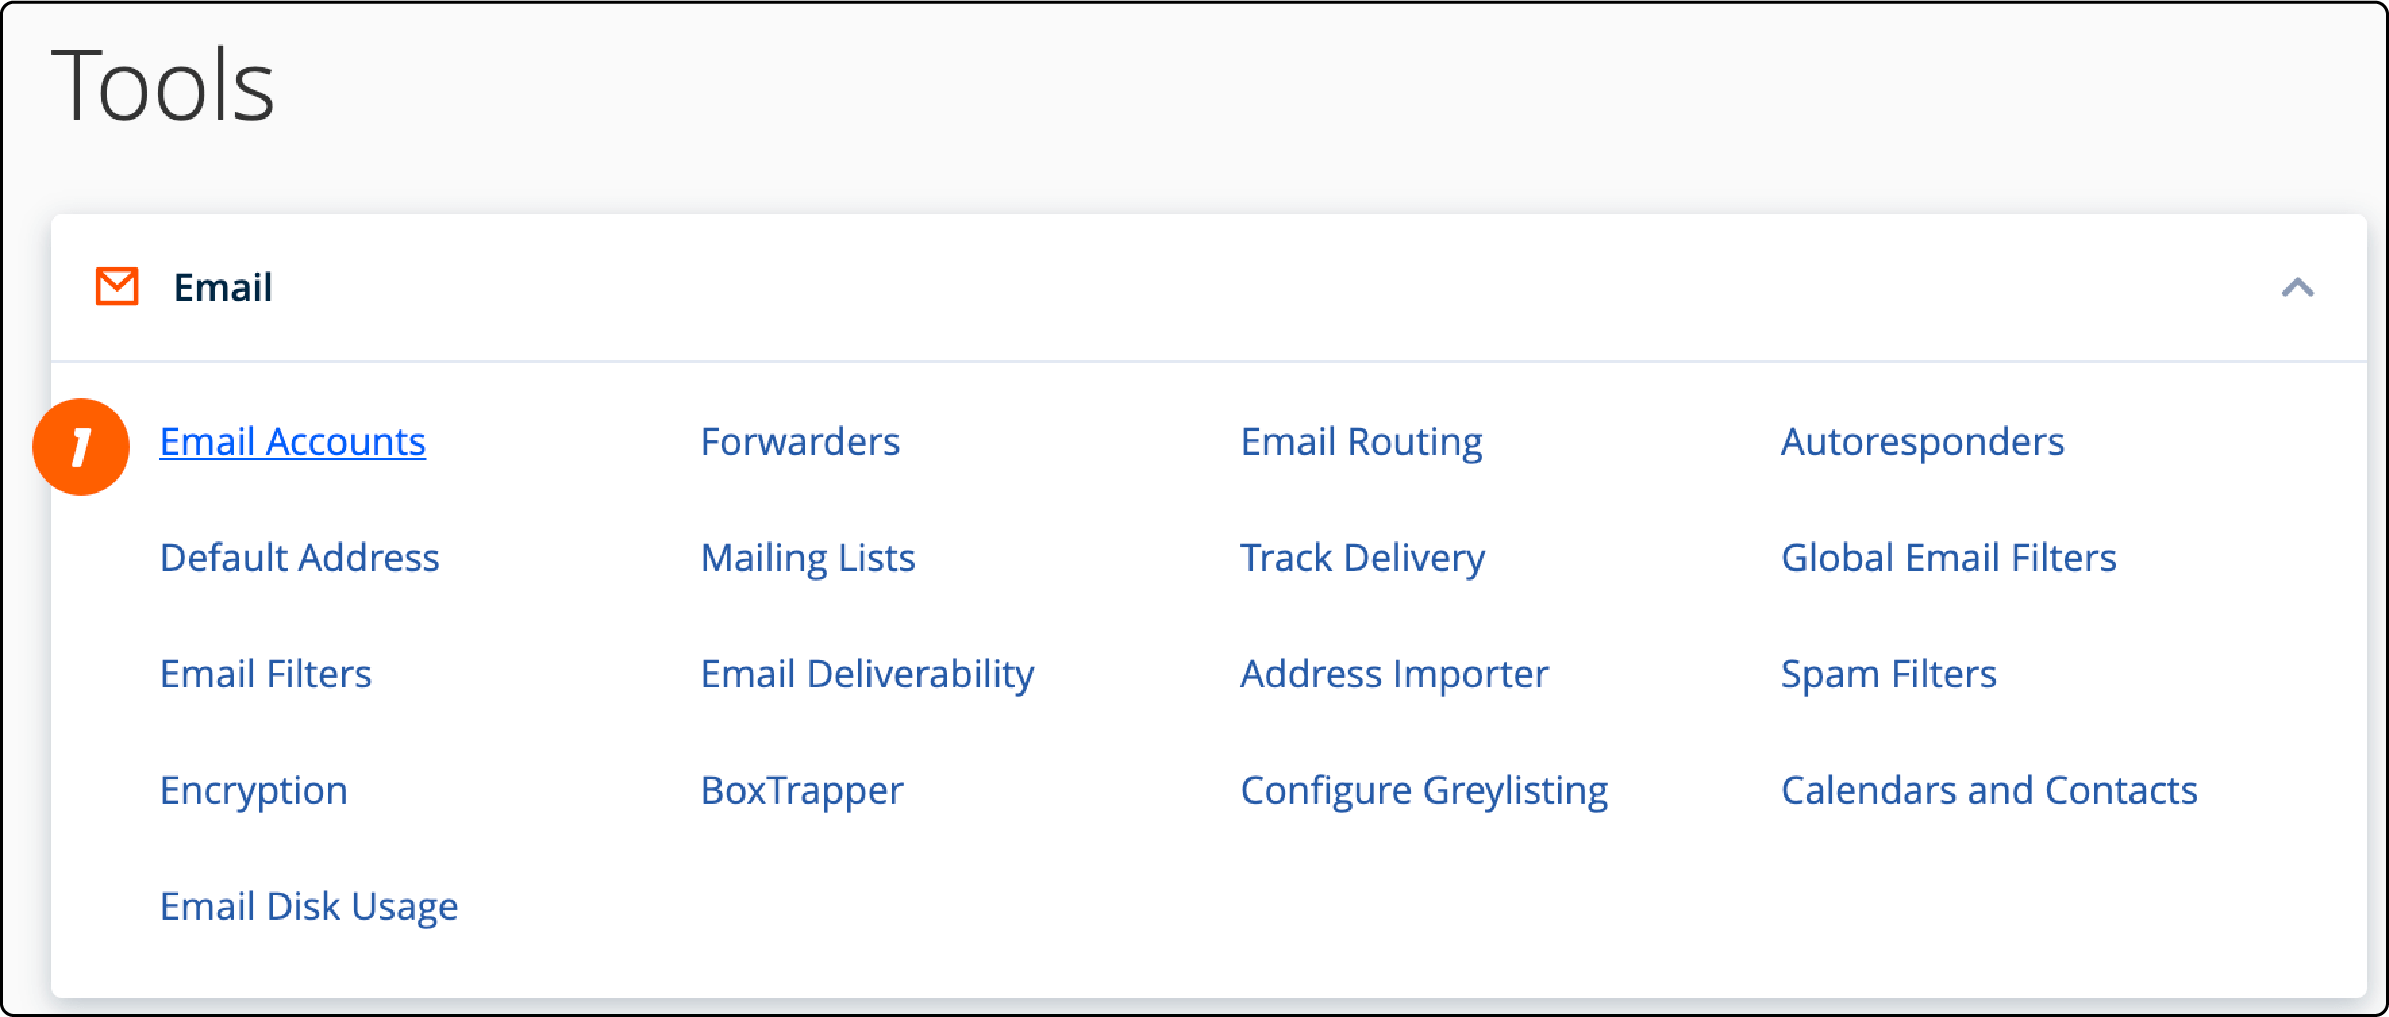
- Opt for Create New Email.
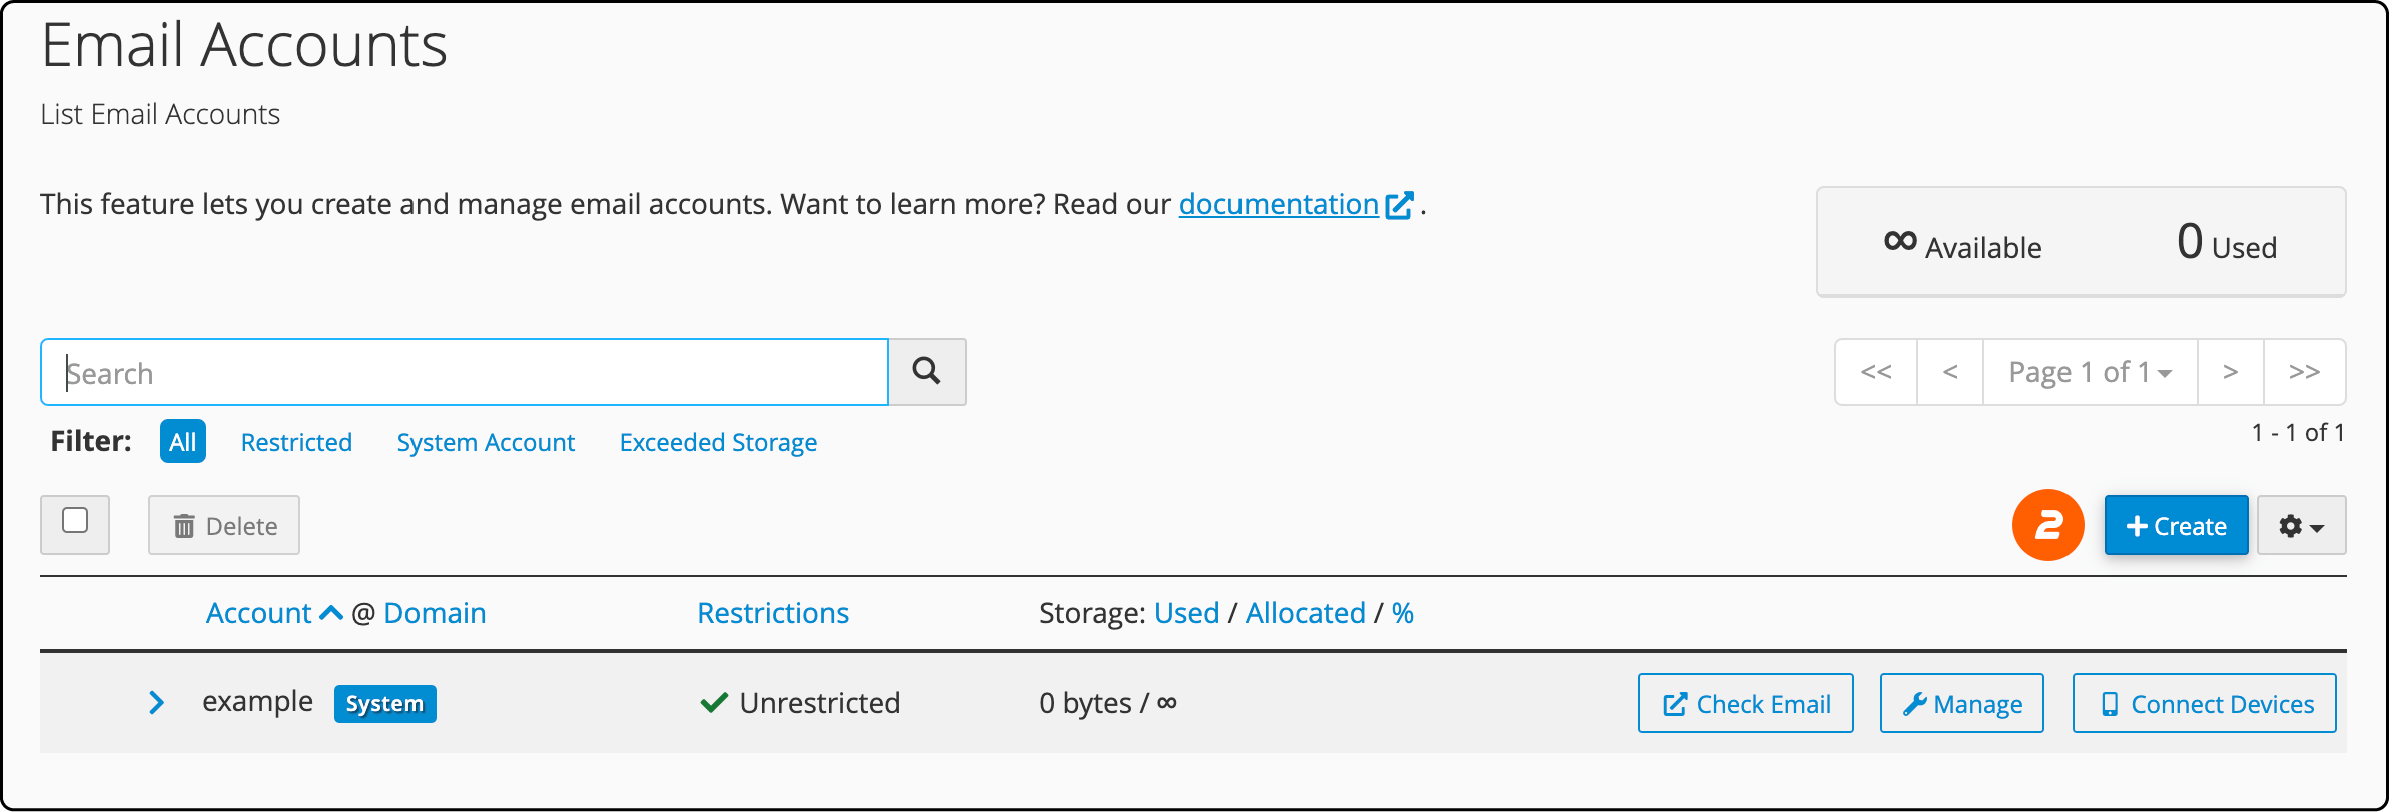
- Specify the desired email name.
- Generate a secure password.
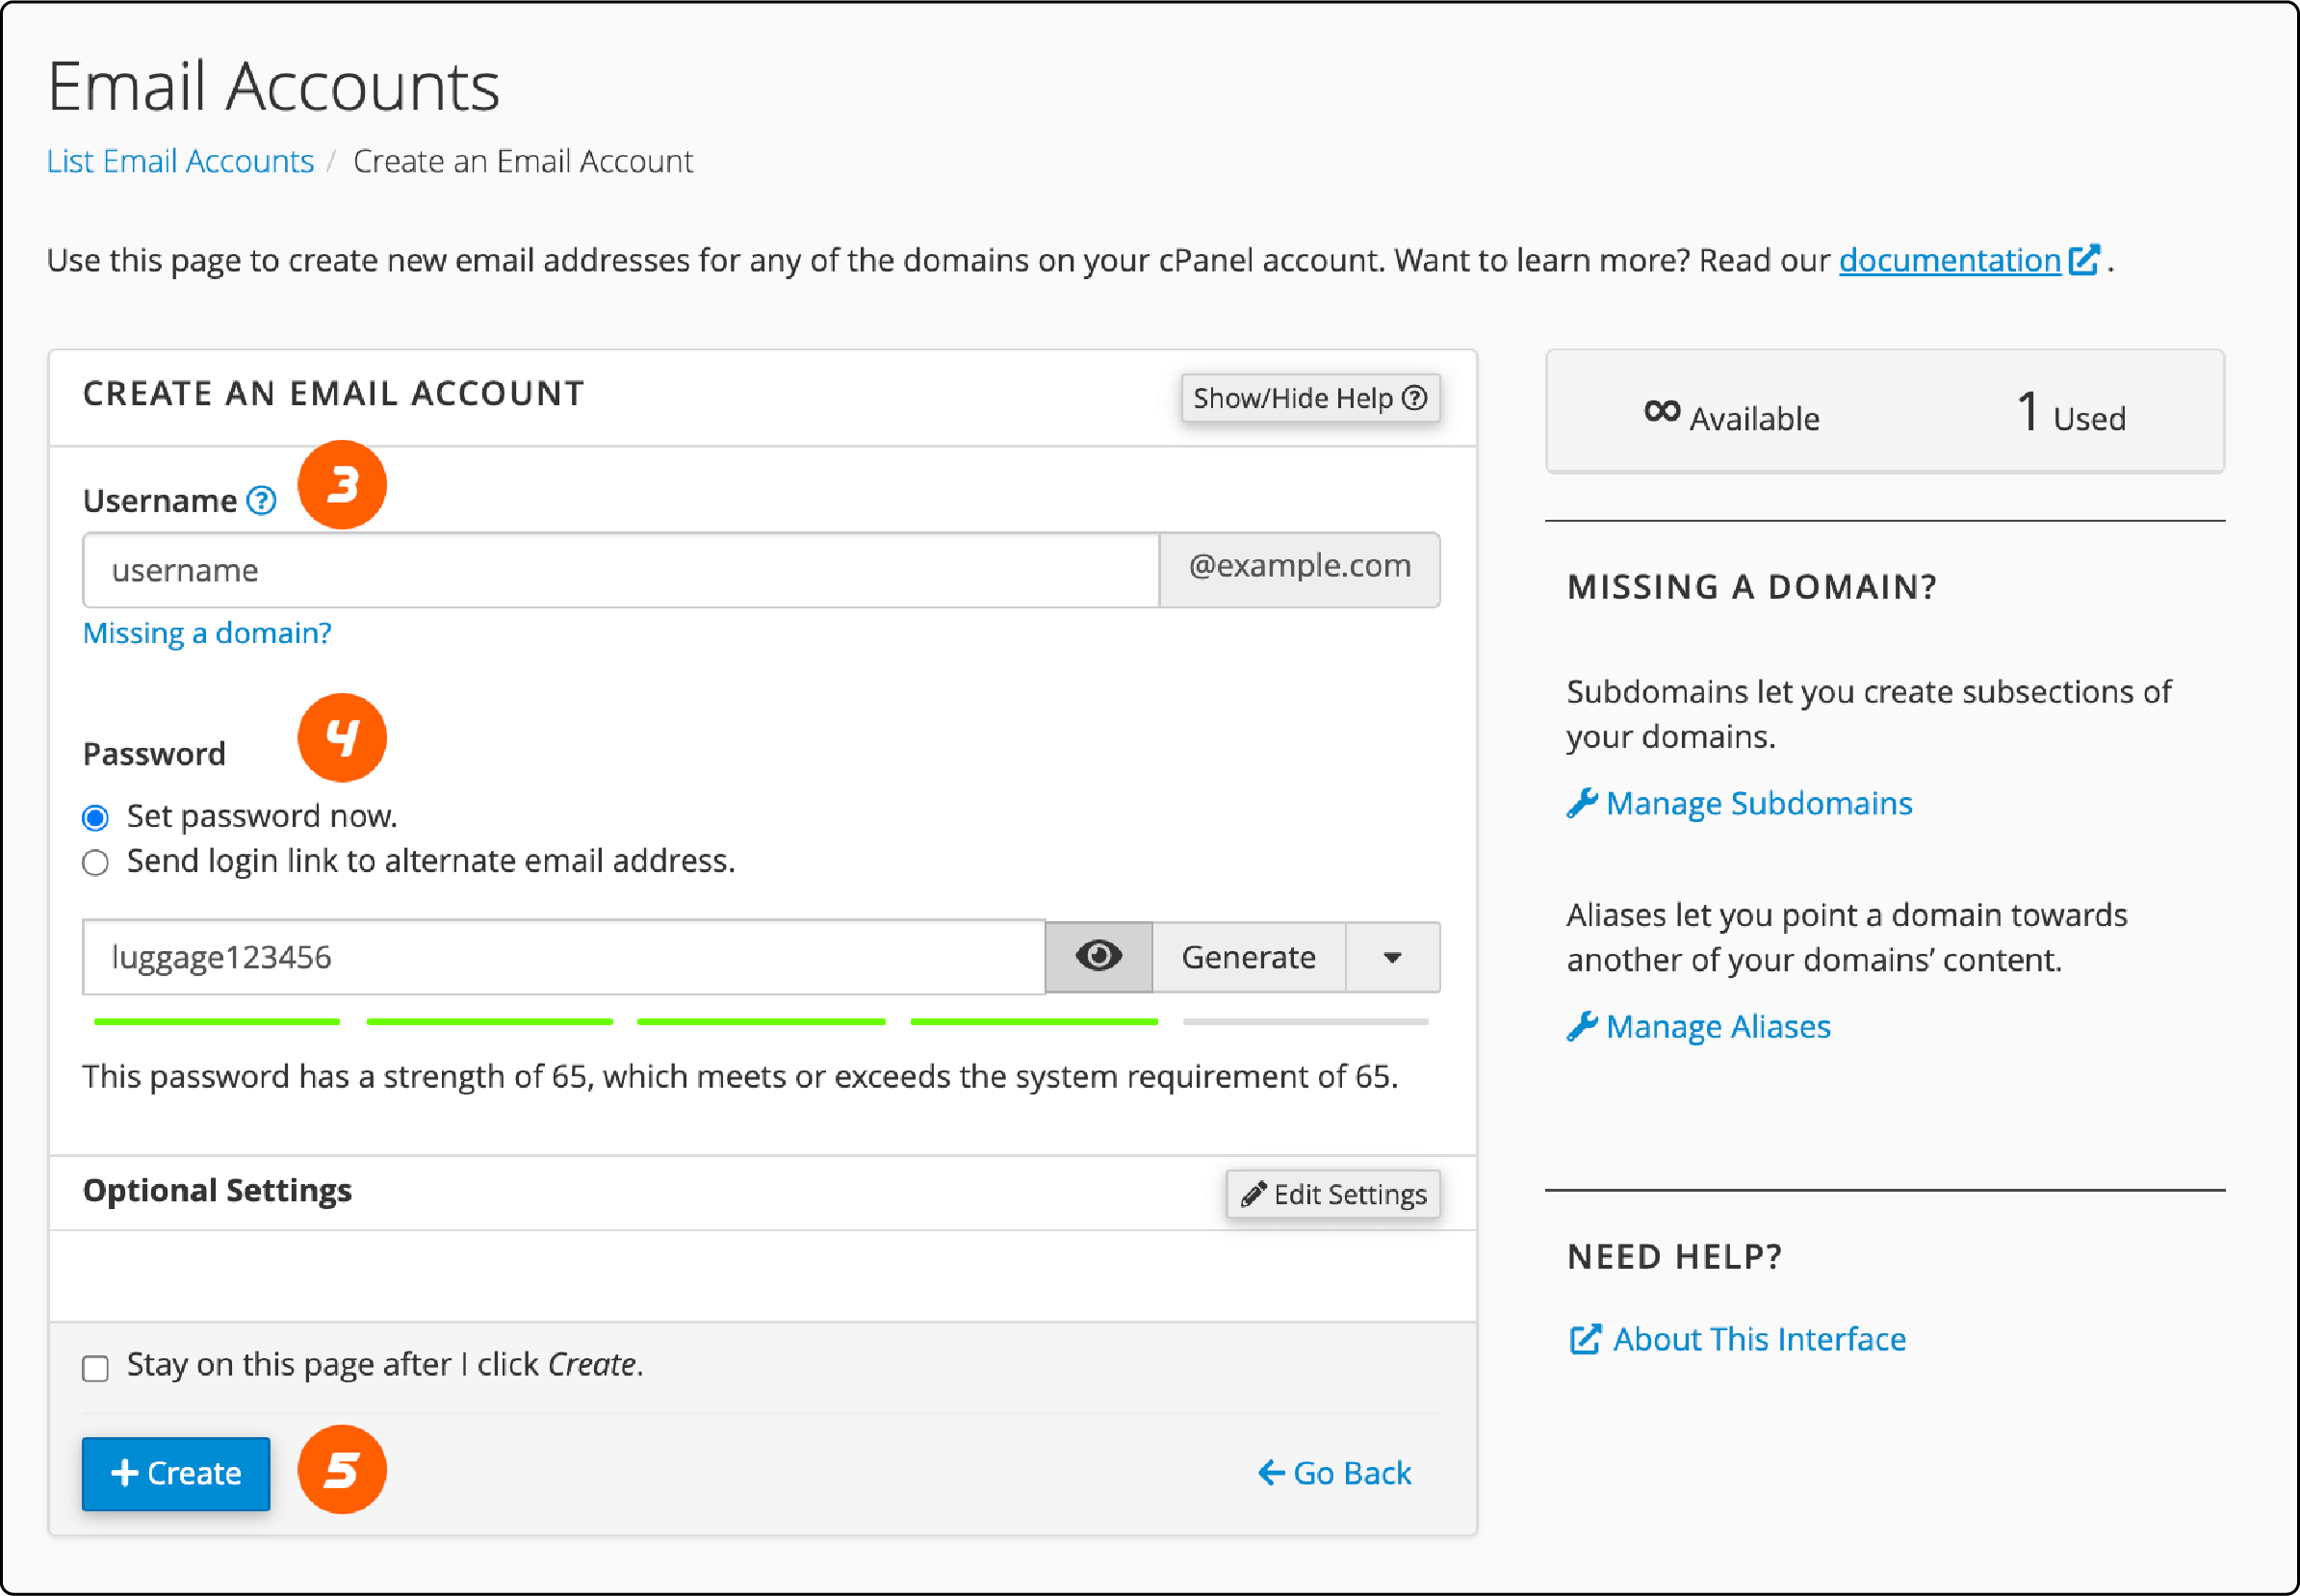
- Re-enter the new password for confirmation.
- Click on Create or Save.
- Allow the setup to process, then verify if your new email is functional.
Step 2: Configure Email Sending System for Magento Stores
Setting up the email-sending system for Magento stores is a straightforward process. Follow these steps:
-
Access your Magento admin panel in the website's backend.
-
Navigate to Stores > Settings > Configuration.
-
On the left-hand side, under General, select Store Email Addresses.

-
Within the General Contact section (used for inquiries, product information, and partnership proposals), make the following adjustments:
-
In General Contact > Sender Name, enter the sender name responsible for all messages sent from this General Contact email.
-
In General Contact > Sender Email, provide the associated email address.
-
-
Repeat the same process for the Sales Representative and Customer Support fields. Note: If you use Custom Email, update the content to reflect the appropriate sender's identity.
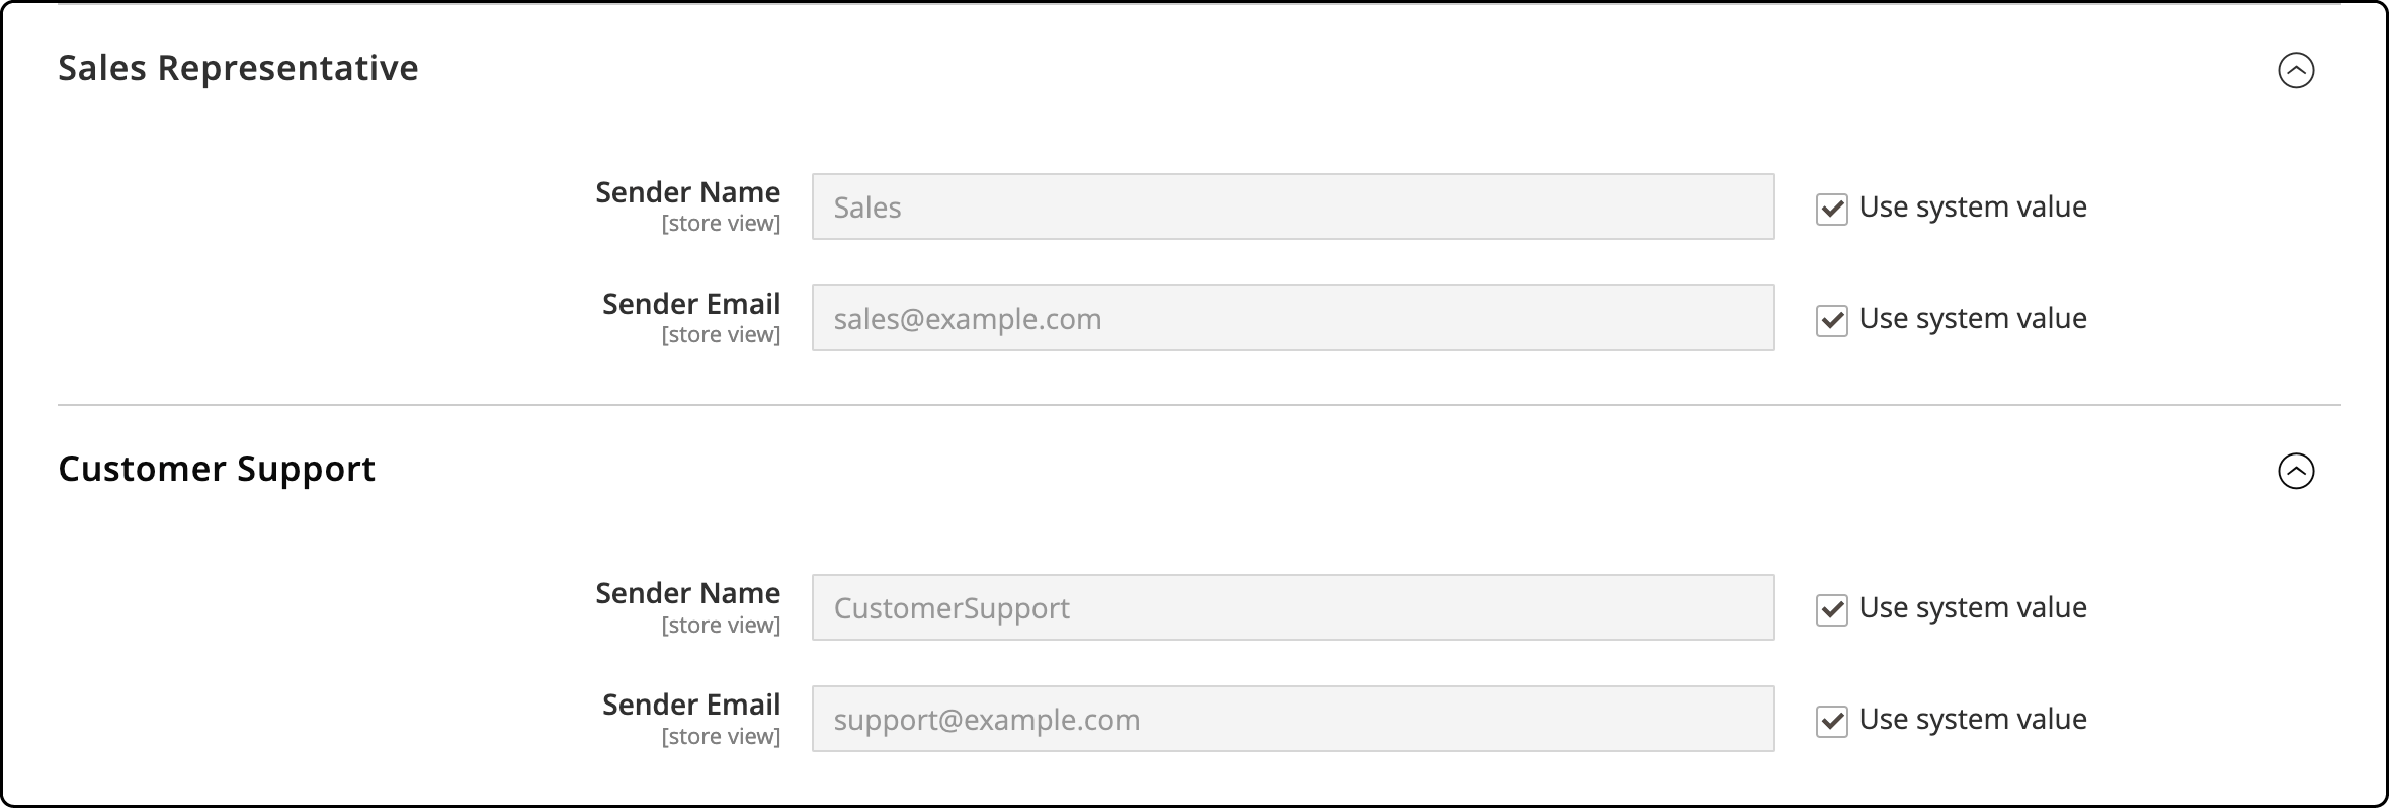
- Finally, click the Save Config button to apply the email settings for your Magento store.
Step 3: Keep your Sales Email Configuration Up-to-date
Updating your sales email setup is important to ensure timely and reliable customer communication. Nobody likes delayed sales emails, especially regarding order confirmations or tracking information. Here, we cover how to maintain a current sales email configuration for your Magento store:
-
First, access the admin panel of your Magento store.
-
Navigate to Sales and select Sales Email. It will take you to the email settings editing page.
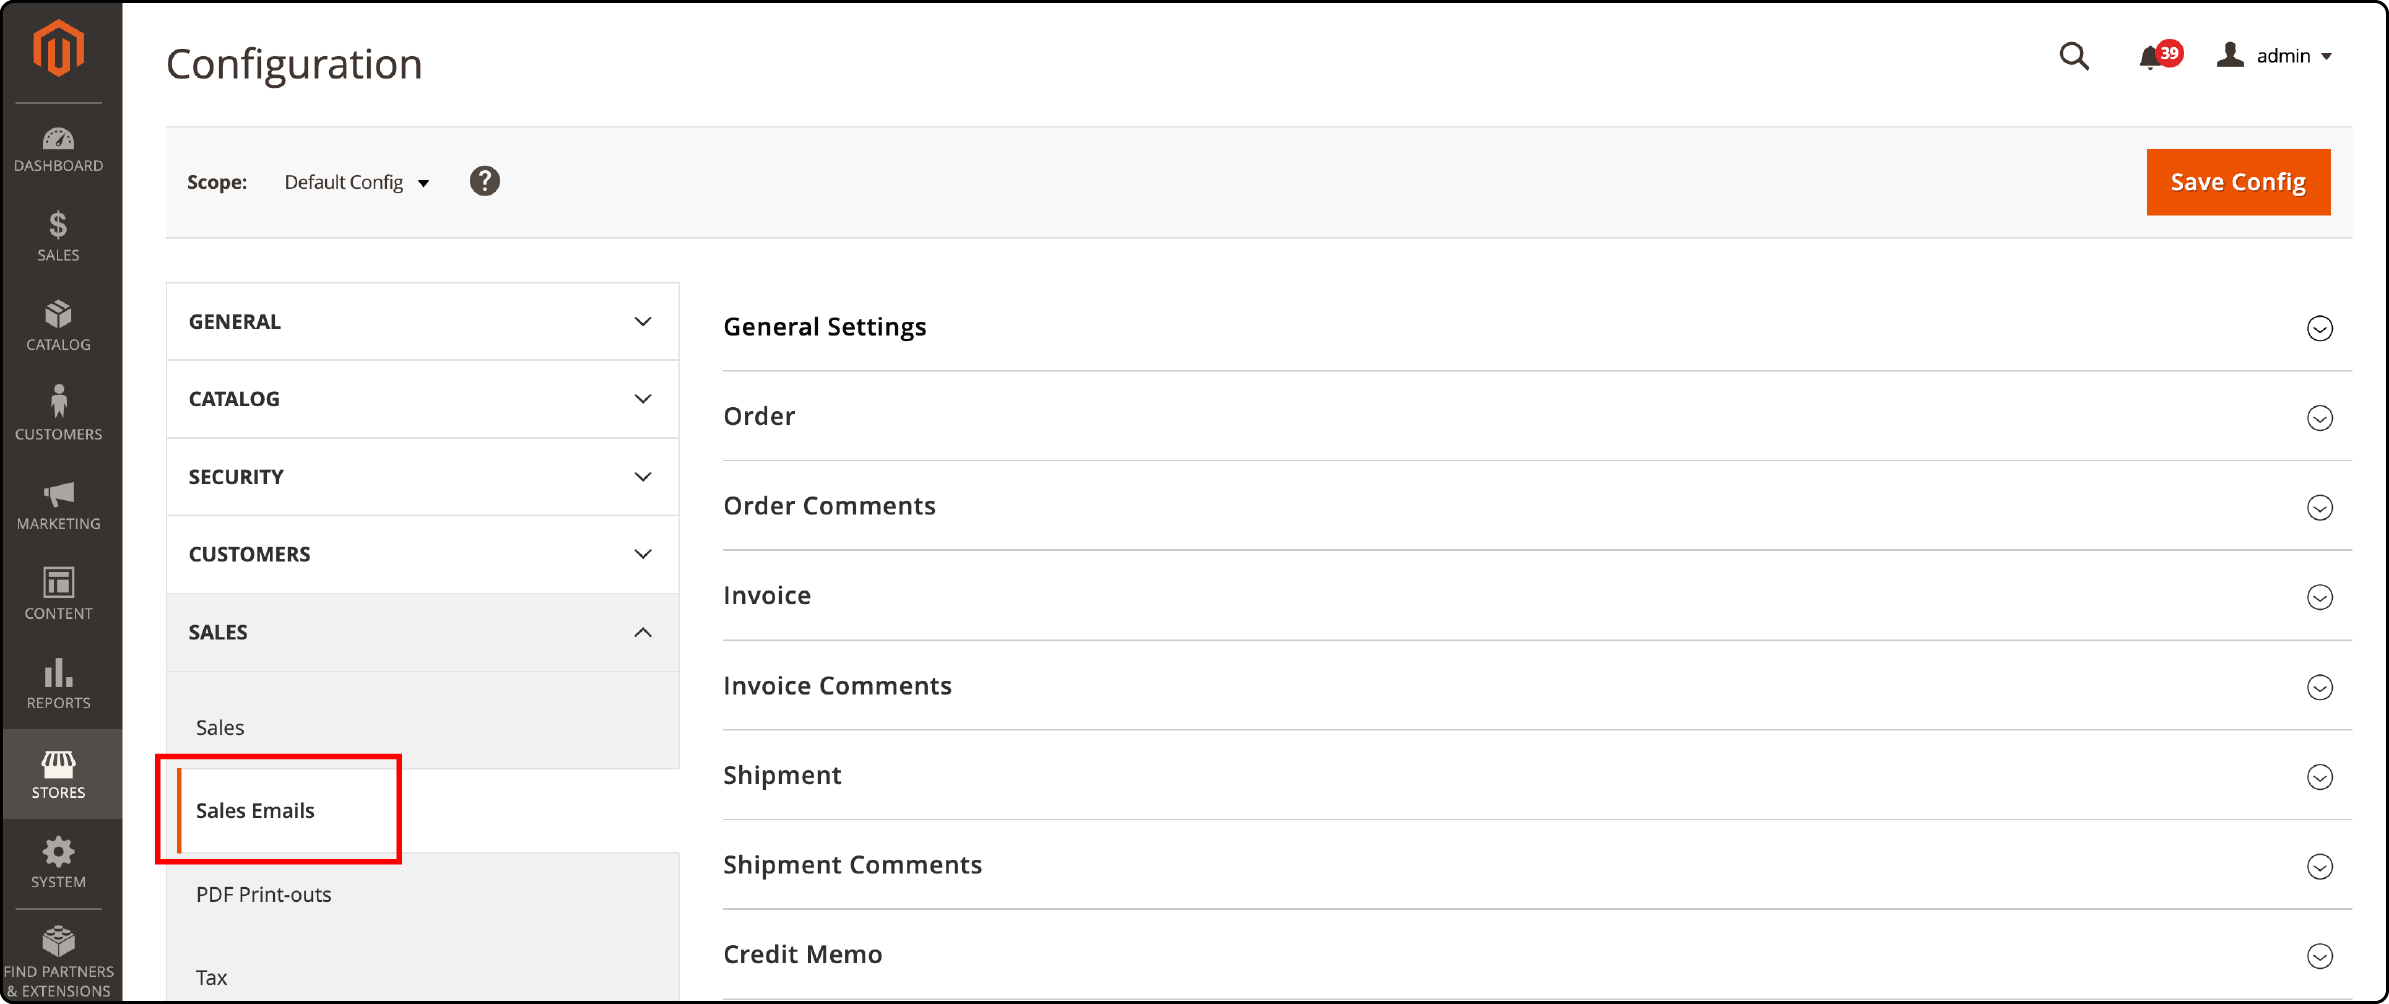
- Select Order and carefully review all the sender information to ensure accuracy.
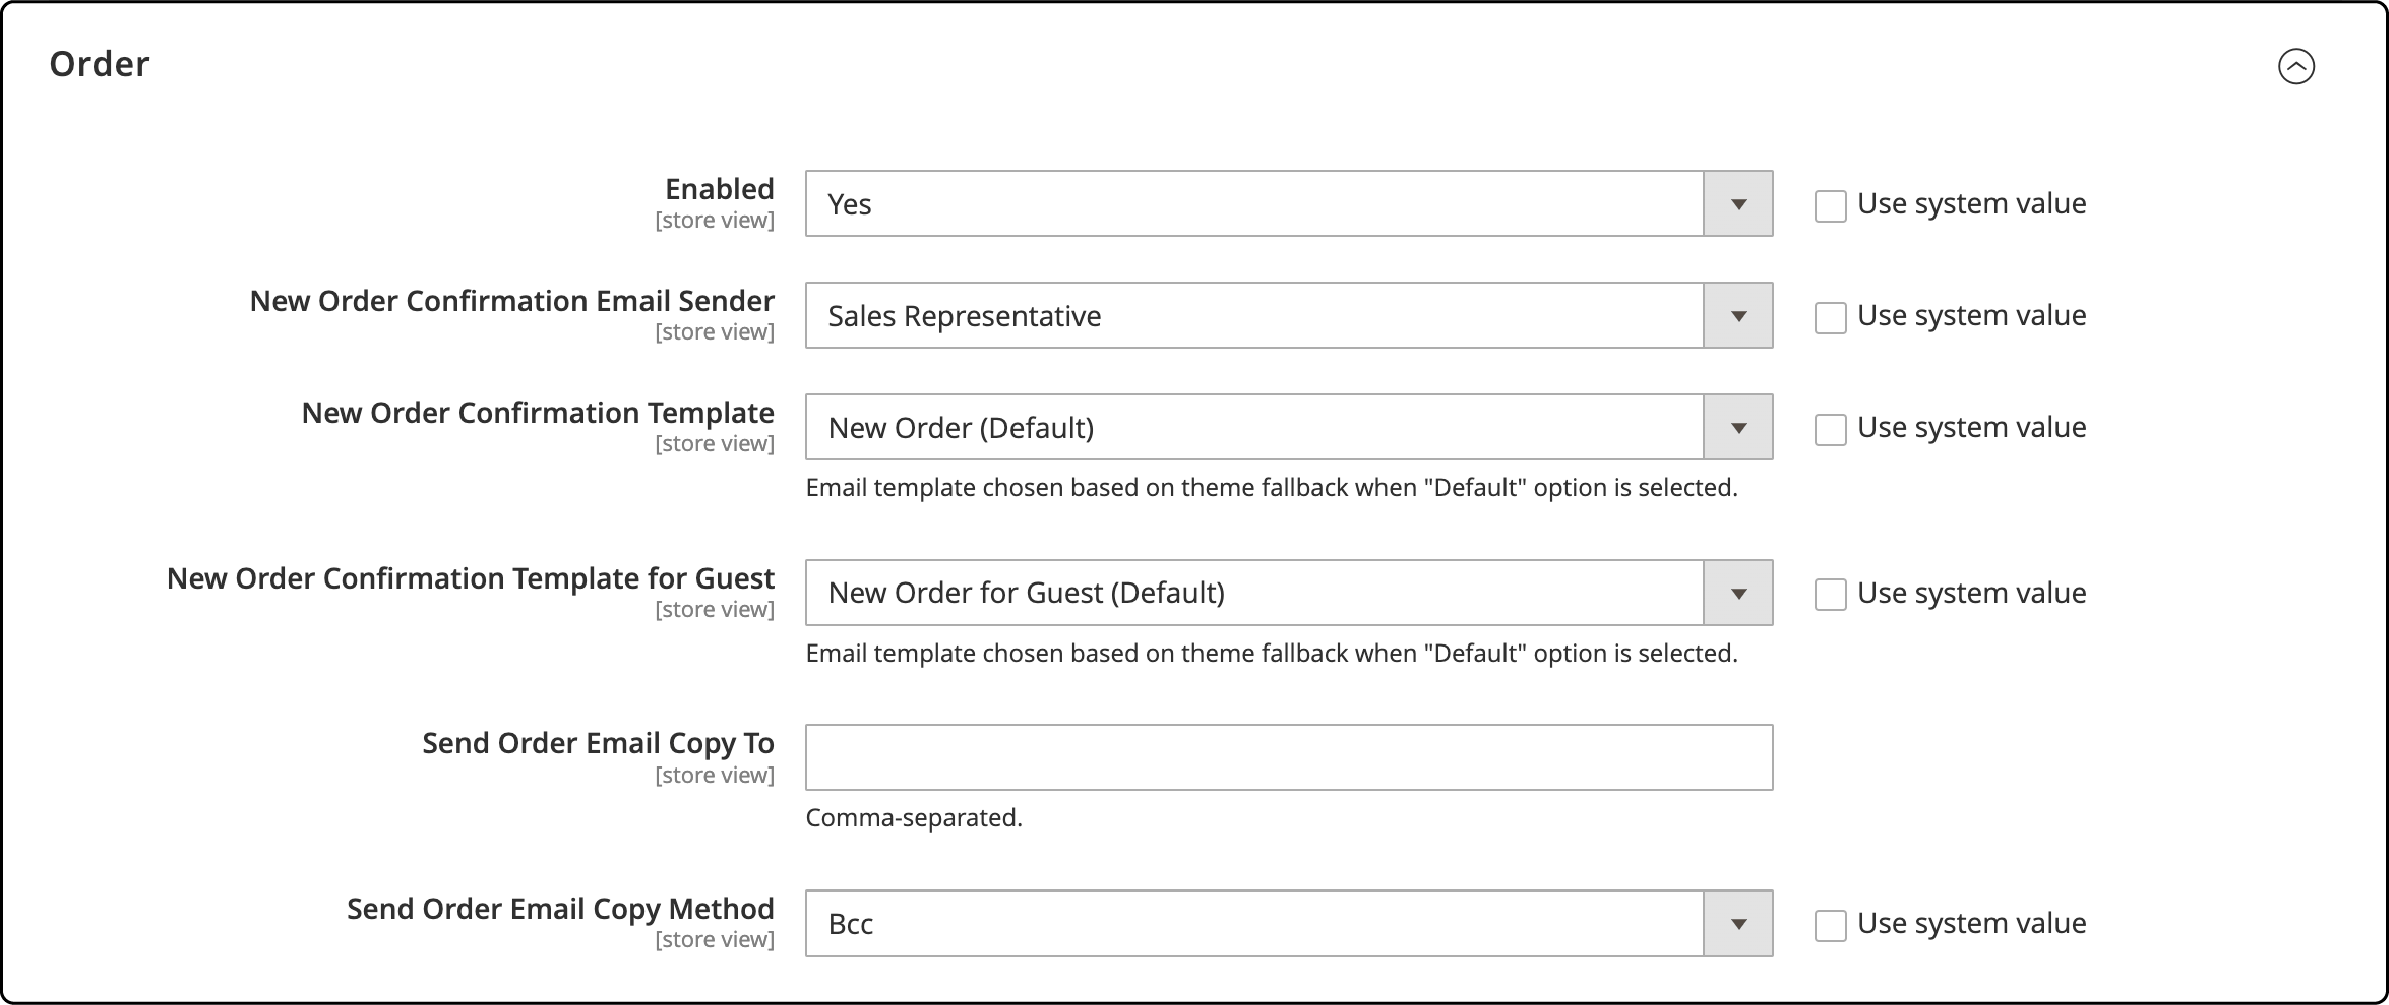
- Once you've reviewed and updated the settings, click the Save Config to apply the changes.
Overview of Magento 2 Email Settings
1. Extension Configuration
Extension configuration empowers you to fine-tune various elements of your email setup. It helps update the sender's email details, configure the SMTP server, manage email logs, and enhance validity through SPF records.
It is highly recommended to configure these settings accurately. It ensures that your customers receive their full order confirmations and other important notifications without any issues.
2. General Settings
You can customize your email setup in the general section of Magento 2 Email Settings. It includes:
- Setting sender information.
- Enabling automatic log clearing.
- Managing blacklisted emails.
You can also access logs for troubleshooting, configure SPF records, and handle email-related cron tasks.
These settings provide flexibility and control over your Magento store's email communication.
3. SMTP Basic Configuration
Configuring SMTP in Magento 2 Email Settings is a simple process. You need to:
-
Go to the Magento admin panel > System > Configuration > Advanced > System > Mail Sending Settings.
-
Enter your SMTP settings, including your SMTP server name and your SMTP port.
-
Locate the file
app/code/core/Mage/core/Model/Email/Template.phpon your local system. -
Enable the module.
-
Open the Template.php file and modify the getMail() function as follows:
php
public function getMail()
{
    if (is_null($this->_mail)) {
        /* Changes Begin */
        $mySmtpHost = Mage::getStoreConfig('system/smtp/host');
        $mySmtpPort = Mage::getStoreConfig('system/smtp/port');
        $config = array(
            'port' => $mySmtpPort,
            'auth' => 'login',
            'username' => 'email@domain.com',
            'password' => 'yourpassword'
        );
        $transport = new Zend_Mail_Transport_Smtp($mySmtpHost, $config);
        Zend_Mail::setDefaultTransport($transport);
        /* Changes End */
        $this->_mail = new Zend_Mail('utf-8');
    }
    return $this->_mail;
}
Choose between using the localhost or a custom SMTP server as your email-sending method. If you opt for a custom server, provide the full hostname, port number, and verification details. Remember to save your configuration before testing the setup with a test email.
This basic configuration ensures reliable and secure email sending from your Magento 2 store via Simple Mail Transfer Protocol (SMTP).
4. Sender Email Update
You can easily update the sender's email by following these steps:
-
Go to Magento 2 admin panel > Stores > Settings > Configuration.
-
Under the General section, open Store Email Addresses.

- Expand the General Contact section.
- You can easily update the sender's email address and name here. (Note: We recommend using an email address that matches your store's domain.)
- Click Save config.
You can improve email acceptance rate and establish customer trust by keeping this information up-to-date.
5. Automatic Log Clearing
Magento 2 Email Settings includes a feature called Automatic Log Clearing. This feature automatically deletes old logs, so you don't have to do it manually. It ensures that your email logs are always up-to-date and prevents them from taking up unnecessary space. It's a convenient feature that saves you time and keeps your Magento 2 email settings running smoothly.
6. Blacklist Emails
Magento 2 Email Settings offers a powerful tool to safeguard your customers from unwanted or suspicious emails. You can easily blacklist specific email addresses to prevent messages from these sources from reaching your customers.
To utilize this feature:
-
Log in to your Magento 2 admin panel.
-
Go to Customers > All customers.
-
Then, select the desired customer and block their IP or email address.

Once you save, your Magento store will effectively block these addresses from sending Magento emails.
7. Debug Log
The debug log in Magento 2 records errors during email sending. It provides detailed error information, aiding in quick troubleshooting and resolution.
Reviewing the debug log can assist you in identifying issues with email settings, SMTP configuration, and related parameters. It ensures that customer communication via email remains smooth and trouble-free. It also helps you stay updated on potential problems, enabling prompt resolution for email functionality.
8. SPF Record Configuration
To ensure successful email delivery and prevent your emails from being marked as spam, configure your SPF (Sender Policy Framework) record. This record is crucial for email and reputation management.
Here's how to configure the SPF record:
-
Access your domain's DNS settings.
-
Add a TXT record with specific information about authorized IP addresses or domains for sending emails on your behalf.
You should seek assistance from your ecommerce hosting provider or IT team for proper SPF record configuration. They can provide the required format and values to include in the TXT record.
Once you have this information, update your DNS settings to ensure smooth email delivery.
9. Cron Tasks List
Cron tasks in Magento 2 automate vital processes, such as sitemap generation, currency rate updates, and email dispatch.
To view your Magento 2 cron job list, access the command line and enter bin/magento cron:install.
This command displays all scheduled tasks on your site, ensuring smooth and error-free operations. Promptly address any issues to maintain optimal website functionality.
How to Set Up Magento 2 Email SMTP Setup
Setting up Magento 2 Email SMTP involves several steps. Here is how:
Step 1: Install the SMTP Extension
To install the SMTP extension in Magento 2, follow these steps:
-
Go to the Magento admin panel.
-
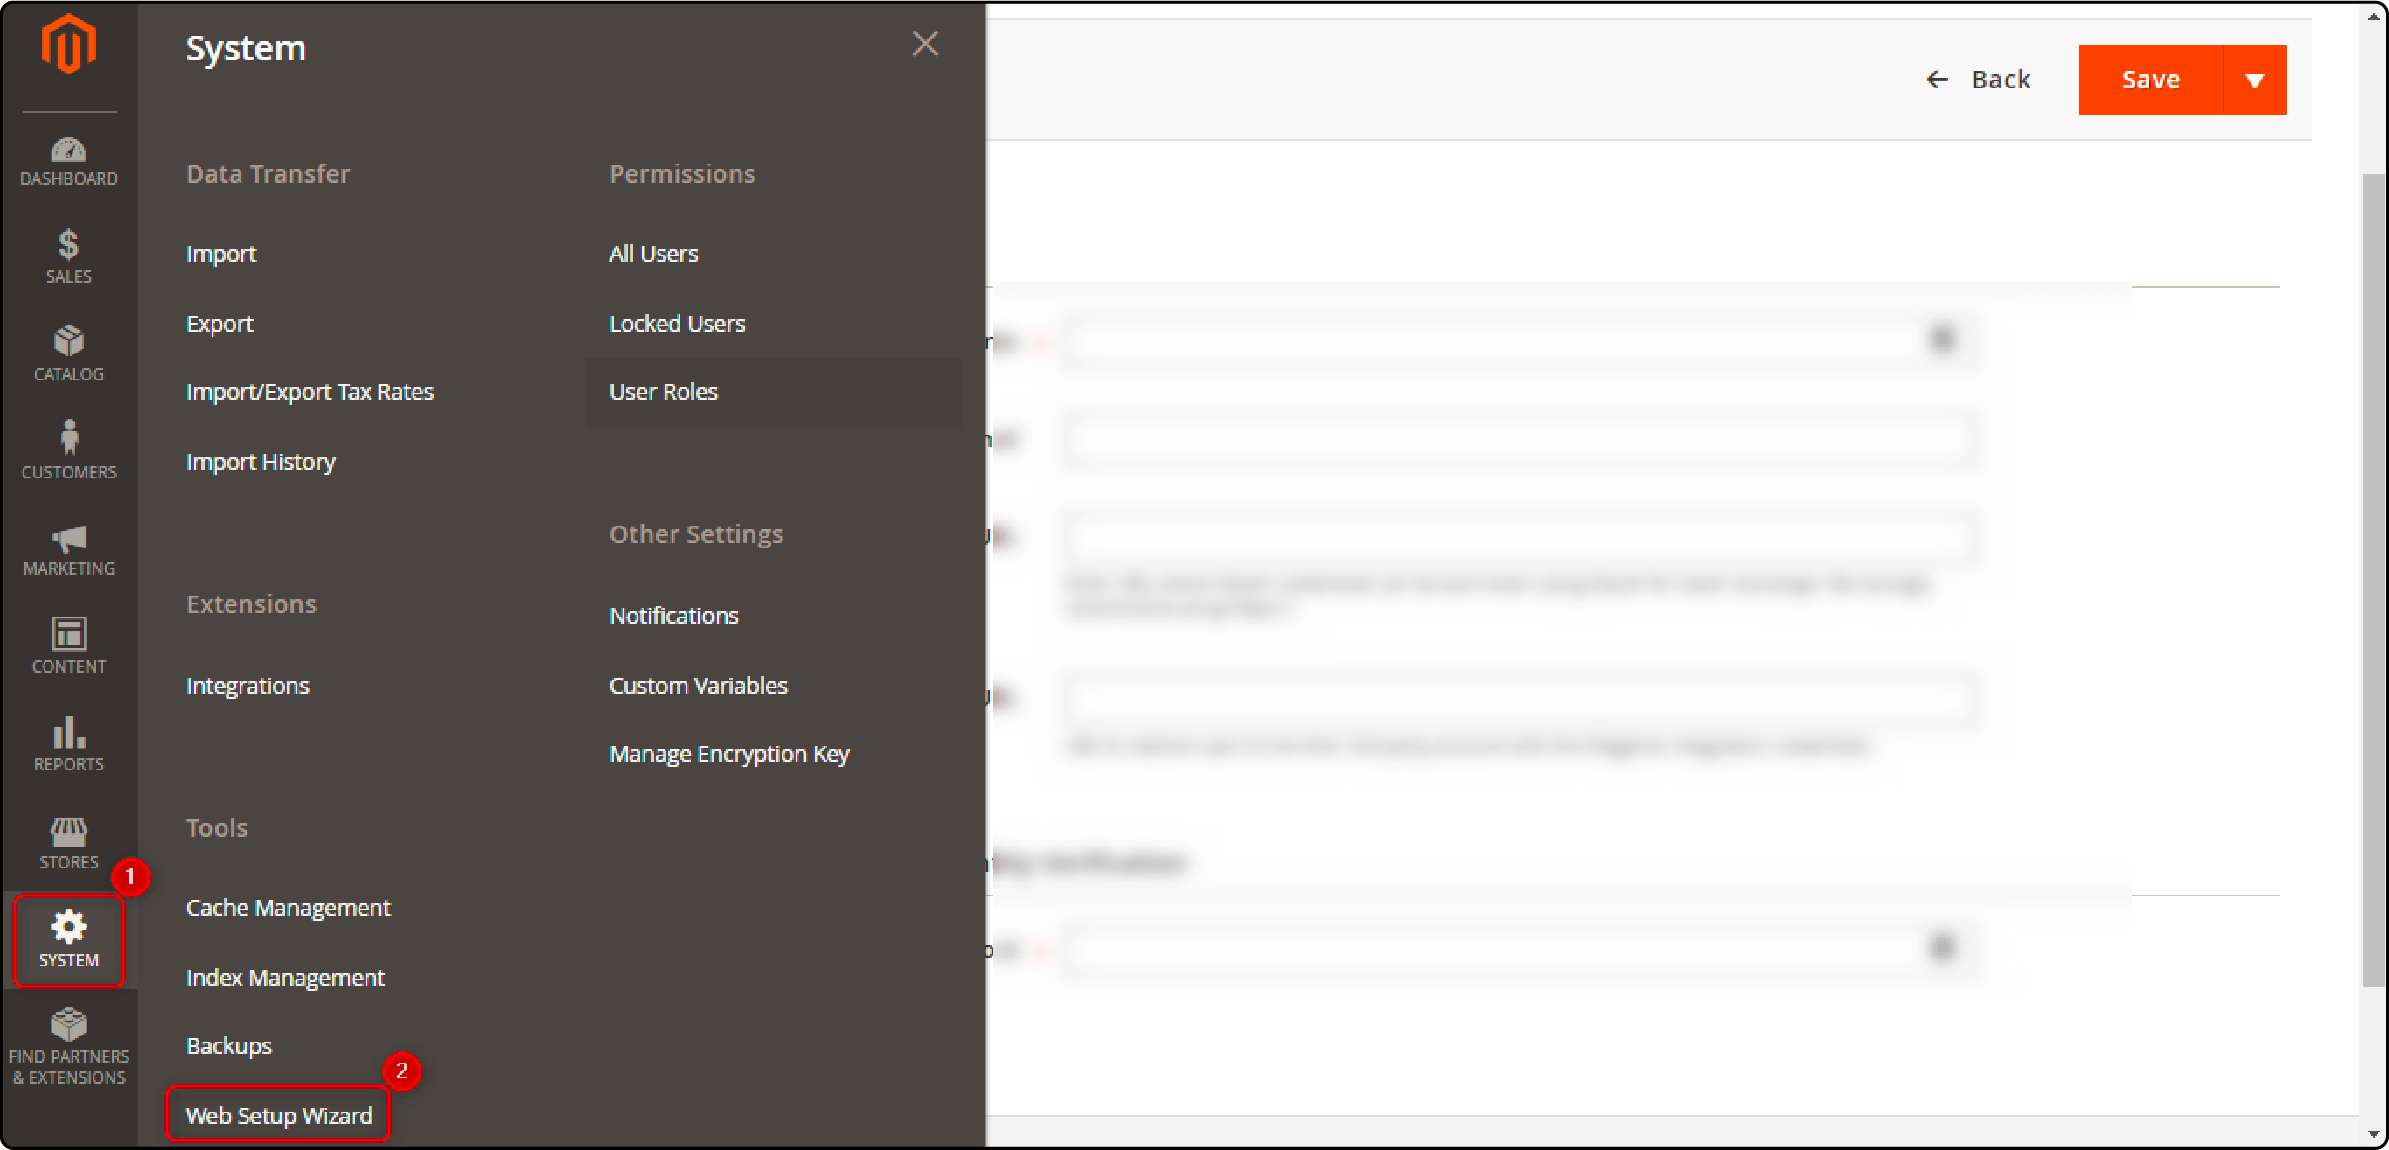
Click System in the left panel, then choose Web Setup Wizard.
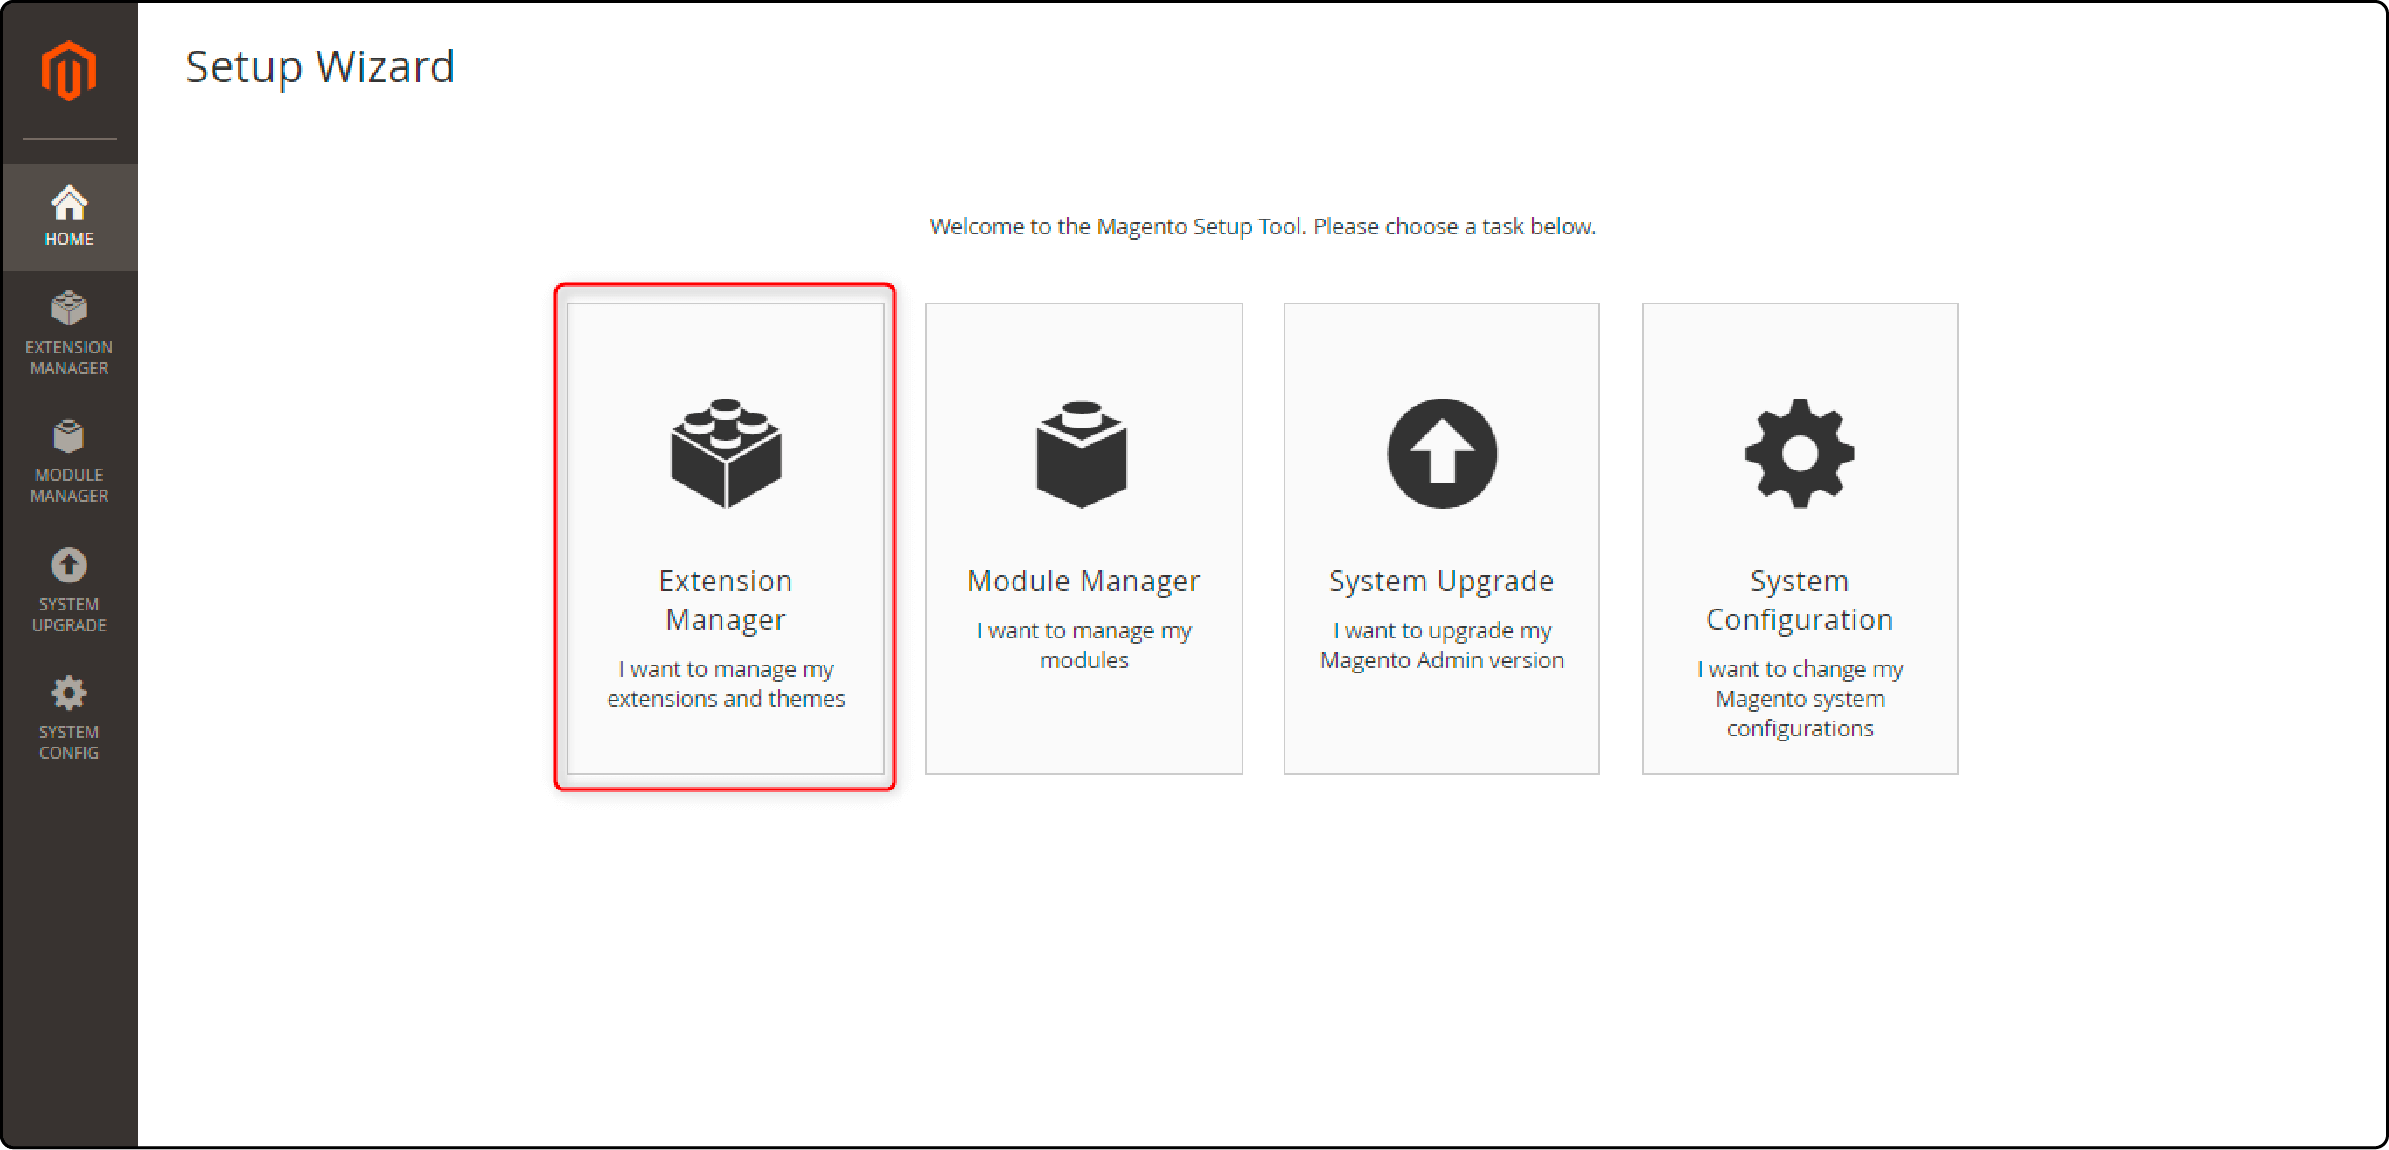
- Select Extension Manager.
- Enter your Magento Marketplace Public and Private keys, then click Submit.
- Click Review and Install.
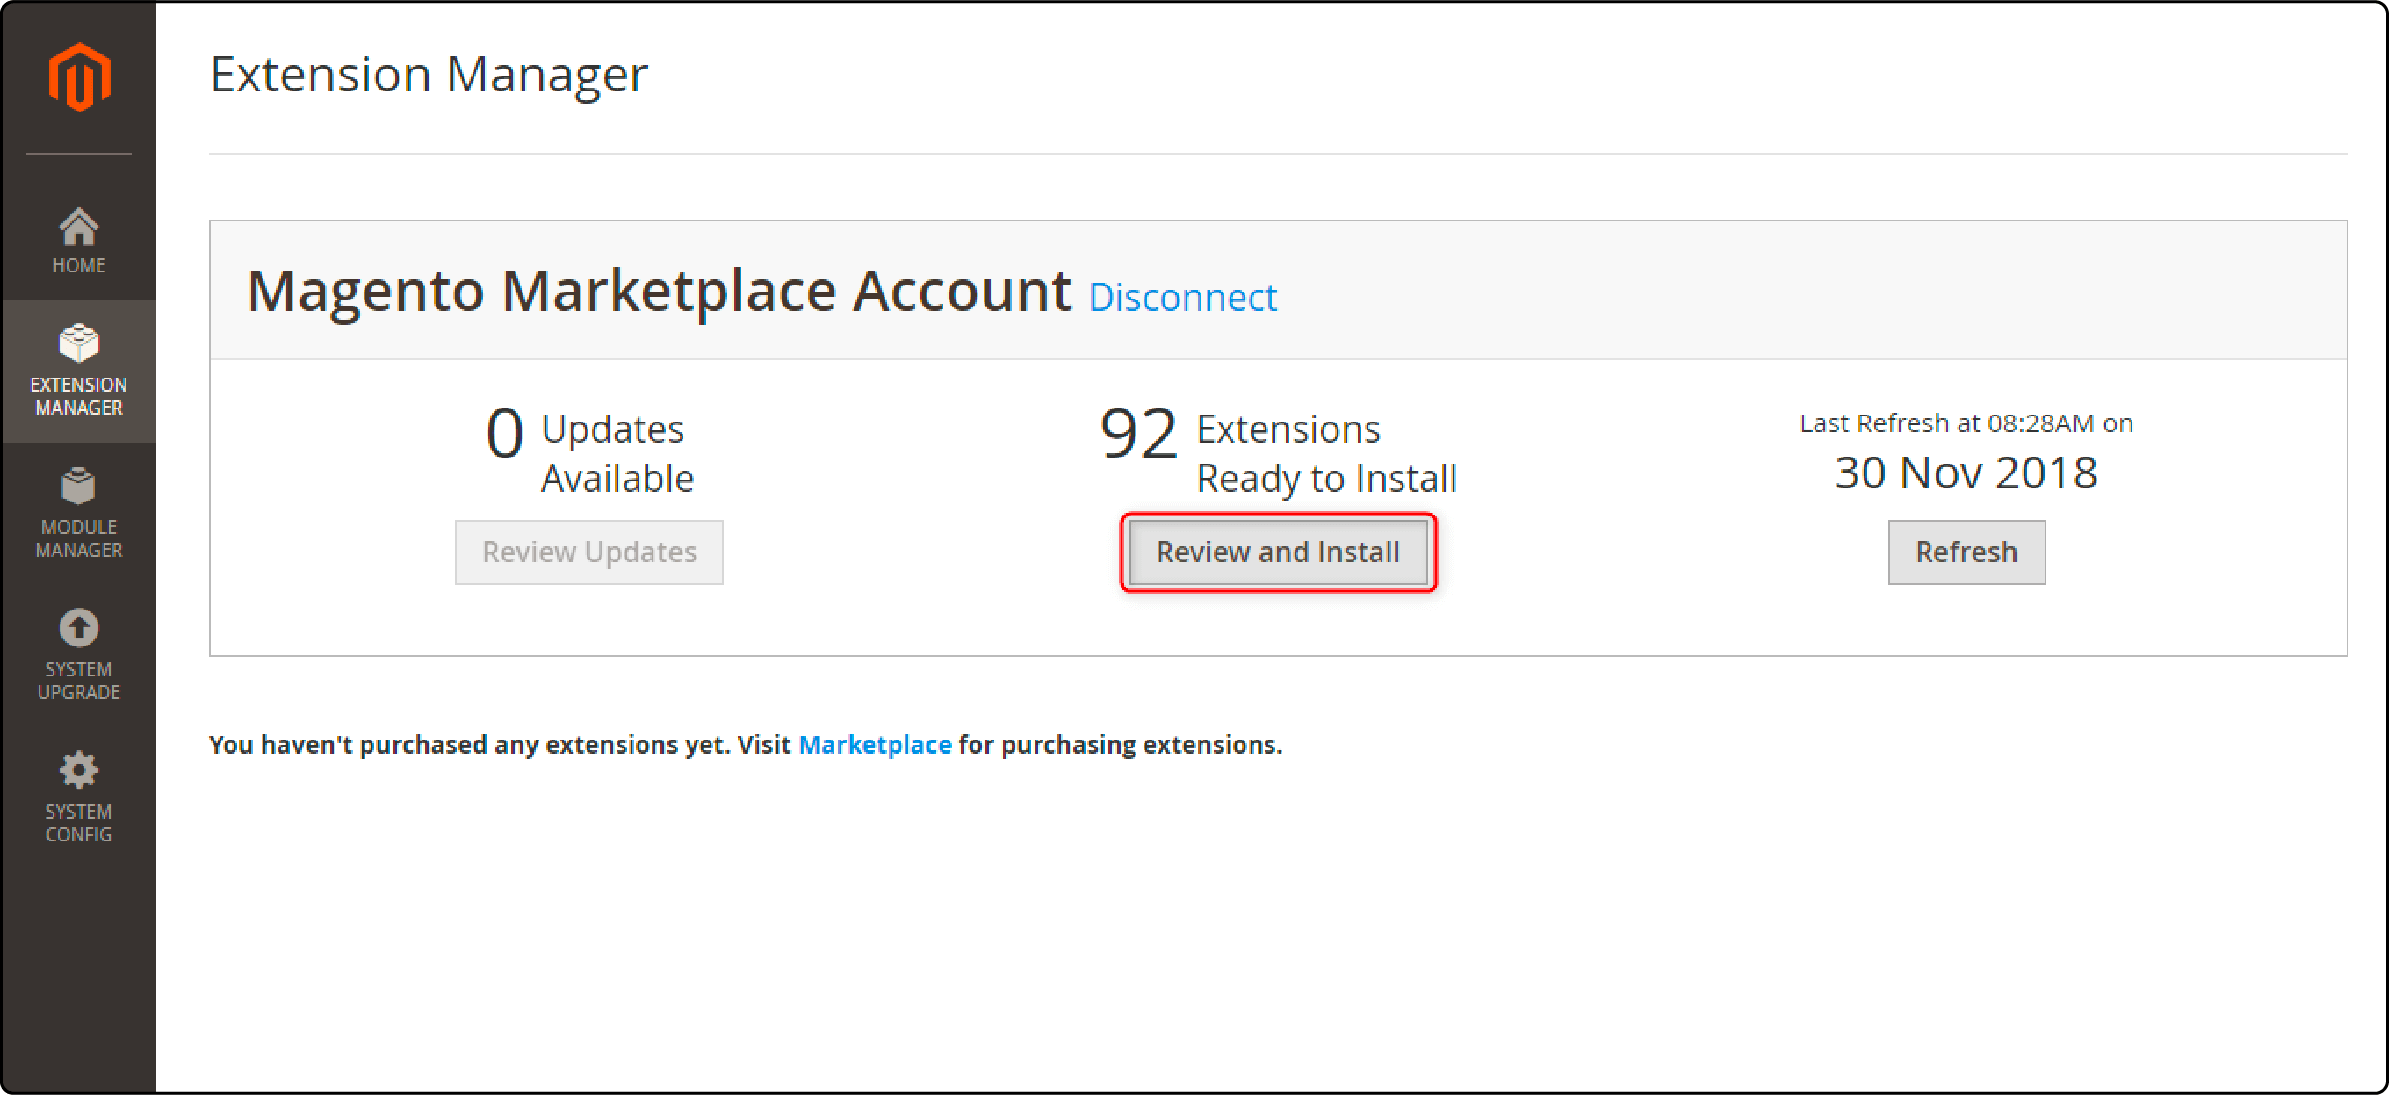
-
In the Extension Manager, search for the SMTP extension and select it.
-
Click Start Readiness Check.
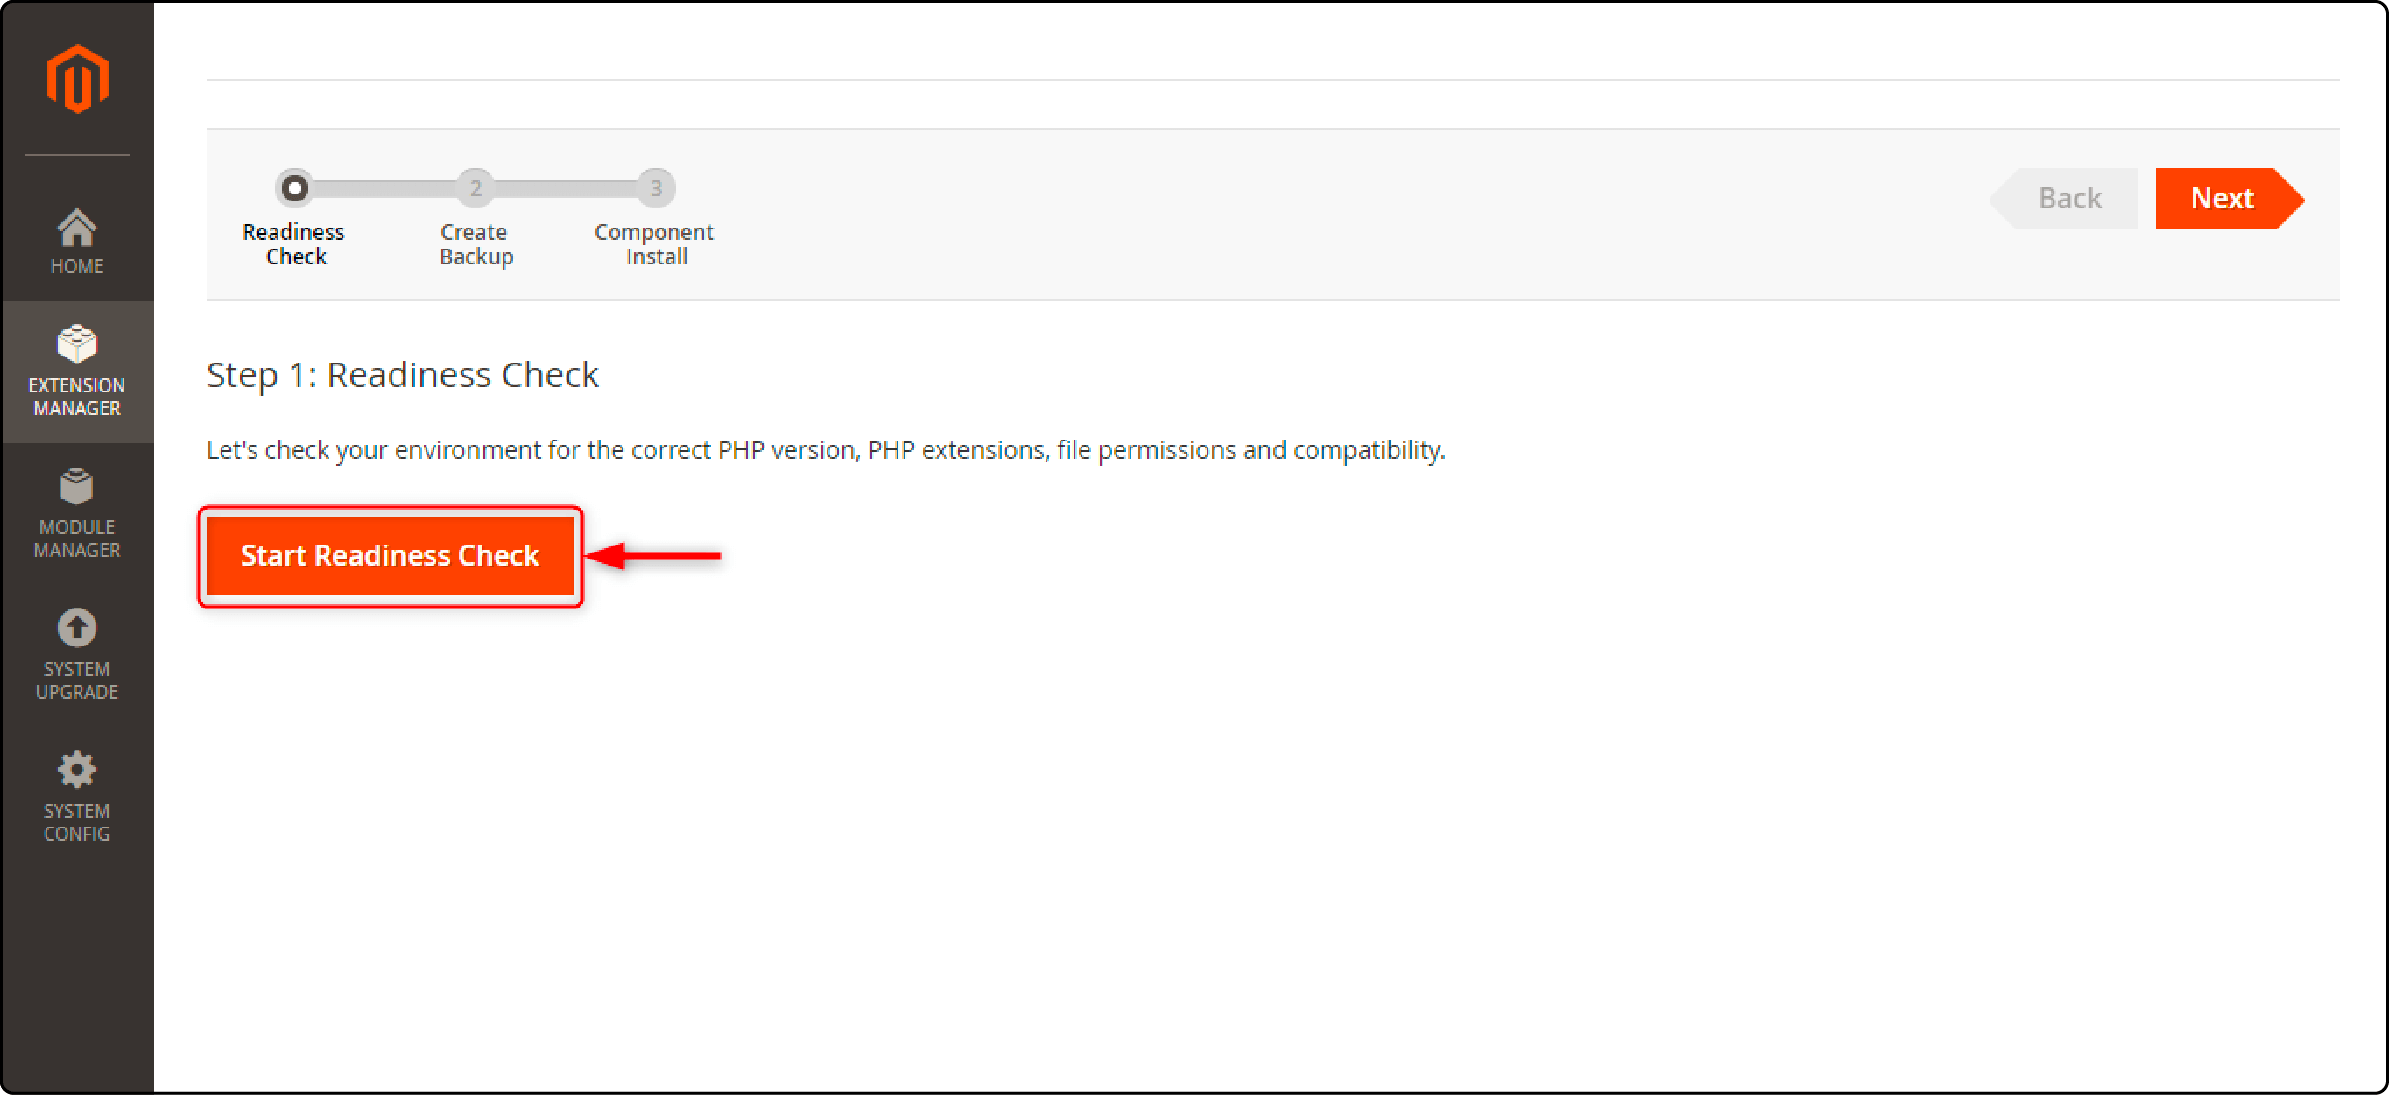
-
The process will take a moment. Click Next to continue.
If you've already taken an on-demand backup on your server, you can skip the backup step safely. Uncheck all three backup options.
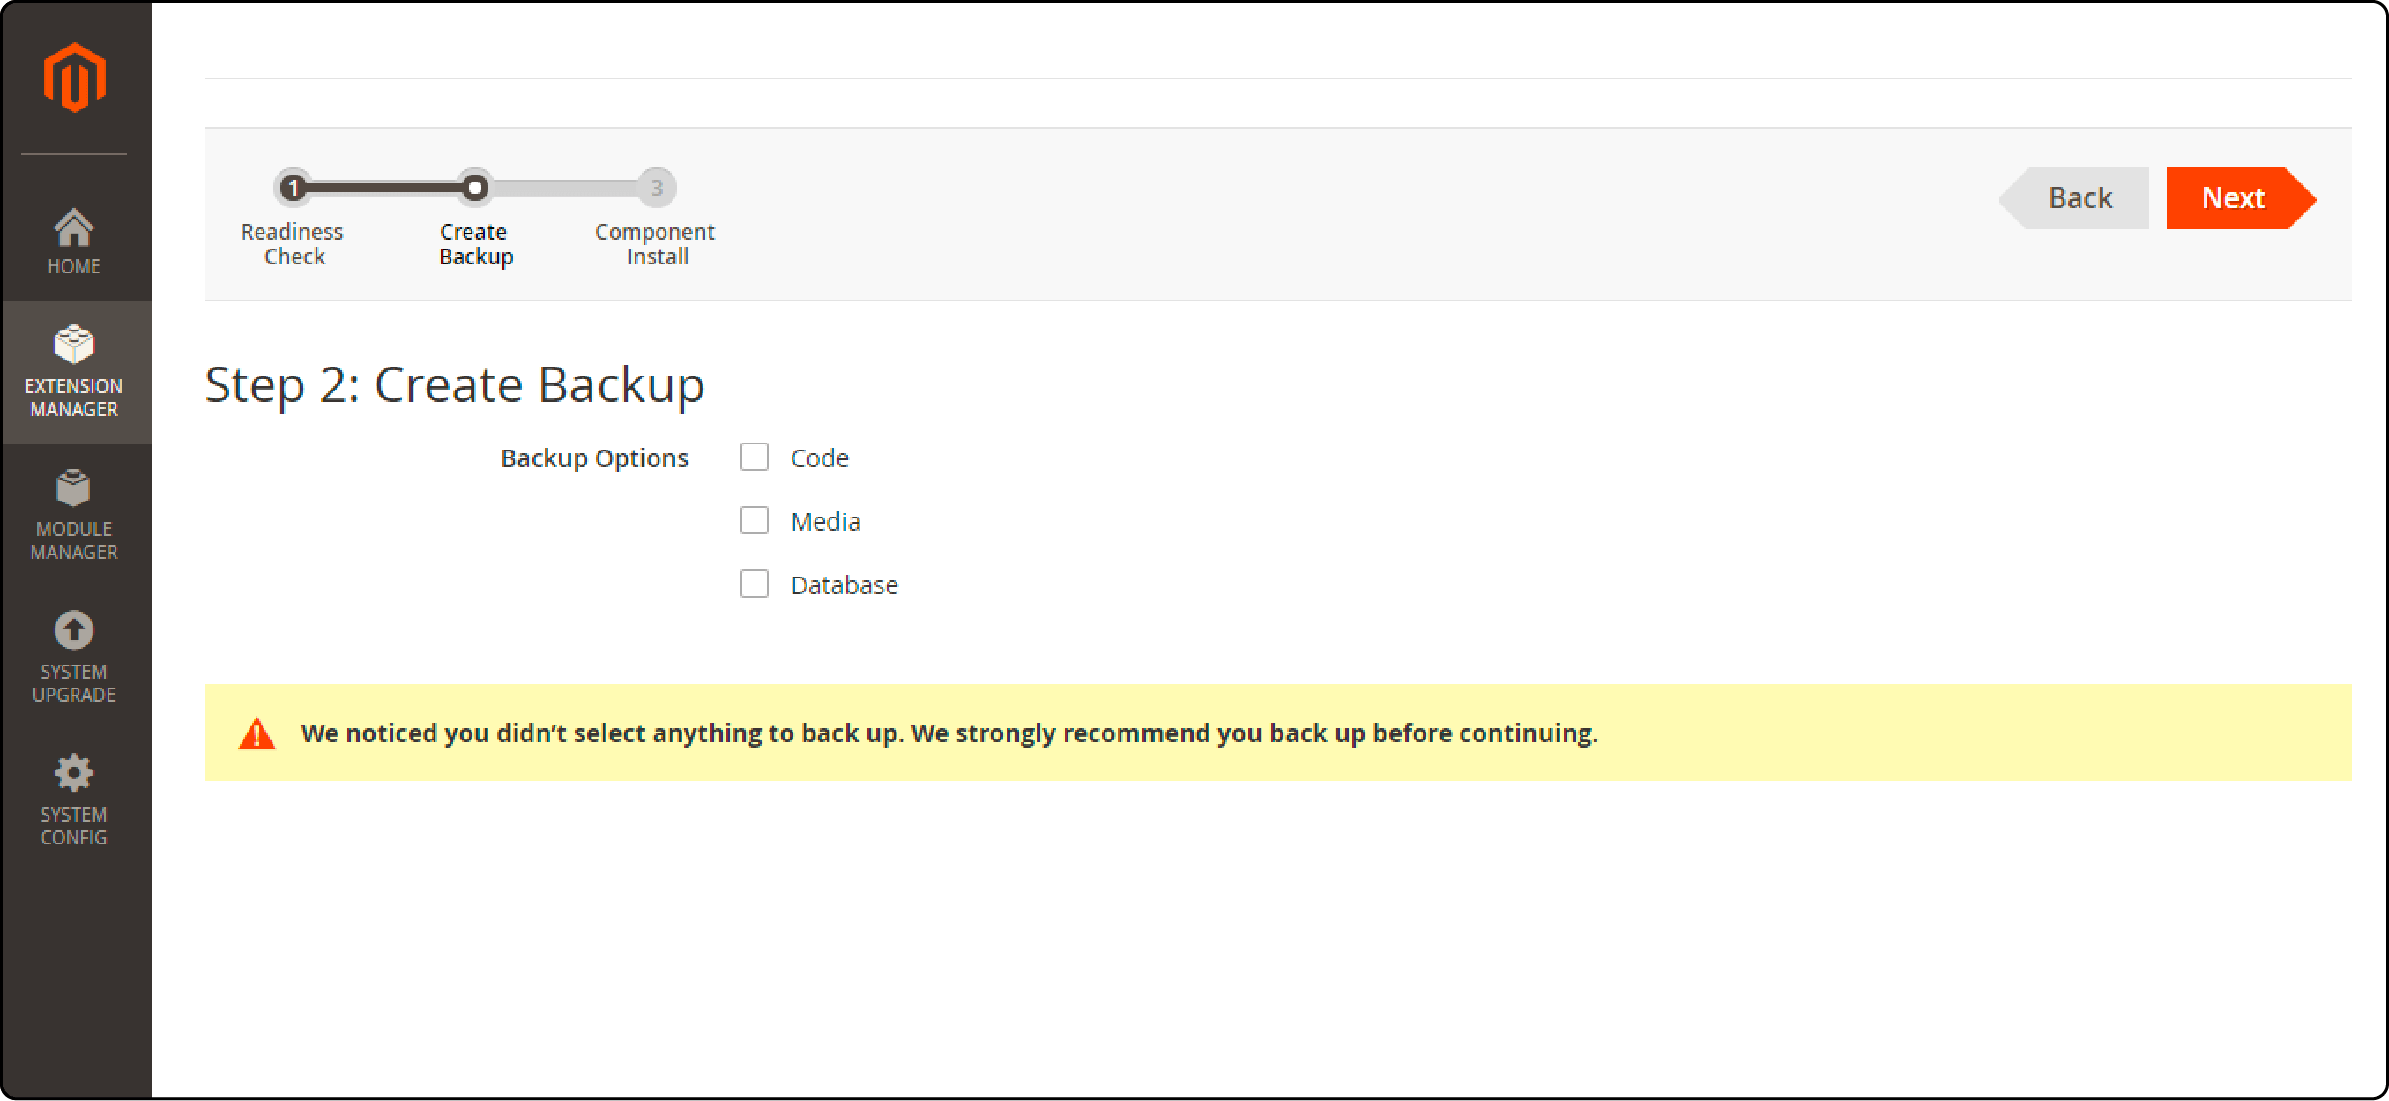
- Click Install to begin the process.
Step 2: Select your Desired SMTP Provider
-
Start by selecting a reliable SMTP provider for Magento 2. Options include Gmail, SendGrid, and Mailgun. Prioritize providers with excellent delivery rates and robust security measures.
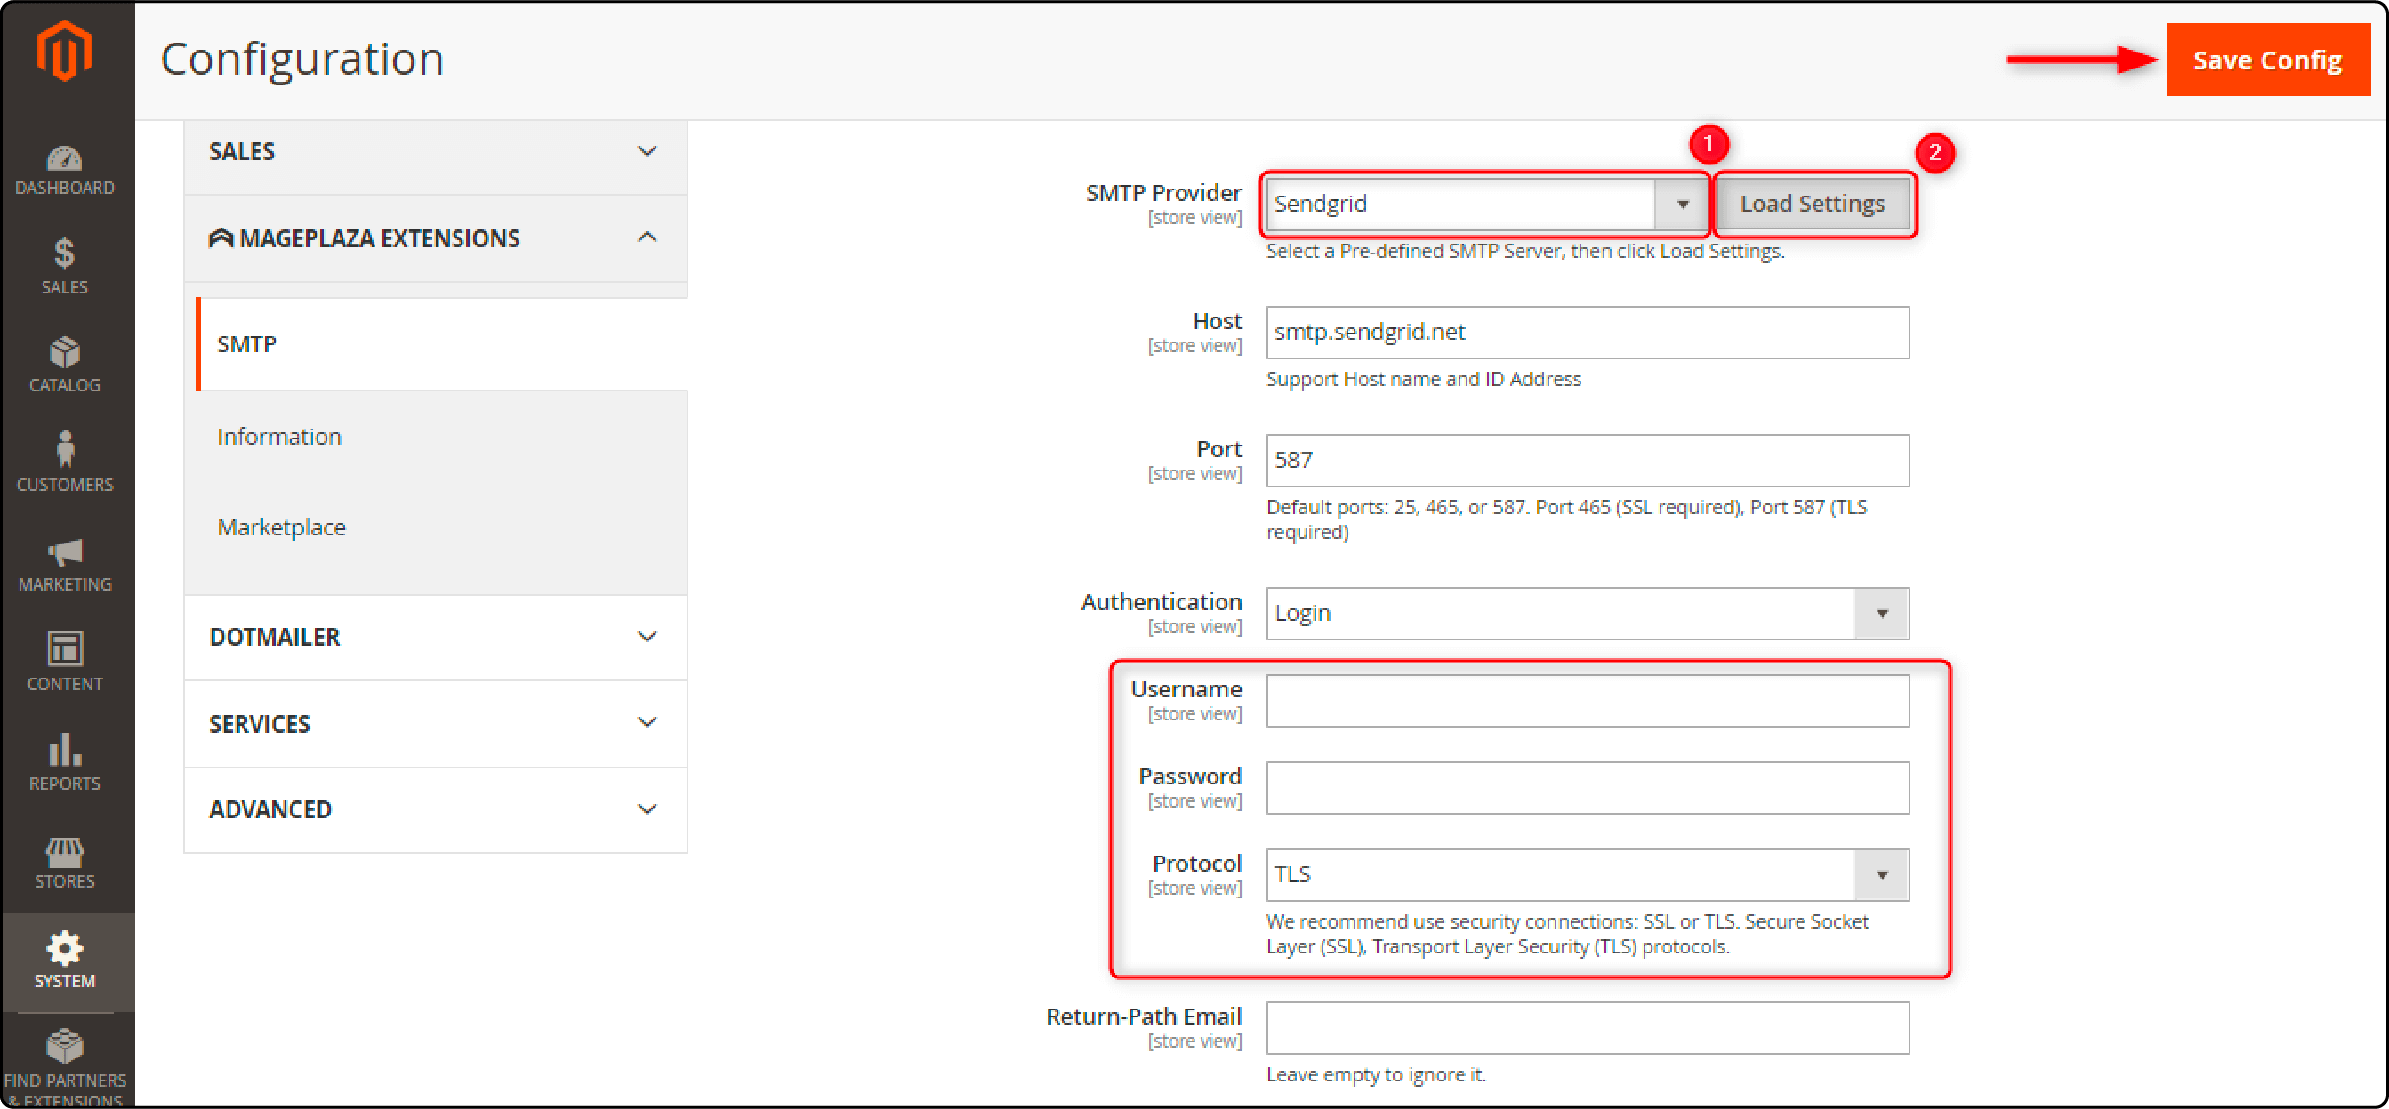
-
In the SMTP Provider dropdown menu, pick your preferred provider.
-
Click the Load Settings button.
-
Enter the username and password provided by your selected email service provider.
-
Click the Save Config button.
-
You will receive a confirmation message: "You saved the configuration."
Consider factors like pricing, customer support, and ease of integration with Magento 2.
Step 5: Verify SMTP Settings
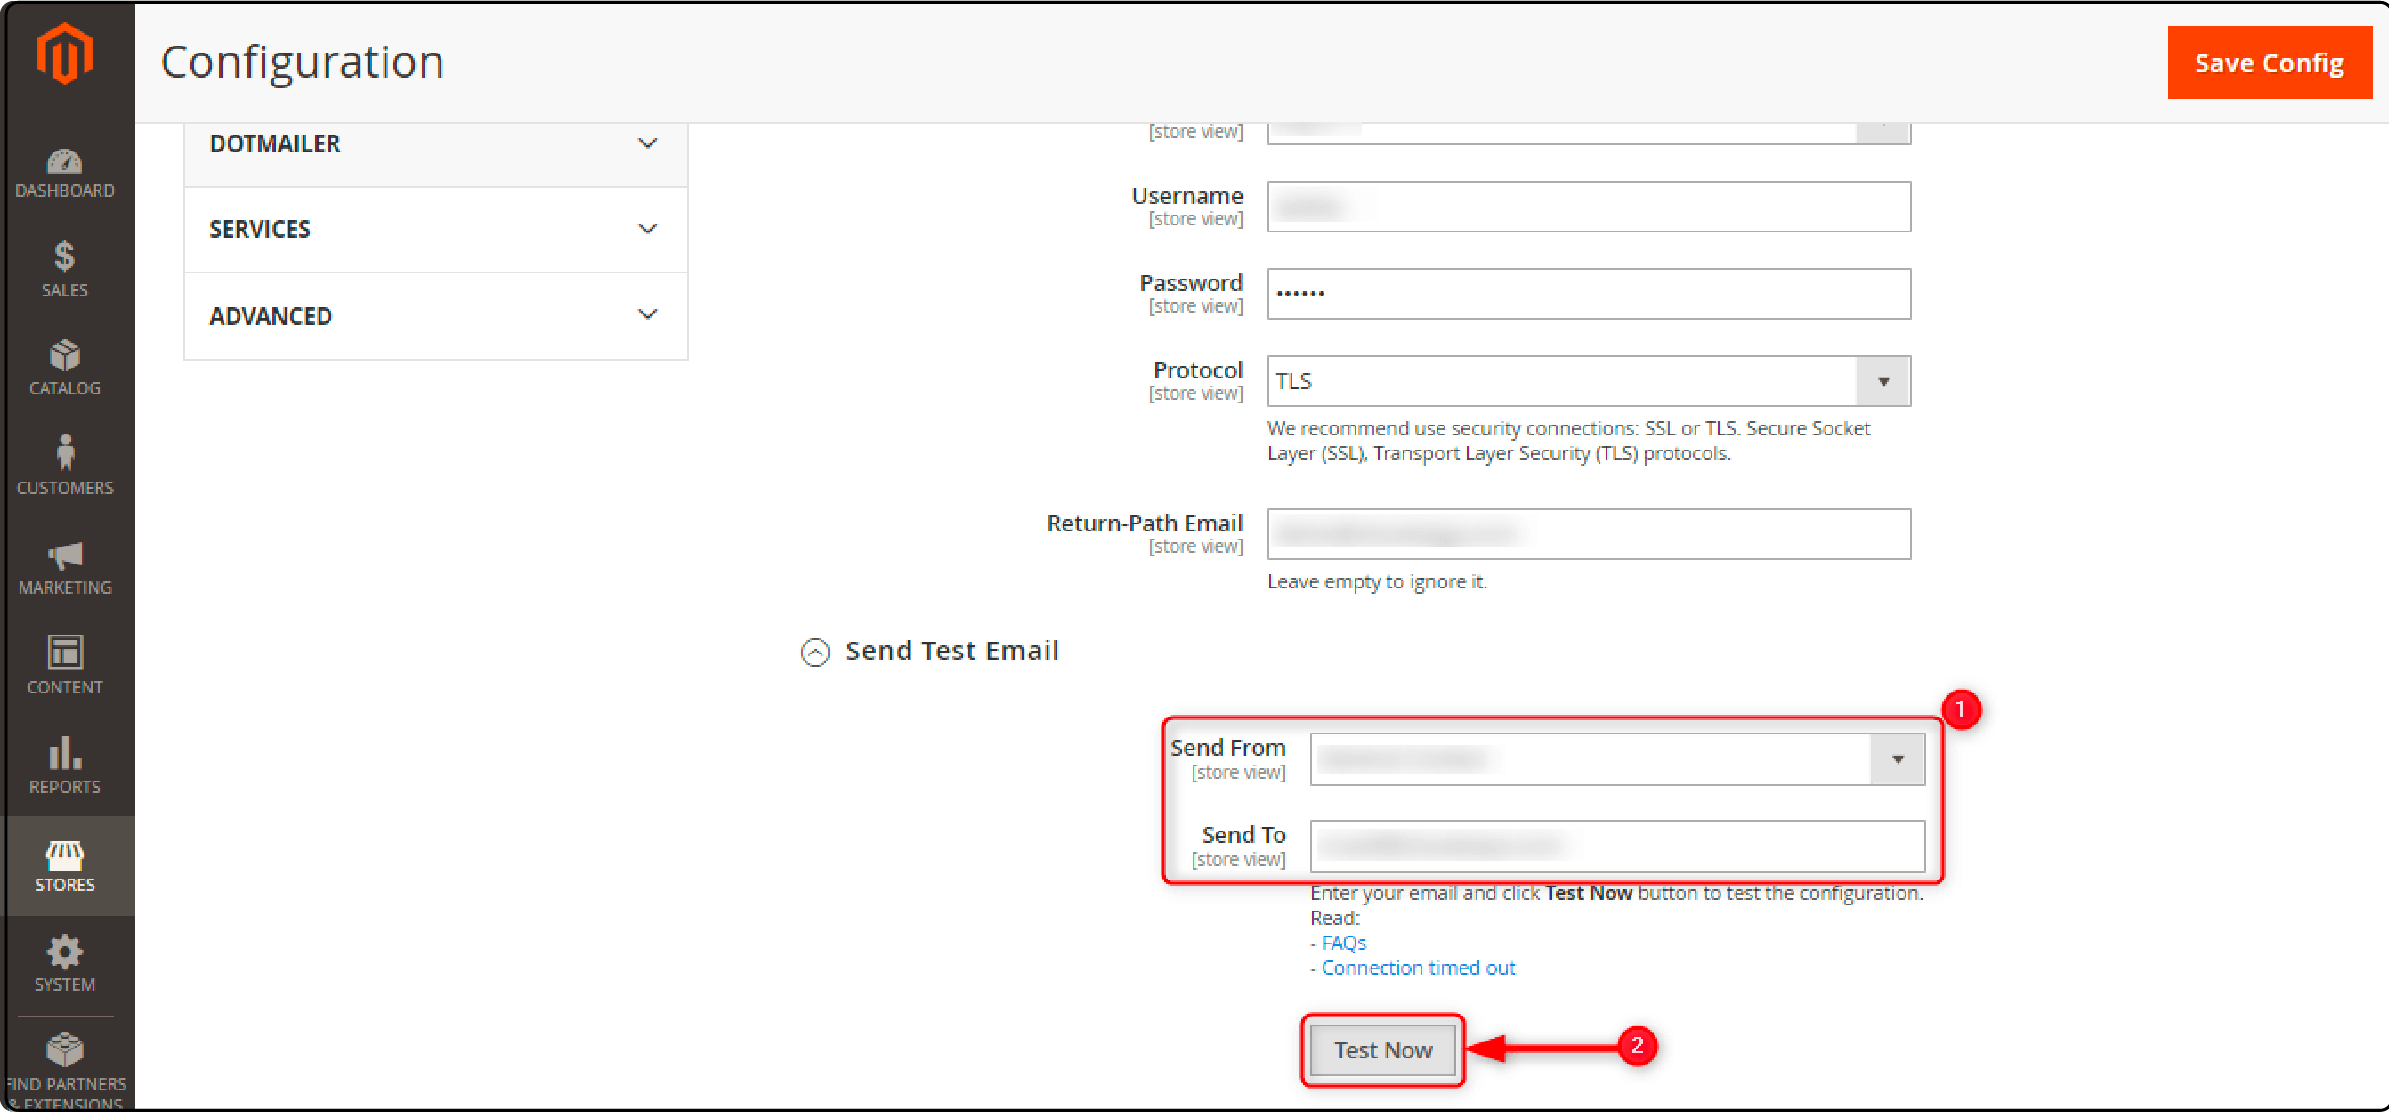
To ensure your SMTP settings in Magento 2 are working properly, you need to test them. Here are the steps:
-
Go to the SMTP section in the Extension's submenu.
-
Choose Send Email Test from the dropdown.
-
Enter the recipient's email address.
-
Click Test Now to send a test email.
-
Check your inbox for the test email confirmation.
FAQs
1. What are Magento 2 SMTP settings?
Magento 2 SMTP settings, found in the store settings configuration, enable you to connect with reliable SMTP servers. These servers facilitate the sending of emails from your Magento extension.
2. What is an SMTP server?
An SMTP server stands for Simple Mail Transfer Protocol server. It is a specialized computer responsible for sending, receiving, and relaying email messages across the Internet.
3. How do I set up the email sender on my Magento 2 store?
Follow these steps to set up an email sender on your Magento 2 store. First, click Store Email Addresses under mail sending settings. Then, you can add your Gmail account or other SMTP providers within the default Magento system.
4. Can I use a third-party extension for my Magento 2 SMTP service?
Yes, You can use a third-party extension like the Magento 2 SMTP extension to improve your mail-sending performance.
5. What is the purpose of SMTP configuration?
SMTP configuration is essential for ensuring that your email client or server can communicate with the SMTP server. It allows you to send emails reliably and securely.
Summary
Setting up Magento 2 email settings ensures seamless communication and enhanced customer engagement for your Magento ecommerce store. The tutorial highlights the importance of Magento 2 Email Settings in optimizing your online store's email communication. You can use it to configure SMTP in Magento 2.
Ready to improve your Magento 2 email settings and boost customer engagement? Explore Magento hosting plans that complement your enhanced email functionality and make your store run optimally.


