How to Change Admin Session Lifetime in Magento 2?
Configuring the admin session timeout in Magento 2 prevents auto log-outs while working on the backend of your Magento site. The simple setup allows denial of service (DoS) to help decide how long the admin can access a Magento site’s backend.
Adjusting the session timeout interval allows for optimizing Magento site workflow and enhances security measures for your administrative tasks. We will take you through the steps for admin session lifetime configuration.
Key Takeaways
- You can change the Magento 2 admin session lifetime by accessing the Admin Session Lifetime Configuration in the admin panel.
- Adjusting the session timeout interval enhances workflow efficiency and strengthens security for administrative tasks.
- Consider verifying the updated admin session lifetime to ensure successful implementation.
Understanding Admin Session Lifetime in Magento 2
The admin session lifetime refers to the duration an administrator's session remains active in the Magento 2 backend. By default, the admin session lifetime is 900 seconds (15 minutes).The session is automatically stopped when no activity happens in the backend for 15 minutes.
Optimized lifetime is also an essential aspect of session management for security reasons. Setting a specific time allows administrators to balance store convenience and security. The feature helps prevent unauthorized access to sensitive information and reduces the risk of security breaches.
You can configure the session timeout (lifetime) interval based on the specific requirements of your Magento site and the desired level of security. You can also use extensions or server configurations recommended by Adobe Commerce.
Excessively long session lifetimes may pose security risks. Longer lifetimes increase the window of opportunity for malicious activities if an unauthorized user gains access to an administrator's account. So, you must be cautious with implementing a lengthy lifetime.
Configuring the Magento 2 Admin Session Lifetime
- Log in to your Magento admin panel using your administrator account credentials.

-
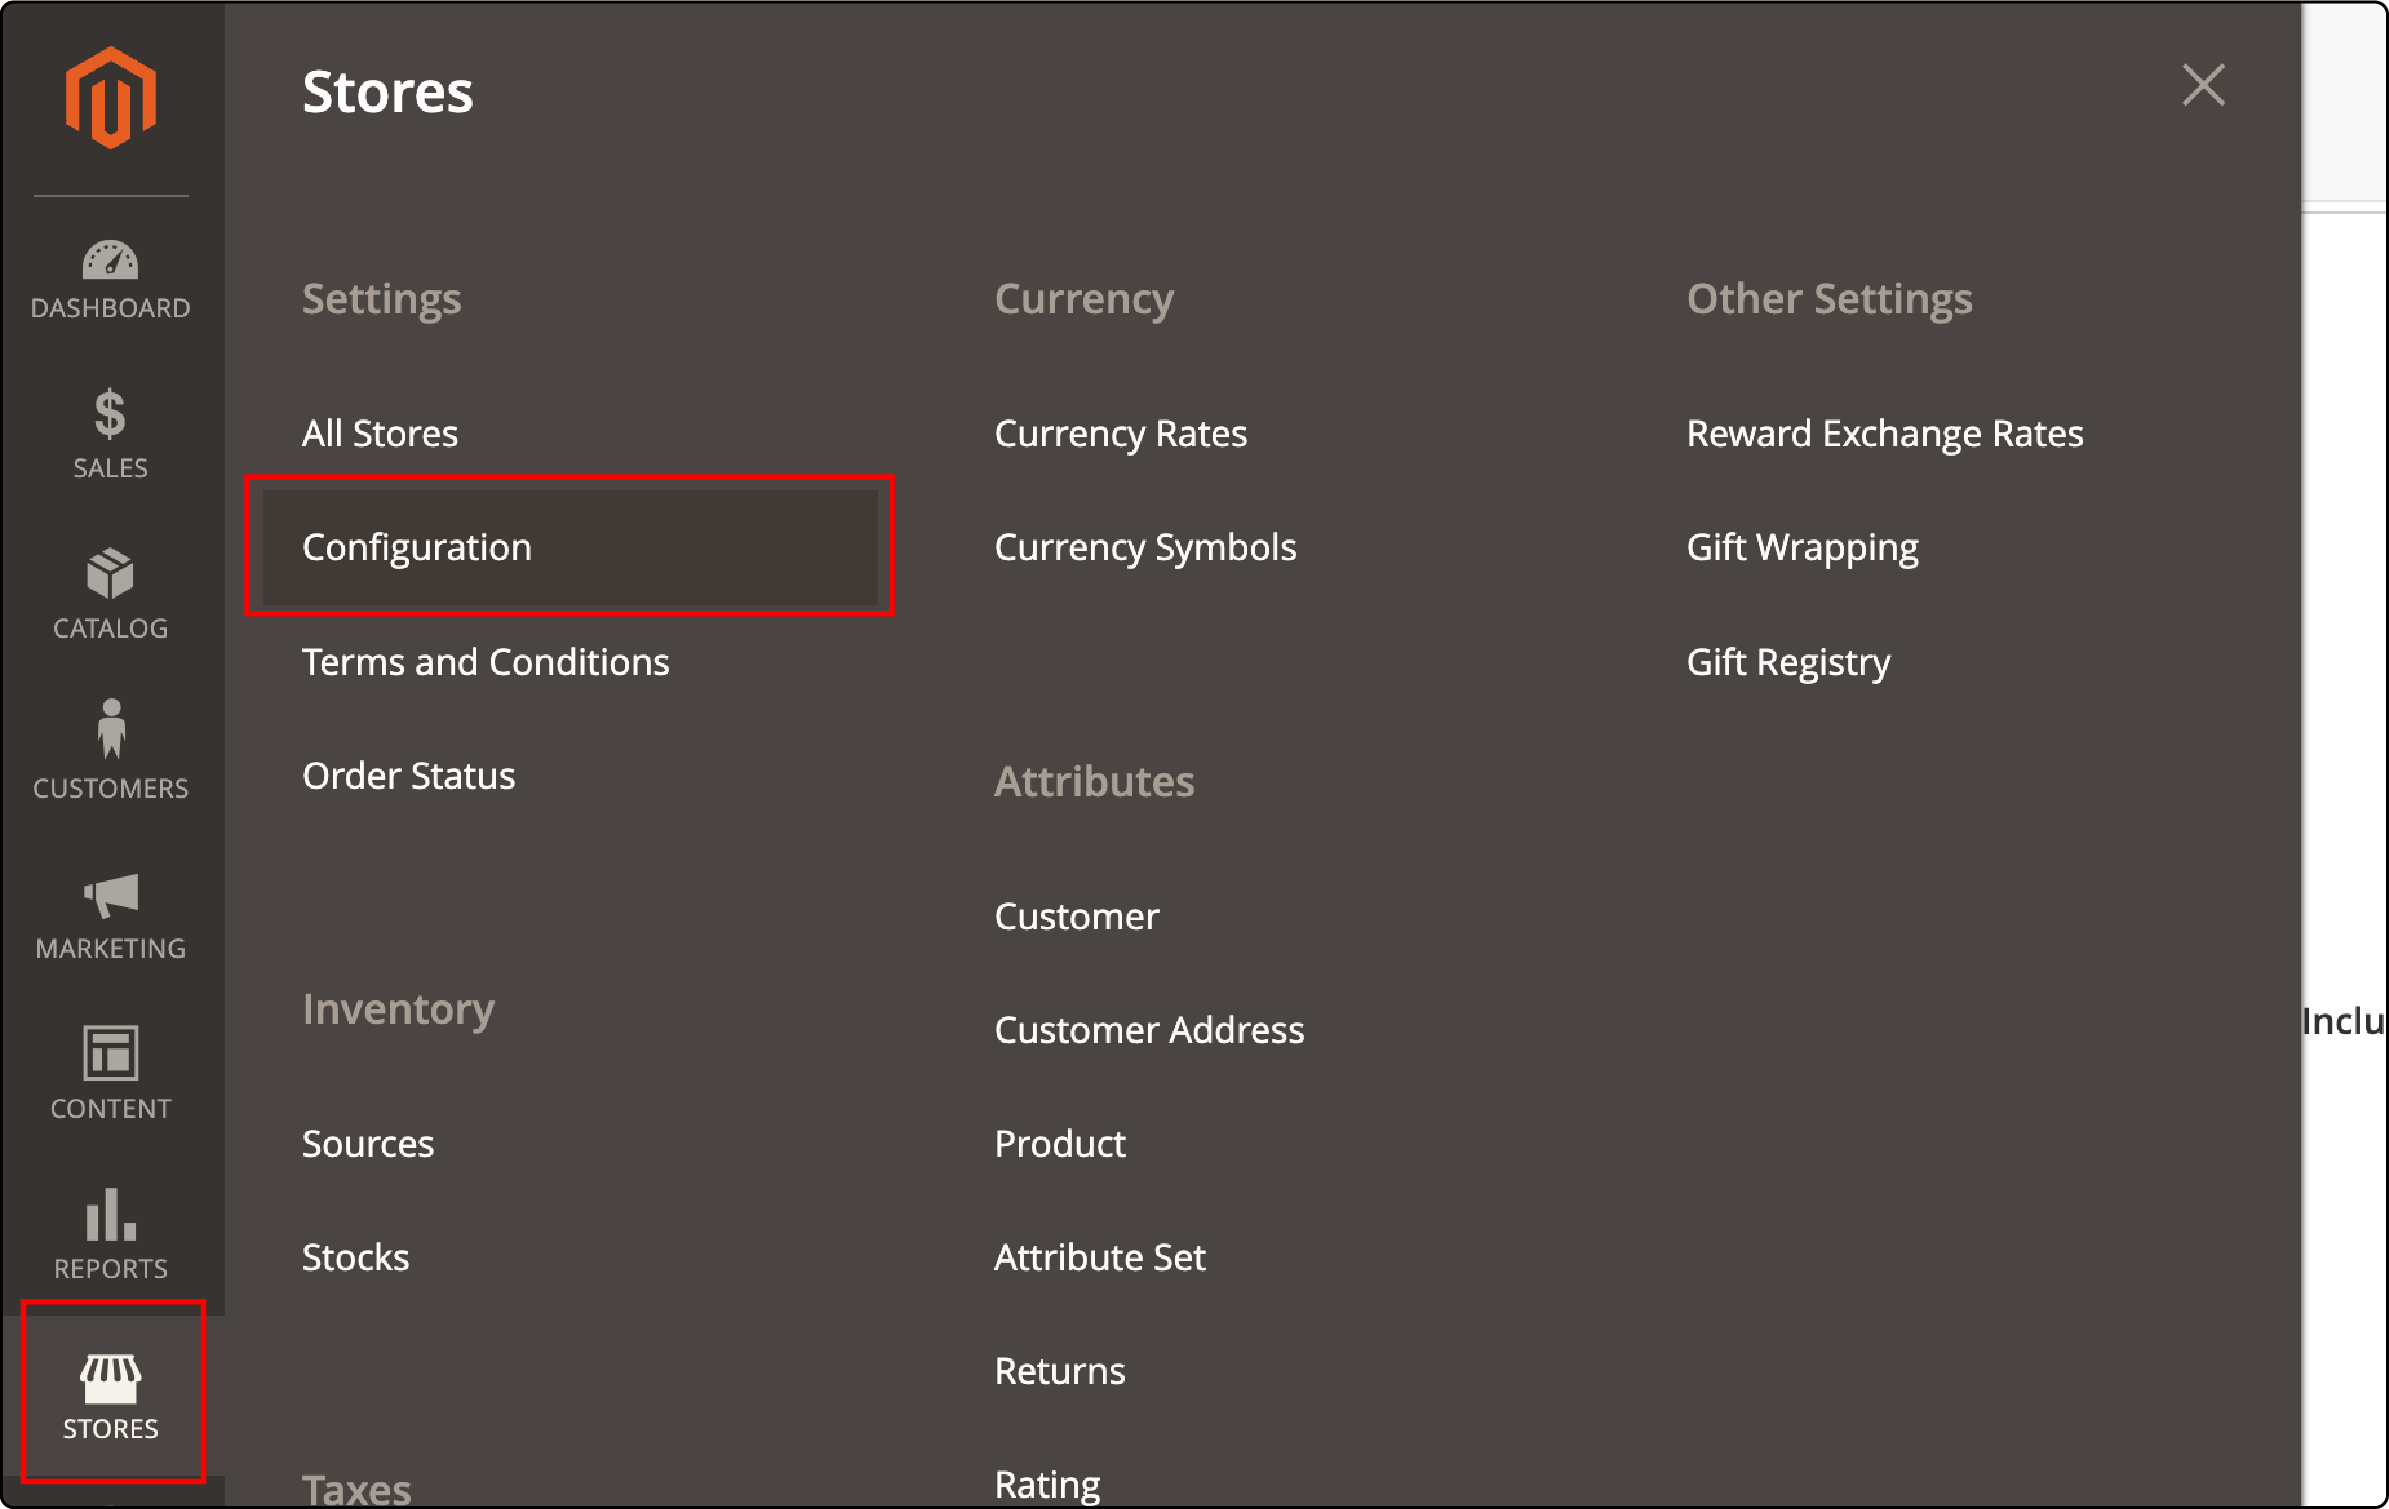
Click Stores in the main menu, then navigate to Configuration under the Settings section.
-
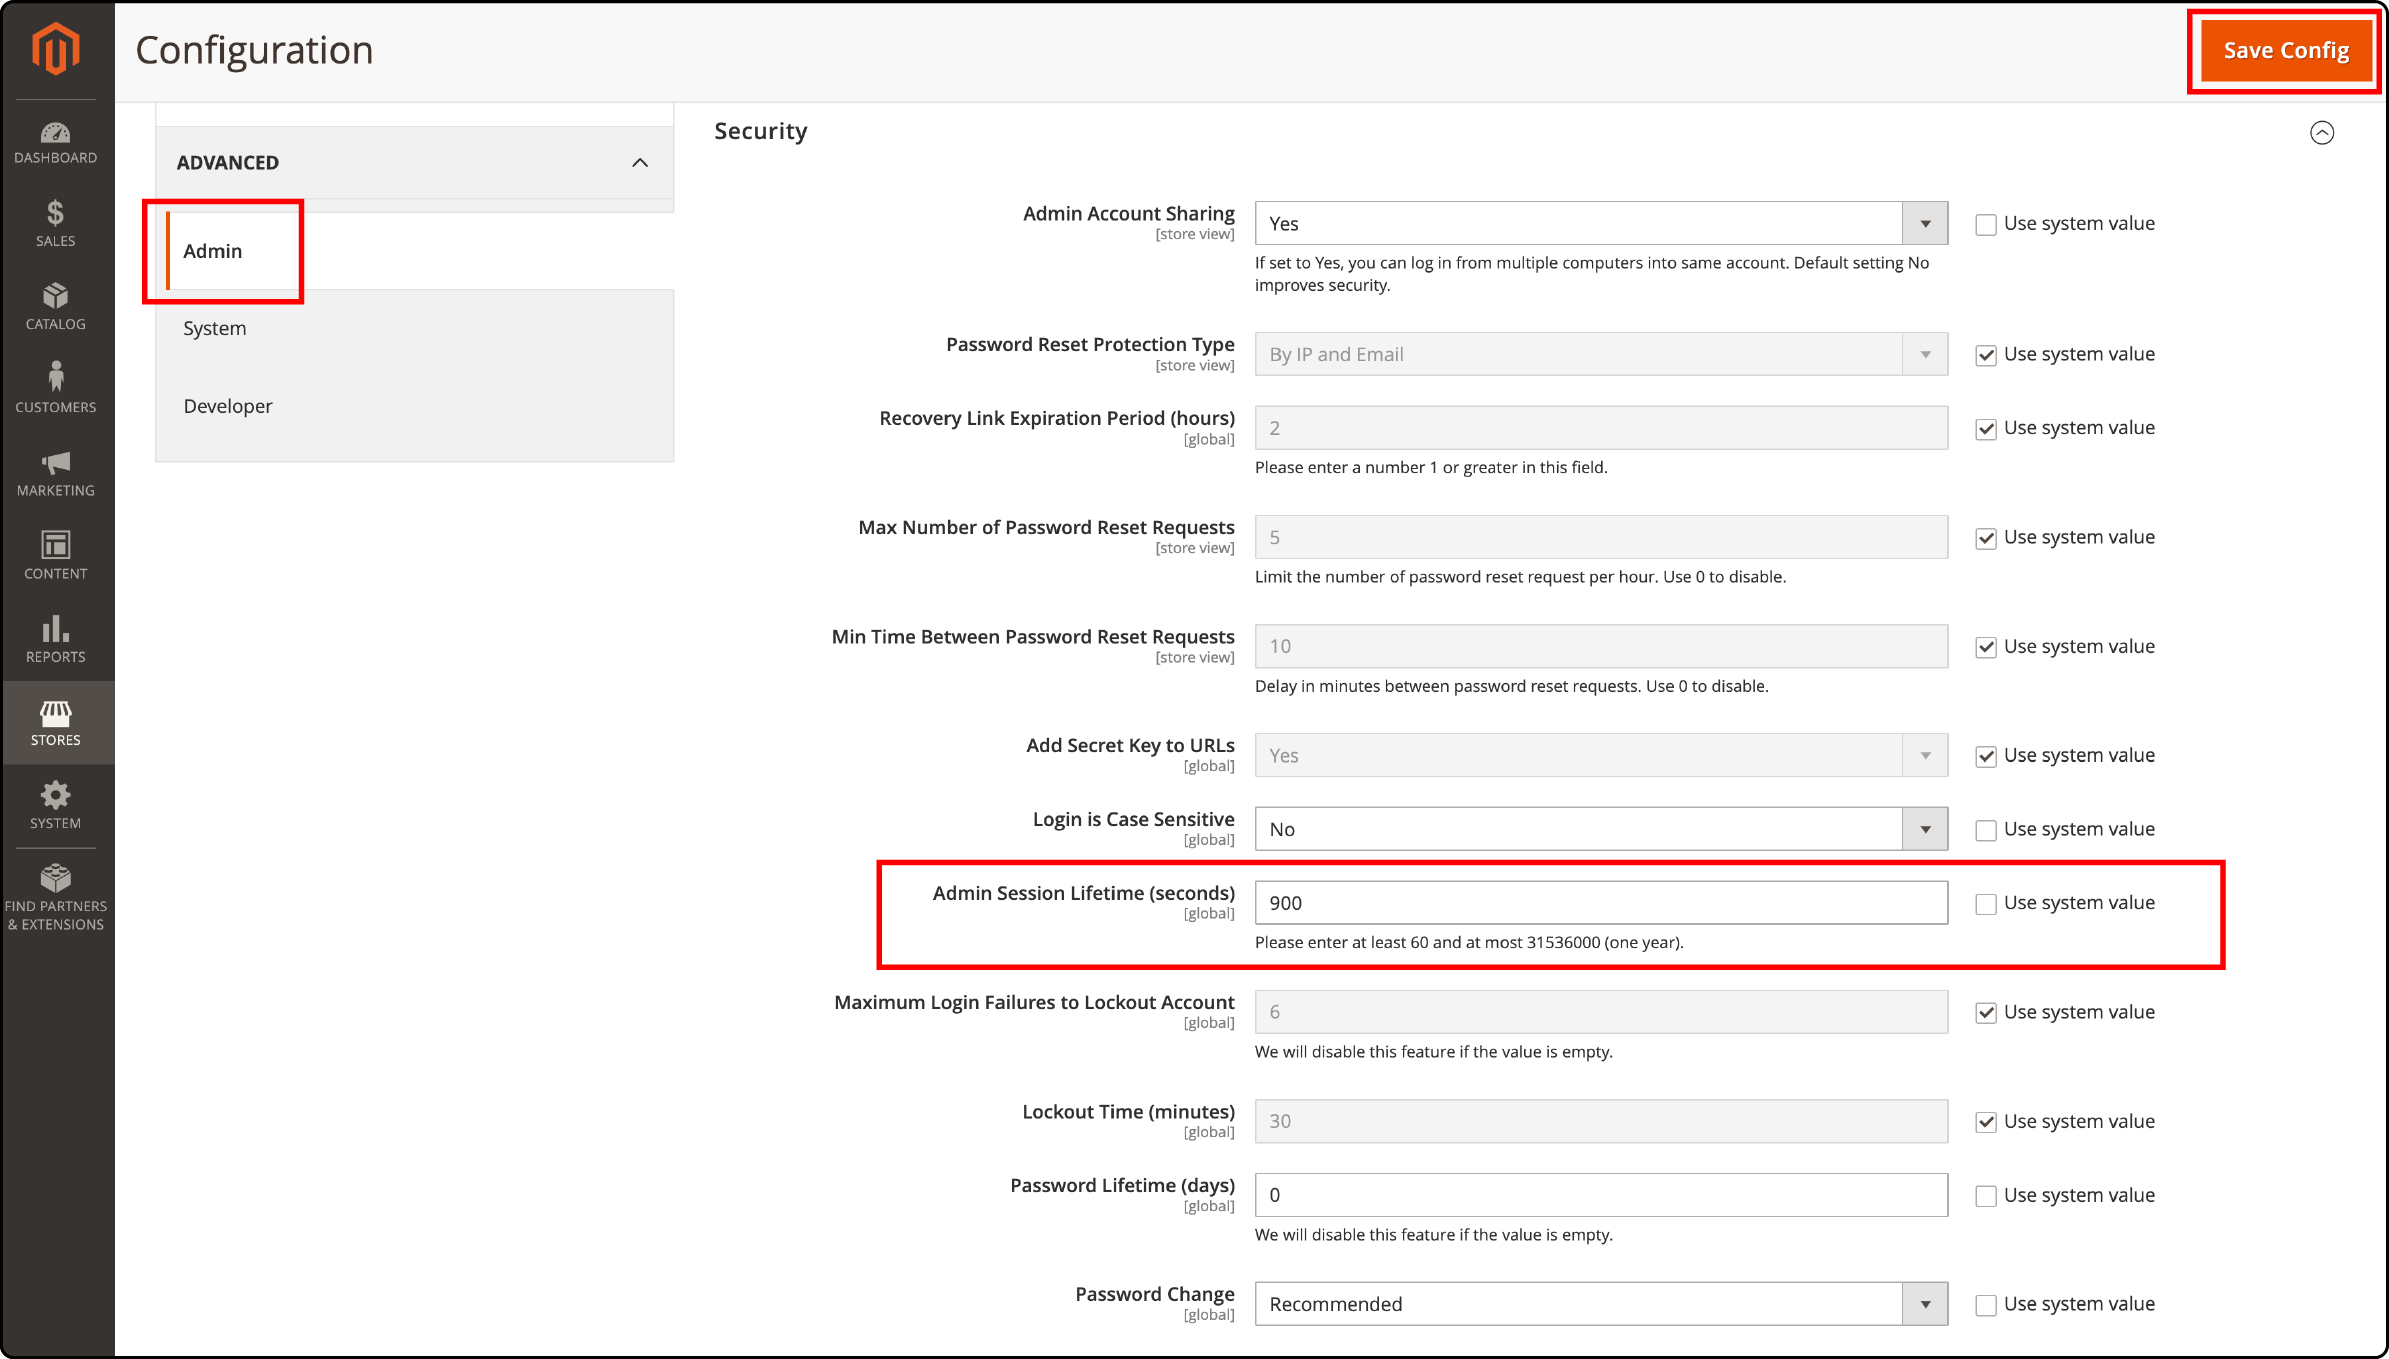
Scroll down and select Advanced from the left-hand menu, then click Admin.
-
Under the Security tab, you will find the Admin Session Lifetime (seconds) text box.
-
Enter the desired session timeout interval in seconds.

-
To save the changes, click the Save Config button.
-
Log out of Magento and log back in for the new session timeout interval to take effect.
Saving and Applying the Magento Admin session Changes
After saving the change, you must log out of Magento and back in. It allows the new session timeout interval to take effect. It also ensures that your administrative tasks carry with the updated session lifetime, optimizing store security and workflow efficiency.
Troubleshooting Errors
If you encounter any errors while saving or applying the changes, there are a few things you can try to resolve the problem:
-
Double-check the value entered in the Admin Session Lifetime (seconds) text box, ensuring it is a valid numeric value.
-
Make sure there are no syntax errors or typos in the configuration file.
-
Suppose you receive an error message related to the session.gc_maxlifetime value, you may need to adjust it in your PHP configuration file (php.ini).
-
If all else fails, consider seeking assistance from a Magento developer or consulting the official documentation for further troubleshooting.
Verifying the Updated Admin Session Lifetime
Method 1
- Login to the admin panel using your administrator account.
- Navigate to the Stores tab and click on Configuration under Settings.
- From there, select the Advanced tab, followed by Admin.
- Under Security, find the Admin Session Lifetime (seconds) text box. It should display the updated session timeout interval you entered.
Method 2
Many Administrators complain that updating the backend settings do not change session time out. Making changes to the directive helps resolve the problem. Making changes to the directive helps resolve the problem.
The session.gc_maxlifetime PHP directive determines the maximum lifetime of a session. By default, it is set to 1440 seconds.
After changing the admin session lifetime, the session.gc_maxlifetime value should reflect your updated interval, ensuring consistency. You can change the value before adjusting the session lifetime in the Magento 2 backend.
Change session.gc_maxlifetime value defined in the php.ini file
Magento 2 allows manually adjusting the admin session lifetime by editing the PHP.ini file. It offers greater control over the timeout interval, allowing you to customize according to specific needs.
-
Locate the PHP.ini file on your server. It is typically found in the root directory or within the /etc/php folder.
-
Open the PHP.ini file using a text editor of your choice.
-
Search for the line that contains the session.gc_maxlifetime directive. This directive determines the maximum lifetime of session data.
-
Modify the value of the session.gc_maxlifetime php to a desired session timeout interval. For example, if you want the session to expire after 1800 seconds (30 minutes), set the value to 1800.
-
Save the changes to the PHP.ini file and close the text editor.
Once you have made the necessary adjustments, the new admin session lifetime will take effect. Modifying the PHP.ini file may require server access or assistance from your hosting provider. You must also restart your web server to apply the changes.
FAQs
1. Can I change Magento admin session lifetime to enhance security?
Configuring the admin session lifetime helps protect against unauthorized access and session hijacking, ensuring that sessions expire within a specified timeframe.
2. How can I verify the successful update backend session timeout in Magento?
To verify the updated admin session lifetime, you can use various methods like:
- Logging in and out
- Using specific admin functions like PHP directives ( session.gc_maxlifetime).
3. Can I manually adjust admin session lifetime in the PHP.ini file in Magento 2?
You can manually adjust the admin session lifetime in the PHP.ini file by modifying the relevant lifetime variables. However, it is important to ensure security and make the changes accurately.
4. What is the most common error when configuring the admin session time, and what is the solution?
Adding incorrect values for the session.gc_maxlifetime PHP directive is a common error. It leads to shorter sessions than expected. Verifying the timeout (lifetime) eliminates the room for errors.
Summary
Adjusting the admin session lifetime in Magento 2 prevents automatic logouts while working in the site's backend. Understanding the balance between a suitable lifetime (timeout) and a risk-free configuration is essential. It allows to safeguard your Magento 2 backend from unauthorized access by malicious actors.
You must set a desired session timeout or lifetime while maintaining the security of your Magento 2 store. Learn more about protecting your Magento site with managed Magento hosting services.


