How to Configure Magento 2 Image Resize Feature?
The Magento 2 image resize feature helps optimize your ecommerce store's product images. High-quality images are essential to reveal different aspects of a product to the customers. With the image resize feature, you can help customers choose better products. In this tutorial, you will learn how to configure the image resize feature on your Magento 2 store.
Key Takeaways
-
Learn how to use the image resize command to resize Magento 2 images.
-
You can use methods like the HelloWorld block, change template file size, or create a helper class to resize product images in Magento 2.
-
Enabling image resizing for the product images enhances your online store's visuals for new products with pixel-perfect images.
Different Methods for Resizing Product Images in Magento 2
1. Using the HelloWorld block
Using the HelloWorld block method is one way of resizing product images in Magento 2. It involves creating a custom module and adding the necessary code to resize the images.
The HelloWorld block allows you to specify the dimensions for your Magento product images and then automatically resize them. It also ensures that the product images are displayed in the correct size without compromising quality or slowing down your site's loading speed.
Create a block class:
To create the block class, run the following code in the Magento 2 command line interface:
<?php
namespace website\HelloWorld\Block;
class HelloWorld extends \Magento\Framework\View\Element\Template
{
    protected $_productRepository;
    protected $_productImageHelper;

    public function __construct(
        \Magento\Backend\Block\Template\Context $context,
        \Magento\Catalog\Model\ProductRepository $productRepository,
        \Magento\Catalog\Helper\Image $productImageHelper,
        array $data = []
    )
    {
        $this->_productRepository = $productRepository;
        $this->_productImageHelper = $productImageHelper;
        parent::__construct($context, $data);
    }

    public function getProductById($id)
    {
        return $this->_productRepository->getById($id);
    }

    public function getProductBySku($sku)
    {
        return $this->_productRepository->get($sku);
    }

    /**
     * Schedule resize of the image
     * $width *or* $height can be null - in this case, lacking dimension will be calculated.
     *
     * @see \Magento\Catalog\Model\Product\Image
     * @param int $width
     * @param int $height
     * @return $this
     */
    public function resizeImage($product, $imageId, $width, $height = null)
    {
        $resizedImage = $this->_productImageHelper
                           ->init($product, $imageId)
                           ->constrainOnly(TRUE)
                           ->keepAspectRatio(TRUE)
                           ->keepTransparency(TRUE)
                           ->keepFrame(FALSE)
                           ->resize($width, $height);
        return $resizedImage;
    }
}
?>
Next, you can load the product, and the resized images will be visible. In the following example, the produt_thumbnail_image is used as the image ID.
<?php
//Get product object by ID
$id = 'PRODUCT_ID';
$_product = $block->getProductById($id);

//Get product object by SKU
// $sku = 'PRODUCT_SKU';
// $_product = $block->getProductBySku($sku);
 $imageId = 'product_thumbnail_image';
$width = 50;
$height = 50;
 $resizedImageUrl = $block->resizeImage($product, 'product_thumbnail_image', $width, $height)->getUrl();
?>
<img src="<?php echo $resizedImageUrl;?>" alt="<?php echo $_product->getTitle();?>" />
2. Changing image size in the template file
You can modify the code and change the image size in the template (.phtml) file. It is useful if you want to customize the size for specific product image sections or elements in your Magento store.
Editing the template file gives you more control over displaying your product images. When changing the image size in the template file, maintain the original image's aspect ratio. It helps avoid distorting the appearance of resized images.
You can refer to Magento's latest documentation for installation support on specific Magento versions. To change the image size, run the following code in the template file:
<?php
//Get product object by ID
$id = 'PRODUCT_ID';
$_product = $block->getProductById($id);
//Get product object by SKU
// $sku = 'PRODUCT_SKU';
// $_product = $block->getProductBySku($sku);
 $imageId = 'product_base_image';
$width = 200;
$height = 300;
 $resizedImageUrl = $_imageHelper
                        ->init($product, $imageId)
                        ->constrainOnly(true)
                        ->keepAspectRatio(true)
                        ->keepTransparency(true)
                        ->keepFrame(false)
                        ->resize($width, $height)
                        ->getUrl();
?>
<img src="<?php echo $resizedImageUrl;?>" alt="<?php echo $_product->getTitle();?>" />
3. Creating a helper class
A helper class is a PHP file containing reusable image resizing functions. Creating a helper class allows for defining specific rules and parameters for resizing images. You can specify the dimensions and compression settings.
You can also add functionalities like image watermarking or cropping. With a helper class, you can call the resize function in your template files or custom modules whenever needed. It simplifies the process of image resizing and makes it easier to maintain consistent product image sizes throughout your Magento store.
<?php
namespace Vendor\Namespace\Helper;
use Magento\Framework\App\Filesystem\DirectoryList;
class Image extends \Magento\Framework\App\Helper\AbstractHelper
{
/**
* Custom directory relative to the "media" folder
*/
const DIRECTORY = 'custom_module/posts';
/**
* @var \Magento\Framework\Filesystem\Directory\WriteInterface
*/
protected $_mediaDirectory;
/**
* @var \Magento\Framework\Image\Factory
*/
protected $_imageFactory;
/**
* Store manager
*
* @var \Magento\Store\Model\StoreManagerInterface
*/
protected $_storeManager;
/**
* @param \Magento\Framework\App\Helper\Context $context
* @param \Magento\Framework\Filesystem $filesystem
* @param \Magento\Framework\Image\Factory $imageFactory
* @param \Magento\Store\Model\StoreManagerInterface $storeManager
*/
public function __construct(
\Magento\Framework\App\Helper\Context $context,
\Magento\Framework\Filesystem $filesystem,
\Magento\Framework\Image\AdapterFactory $imageFactory,
\Magento\Store\Model\StoreManagerInterface $storeManager
) {
$this->_mediaDirectory = $filesystem->getDirectoryWrite(DirectoryList::MEDIA);
$this->_imageFactory = $imageFactory;
$this->_storeManager = $storeManager;
parent::__construct($context);
}
/**
* First check this file on FS
*
* @param string $filename
* @return bool
*/
protected function _fileExists($filename)
{
if ($this->_mediaDirectory->isFile($filename)) {
return true;
}
return false;
}
/**
* Resize image
* @return string
*/
public function resize($image, $width = null, $height = null)
{
$mediaFolder = self::DIRECTORY;
$path = $mediaFolder . '/cache';
if ($width !== null) {
$path .= '/' . $width . 'x';
if ($height !== null) {
$path .= $height ;
}
}
$absolutePath = $this->_mediaDirectory->getAbsolutePath($mediaFolder) . $image;
$imageResized = $this->_mediaDirectory->getAbsolutePath($path) . $image;
if (!$this->_fileExists($path . $image)) {
$imageFactory = $this->_imageFactory->create();
$imageFactory->open($absolutePath);
$imageFactory->constrainOnly(true);
$imageFactory->keepTransparency(true);
$imageFactory->keepFrame(true);
$imageFactory->keepAspectRatio(true);
$imageFactory->resize($width, $height);
$imageFactory->save($imageResized);
}
return $this->_storeManager->getStore()->getBaseUrl(\Magento\Framework\UrlInterface::URL_TYPE_MEDIA) . $path . $image;
}
}
Enabling Image Resizing in Magento 2
To enable image resizing from the Magento 2 admin panel, follow the below-mentioned steps:
-
Log in to your Magento admin panel.
-
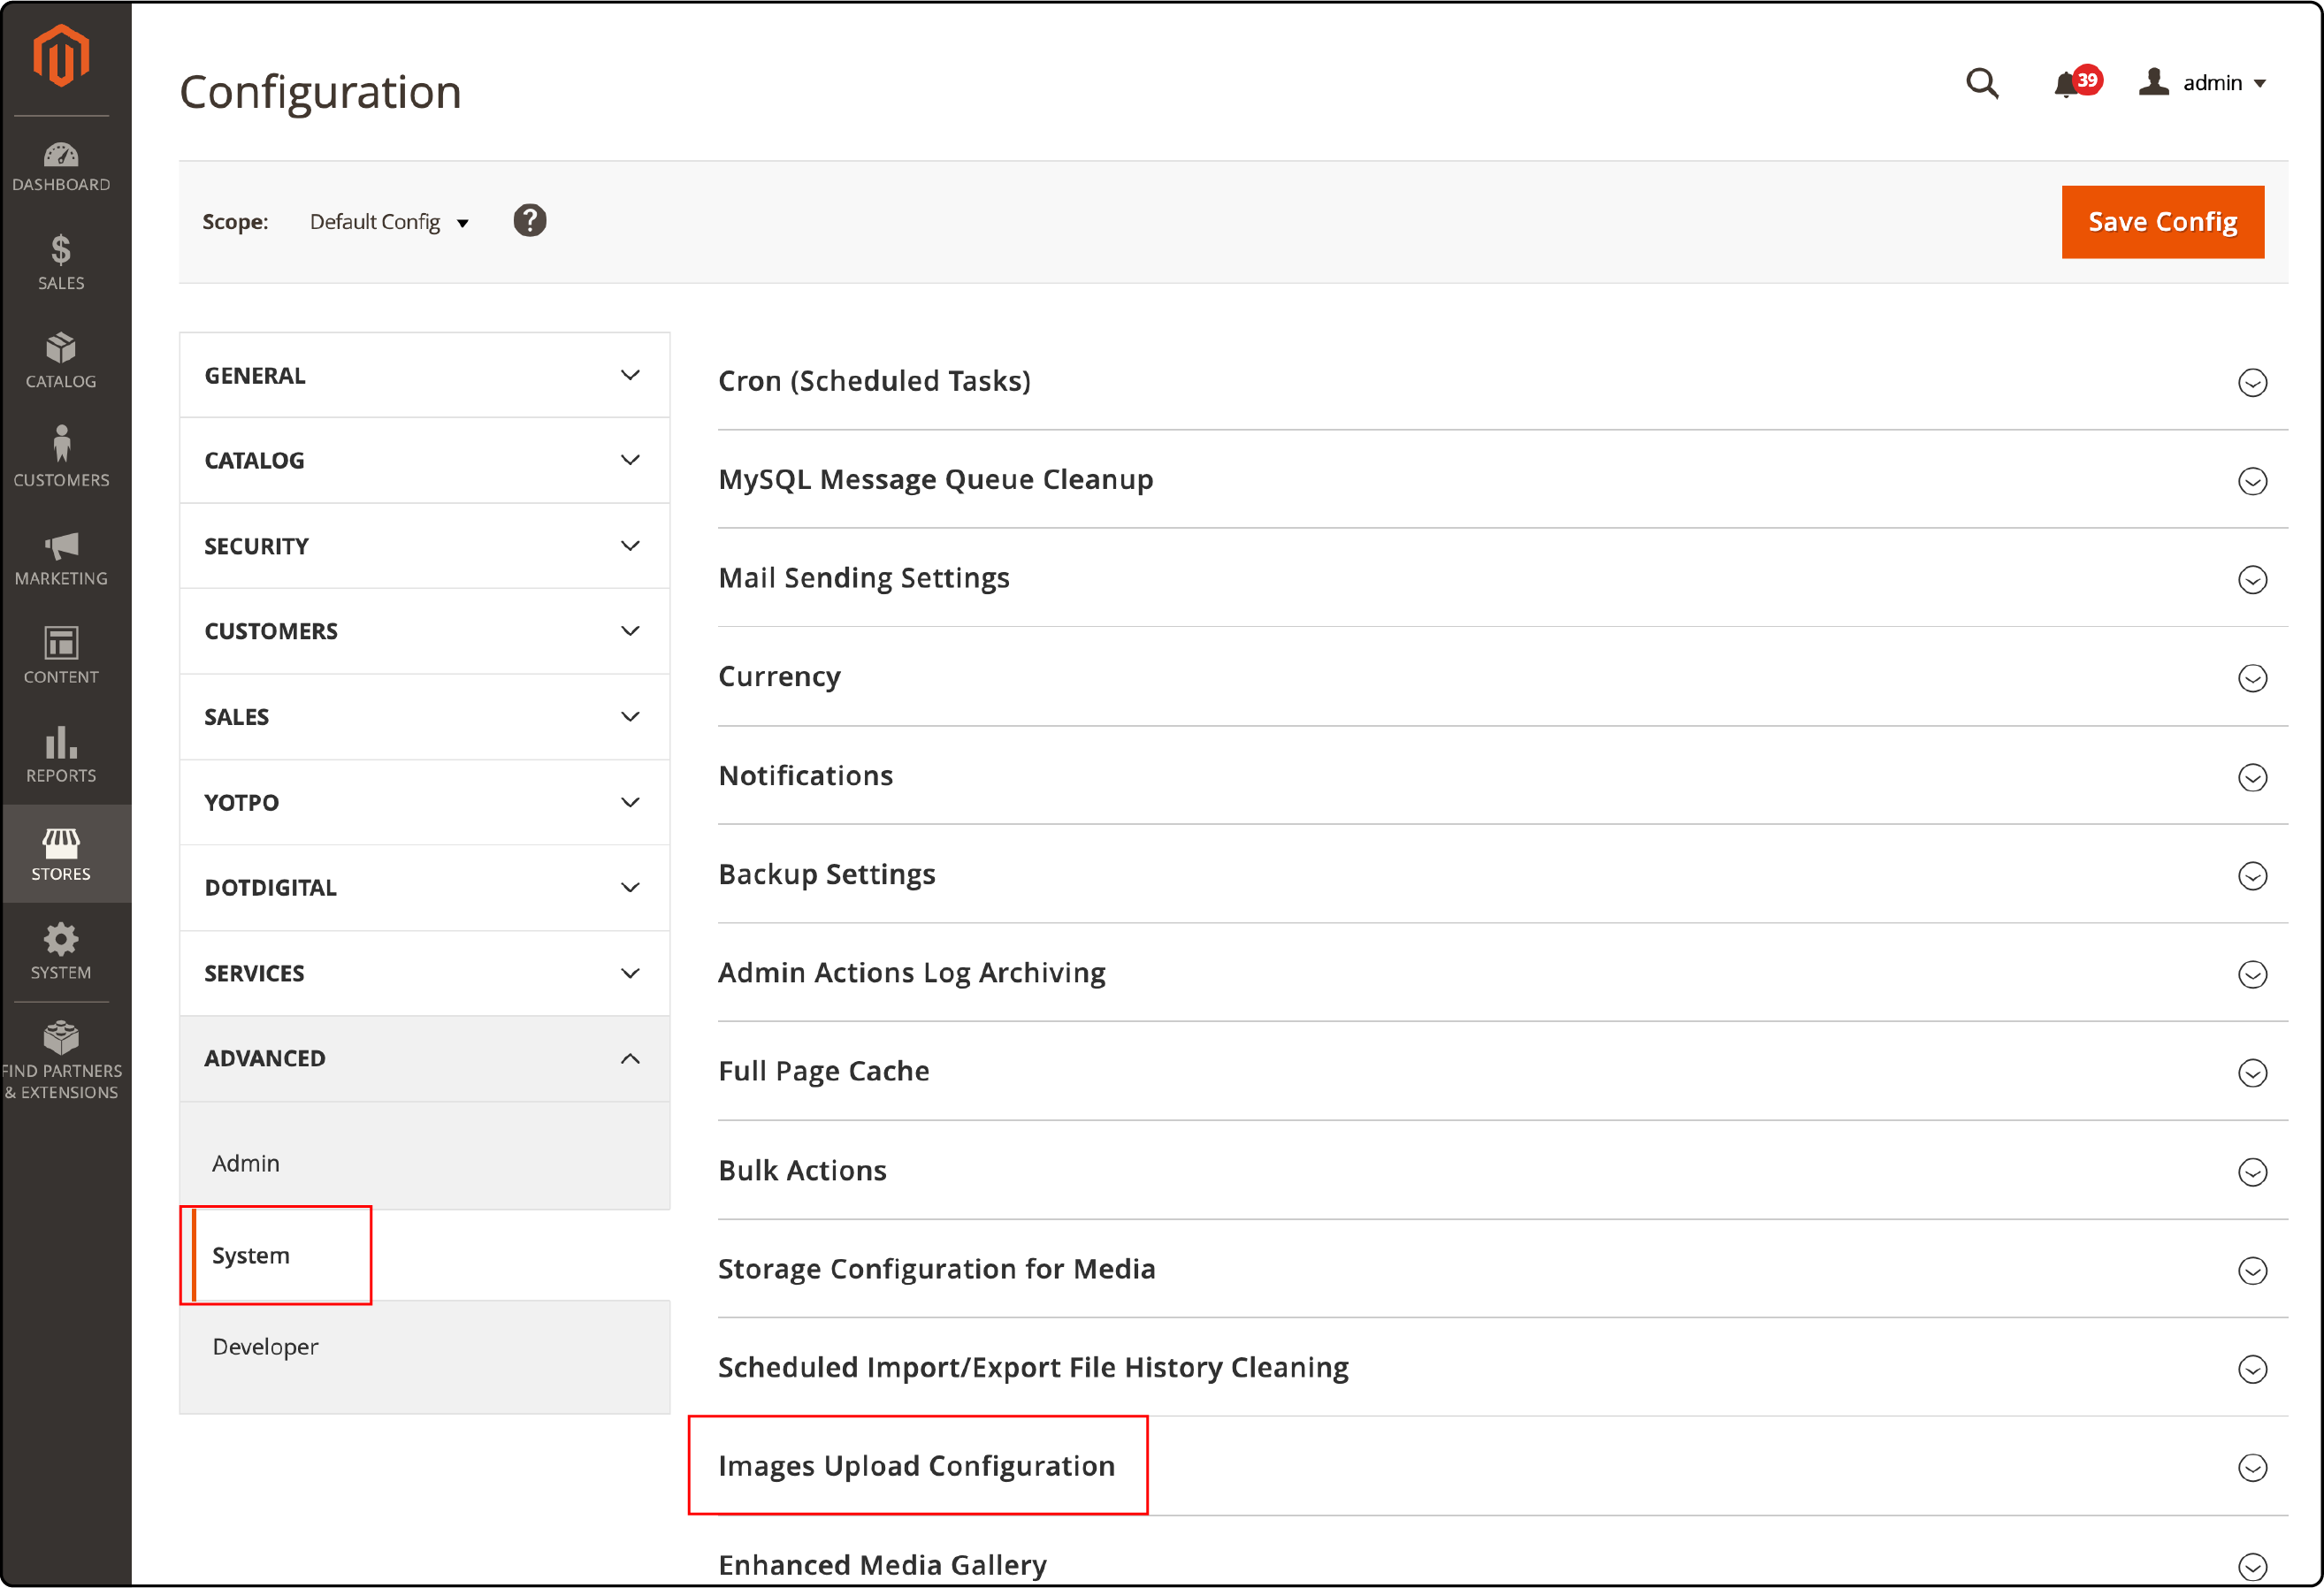
Go to Stores, and under Settings, open the Configuration section.
-
Expand the ‘Advanced’ option and choose ‘System.’
-
Next, expand the ‘Images Upload Configuration’ section.

-
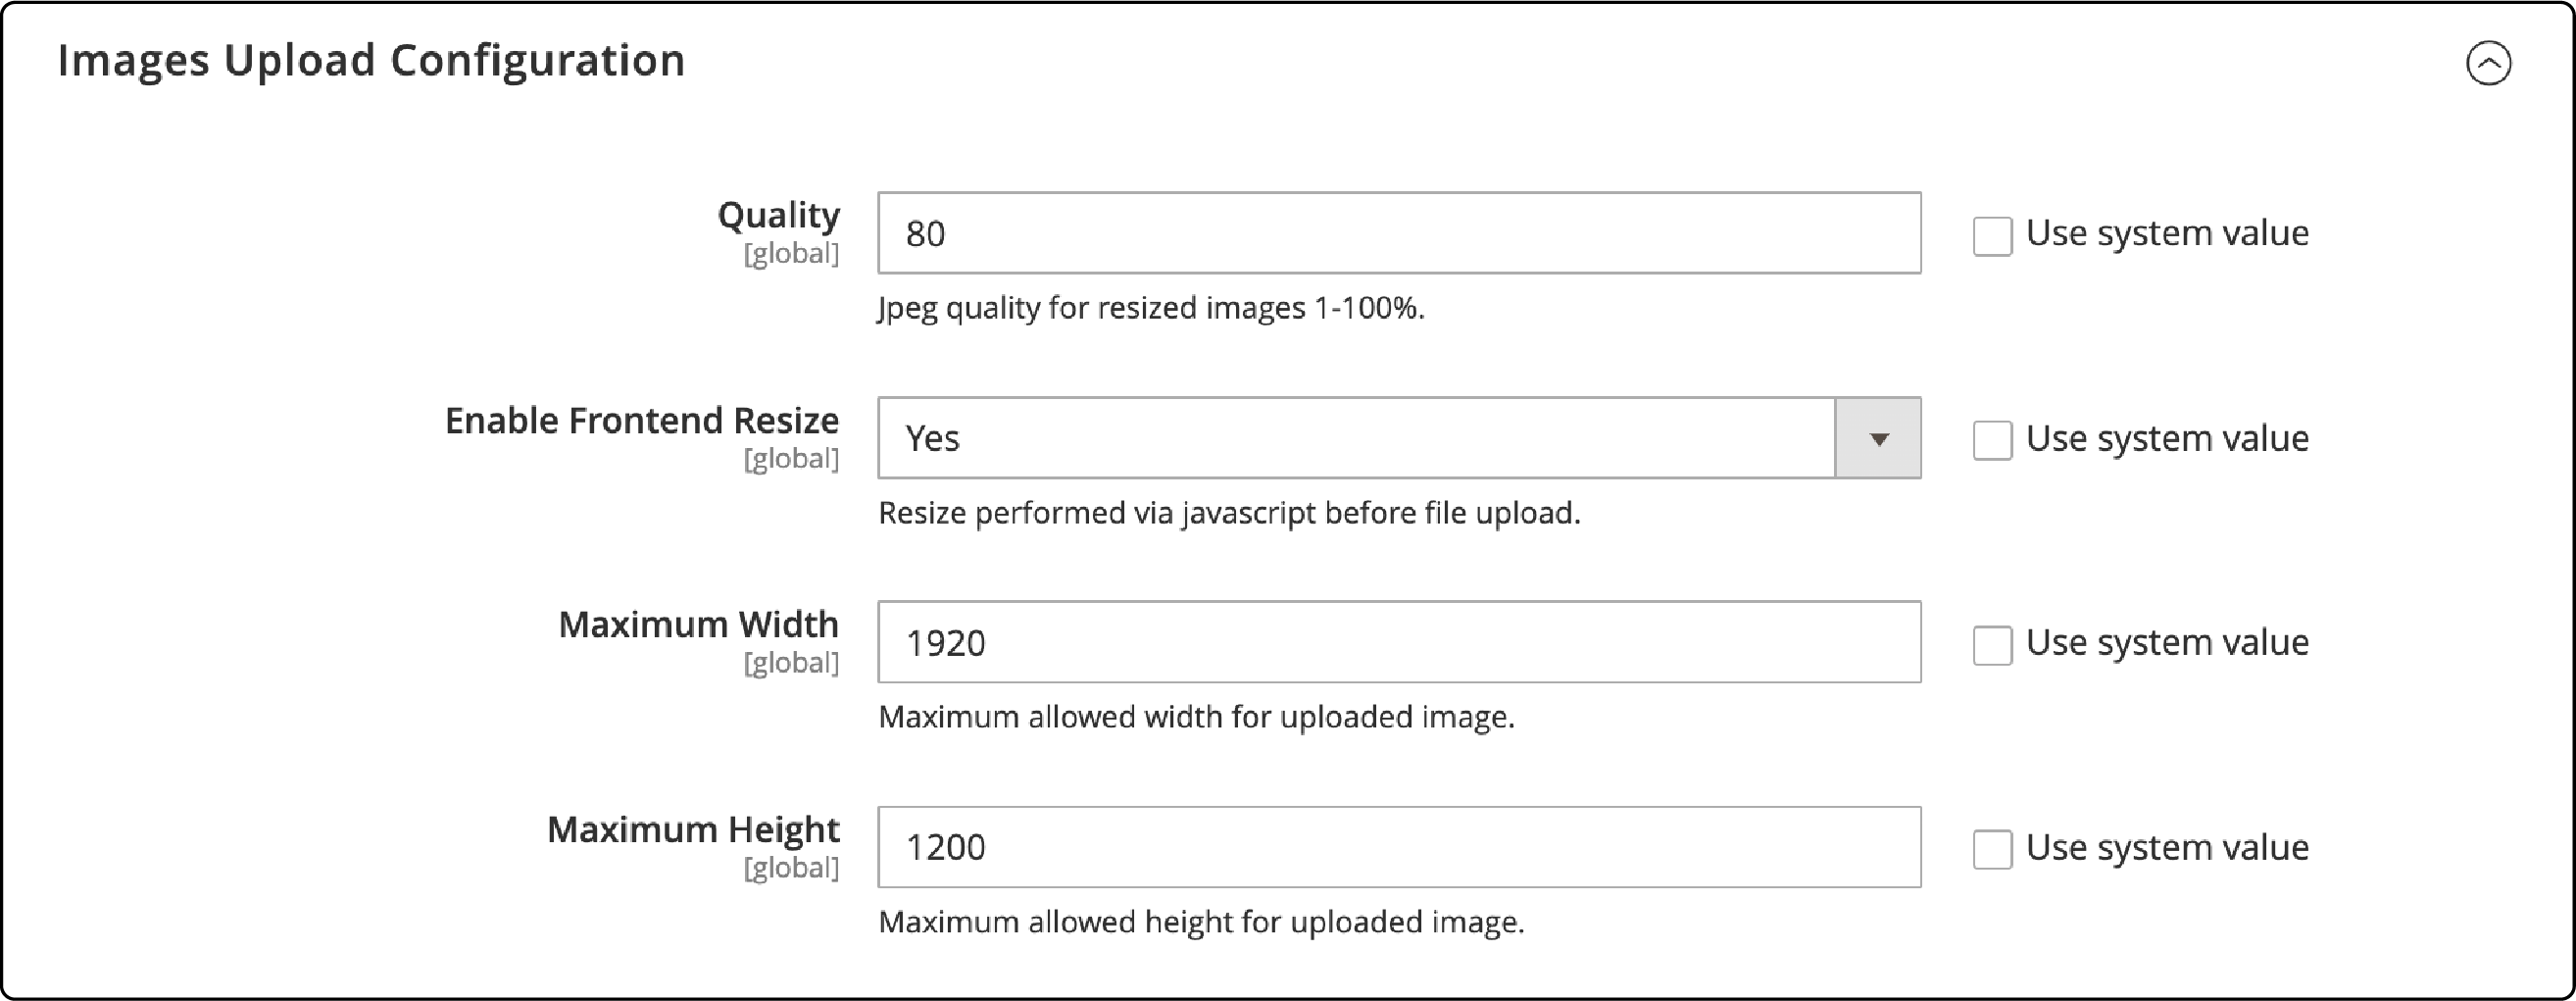
De-select the ‘Use system value’ checkbox. It will allow changing the default settings.
-
Set the ‘Enable Frontend Resize’ to ‘Yes.’
-
Create a Quality setting between 1 and 100%. We recommend a setting between 80-90% for a reduced file size and high quality.
-
Set the Maximum Width in pixels for the image.
-
Set the Maximum Height in pixels for the image.

- To save the changes, click the ‘Save Config’ button.
Field descriptions
You must configure a few fields to enable image resizing in Magento 2. Here are the field descriptions you need to know:
| Parameter | Description |
|---|---|
| Quality | The field determines the JPG quality for the resized product image. Lower quality reduces the file size. |
| Enable Frontend Resize | Enabling the frontend resize allows resizing large images uploaded for the Product Details page. When the image is resized, the Magento site maintains the exact proportions to meet the largest size for Maximum Width or Maximum Height. |
| Maximum Width | It determines the maximum pixel width for the product image. When the image is resized, it does not exceed the ‘defined’ width. |
| Maximum Height | It enables defining the maximum pixel height for the product image. When resized, the image does not exceed the ‘defined’ height. |
Image placeholders
Image placeholders are temporary images displayed on a Magento website while the actual images load. Using a placeholder image improves the browsing experience and reduces page load times of your Magento 2 store. By default, the image placeholder is a logo.
You can enable a unique placeholder for different image roles on your Magento store. The temporary images serve as visual representations of the final product image. So customers don’t have to wait until the product images load completely. Once the actual images load, they replace the placeholders seamlessly.
To upload placeholder images:
-
On your Magento Admin sidebar, go to Stores.
-
Under the ‘Settings’ option, open ‘Configuration.’
-
Expand Catalog, then choose Catalog.
-
Open the ‘Product Image Placeholders’ section.
-
For each image role, click Choose File, then upload an image from your computer.
You can use the same image for all three roles, i.e., Base, Small, and Thumbnail. You can also upload a different placeholder image for each role.

-
To save the changes, click the ‘Save Config’ button.
FAQs
1. How can I resize images in Magento 2?
To resize images in Magento 2, you can use the built-in image resize feature. It allows you to adjust the width and height of your Magento images, ensuring they meet your specific requirements. Whether you need to resize original images or SVG files, Magento 2 provides a convenient solution.
2. What is the role of the image resize feature in Magento 2?
The image resize feature lets you modify image files. You can specify the image width and height, allowing customers to zoom in or out as needed. The feature is useful when you want to showcase new products with pixel-perfect images on your Magento 2 store without fixing the dimensions of individual images.
3. Does understanding Image Scaling improve overall site performance in Magneto 2?
Understanding and applying Image scaling improves your Magento loading speed, as images take longer. It enhances the overall performance of a Magento website and impacts customer experience.
4. Why are quality settings important when using the command line to resize images in Magento?
Enabling quality settings ensures the right size and top quality. It also ensures maximizing website performance while resizing specific product images via the Magento 2 command line.
Summary
Magento 2 image resize is an efficient tool to optimize product images and improve website performance. Implementing the right image dimensions on your product pages helps optimize the page loading speed on your Magento site. It also enhances the user experience and sales on your Magento 2 site.
Consider using a robust Magento hosting platform to optimize your online store’s page loading speed.


