How to Configure Magento 2 Robots.txt file?
Configuring the Magento 2 Robots.txt file is essential for guiding search engine crawlers and optimizing your website's visibility. The robots.txt file, an integral part of SEO strategy, instructs search engine bots on which parts of the website to crawl. This guide walks you through how to set up and customize your Magento 2 Robots.txt file easily. Let's dive in and make your online store more searchable!
Key Takeaways
- Understand the importance of Robots.txt in improving SEO and how to configure Robots.txt in Magento 2.
- Why is the customization of Robots.txt crucial?
- How to add a sitemap to a robots.txt file in Magento 2?
- Get examples of custom instructions for Magento 2 Robots.txt.
- Understand the roles of Googlebot and page user agents and explore the significance of disallowing checkout pages.
- Explore the significance of disallowing checkout pages.
Understanding Magento 2 Robots. txt File
A robots.txt file is an XML file Magento uses to manage crawlers and bots like a Google bot. Proper configuration of the robots.txt file can help improve your website's visibility and ensure that search engines index the right pages.
What is a robots.txt file?
A robots.txt file is a guide for web crawlers. It instructs search engine crawlers on which pages to access or not to access pages and URLs on your website. You can find this file in the root folder of your site.
Importance of robots.txt for SEO
For website owners, default settings for robots.txt are provided as a starting point. Customizing these settings to meet your specific SEO and content management needs is highly recommended.
By adjusting these default settings, you can optimize your website's visibility to search engines while protecting sensitive or irrelevant content from being indexed.
With robots.txt, you can protect private data or content that has yet to be ready It helps because search engines see fresh and useful content first. Your Magento store gets more focus and the ranking in search results increases.
Steps to Configure Magento 2 Robots. txt File
To configure the robots.txt file in Magento, navigate to the Search Engine Robots tab in your website's admin panel. You can follow these steps to add a sitemap to your robots.txt file in Magento 2:
- First, access the Admin Panel of your Magento store.
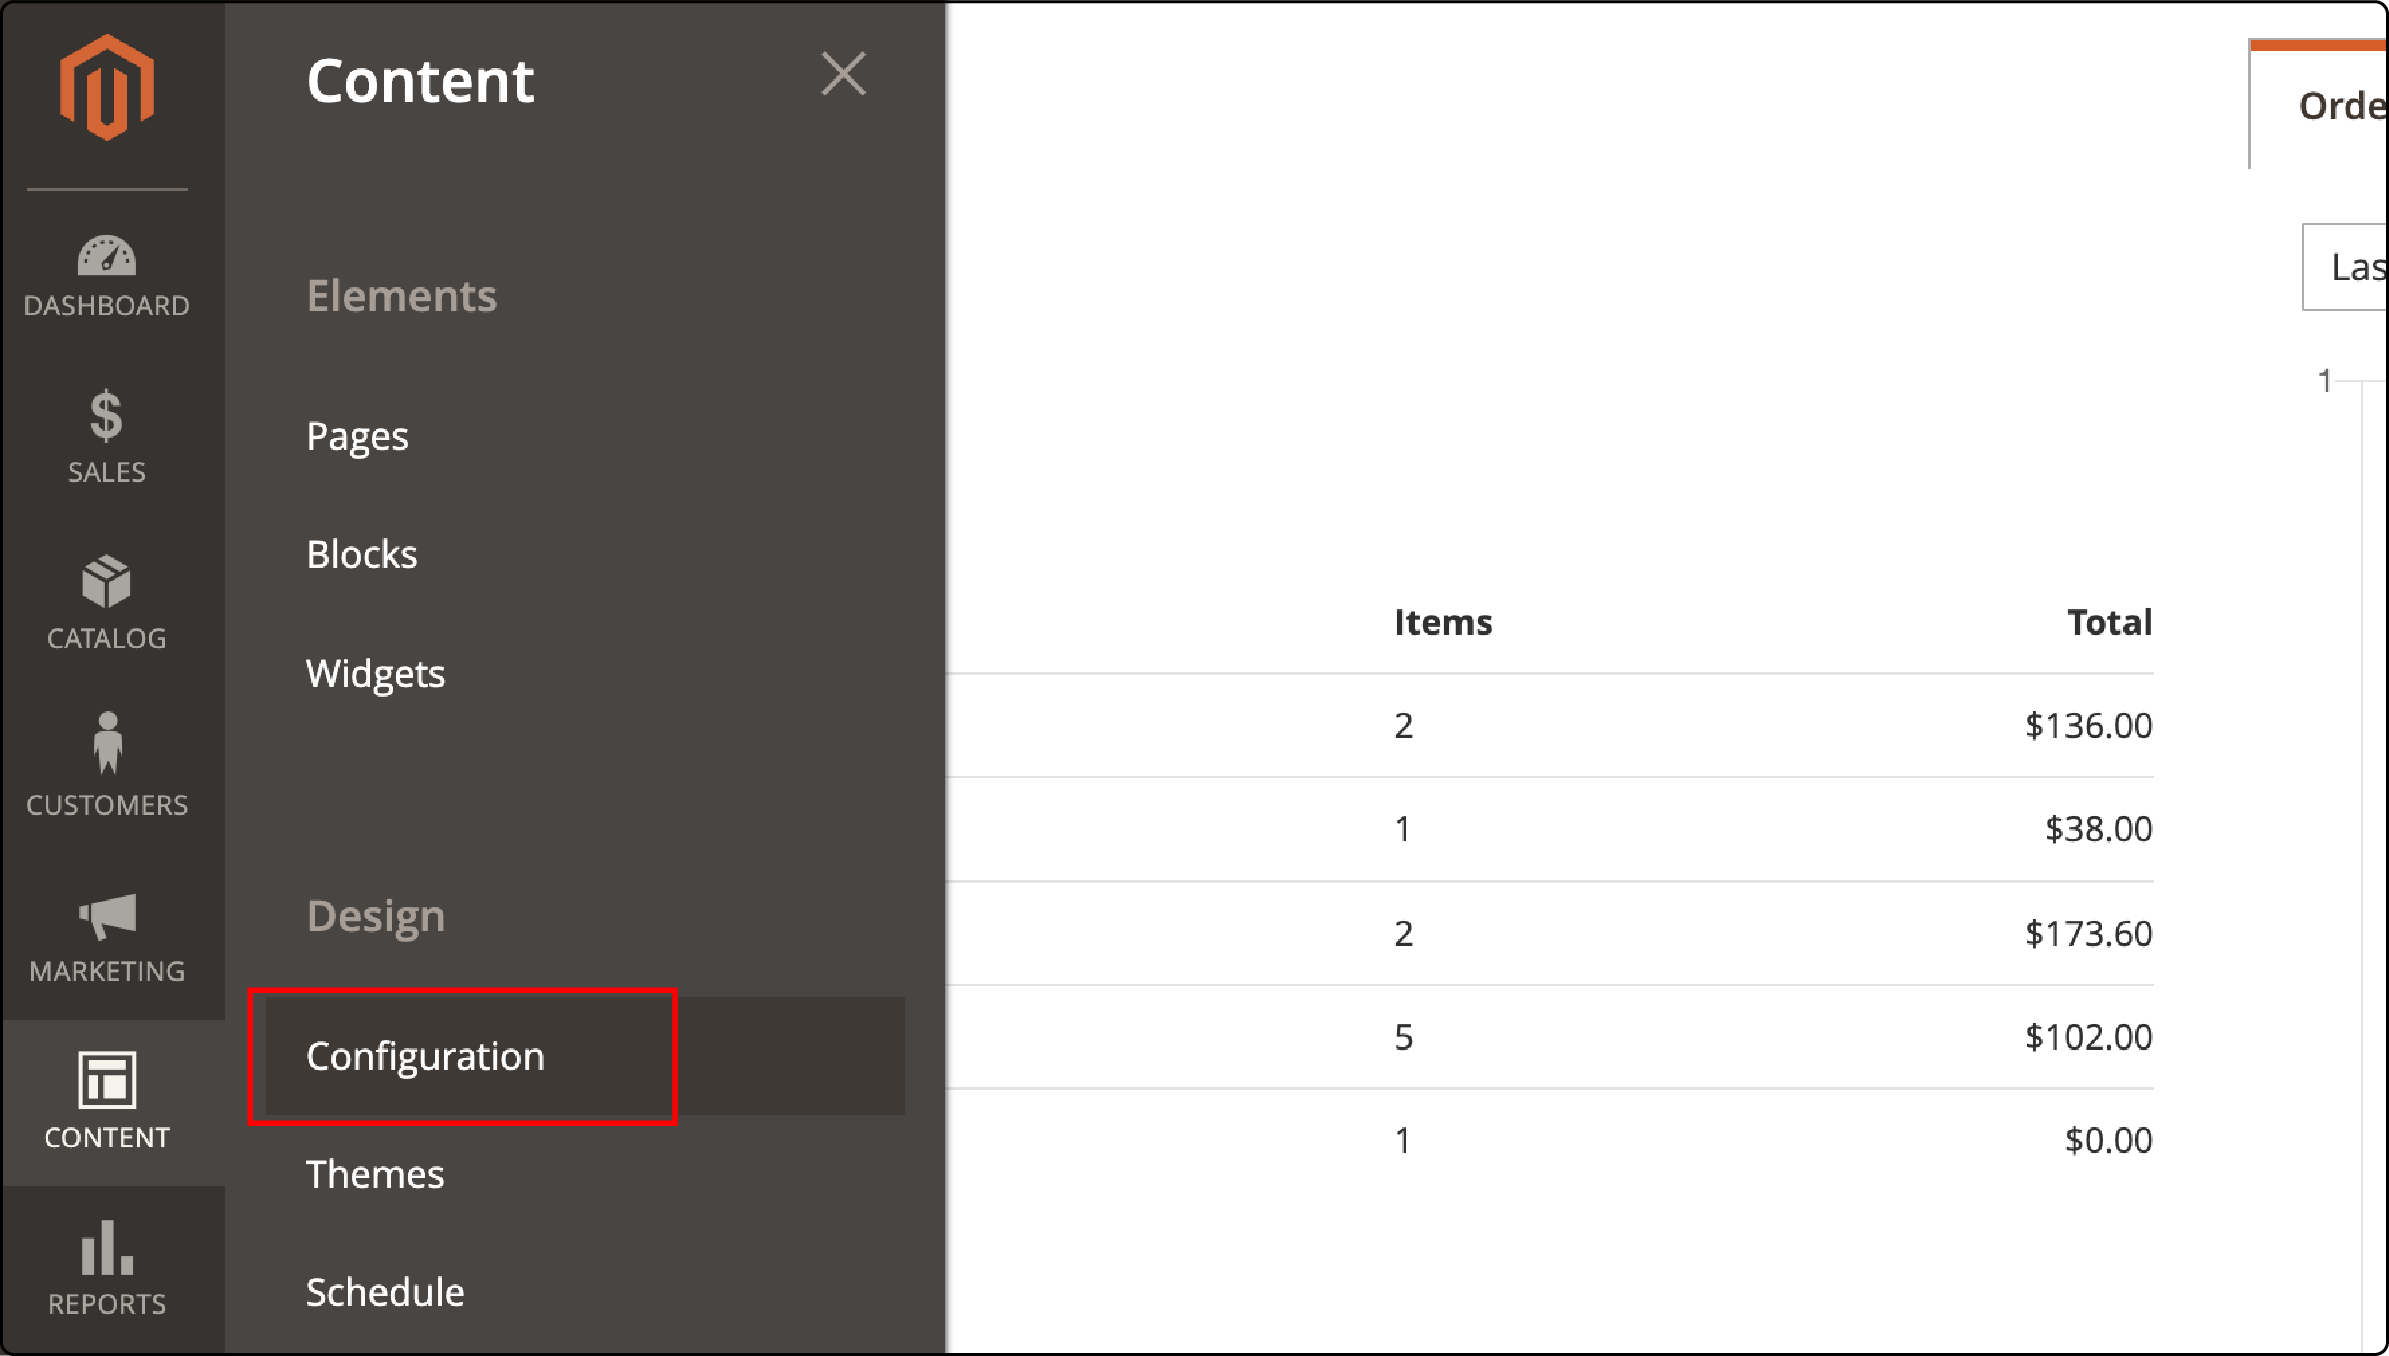
- Navigate to Content, choose Design, followed by Configuration.

- Choose the website for which you want to configure the robots.txt file.

-
Look for the "Search Engine Robots" section and click on it.
-
Select the Default Robots menu under the Search Engine Robots section and change the default settings to one of the following:
- INDEX, FOLLOW
- NOINDEX, FOLLOW
- INDEX, NOFOLLOW
- NOINDEX, NOFOLLOW

The Edit custom instruction of the robots.txt File line allows writing custom instructions.
- To reset the default robot settings, click the Reset To Default button. It will remove all your customized instructions
- Finally, click on “Save Configuration” to apply the changes.

Adding a sitemap to robots.txt
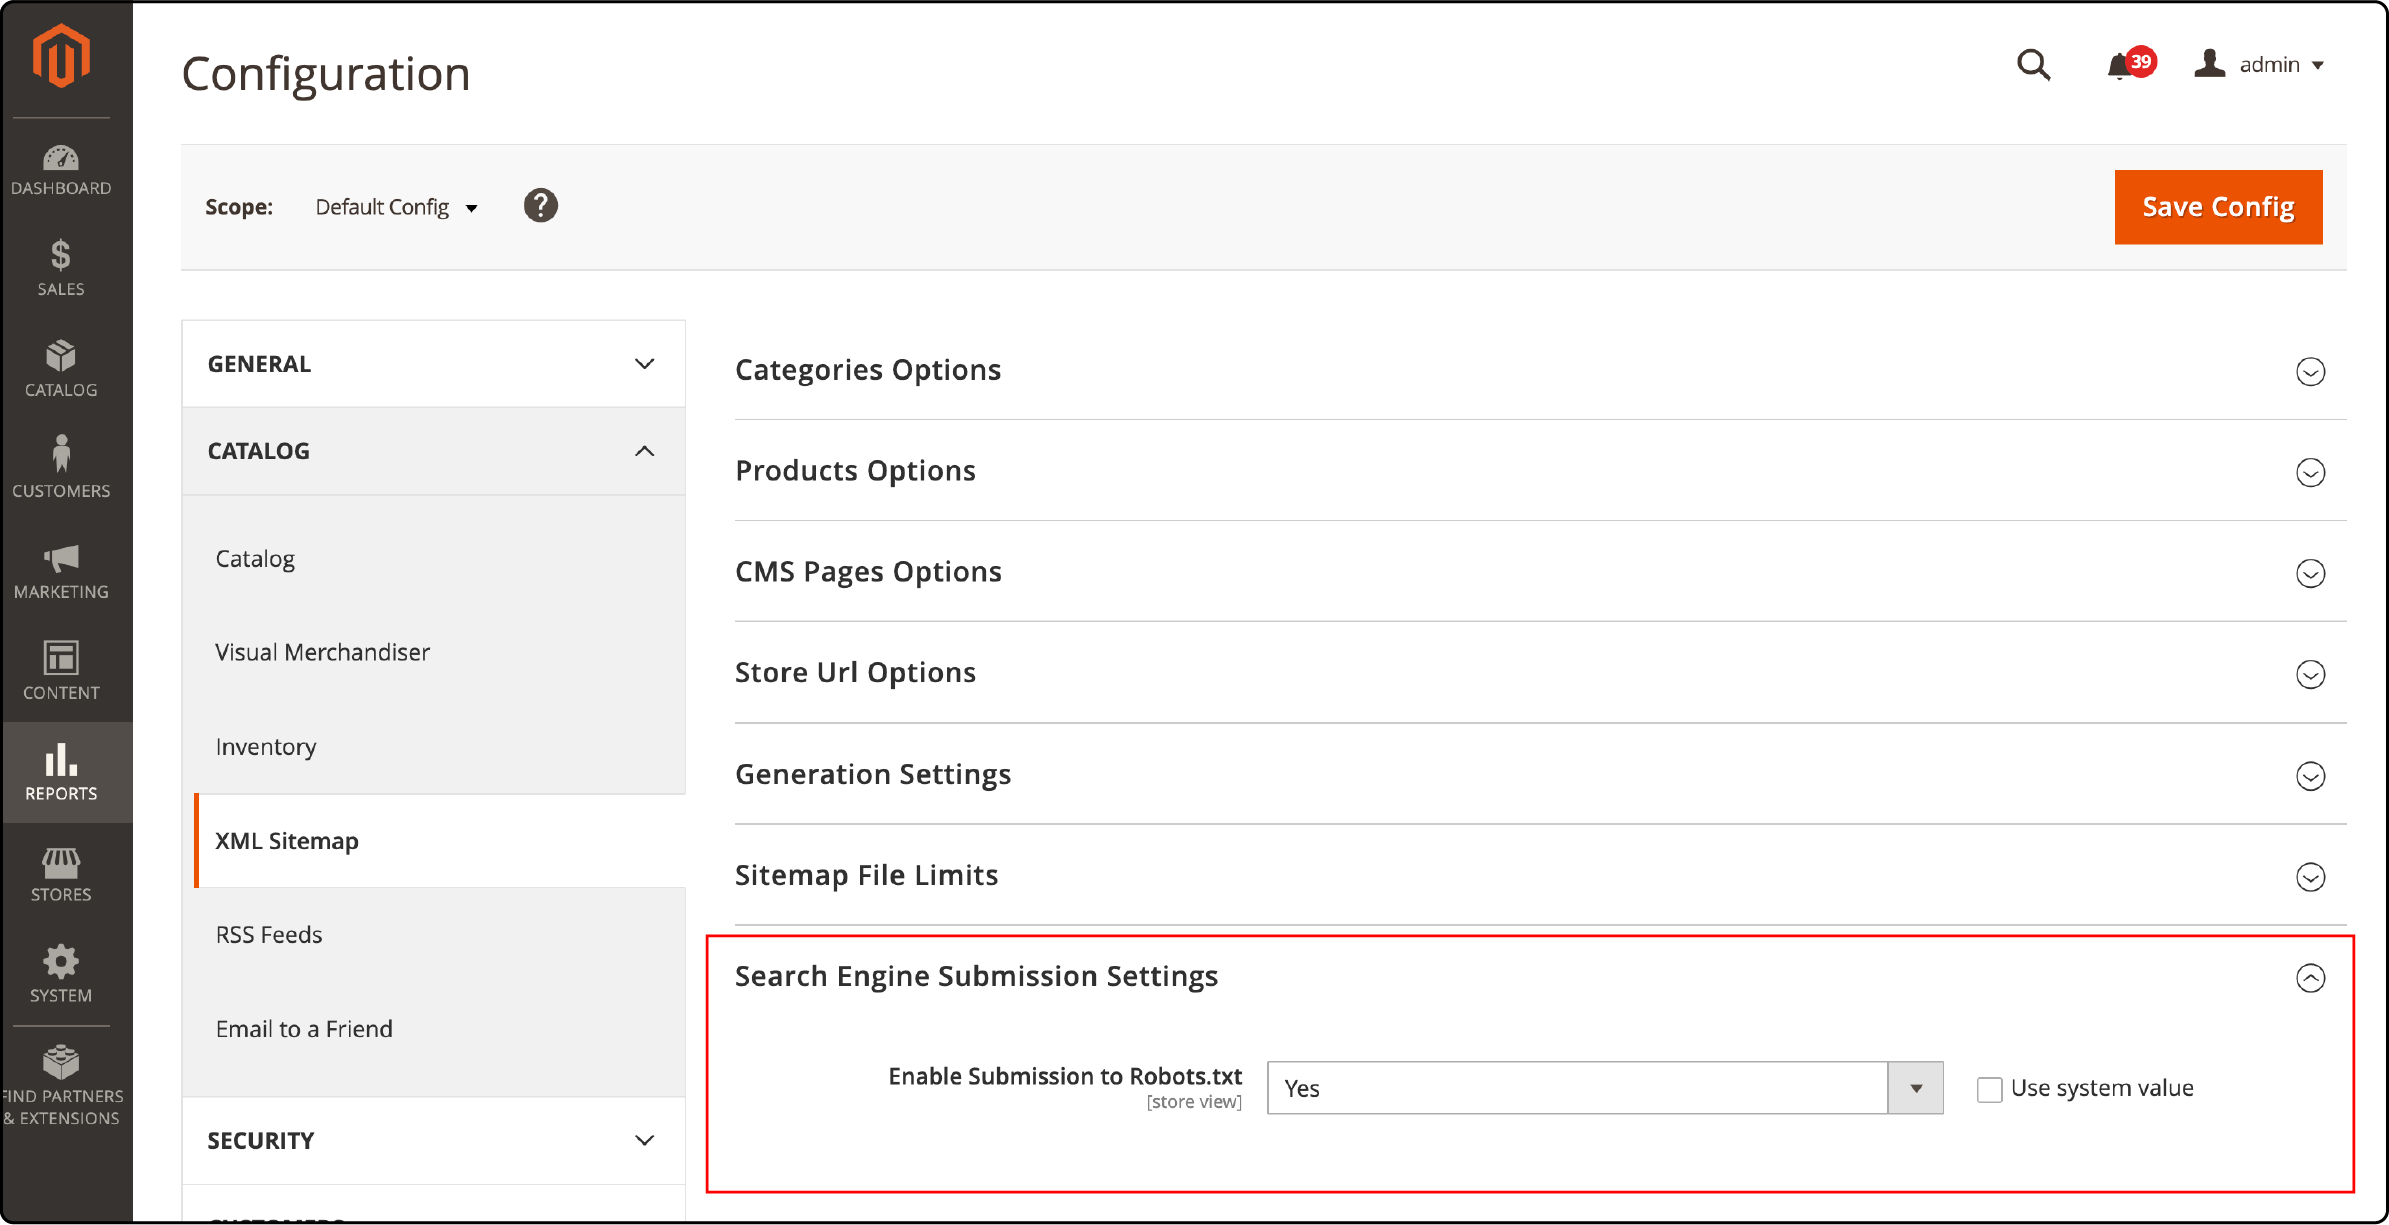
- Navigate Stores, then choose Configuration, followed by Catalog.
- Under the XML Sitemap option, find the Search Engine Submission Settings section.
- Set the enable Submission to Robots.txt section option to "yes."
- Click Save configuration.

You can also choose the sitemap to be enabled automatically with the following steps:
- Navigate to Content, and select the Design option.
- Under Configuration, open the Search Engine Robots section.
- Add a new line in the “Edit Custom instruction" field with the following code: Sitemap: [your sitemap URL].
- Replace [your sitemap URL] with your actual sitemap URL.
- Finally, click the ‘Save Config’ button to save your changes.

Restricting access to specific folders or pages
Restrict access to specific folders or pages in Magento 2 with the following steps:
-
Open the Robots.txt file for editing.
-
Access the Admin Panel of your Magento store.
-
Navigate to Content, choose Design, and select Configuration.
-
Choose the website for which you want to configure the robots.txt file.
-
Under Search Engine Robots, click Edit next to Default Instructions.
-
Add directives to disallow access.
-
Use the "Disallow" directive followed by the path of the folder or page you want to restrict.
For example: "Disallow: /catalog/product/view."

- Click the Save Configuration button to apply the new settings.
- Test the restrictions.
Custom instructions examples for Magento 2.
You can add custom instructions to the robots.txt file in Magento 2. Here are some examples:
Allow Full Access
user-agent:*
Disallow:
Disallow Access to All Folders
User-agent:*
Disallow: /`
Disallow Catalog Search Pages
Disallow: /catalog/product_compare/
Disallow: /catalog/category/view/
Disallow: /catalog/product/view/
Disallow: /report/
Disallow: /var/
Restrict CMS Directories
Disallow: /app/
Disallow: /bin/
Disallow: /dev/
Disallow: /lib/
Disallow: /phpserver/
Disallow URL Filter Searches
Disallow: /?dir
Disallow: /?dir=desc
Disallow: /?dir=asc
Disallow: /?limit=all
Disallow: /?mode*
Implementing best practices for robots.txt
To ensure your Magento store's robots.txt file is optimized for search engines, follow these best practices:
-
Disallow irrelevant pages: Specify which pages or directories should not be indexed by search engines
-
Include a sitemap: Add your XML sitemap URL to the robots.txt file. It helps search engine crawlers find and index all relevant pages on your site.
-
Restrict access to sensitive areas: Use the "Disallow" directive to block search engines from accessing confidential directories such as admin panels or CMS directories.
-
Optimize crawl budget: Limit excessive crawling of non-important pages by specifying which areas should not be crawled frequently, such as review or product comparison pages.
-
Regularly check for errors: Use tools like Google Search Console to identify issues with your robots.txt file, such as syntax errors or incorrect directives.
FAQs
1. What is the role of the Googlebot user agent in configuring robots.txt in Magento 2?
The Googlebot user agent is crucial in how your Magento website interacts with bots like the Google bot. By configuring your robots.txt file, you can control what content the bot is allowed or disallowed from indexing on your site.
The page user agent, on the other hand, represents the web crawler or user agent responsible for accessing and rendering your web pages.
When configuring your robots.txt file, it's essential to consider both the Google bot user agent and the page user agent to ensure that your website's content is appropriately indexed and displayed.
2. Should I disallow checkout pages in my robots.txt file?
Using the ‘checkout pages disallow’ command in your robots.txt file is a good practice. It helps prevent web crawlers from accessing sensitive user data during checkout.
You can add the following line to your robots.txt file:
Disallow: /checkout/
3. How can I control access for specific user agents in robots.txt?
To control access for specific user agents in your robots.txt file, use the "User-agent" directive.
For example, to disallow a user agent named "BadBot" from crawling your site, add the following lines:
User-agent: BadBot Disallow: /
4. Why should I allow catalog search pages in robots.txt?
It would be best to allow catalog search pages to be indexed by search engines. Magento's default settings typically allow this, so there's no need to add specific directives for catalog search pages in your robots.txt file. Ensure your robots.txt file doesn't include ‘disallow’ rules for catalog search URLs.
5. What is an "Access User Agent" in robots.txt?
An "Access User Agent" in robots.txt refers to a specific user agent or web crawler that you want to grant access to your website. You can use directives to specify which user agents can access certain parts of your site.
6. What does the “folders user agent” in the Magento 2 robots.txt file refer to?
The folders user agent in robots.txt for Magento refers to a directive determining which user agents are allowed or disallowed from accessing specific folders or directories on your website. It is a useful way to control bot access to certain parts of your site.
7. What are the default instructions in Magento's robots.txt file?
Magento's default instructions in the robots.txt file allow most search engine robots to access the entire website. It is essential to review and customize these instructions based on your specific needs.
Summary
Configuring the Magento 2 robots.txt file is important for SEO and controlling search engine crawlers. A properly configured robots.txt file ensures that the search engines are crawling the website efficiently. Customizing the Magento robots file according to your needs will improve your website's visibility.
Ready to upgrade your Magento 2 store with better SEO practices? Explore Magento hosting plans to optimize page loading times and enhance the visibility of your Magento 2 store!


