Magento Header Configuration: HTML Head, Header, and Footer
Customizing the Magento header configuration is crucial for creating responsive and visually appealing Magento 2 stores that work seamlessly on mobile and desktop devices. It includes changing the HTML head, header, and footer areas to enhance the color, font, and overall design, offering an excellent user experience to clients and businesses. This tutorial will elaborate on how you can tweak the settings on your Magento store to ensure enhanced visual appeal and user experience, making it an ideal choice for B2B websites and services.
Key Takeaways
-
Learn how to customize the Magento 2 header configuration for a unique store appearance that caters to mobile and desktop users.
-
Discover how to edit the HTML Head, header, and footer to enhance visual appeal by adjusting color, font, and design elements.
-
Find out how to add a favicon to your Magento 2 website for better branding, making your business stand out among competitors.
-
Understand the importance of header configuration and its impact on user experience, especially for B2B clients.
-
Learn to change the email header template in Magento 2 to ensure consistency across devices and versions.
Customizing the HTML Head in Magento 2
-
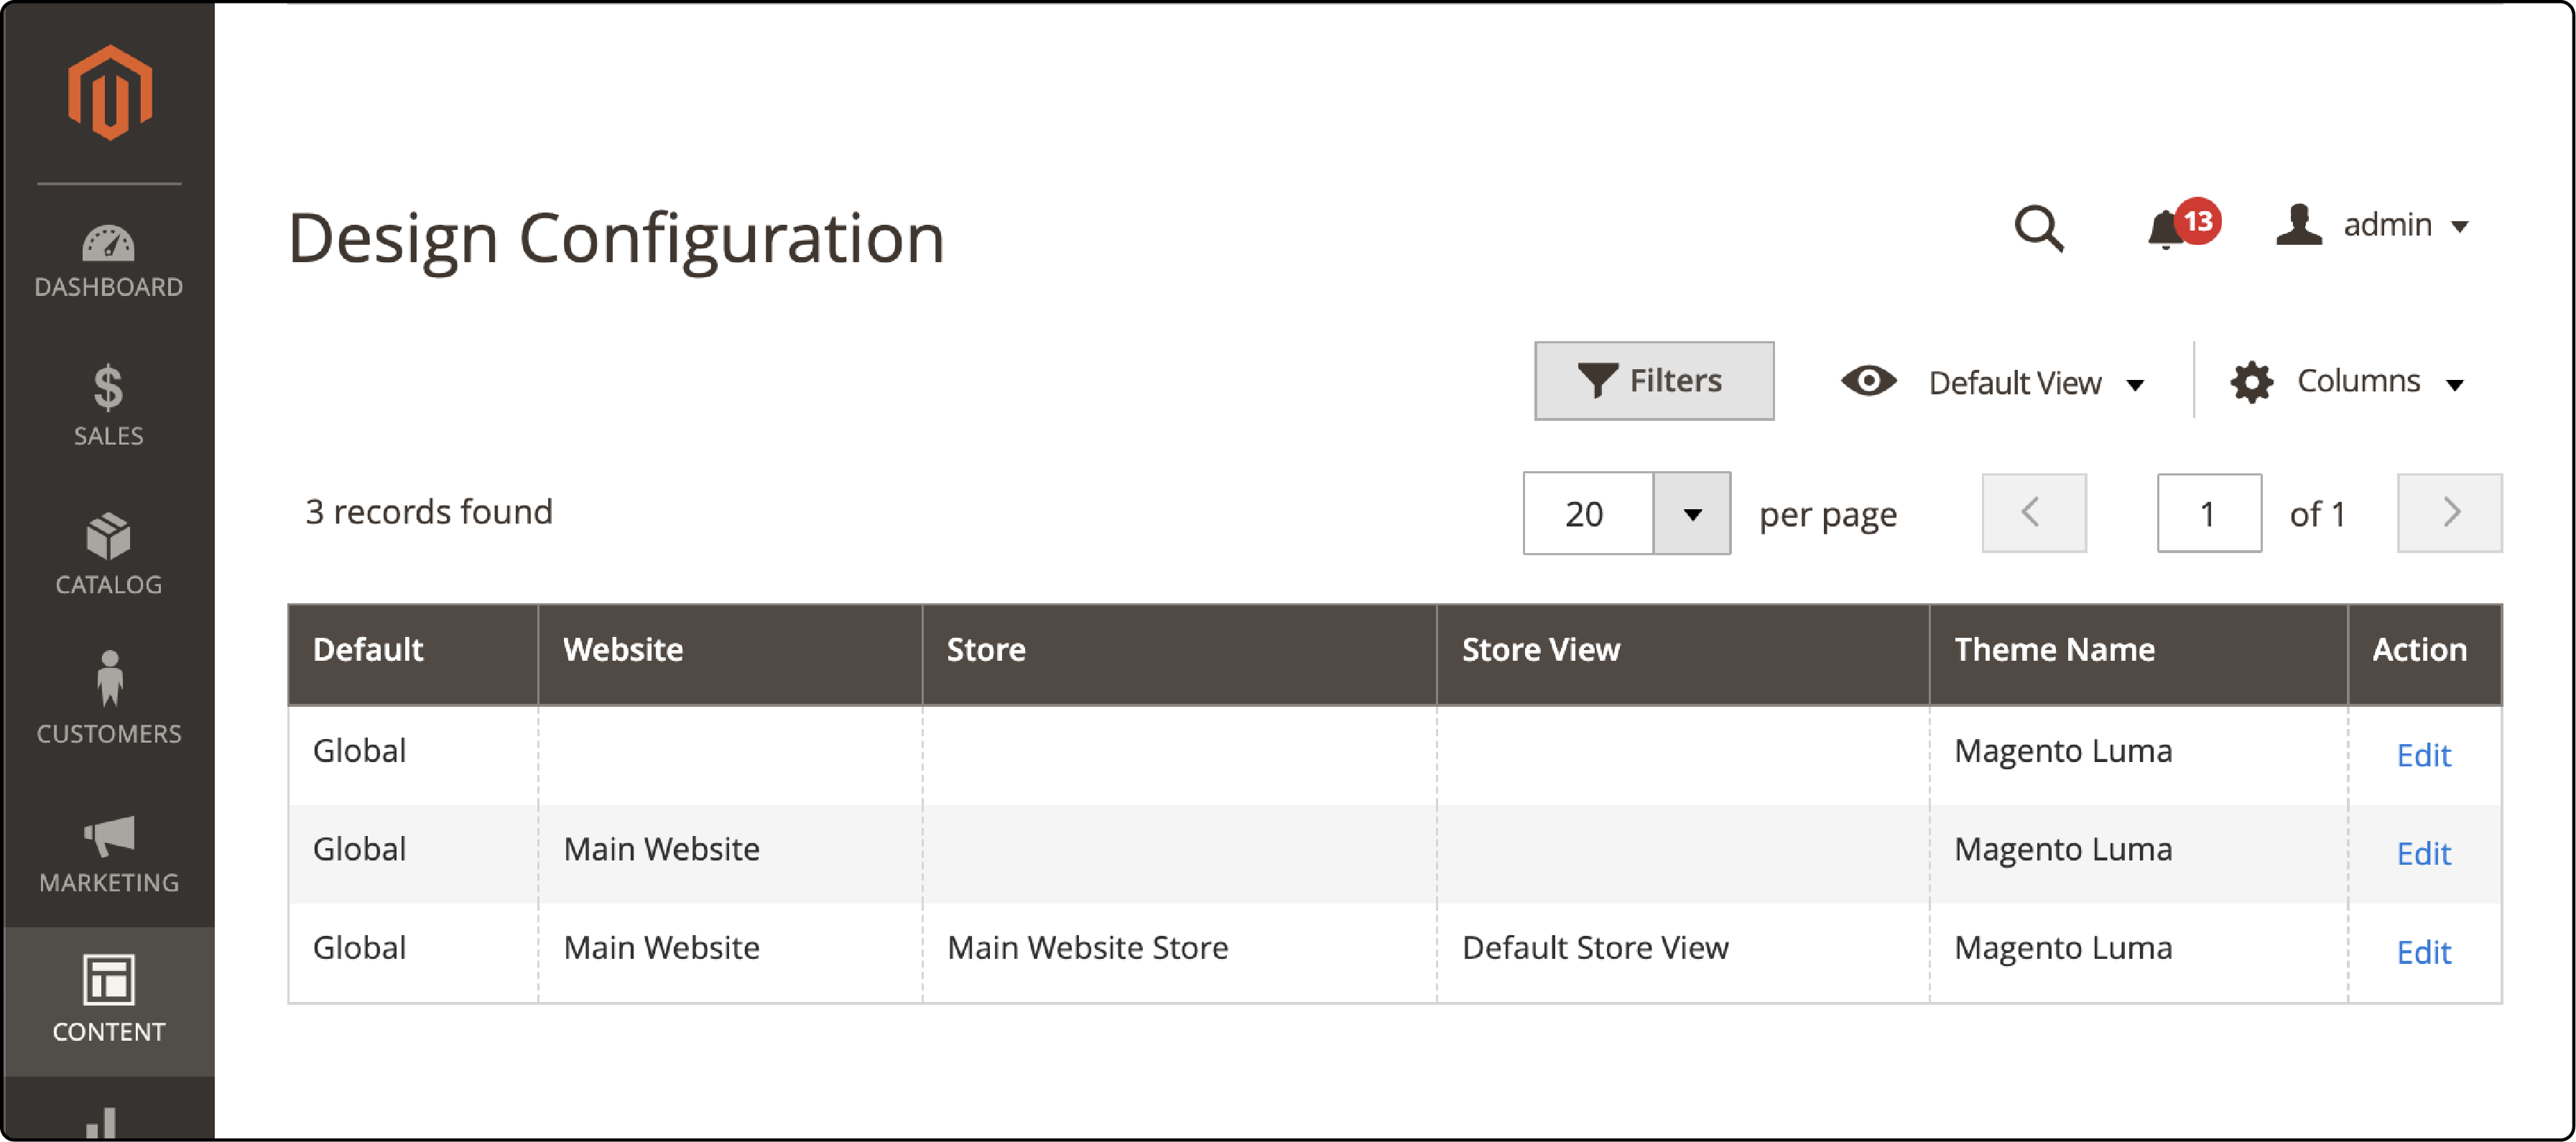
Log in to your Magento admin panel.
-
Navigate to Content.
-
Under Design, click the Configuration section.
-
Select a Store View for which you want to edit the header and click Edit in the Action column.
-
Next, Scroll down to find the Other Settings section.
-
Expand the HTML Head dropdown.
-
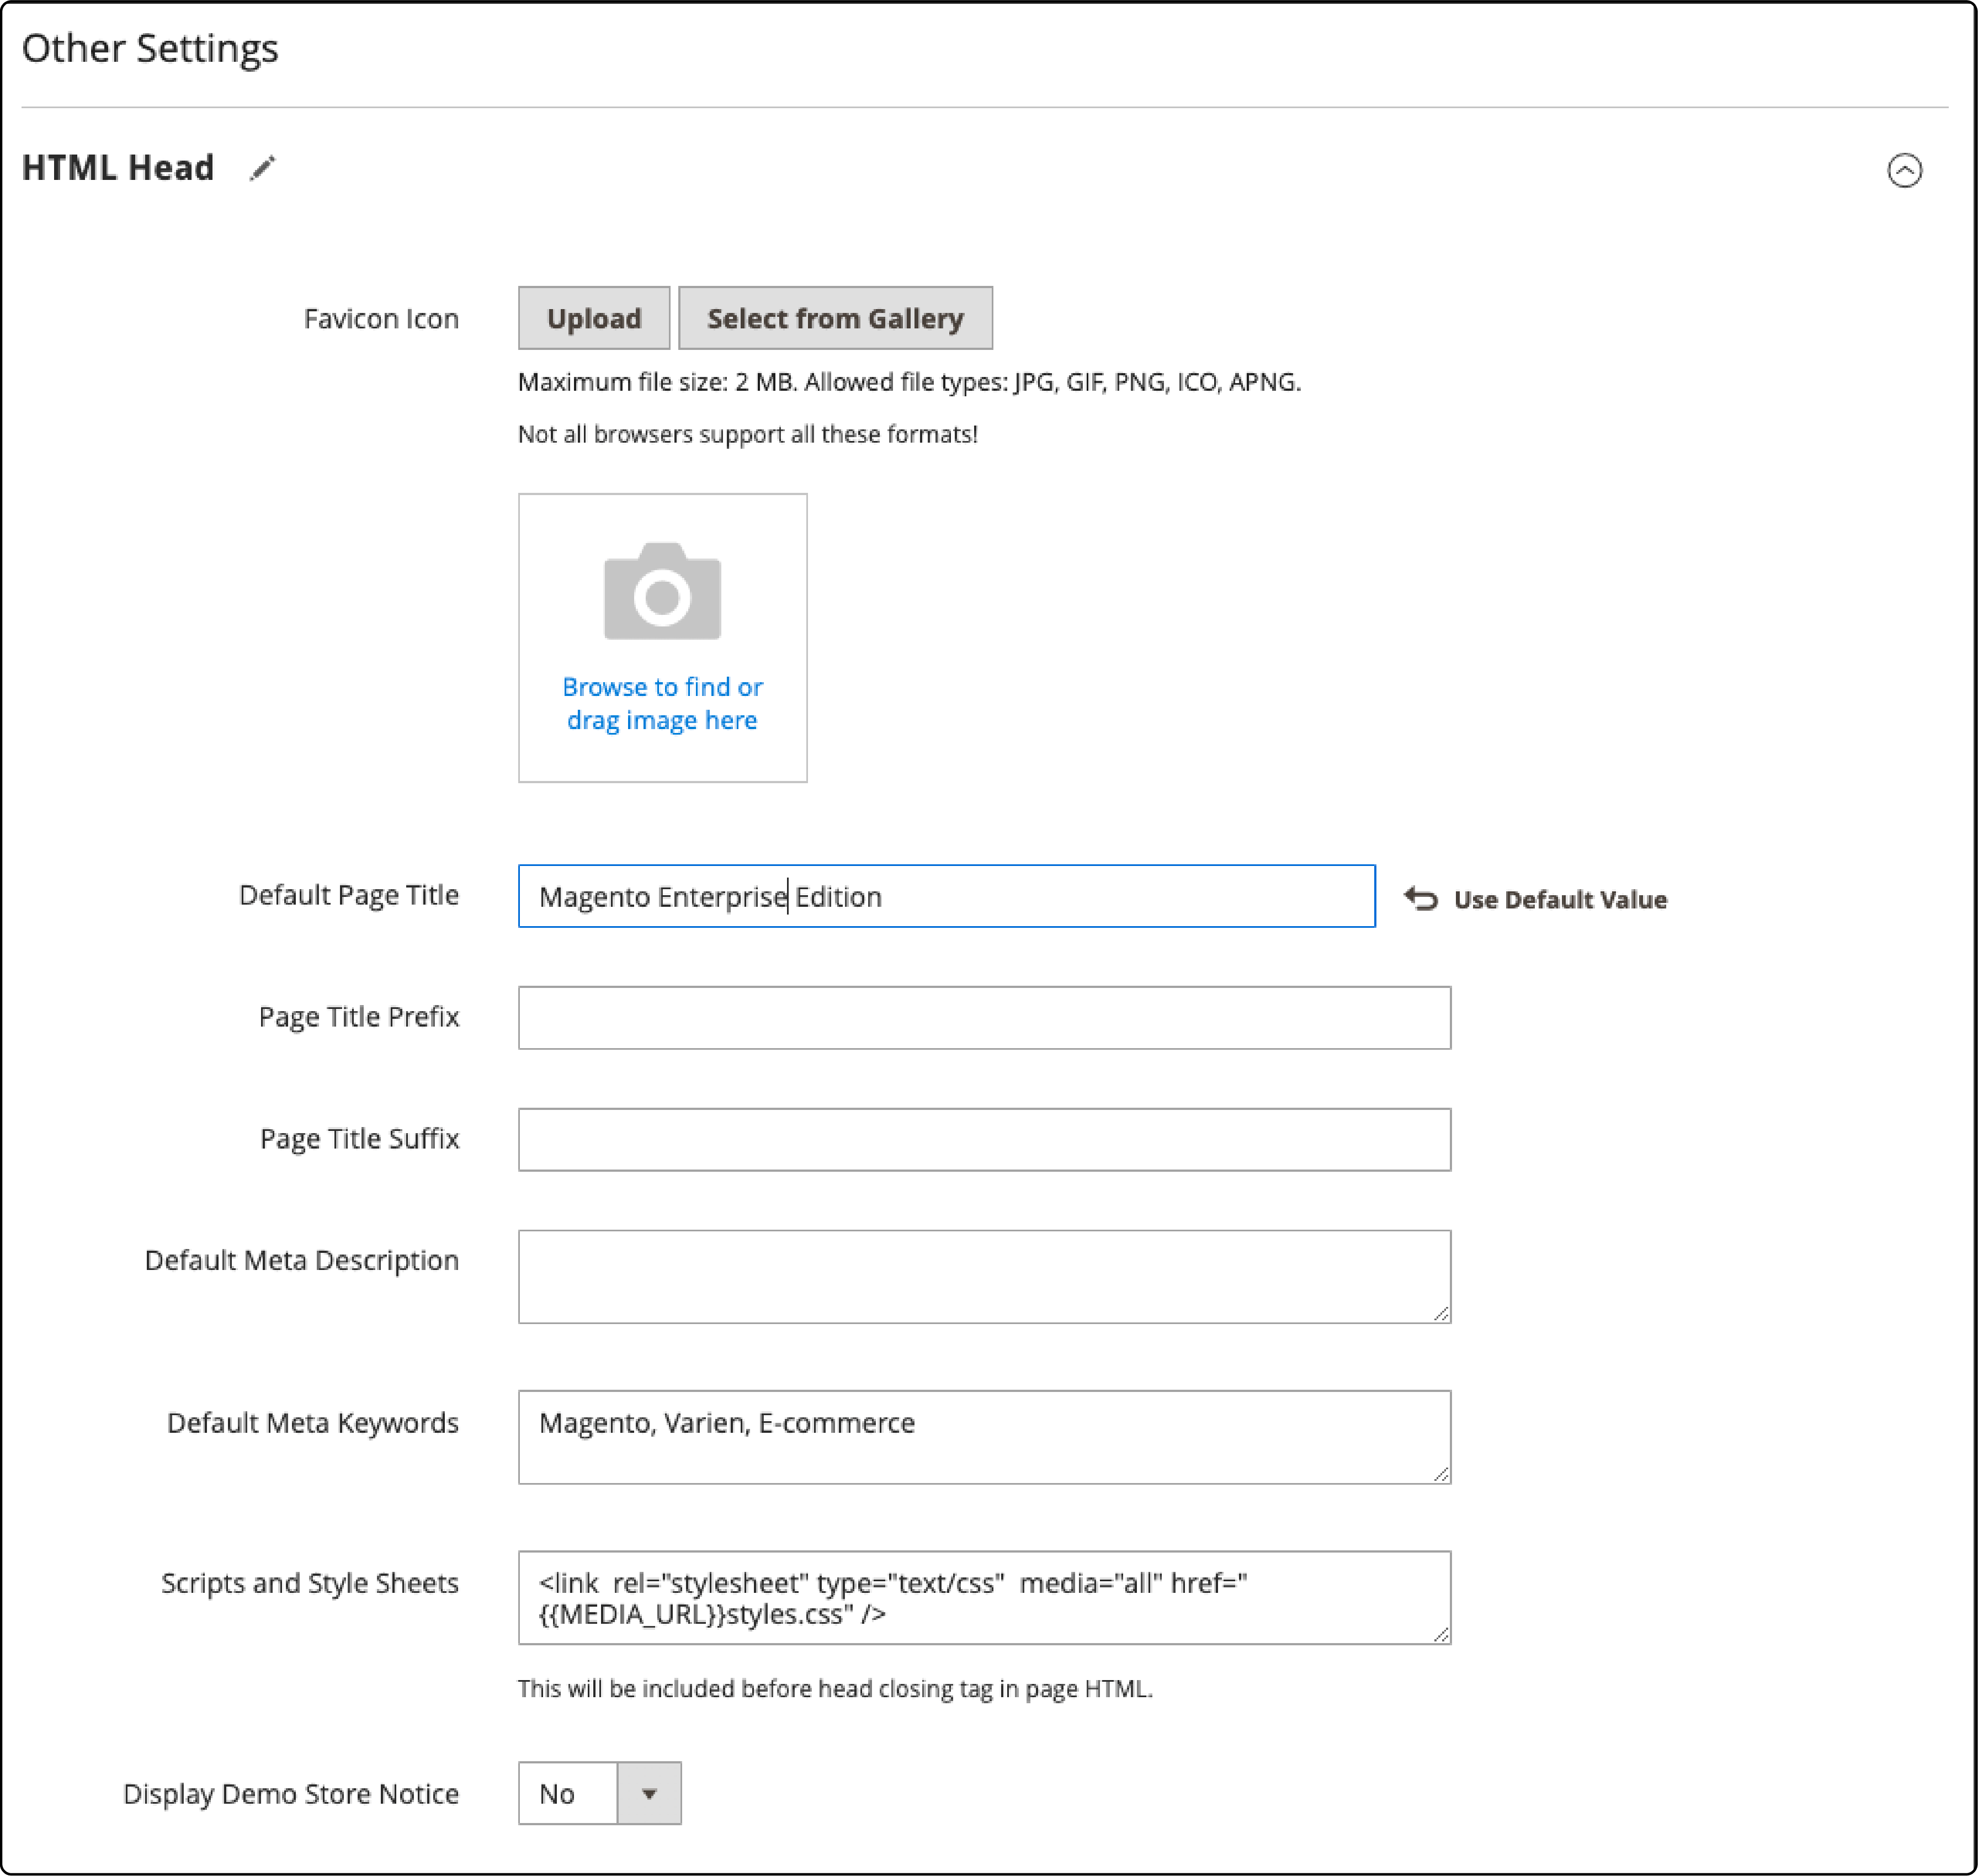
Next, adjust the following fields according to need and preference:
-
Add the Favicon image for the Magento 2 header. You can upload a Maximum file size of 2 MB, and Magento allows JPG, GIF, PNG, ICO, and APNG file types, giving you options for your brand's colors and fonts.
-
Add a Default Page Title to make your store's frontend more informative.
-
Add a suffix for your Magento page title for a consistent user experience across devices.
-
Add the Prefix for your Magento page title to reinforce your brand's identity.
-
Specify the Default Meta Description to optimize your site's SEO for better navigation and visibility.
-
Next, add the Default Meta Keywords to ensure your website ranks higher in search results.
-
You can specify the Scripts and Style Sheets, allowing you to fine-tune the design and layout based on different screen sizes and devices.
-
Next, choose whether to Display the Demo Store Notice to users on login by selecting the Yes and No options. It will help provide a smooth user experience regardless of the device.
-
- Click the Save Configuration button to make the changes permanent.
Note: The default Magento 2 does not allow adding a header to the checkout page on your online store. However, with the help of experienced developers, you can still add a header to your checkout pages. It will require tweaking the checkout.xml file of your Magento site.
Customizing the header design in Magento 2
Magento 2 allows fine-tuning the header template to enhance the user experience on your online store. The process ensures your Magento site adapts perfectly to any device or version.
Here’s how you can tweak the Magento backend settings to alter the header:
-
Log in to your Magento admin panel.
-
Navigate to Content.
-
Under Design, click the Configuration section.
-
Select a Store View for which you want to edit the header and click Edit in the Action column.
-
Next, Scroll down to find the Other Settings section.
-
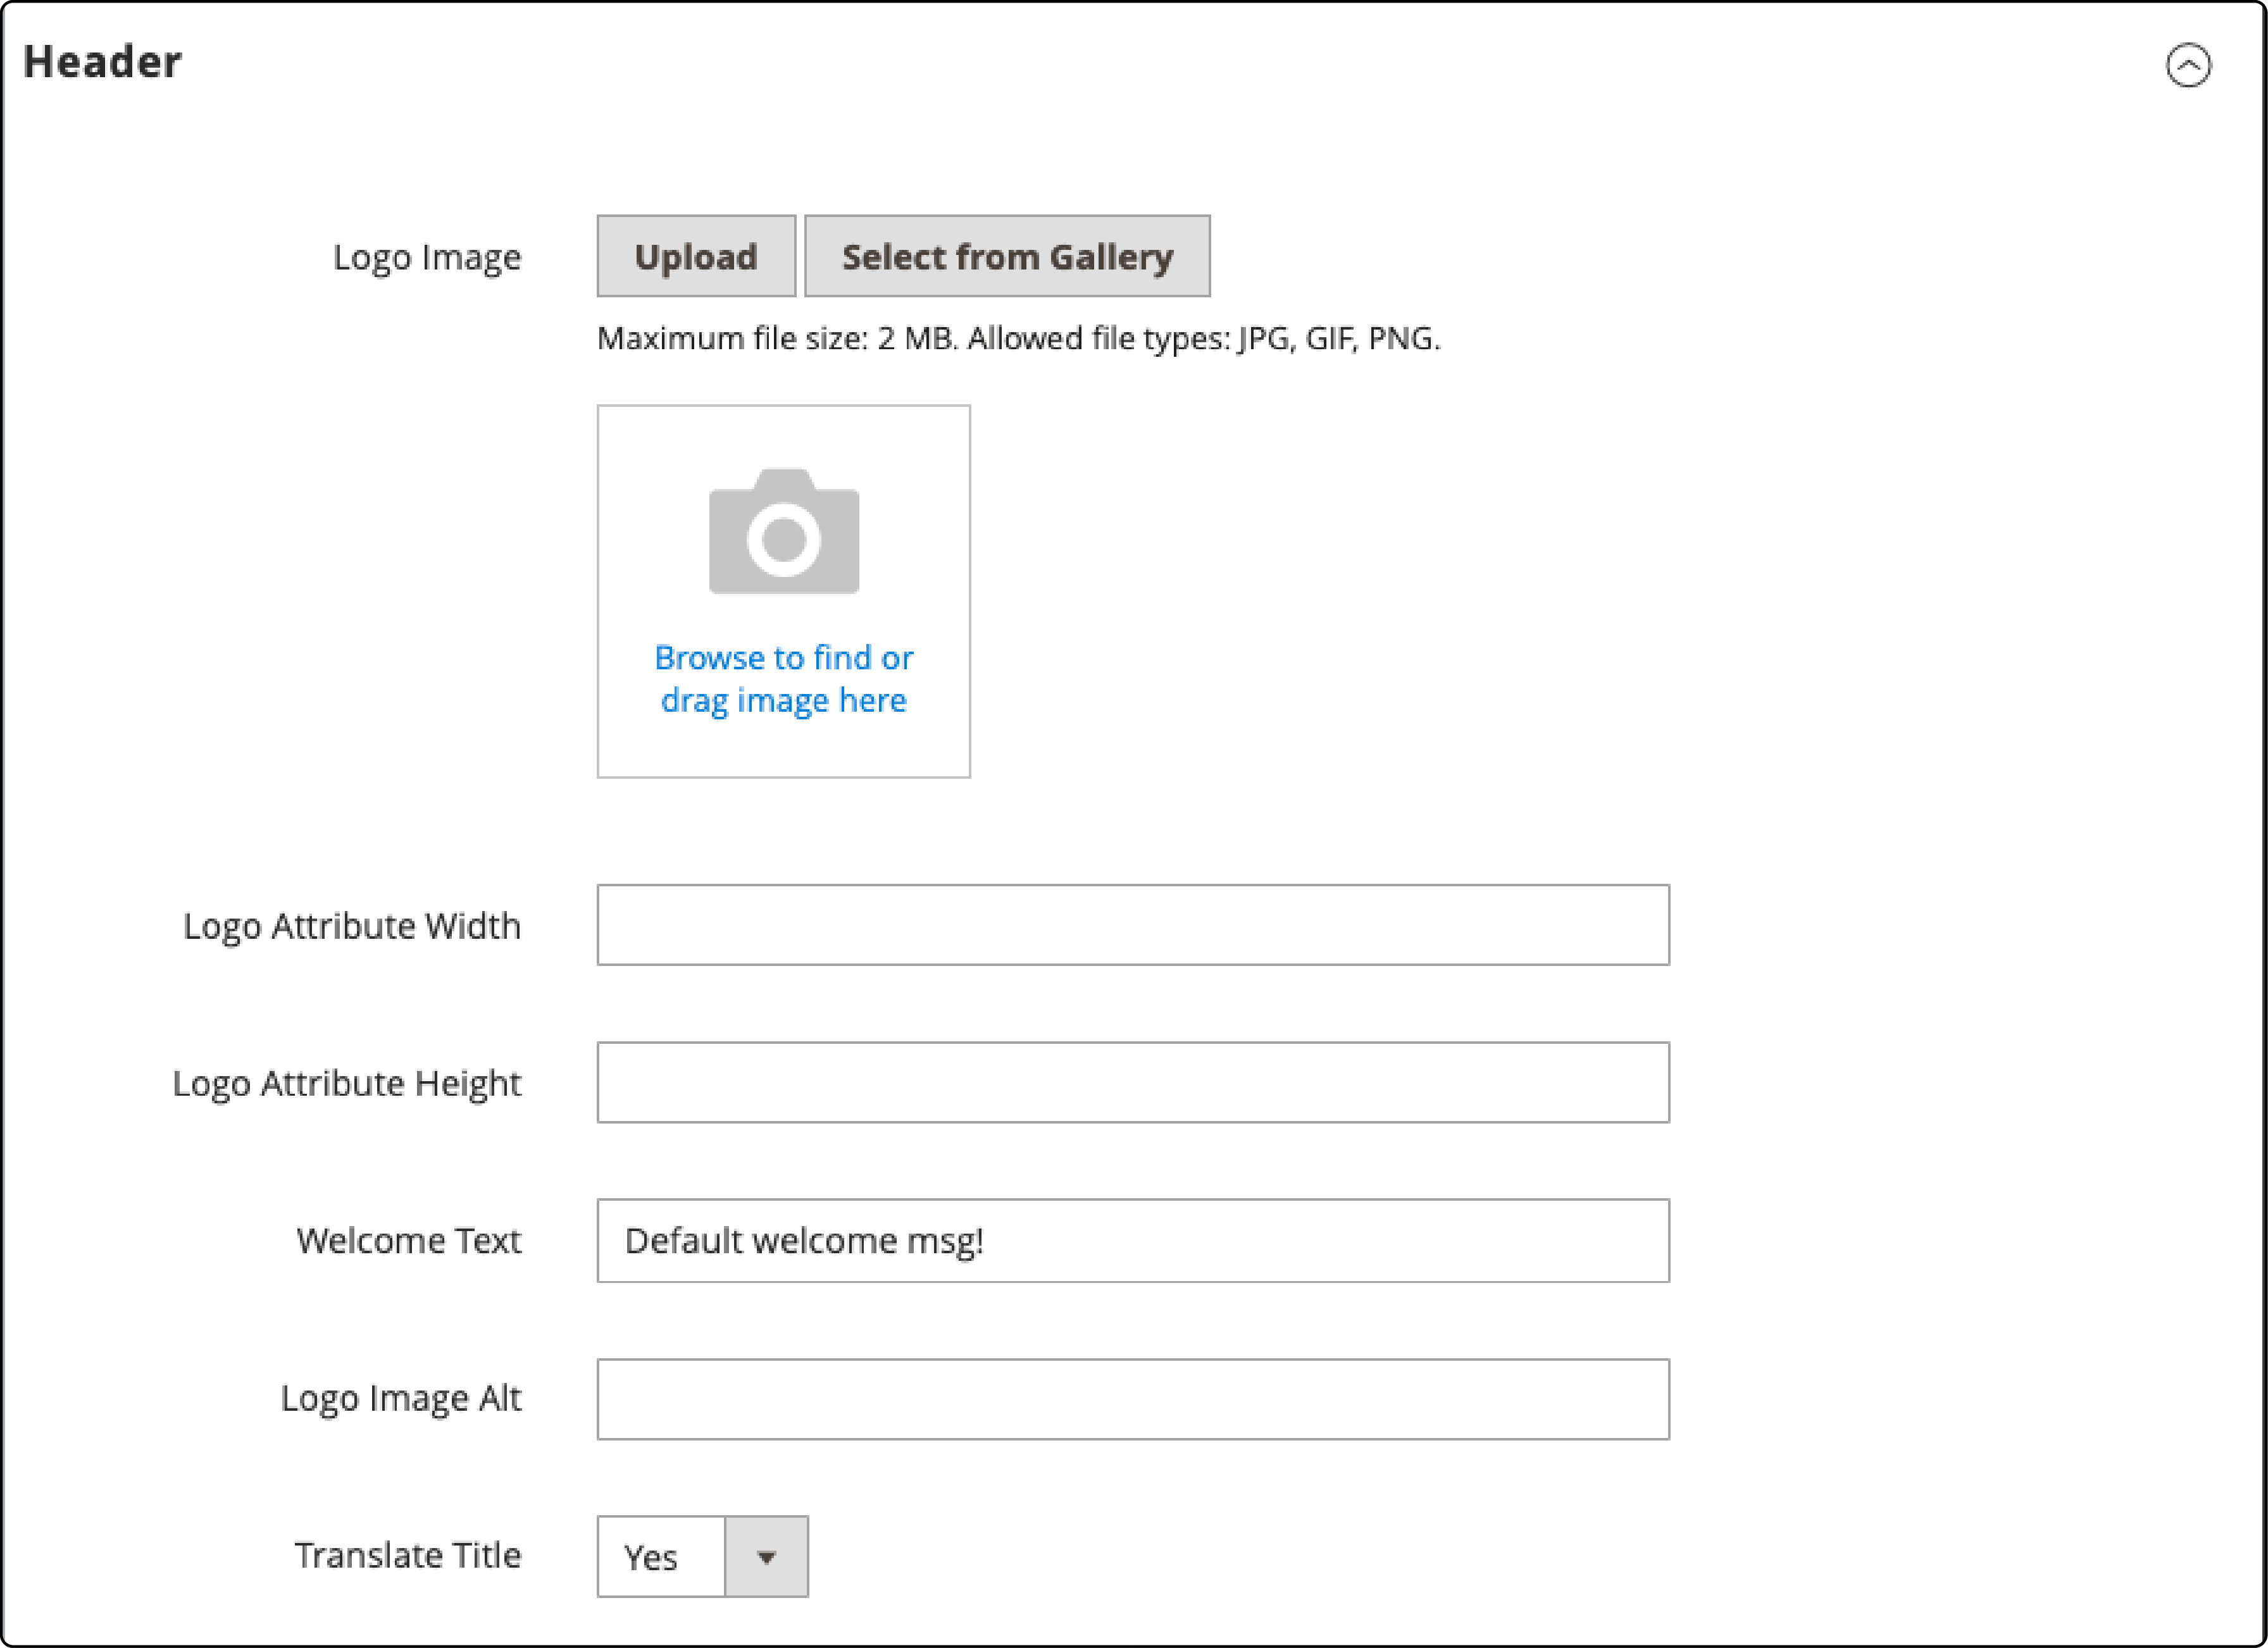
Expand the Header dropdown.
-
Adjust the settings to cater to how users interact with your site. It will ensure a consistent and user-friendly experience across devices.
- Once you make all the necessary changes, click the Save Configuration button.
Configuring the Footer Design in Magento 2
Customizing the footer design in Magento 2 allows you to add a personalized touch to your Magento storefront. It also helps create a design that appeals to users on both mobile and desktop devices. The process includes adding copyright information and essential links that resonate with your brand identity. It makes for an ideal choice for businesses of all sizes.
-
Log in to your Magento admin panel.
-
Navigate to Content.
-
Under Design, click the Configuration section.
-
Select a Store View for which you want to edit the header and click Edit in the Action column.
-
Next, Scroll down to find the Other Settings section.
-
Expand the Footer dropdown.
-
Next, fill in the following fields to enhance the user experience for your clients:
-
Add the Miscellaneous HTML details. It is displayed before the body closing tag, ensuring that your users easily find the information they need.
-
Specify the Copyright details to reinforce your brand's identity and protect your intellectual property rights.
-
Set the Display Report Bugs Link field to Yes. It offers transparent communication with your users, building trust in your products and services.
-
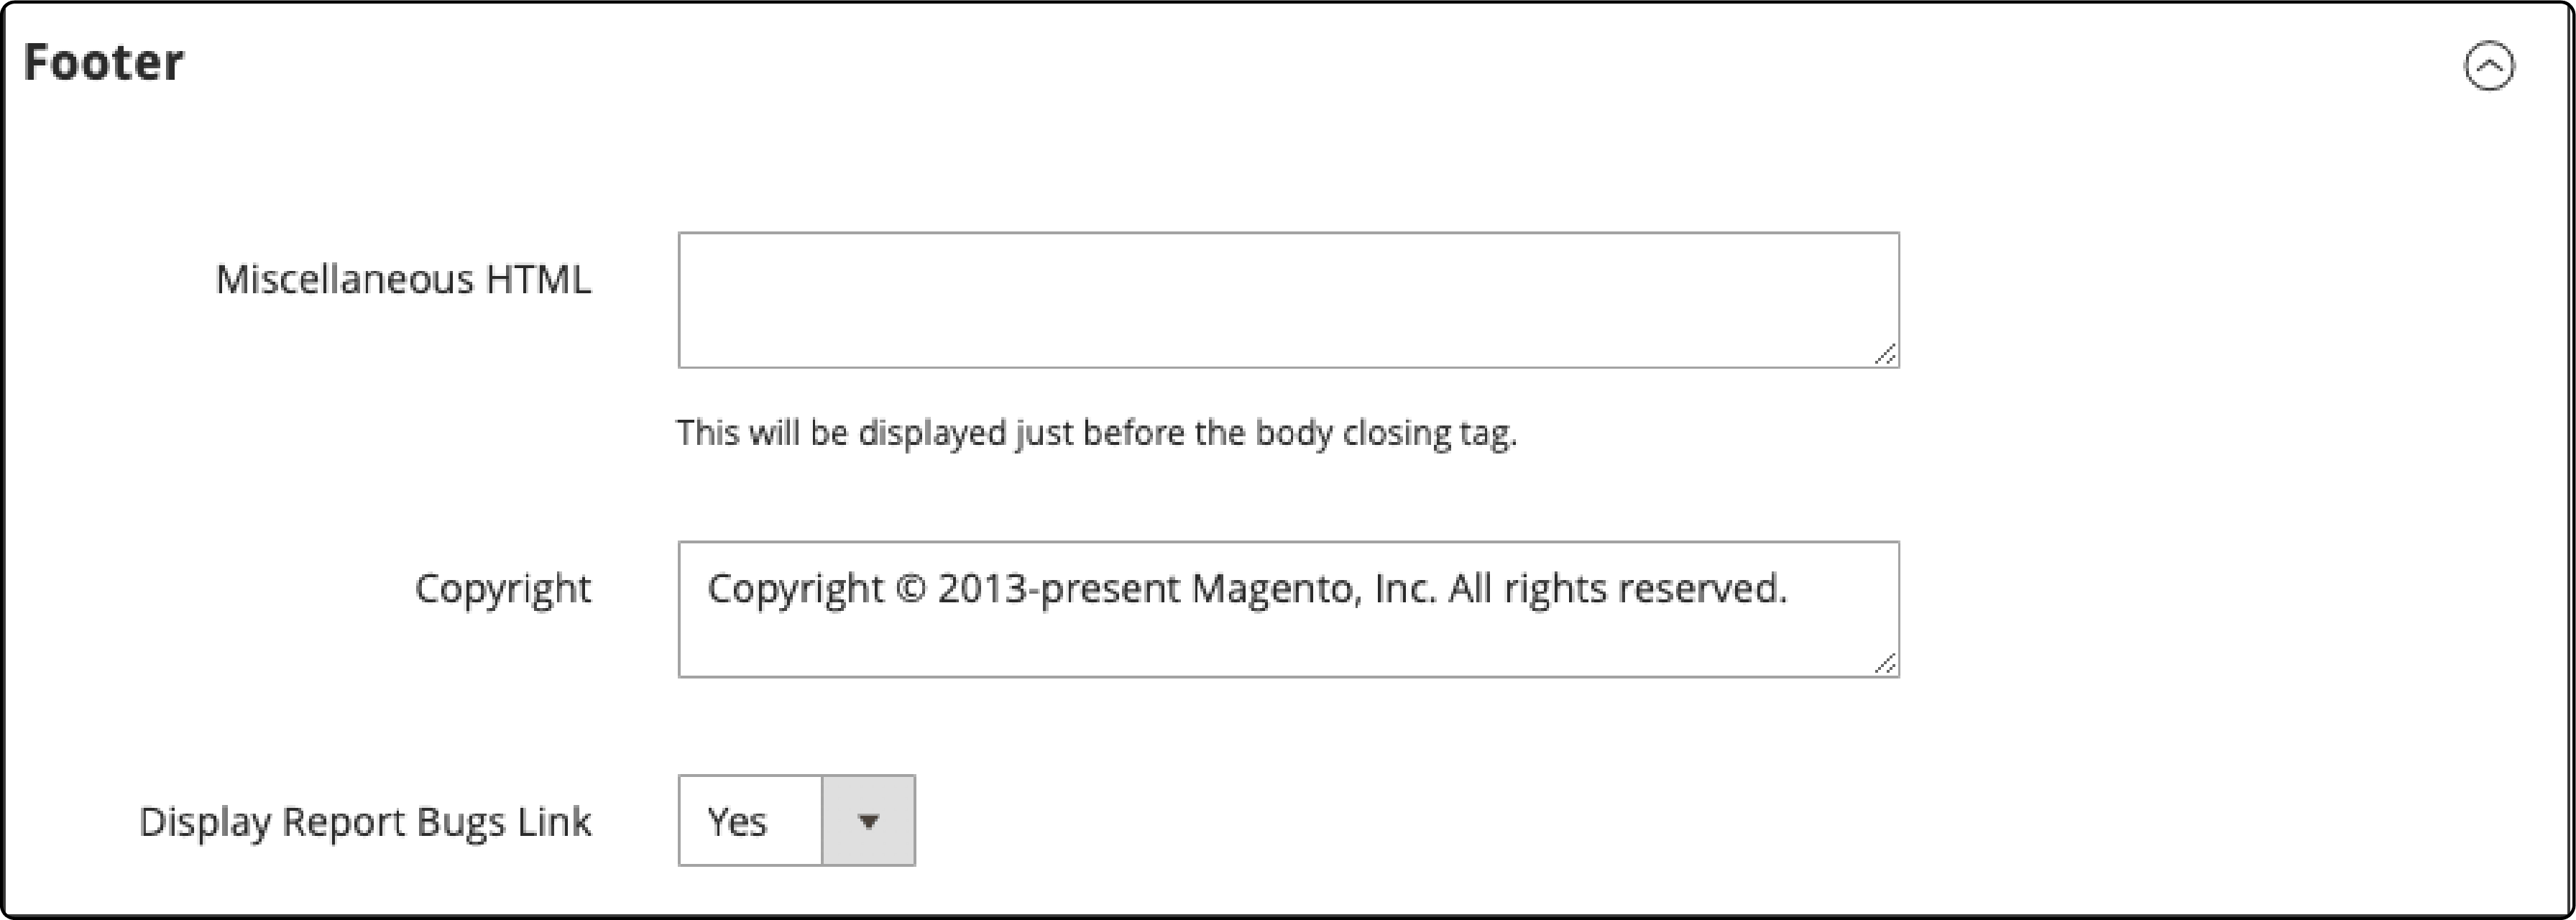
- Once you make all the necessary changes, click the Save Configuration button.
Follow the steps above to create an engaging user experience catering to clients and businesses. It will ensure that users find what they need while browsing your online store.
Changing the store email addresses
In Magento 2, store owners can set up different email addresses for various functions like customer support or order updates. It allows for efficient communication with the customers.
-
Log in to your Magento admin panel.
-
Navigate to Content.
-
Under Design, click the Configuration section.
-
Select a Store View for which you want to edit the header and click Edit in the Action column.
-
Next, Scroll down to find the Other Settings section.
-
Expand the Transactional Emails dropdown.
-
Next, adjust the following Fields to enhance communication and offer responsive customer support:
-
Add a Magento Logo Image to make your emails more visually appealing, reinforcing your brand's image.
-
Specify the Logo Image Alt for better accessibility. It will ensure all users can interact with your brand regardless of device or location.
-
Define the Logo Width to create a consistent email layout. It will make it easy for users to read your messages on various devices.
-
Define the Logo Height to optimize email readability. It ensures your messages reach the customers effectively.
-
Select a Header Template to match your brand's design. It will make your emails visually appealing and professional.
-
Select a Footer Template to reinforce your brand's identity in every communication.
-
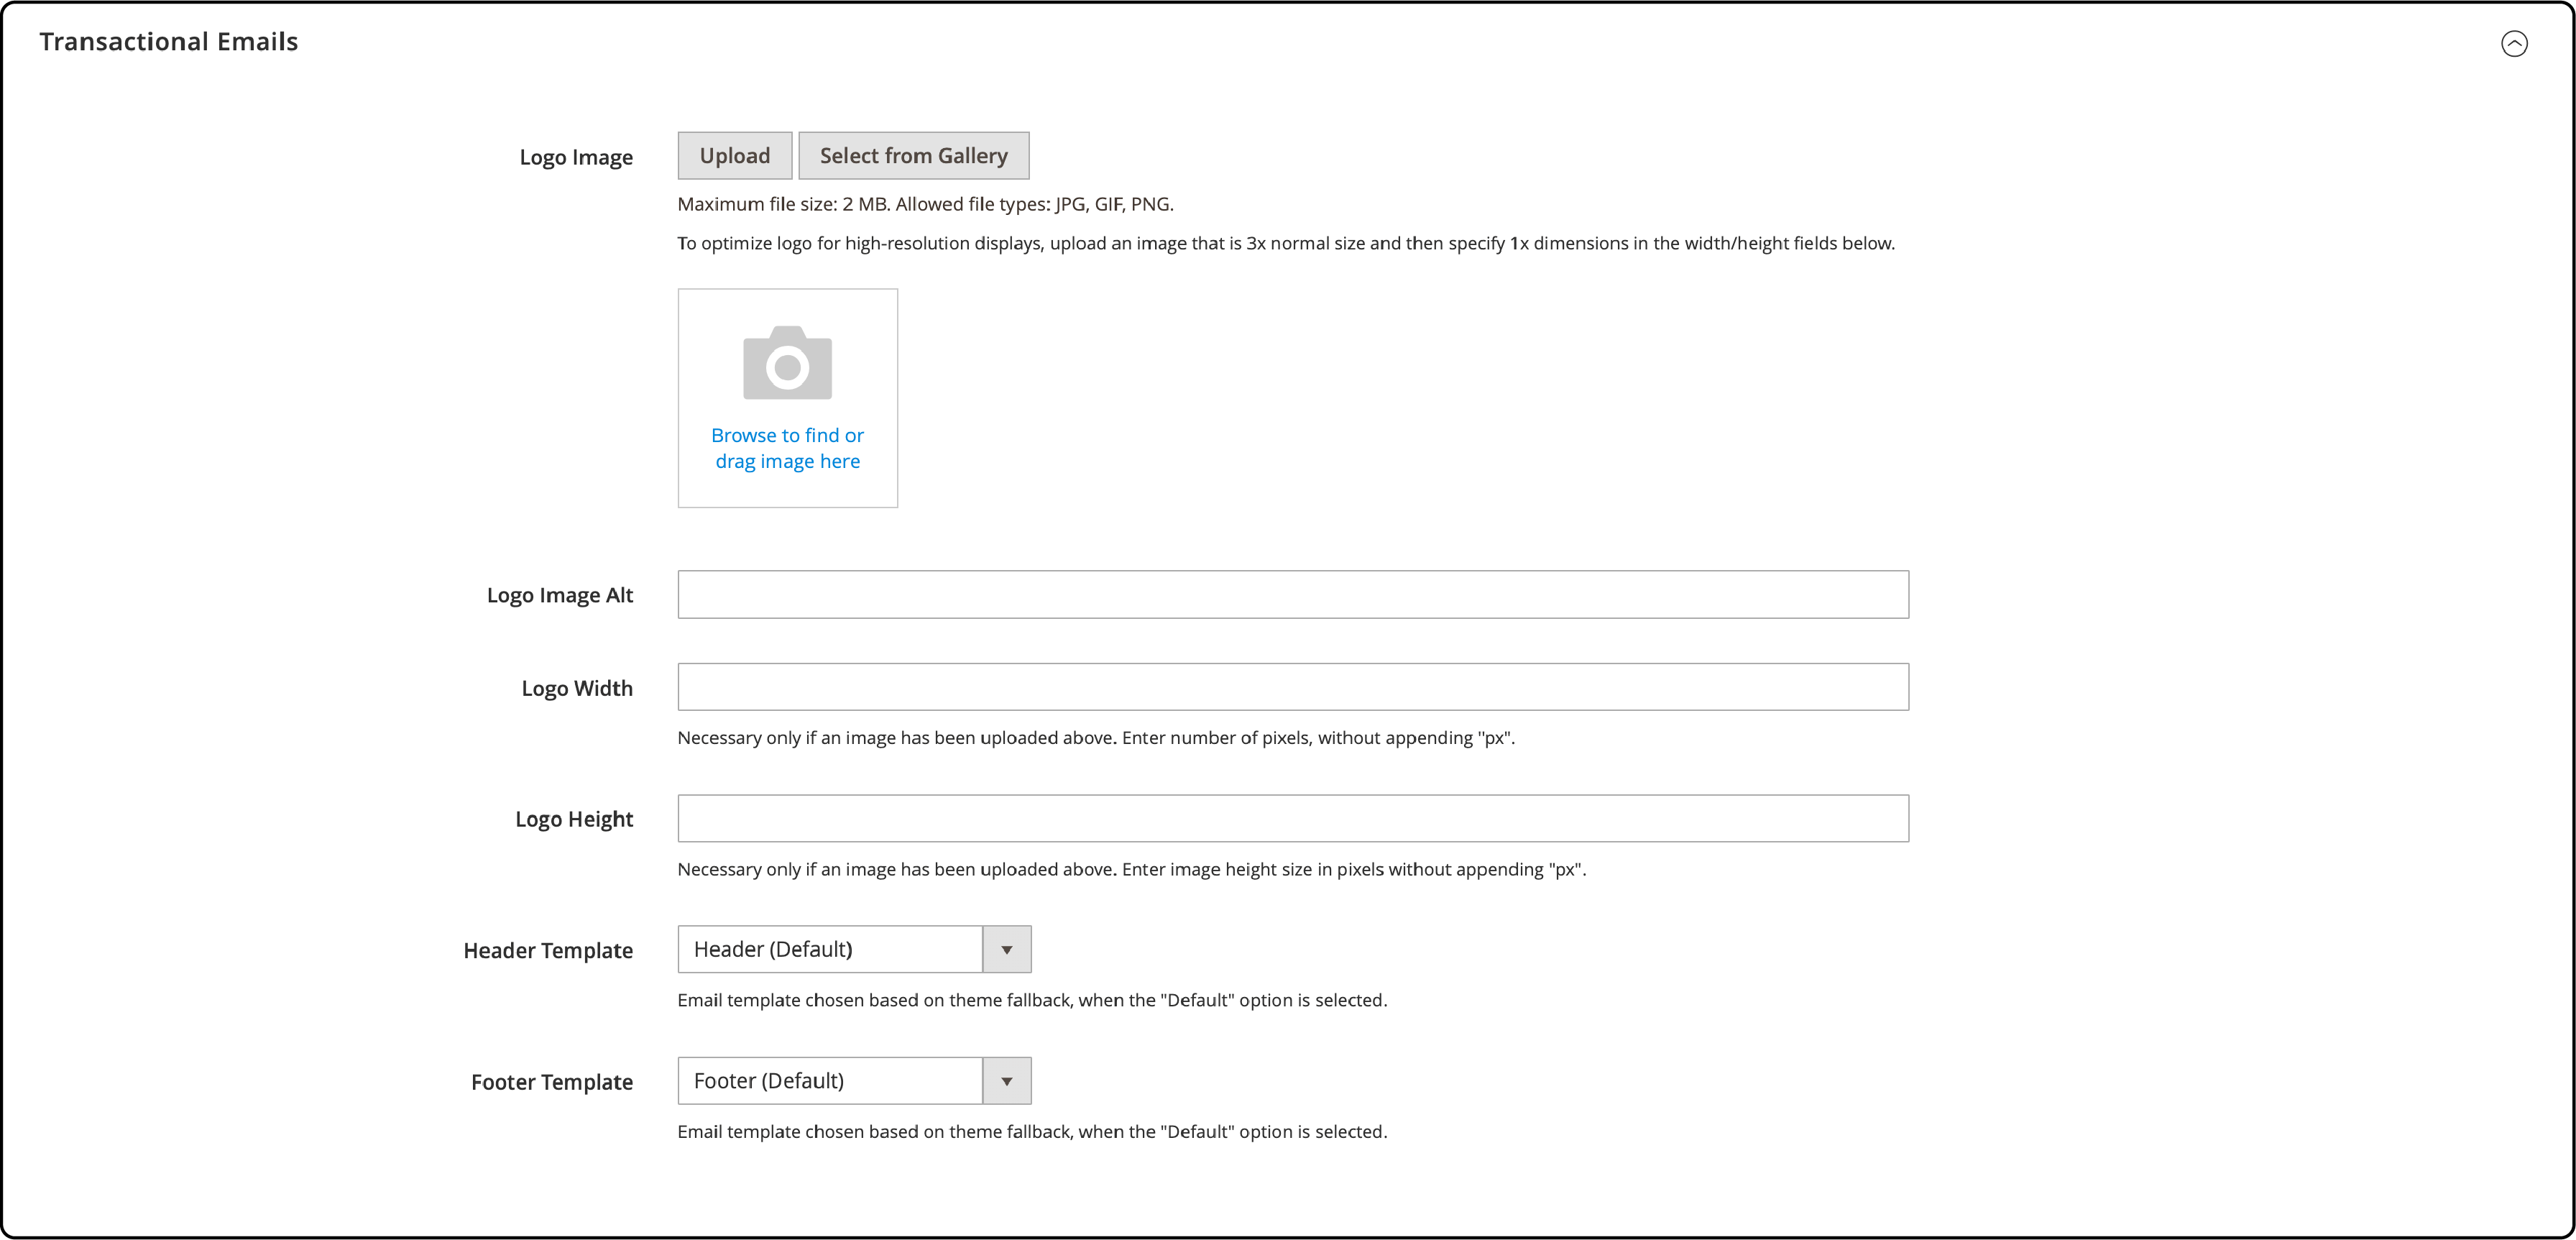
- Once done, click the Save Configuration button.
Common Issues and Tips for Configuring Design in Magento 2
Sometimes, you may need help with setting up your store's design. One of the most common issues is that changes do not reflect on the site’s front end, even after saving the configurations, affecting mobile and desktop users. It could be a result of caching. To fix the issue, flush the Magento 2 cache.
Another problem you may face is that the CSS or layout updates must be fixed, impacting the design and layout for mobile and desktop users. To fix the issue, ensure you've deployed static content when working in production mode.
To do the same, run the command bin/magento setup:static-content:deploy using SSH (Secure Shell) or your server's command line interface. It will ensure all users can access your site's features and functionalities.
Also, check that you uploaded images and extensions with the correct paths and filenames. The process will allow all users to offer responsive images and seamless navigation. Ensure that permissions are set right so Magento 2 can read them. Address any issues or questions your clients and businesses may have.
FAQs
1. What is the significance of header configuration in Magento 2, and how does it impact responsive design for mobile and desktop users?
Header configuration in Magento 2 is vital for maintaining a professional and user-friendly appearance on your website. You can assign and modify header content according to your preferences. It will ensure that your website's header aligns with your brand's image and provides a seamless user experience.
2. How can I edit the header template and layout in Magento 2 to ensure a responsive design?
You need to modify the XML code in your theme to edit the header template and Magento 2 layout. Navigate to your theme's XML files and locate the header section. Make the necessary changes to customize the header's appearance and functionality.
3. Can I customize the customer account link of the header in Magento 2 store for a better user experience?
Yes, you can customize the customer account link in the header of your Magento 2 store to offer a more personalized and responsive user experience.
You'll need to edit the header template and layout files to do this. By modifying the XML code and linking it to your desired page, you can create a user-friendly navigation path for clients.
4. How do I change the email header in Magento 2 for better communication with clients and businesses?
To change the email header template in Magento 2 and improve communication with clients and businesses, you should modify the XML and code related to email templates. Locate the email header template file, customize it as needed, and then update the configuration to link it with your email templates.
5. What is the role of headers and footers in configuring a Magento 2 theme, and how does it impact responsive design?
Headers and footers in Magento 2 theme configuration play a crucial role in defining the layout and structure of your online store. To create a user-friendly and visually appealing design, you can modify these sections using custom code and adding Magento top links.
The flexibility of Magento 2 allows you to adapt these elements according to your preferences while maintaining a clean and organized page layout.
6. Can I modify header links in Magento 2 for a more responsive and user-friendly navigation experience?
Yes, you can use the header links module to change the links in your header in the Magento 2 store. It is a user-friendly approach that allows you to easily assign and customize header links, providing a professional and tailored experience for your website visitors, regardless of their device or version.
7. What is a favicon, and how do I add one to my Magento 2 website for better branding and design?
A favicon is a small icon on browser tabs next to your webpage title, contributing to your website's branding and design. If you want to change or add the favicon to your Magento 2 website, access your Adobe e-commerce site’s admin panel and upload an image file.
Follow the detailed steps provided in the previous sections. It will ensure a consistent and attractive branding experience for all users.
Summary
Magento header configuration is crucial in offering a responsive and visually appealing user experience on your Magento website. It is essential for building a brand identity ensuring consistency in color, font, and design across devices and versions. This tutorial covered the essentials of header, HTML head, and footer customization. The knowledge shared will help create an engaging and user-friendly online store.
Explore the potential of your online store and enhance your e-commerce strategy with a robust Magento hosting platform.


