Magento 2 Cache Management: Best Practices
Do you know how Magento 2 cache management boosts data storage and retrieval in your Magento 2 store? It ensures that your store runs smoothly and loads faster. Magento 2 cache management speeds up data retrieval and processing, leading to faster page loading times. This tutorial covers everything about managing Magento 2 cache and setting it up for your online store.
Key Takeaways:
-
Manage your store's cache directly from the Magento 2 admin panel for convenience.
-
Clear specific or all caches as needed to keep your website running smoothly.
-
Enjoy benefits like better performance, the latest content, improved user experience, and enhanced SEO.
-
Learn cache maintenance best practices, like optimal times for flushing caches and peak time considerations.
-
Master essential commands for cache management via the command line interface for efficient troubleshooting.
What is Magento Cache Management?
Magento cache management boosts your Magento 2 store's performance and speed. It uses caching techniques to store often-accessed data in temporary storage. It reduces server load and improves response time for users.
The cache management system of Adobe Commerce and Magento Open Source boosts your site's performance. If a cache needs refreshing, you'll get a notification. This notification includes a link to the Cache Management page, where you can refresh the cache.

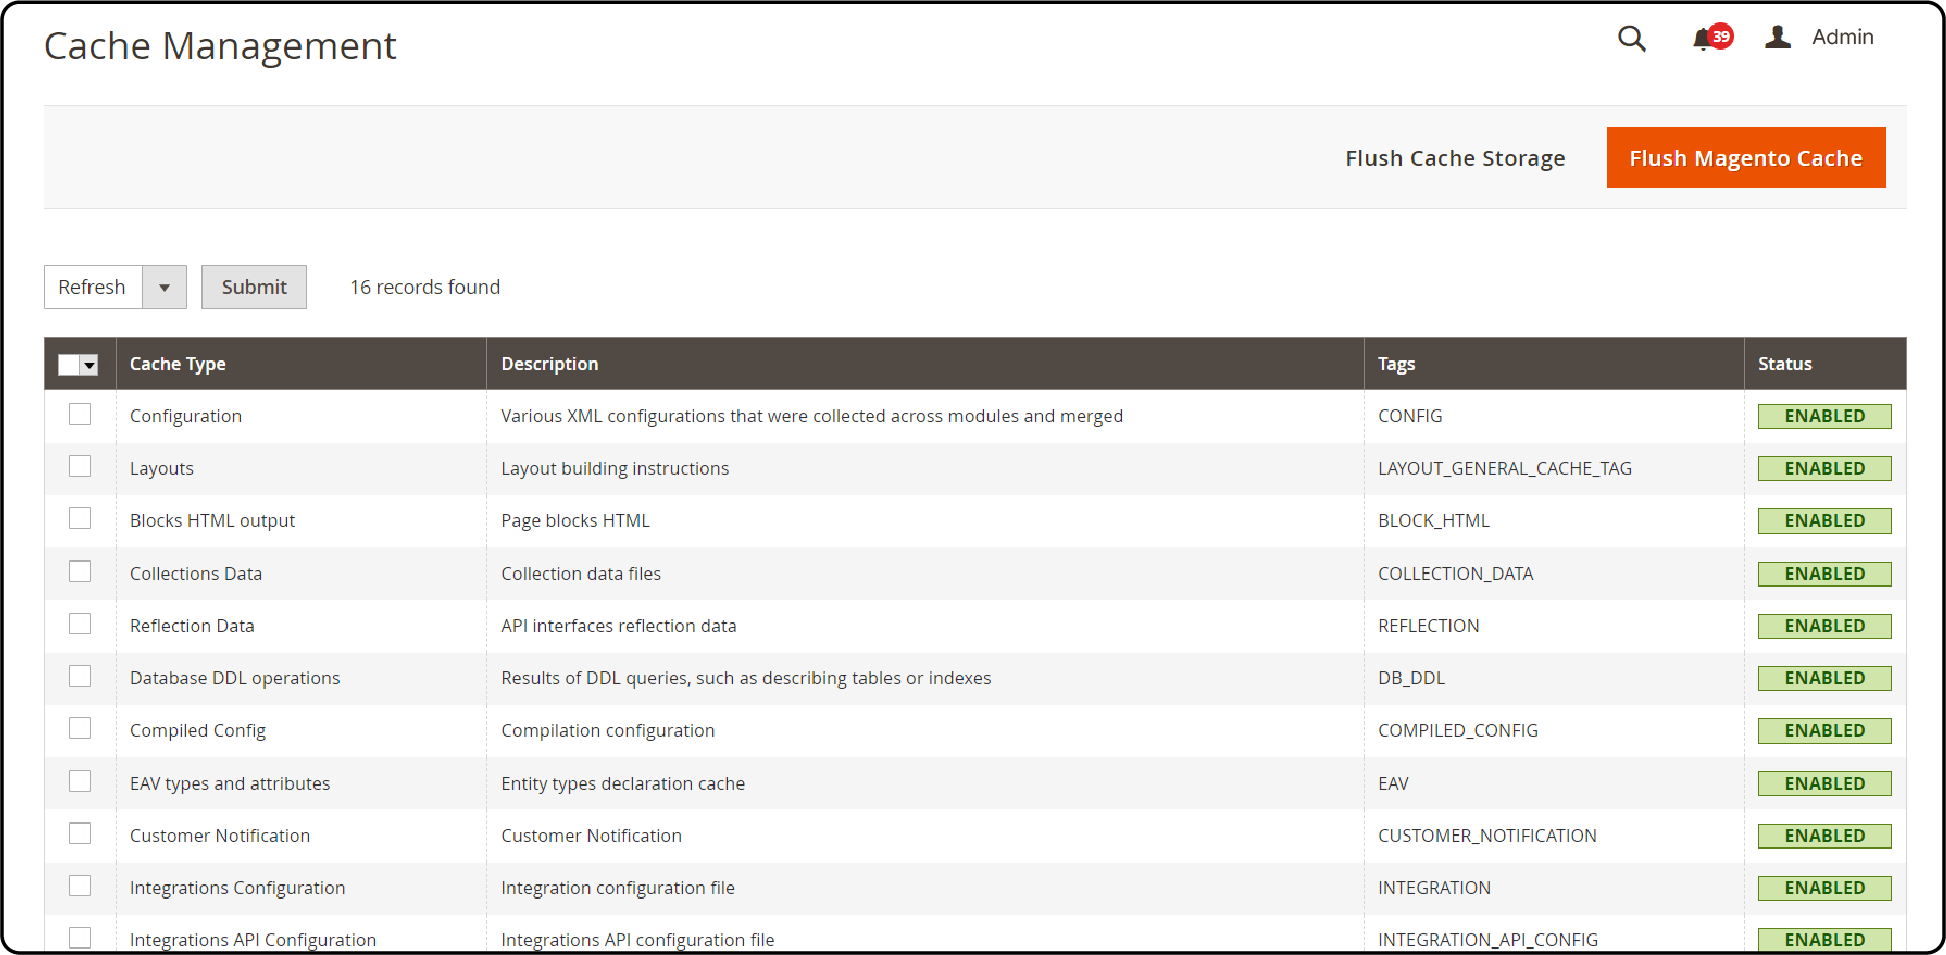
The Cache Management page displays the status of each primary cache along with its tag. There are large buttons in the upper-right corner. These buttons can flush the cache or the entire Cache Storage. At the page's bottom, there are extra buttons. These buttons let you clear the catalog product images cache and the JavaScript/CSS cache.
Always refresh your browser after clearing a cache. It ensures you see the latest files. Clearing the Commerce cache won't clear your browser's cache. To see updated content, you should clear your browser cache separately.
How to Access the Cache Management Page?
- Click Cache Management above the workspace.
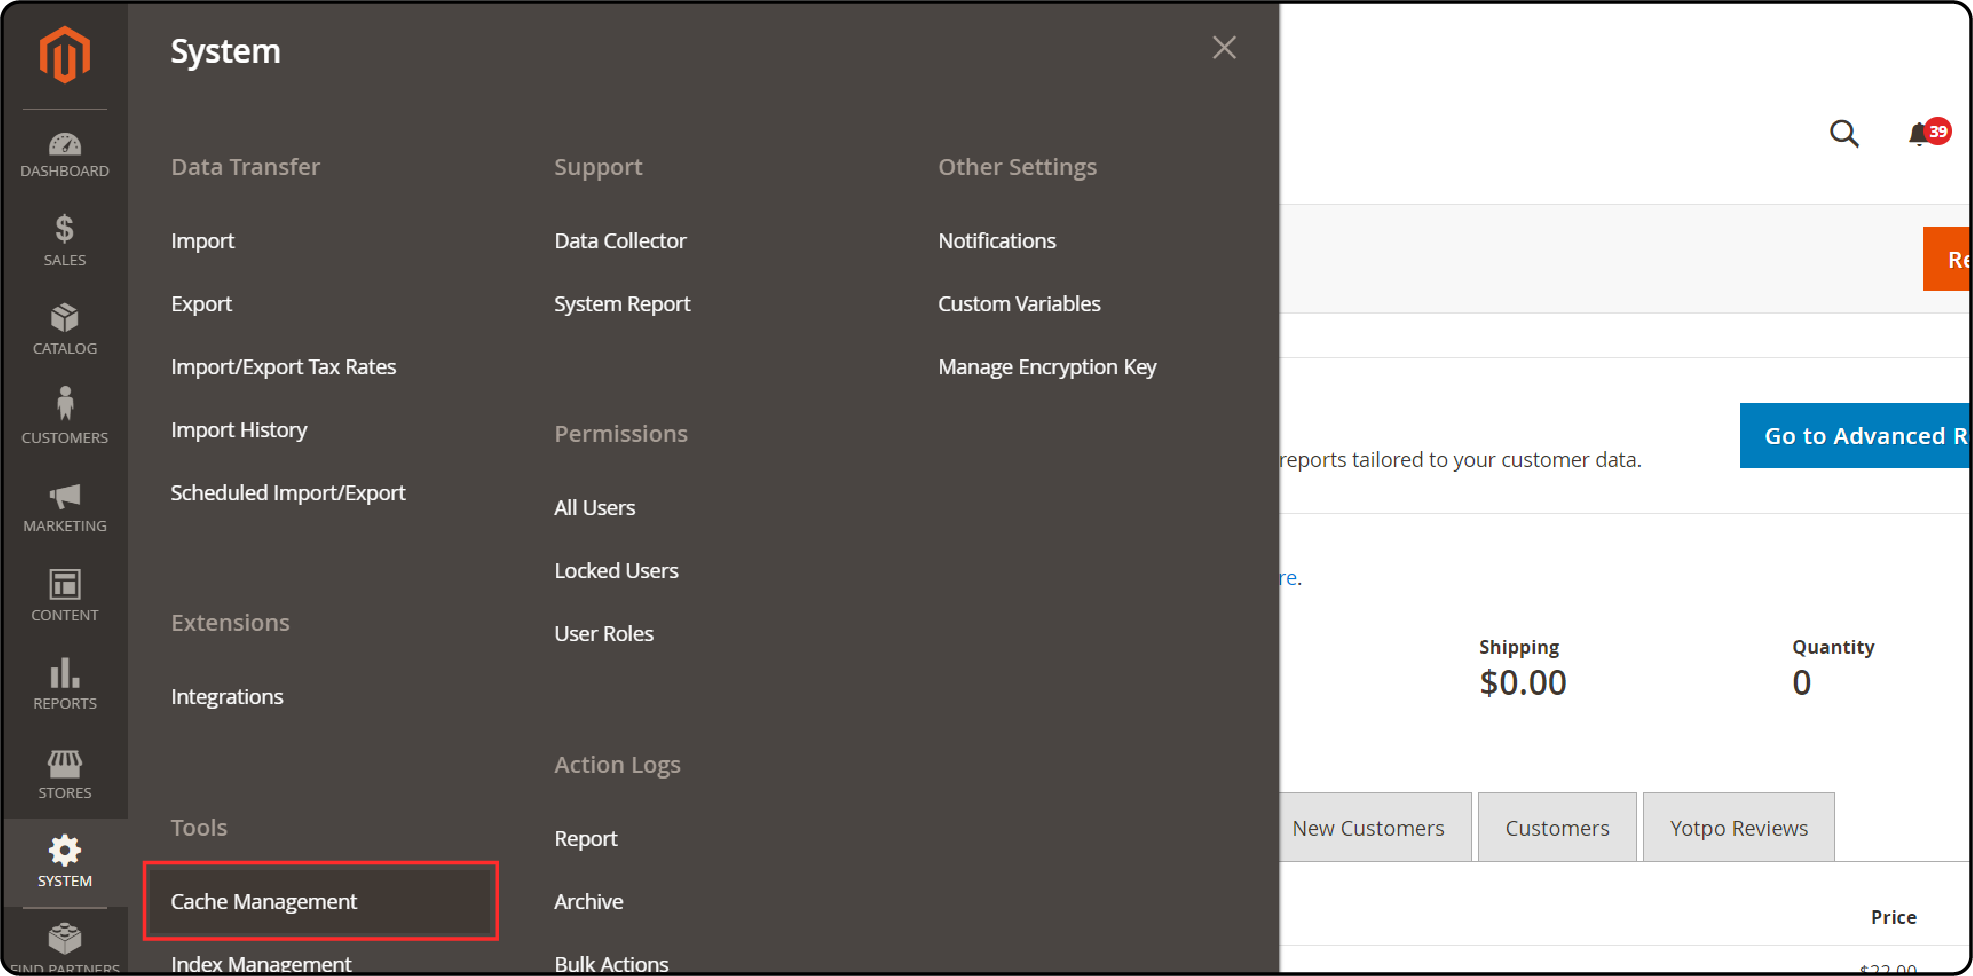
- In the Magento Admin sidebar, navigate to System > Tools > Cache Management.
How to Assign Access to Specific Cache Maintenance Actions by Roles
You can give users access to certain cache maintenance actions based on their role. These actions include viewing, toggling, and flushing caches. Adobe suggests that only users at the administrator level should be able to flush caches. Giving access to all Cache Management features may affect the performance of your storefront.
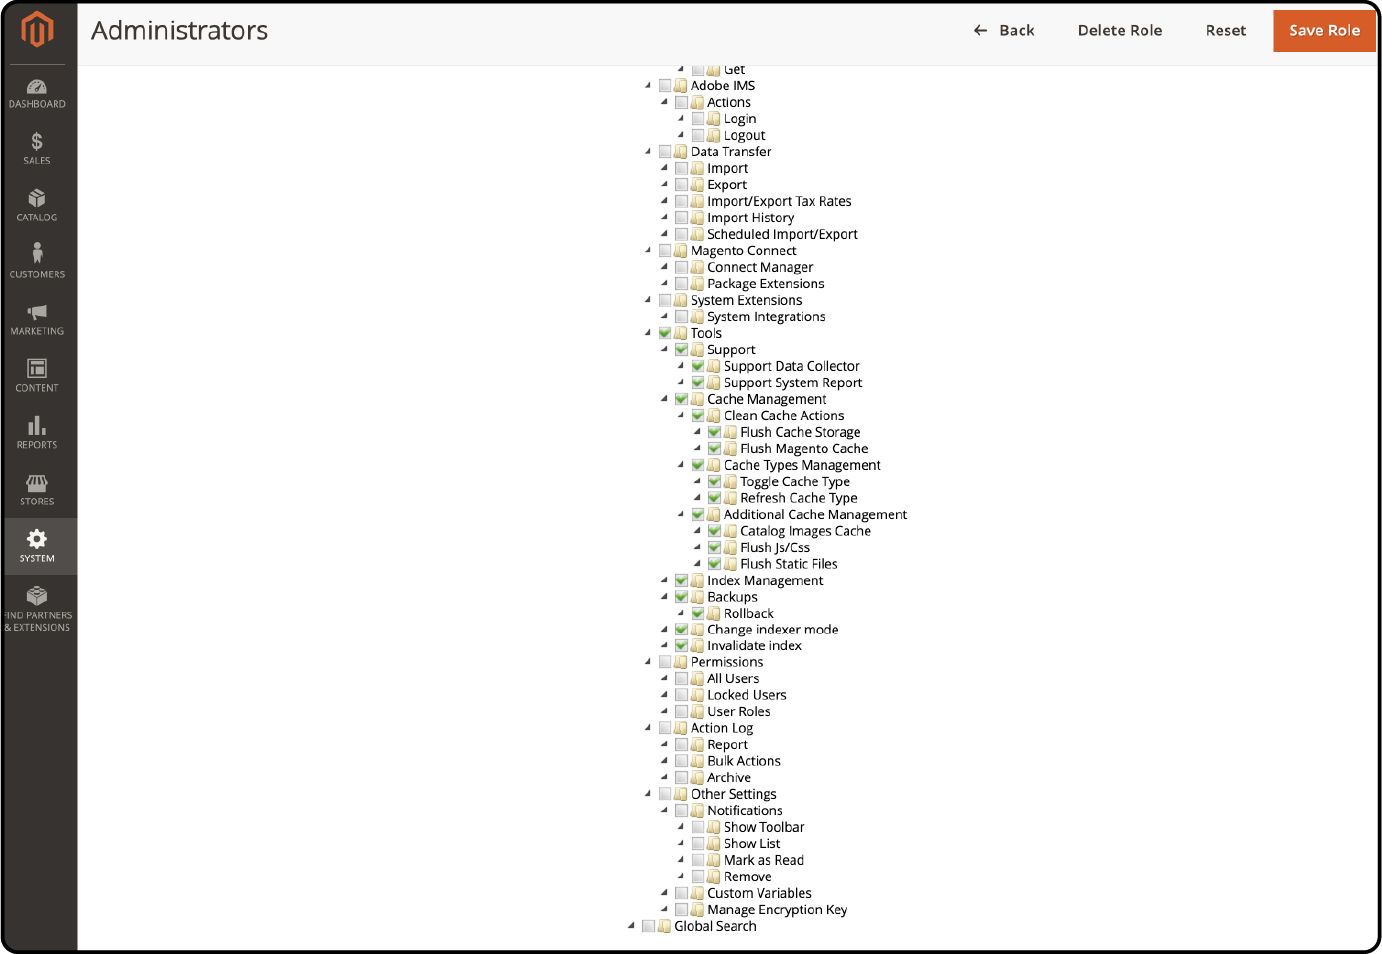
For information on how to assign resources for Admin user accounts, refer to Role resources. Resources that give access to cache management tools are listed below:
| Clean Cache Actions | Cache Type Management | Additional Cache Management |
|---|---|---|
| Flush Cache Storage | Toggle Cache Type | Catalog Images Cache |
| Flush Magento Cache | Refresh Cache Type | Flush Js/Css |
| Flush Static Files |
How to Refresh specific caches
-
To refresh a cache, check the box at the row's start.
-
Choose Refresh under Actions and click Submit.
How to Perform Mass Action Refresh
- To choose multiple caches, set Mass Actions to:
-
Select All
-
Select Visible
-
Select each cache checkbox to refresh.
-
Choose Refresh in Actions and click Submit.
How to Flush the Product Image Cache
-
In Additional Cache Management, click Flush Catalog Images Cache to clear pre-generated product images. A message saying "The Image cache was cleaned" will appear at the top of the workspace.
-
Clear your browser cache.
How to Flush the JavaScript/CSS cache
-
In Additional Cache Management, clear merged Javascript and CSS by clicking Flush JavaScript/CSS Cache. A message that the JavaScript/CSS cache has been cleaned will appear at the top of the workspace.
-
Clear your browser cache.
Full-Page Caching
Adobe Commerce and Magento Open Source employ server-side full-page caching. It allows for a fast display of category, product, and CMS pages.
Full-page caching boosts response time and lightens the server load. Without caching, each page could require executing code blocks and fetching data from the database. However, when full-page caching is on, the server can directly read a fully generated page from the cache.
Cached content helps process requests for similar types of visits. As a result, casual visitors might see pages that are different from those of customers. For caching, visits are categorized into one of three types:
| Visit Type | Description |
|---|---|
| Non-Sessioned | Shoppers view pages without interacting with the store. The system caches each page viewed and serves them to other non-sessioned shoppers. |
| Sessioned | Shoppers interacting with the store receive a session ID. Activities like comparing or adding products to the cart generate cached pages for use during the session, exclusive to that shopper. |
| Customer | Customers log in to shop with personalized offers and prices. Their session is tailored based on their registered account and assigned customer group. |
To set up the full-page caching:
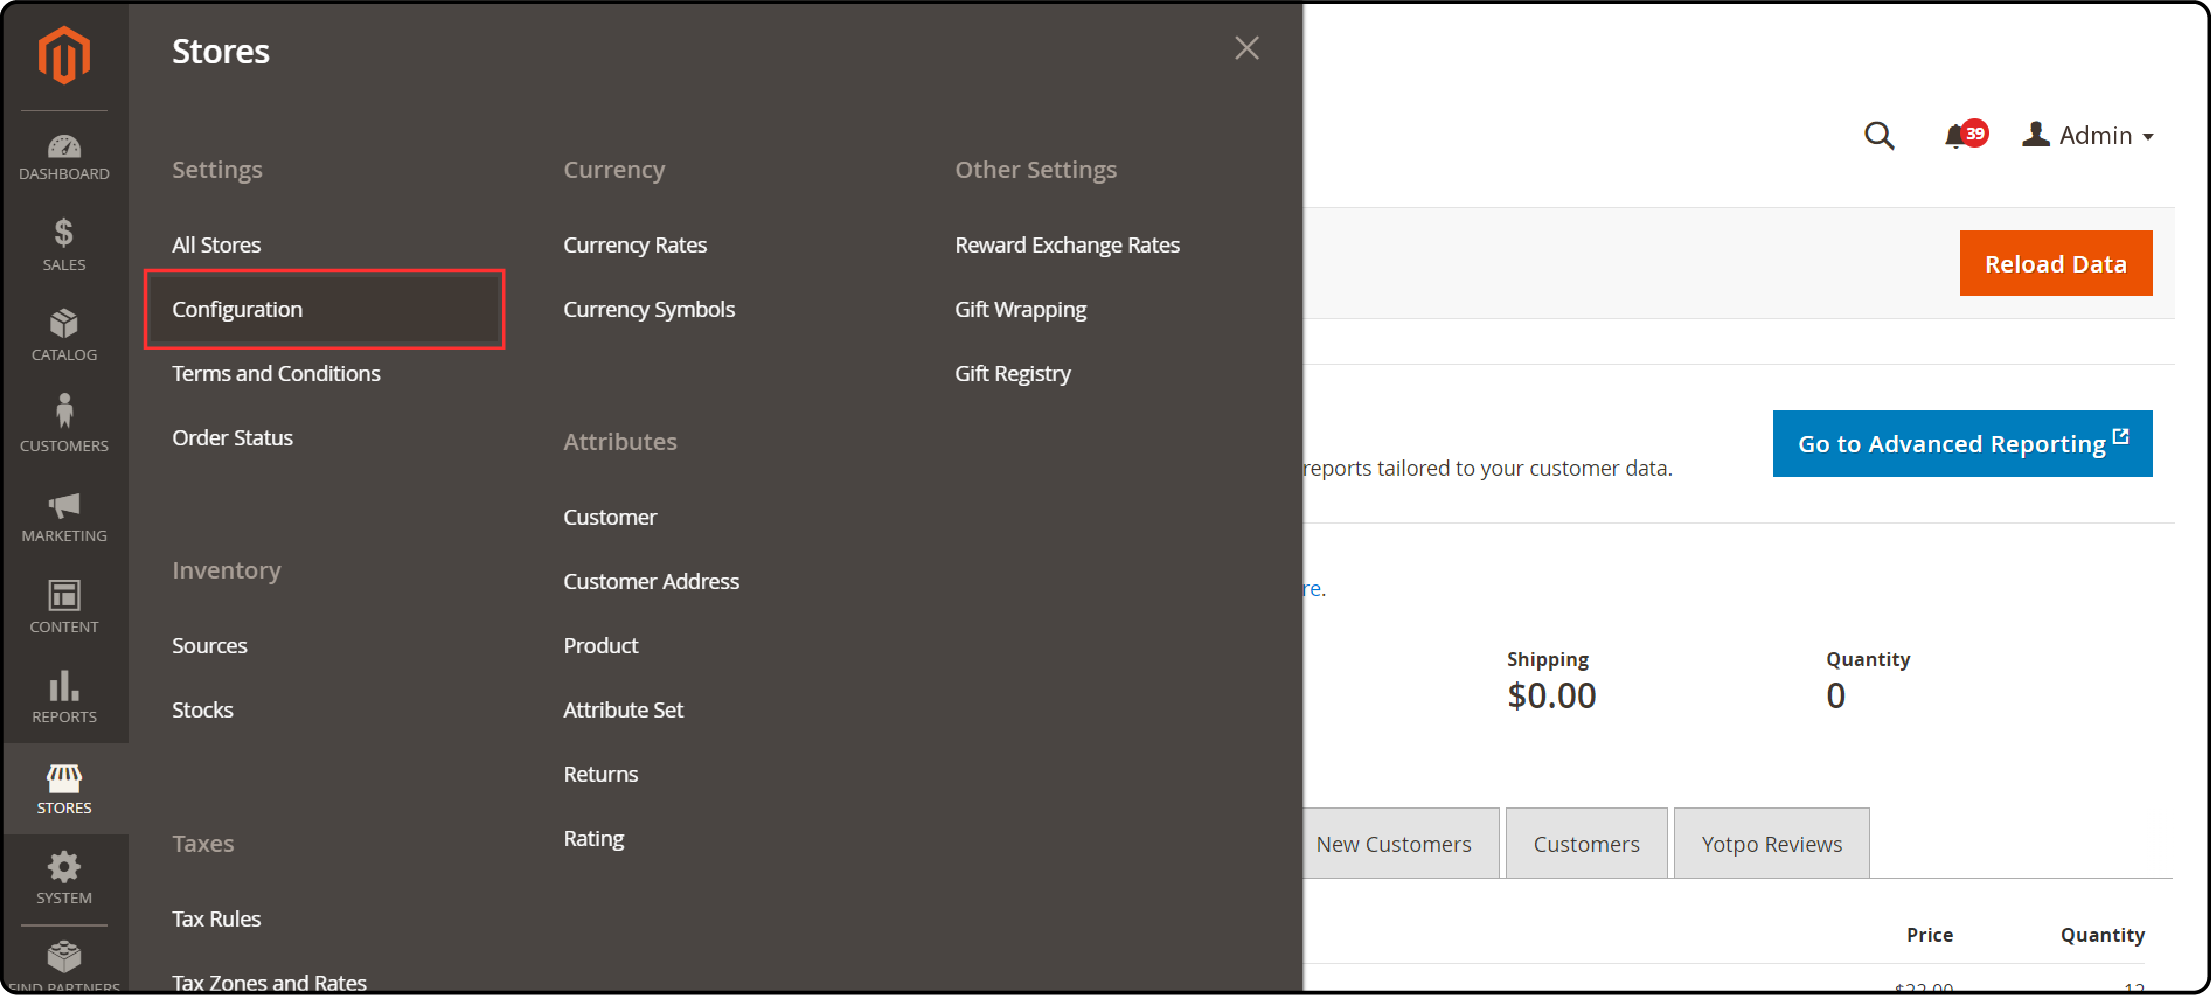
- On the Magento Admin sidebar, select Stores > Settings > Configuration.
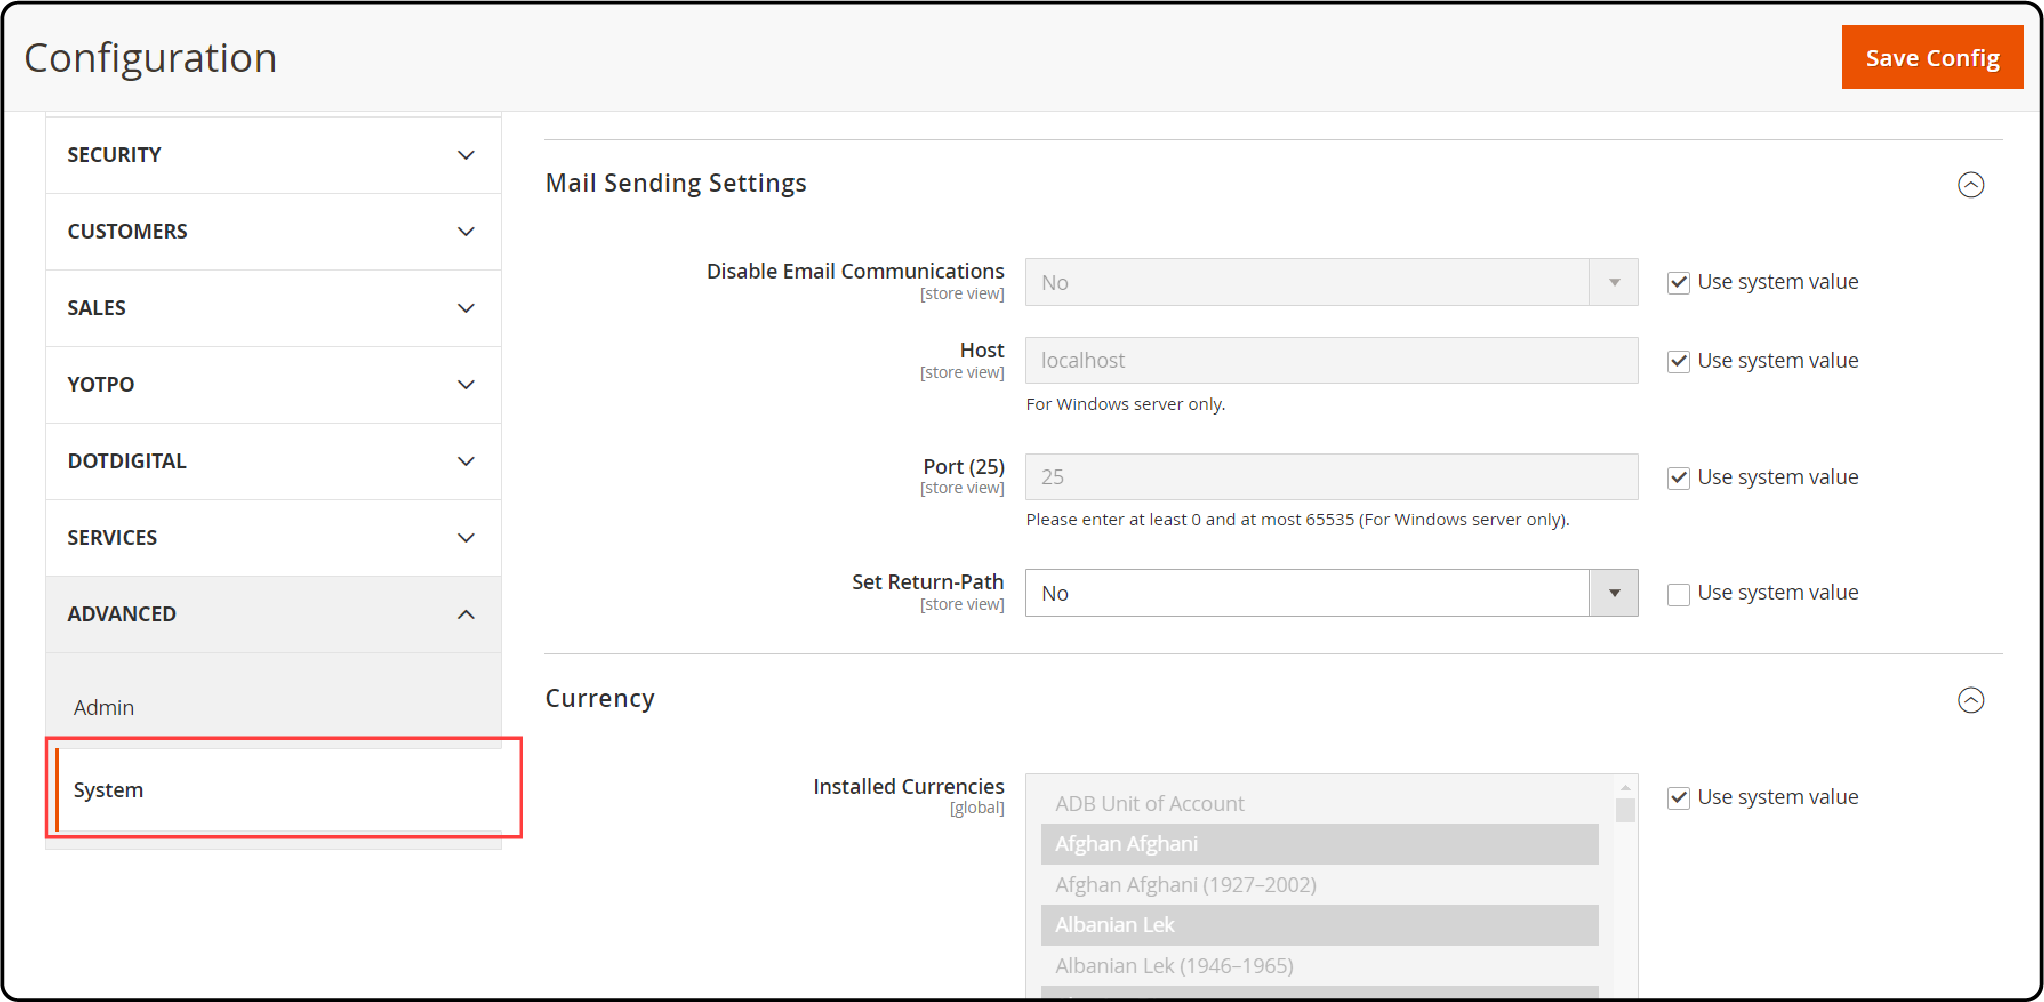
- Expand Advanced in the left panel and choose System.
-
Open the Full Page Cache section.
-
Choose Caching Application:
-
Built-in
-
Varnish Caching

-
To set the page cache timeout, enter the TTL for public content (default: 86400).
-
To set the max number of layout handlesfor processing at the {BASE-URL}/page_cache/block/esi endpoint, adjust the Handles param size. Limiting the size boosts security and performance. (Default is 100).
-
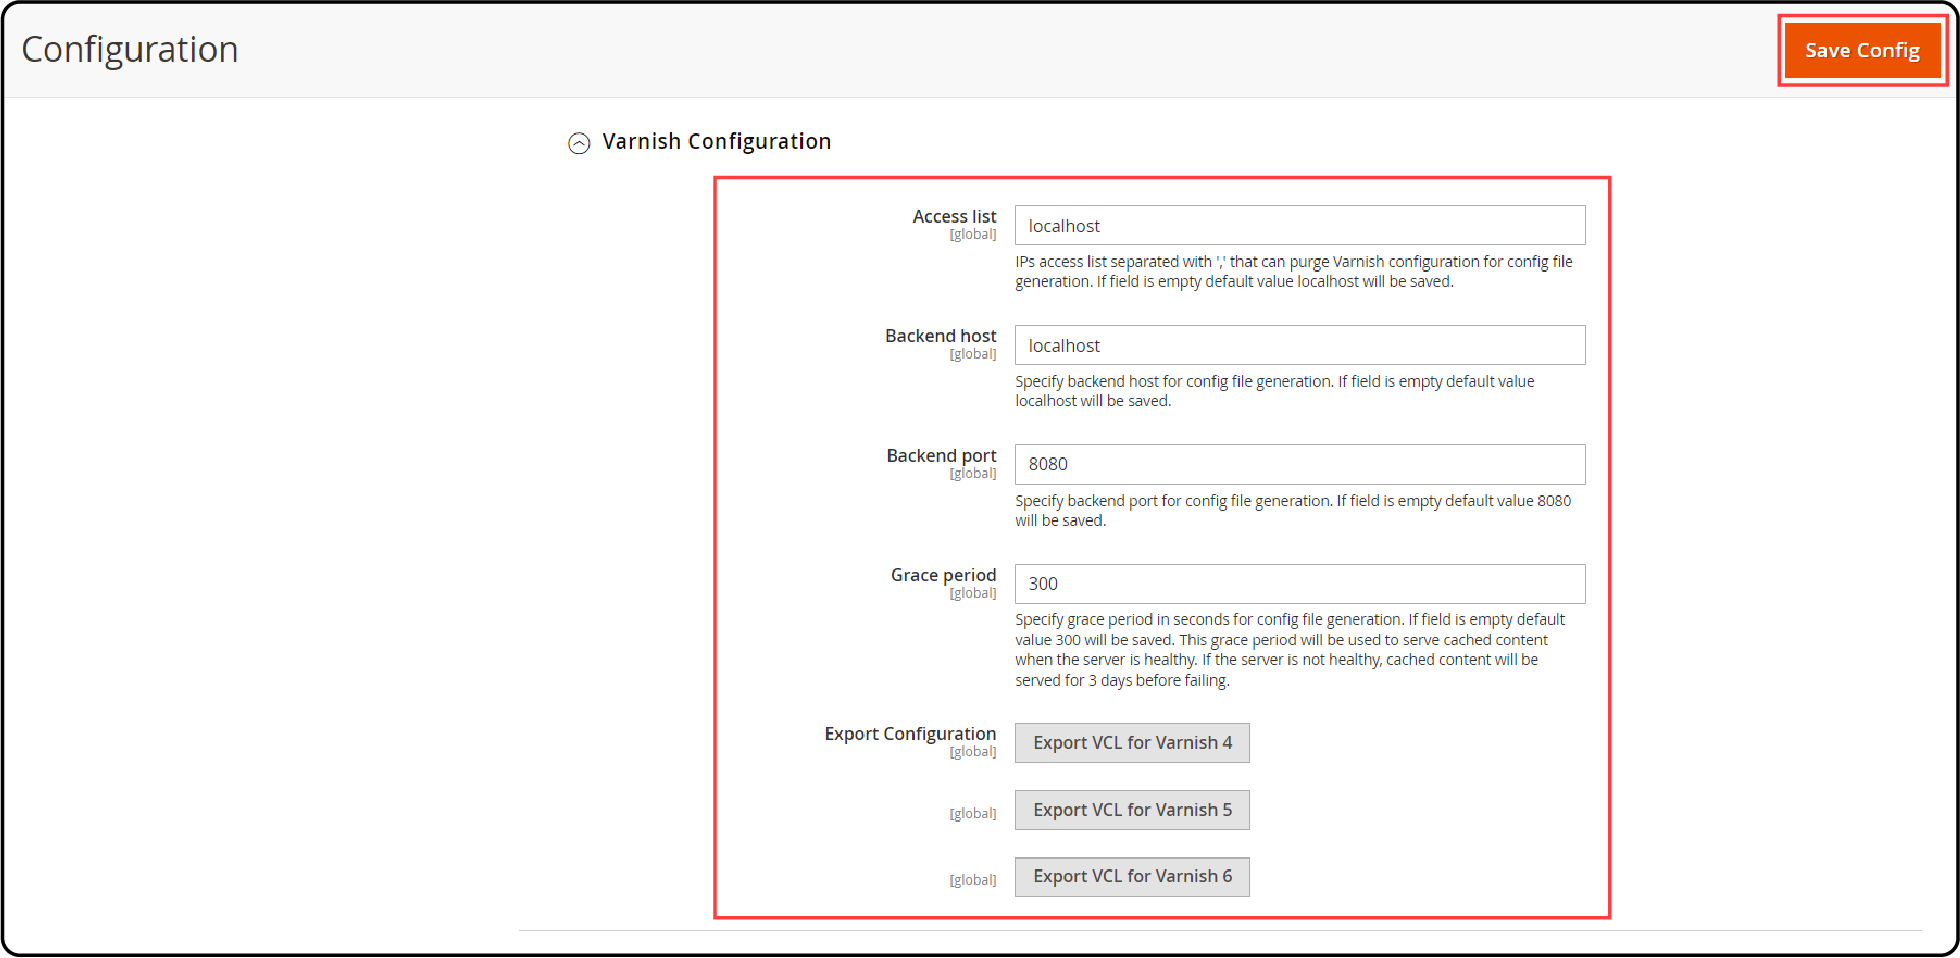
For Varnish, fill out the Varnish Configuration section as follows:
To set up the full-page caching:
-
On the Admin sidebar, select Stores > Settings > Configuration.
-
Expand Advanced in the left panel and choose System.
-
Open the Full Page Cache section.
To set the page cache timeout, enter the TTL for public content (default: 86400).
To set the max number of layout handles for processing at the {BASE-URL}/page_cache/block/esi endpoint, adjust the Handles param size. Limiting the size boosts security and performance. (Default is 100).
For Varnish, fill out the Varnish Configuration section as follows:
-
Access list: Enter IP addresses authorized to purge Varnish config, separating them with commas. The default is localhost.
-
Backend host: Enter the backend host's IP address to generate config files. The default is localhost.
-
Backend port: Identify the backend port for generating config files. Default value: 8080.
-
Grace period: Set a grace period in seconds for generating config files.
To export the configuration, click the Varnish version button for a varnish.vcl file.
Once done, click Save Config.
Best Practices for Caching
In Commerce, reindexing and caching serve distinct roles. Reindexing updates indexes, enhancing search performance, and speeding up data access for Magento storefronts. This process involves tracking database information.
On the other hand, caching stores data, images, and formats. It improves the speed and efficiency of loading and accessing the storefront.
| Cache Maintenance | Description |
|---|---|
| After Extension Installation | Always flush the cache after installing extensions/modules. You can install one or more extensions and then flush the cache. |
| After Commerce Installation | Flush the cache after installing Commerce. For fresh installs, you should also reindex. |
| After Version Upgrade | Flush the cache after upgrading from one version of Open Source or Commerce to another. |
| Consider Peak Times | When flushing caches, consider the type of cache and schedule the flushing during non-peak times. For example, pick a time when few customers use the site, such as late at night or early in the morning. Clearing cache types during peak demand can increase the load on the Admin and cause the site to go down until the operation is completed. |
| No Cache Flush Needed | When reindexing, you do not need to flush the cache. |
FAQs
1. How do I check the cache status in Magento 2 using the command line?
To check the cache status in Magento 2, use the command line interface (CLI). Run the command php bin/magento cache:status. It lists all cache types and their status. It shows if each cache type is enabled or disabled.
2. What's the difference between cleaning vs. flushing Magento's cache, and how do I do it?
Cleaning the cache in Magento removes all items from the enabled cache types. This action is specific to Magento and does not affect other processes or applications. Flushing the cache clears the cache storage entirely.
This action might affect other processes using the same storage. To clean the cache, use the command php bin/magento cache: clean. To flush the cache, use php bin/magento cache:flush.
3. How can I enable or disable specific Magento 2 cache types using the command line?
To enable or disable specific cache types in Magento 2, use the command line. Use the following commands:
To disable a specific cache type, use the command php bin/magento cache:disable [cache_type]. Replace [cache_type] with the cache type code.
To enable a specific cache type, use the command php bin/magento cache:enable [cache_type].
These commands help manage the cache setting efficiently. It is particularly useful during development. It's also helpful when updating the site's content or search settings.
4. How do Magento users disable all cache types at once? Can this be done via the command line?
Yes, Magento users can disable all cache types at once. It is done using the command line. Use the command php bin/magento cache:disable. It disables all Magento 2 cache types. You don't need to specify each one. It's useful for major site changes. Examples include altering HTML output or cache settings.
5. Why manage the cache, especially before and after making changes to the HTML output or search settings?
Managing the cache is essential, especially before and after changing the HTML output or search settings. It ensures that updates are shown quickly and accurately to end-users. Before making changes, disable cache types like page cache or block cache.
It allows developers to see their changes in real time. There's no need to wait for the cache to refresh. Once changes are made and tested, re-enable the cache. It boosts the efficiency and speed of the storefront. Use the command line to clean or flush the cache type after adjustments. Dedicated Magento hosting maintains optimal performance and user experience.
Summary
With Magento 2, manage your store’s cache directly from the admin panel. It offers flexibility to clear specific or all caches as needed. Key benefits are:**
-
Improved Performance: Clearing the cache boosts your website’s speed, reducing load times and enhancing performance.
-
Up-to-date Content: Clearing the cache ensures customers see the latest updates, like product changes or design adjustments.
-
Improved User Experience: A quicker, more responsive website enhances user satisfaction, possibly boosting sales.
-
Better SEO: Search engines favor fast-loading pages. Regular cache clearing can help improve your SEO ranking.
Ready to start managing your cache in Magento 2? With Magento server hosting, you can manage your cache easily.


