How to Add and Delete a Magento Integration?
Magento Integration enables third-party applications to access specific resources, like customer data, orders, or catalogs, using OAuth for authentication. Store owners can create integrations manually through the Magento backend or programmatically with custom extensions in Magento 2.
This tutorial will cover manual and programmatic integration creation in Magento 2. It will also provide instructions for reauthorization and deletion of integrations.
Key takeaways
-
Explore the fundamental aspects of Magento 2 integration, from configuring OAuth credentials to defining API resources within the Commerce Admin.
-
Learn how to add integrations through the Magento Admin Panel, specifying details like integration name, contact email, and OAuth credentials destination URL.
-
Understand the steps to activate integrations in Magento 2 and learn how to reauthorize them when necessary.
-
Discover the process of adjusting API guest access security in Magento 2 by allowing anonymous guest access when needed.
-
Learn how to delete integrations effortlessly in Magento 2, ensuring a clean and organized integration landscape in the Admin interface.
-
Explore the steps in creating integrations programmatically, from setting up the module structure to configuring integration parameters through XML files.
Magento 2 Integration Overview
Magento 2 integration involves configuring OAuth credentials and a redirect URL for third-party integrations within the Commerce Admin. It also defines the necessary API resources for the integration.
It offers flexibility to seamlessly connect with a wide range of systems, including ERPs (Enterprise Resource Planning), payment gateways, and various plugins. It enables businesses to streamline their operations, enhance payment processing, and extend the functionality of their Magento 2 store through these integrated systems.
Onboarding Process
-
Authorization: Navigate to the System > Extensions > Integrations page, locate the relevant integration, and authorize it.
-
Verification and Login: When prompted, grant the requested access. If redirected to a third-party platform, log in or create an account. After a successful login, you will return to the integration page.
-
Confirmation: Receive a notification confirming the successful authorization of the integration.
Note: Once set up and credentials are obtained, there's no need for further calls to access or request tokens.
How to Add an Integration In Magento 2
-
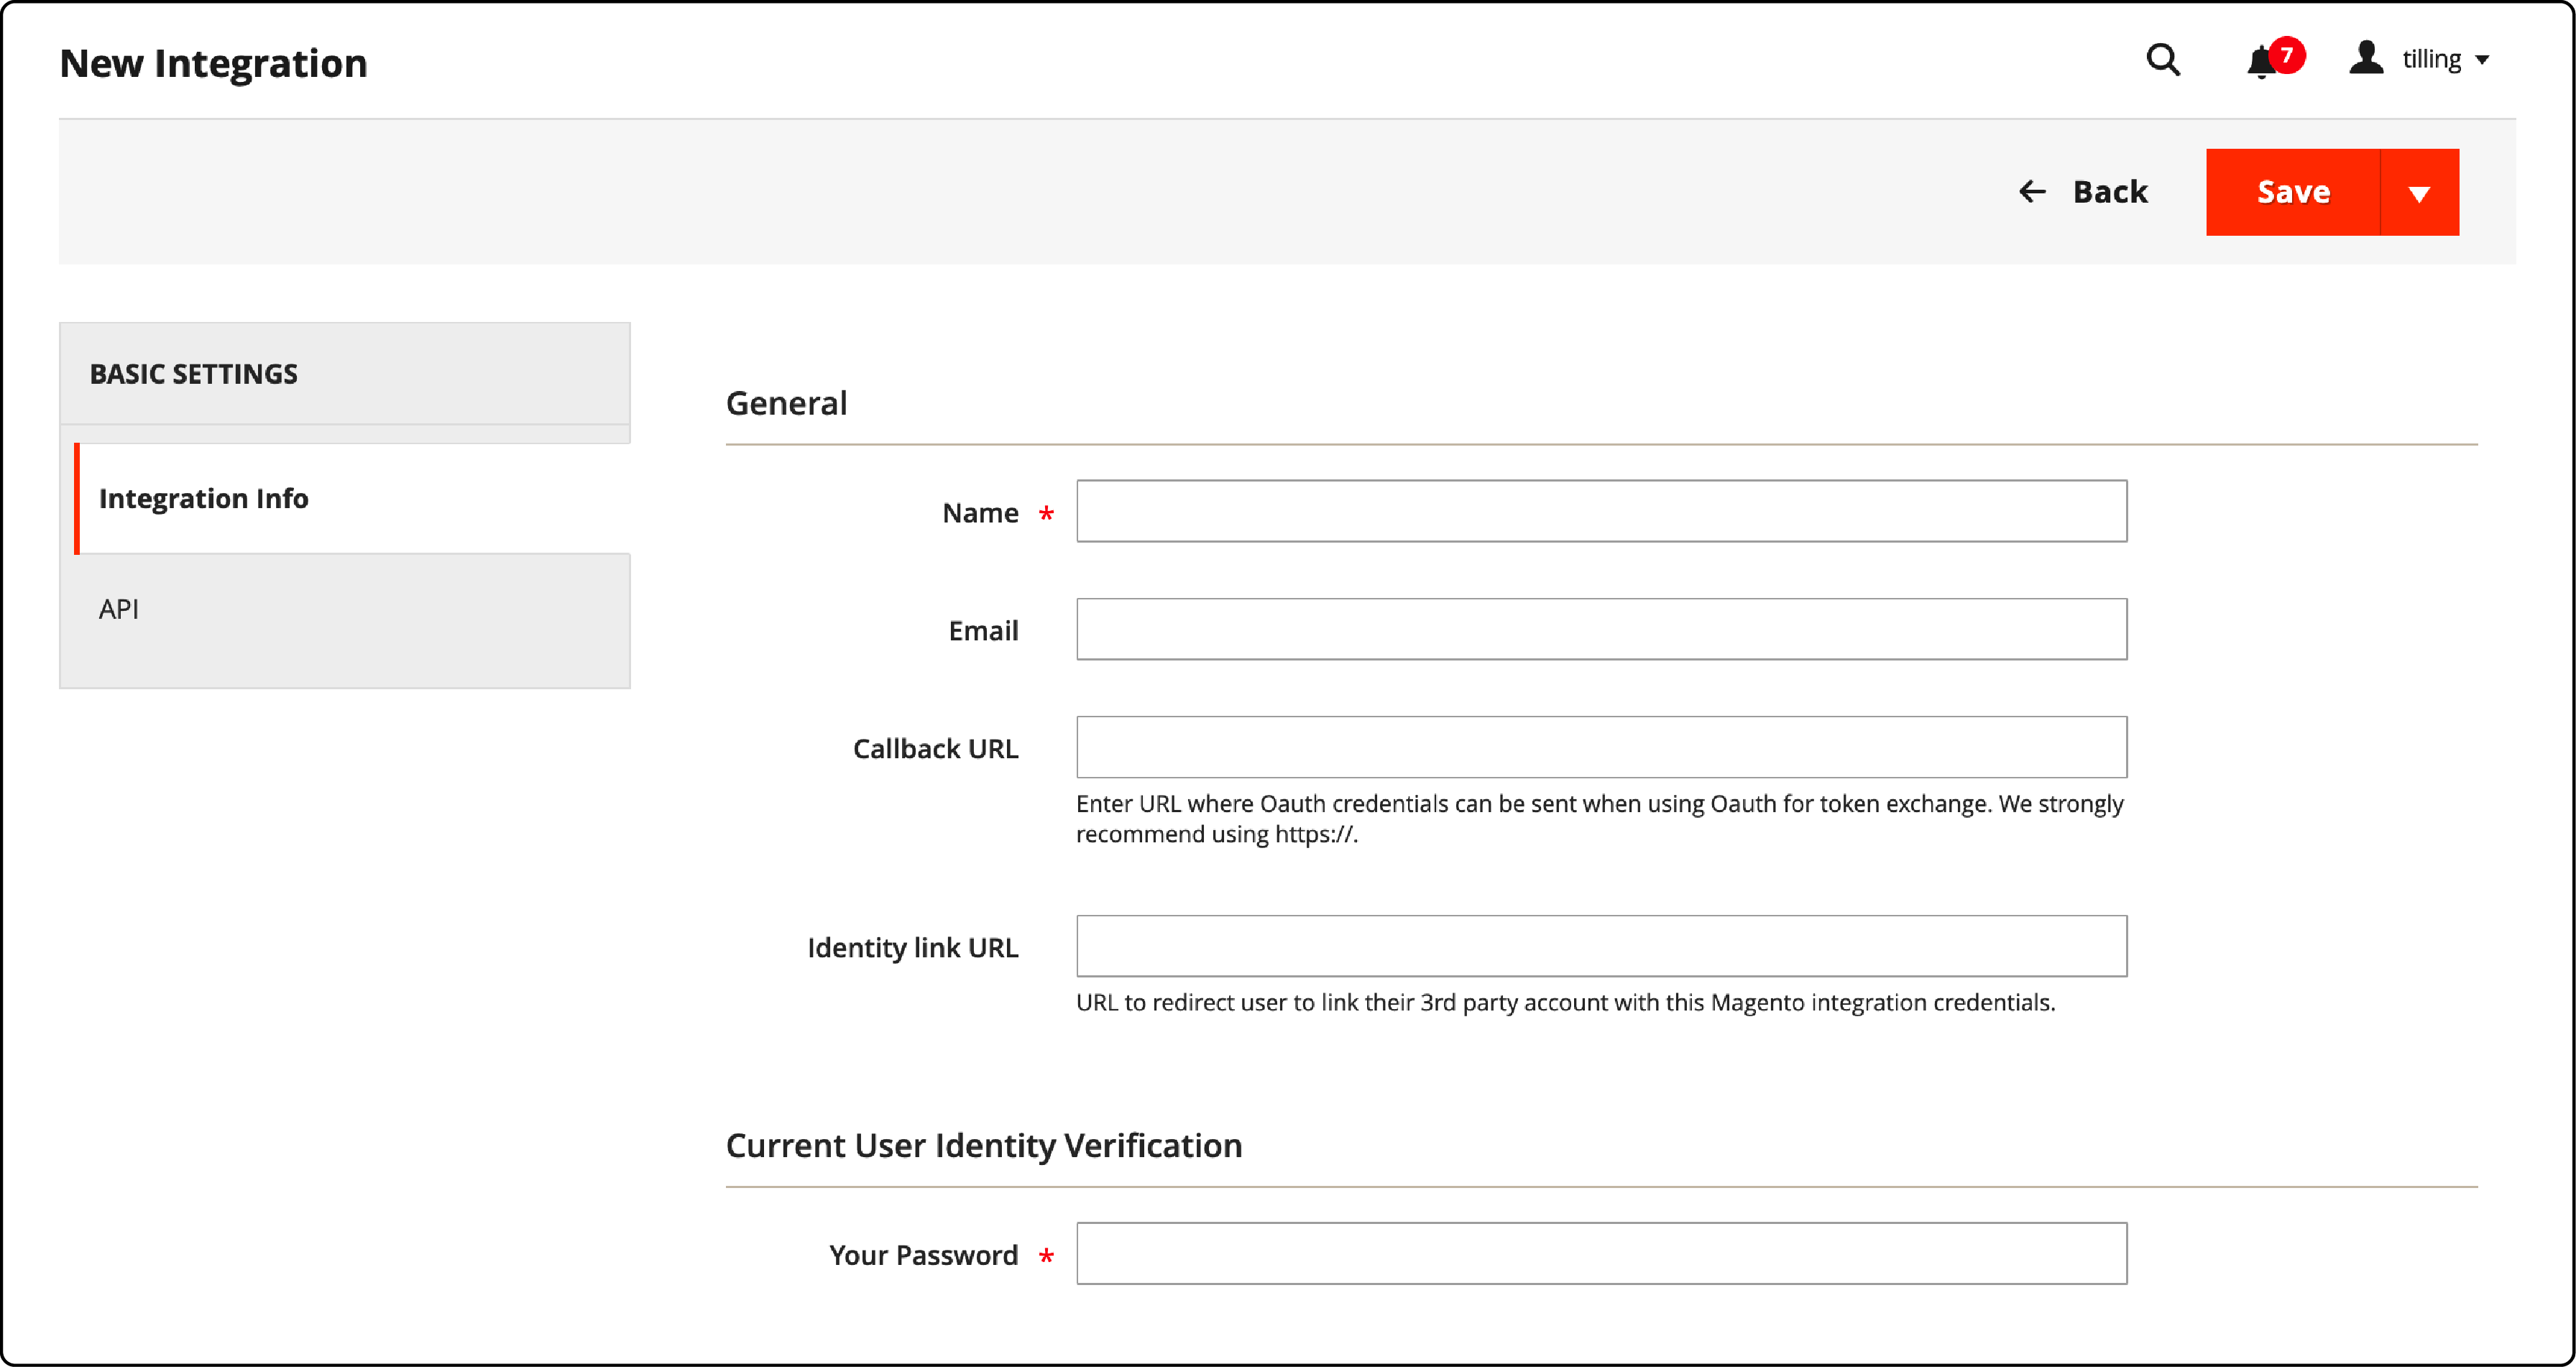
Access the Magento Admin Panel and navigate to System > Extensions > Integrations.
-
Provide the following integration details:

- Name: Assign a name to the integration.
- Contact Email: Enter a valid contact email address.
- Callback URL: Specify the OAuth credentials destination URL (HTTPS strongly recommended).
- Identity Link URL: Define the URL for redirecting users to a third-party account using Magento integration credentials.
Note: The "Integration not secure" warning label appears near each integration name on the Integrations grid until HTTPS URLs are saved for the Callback and Identity Link fields.
-
Confirm your identity by entering your password when prompted.
-
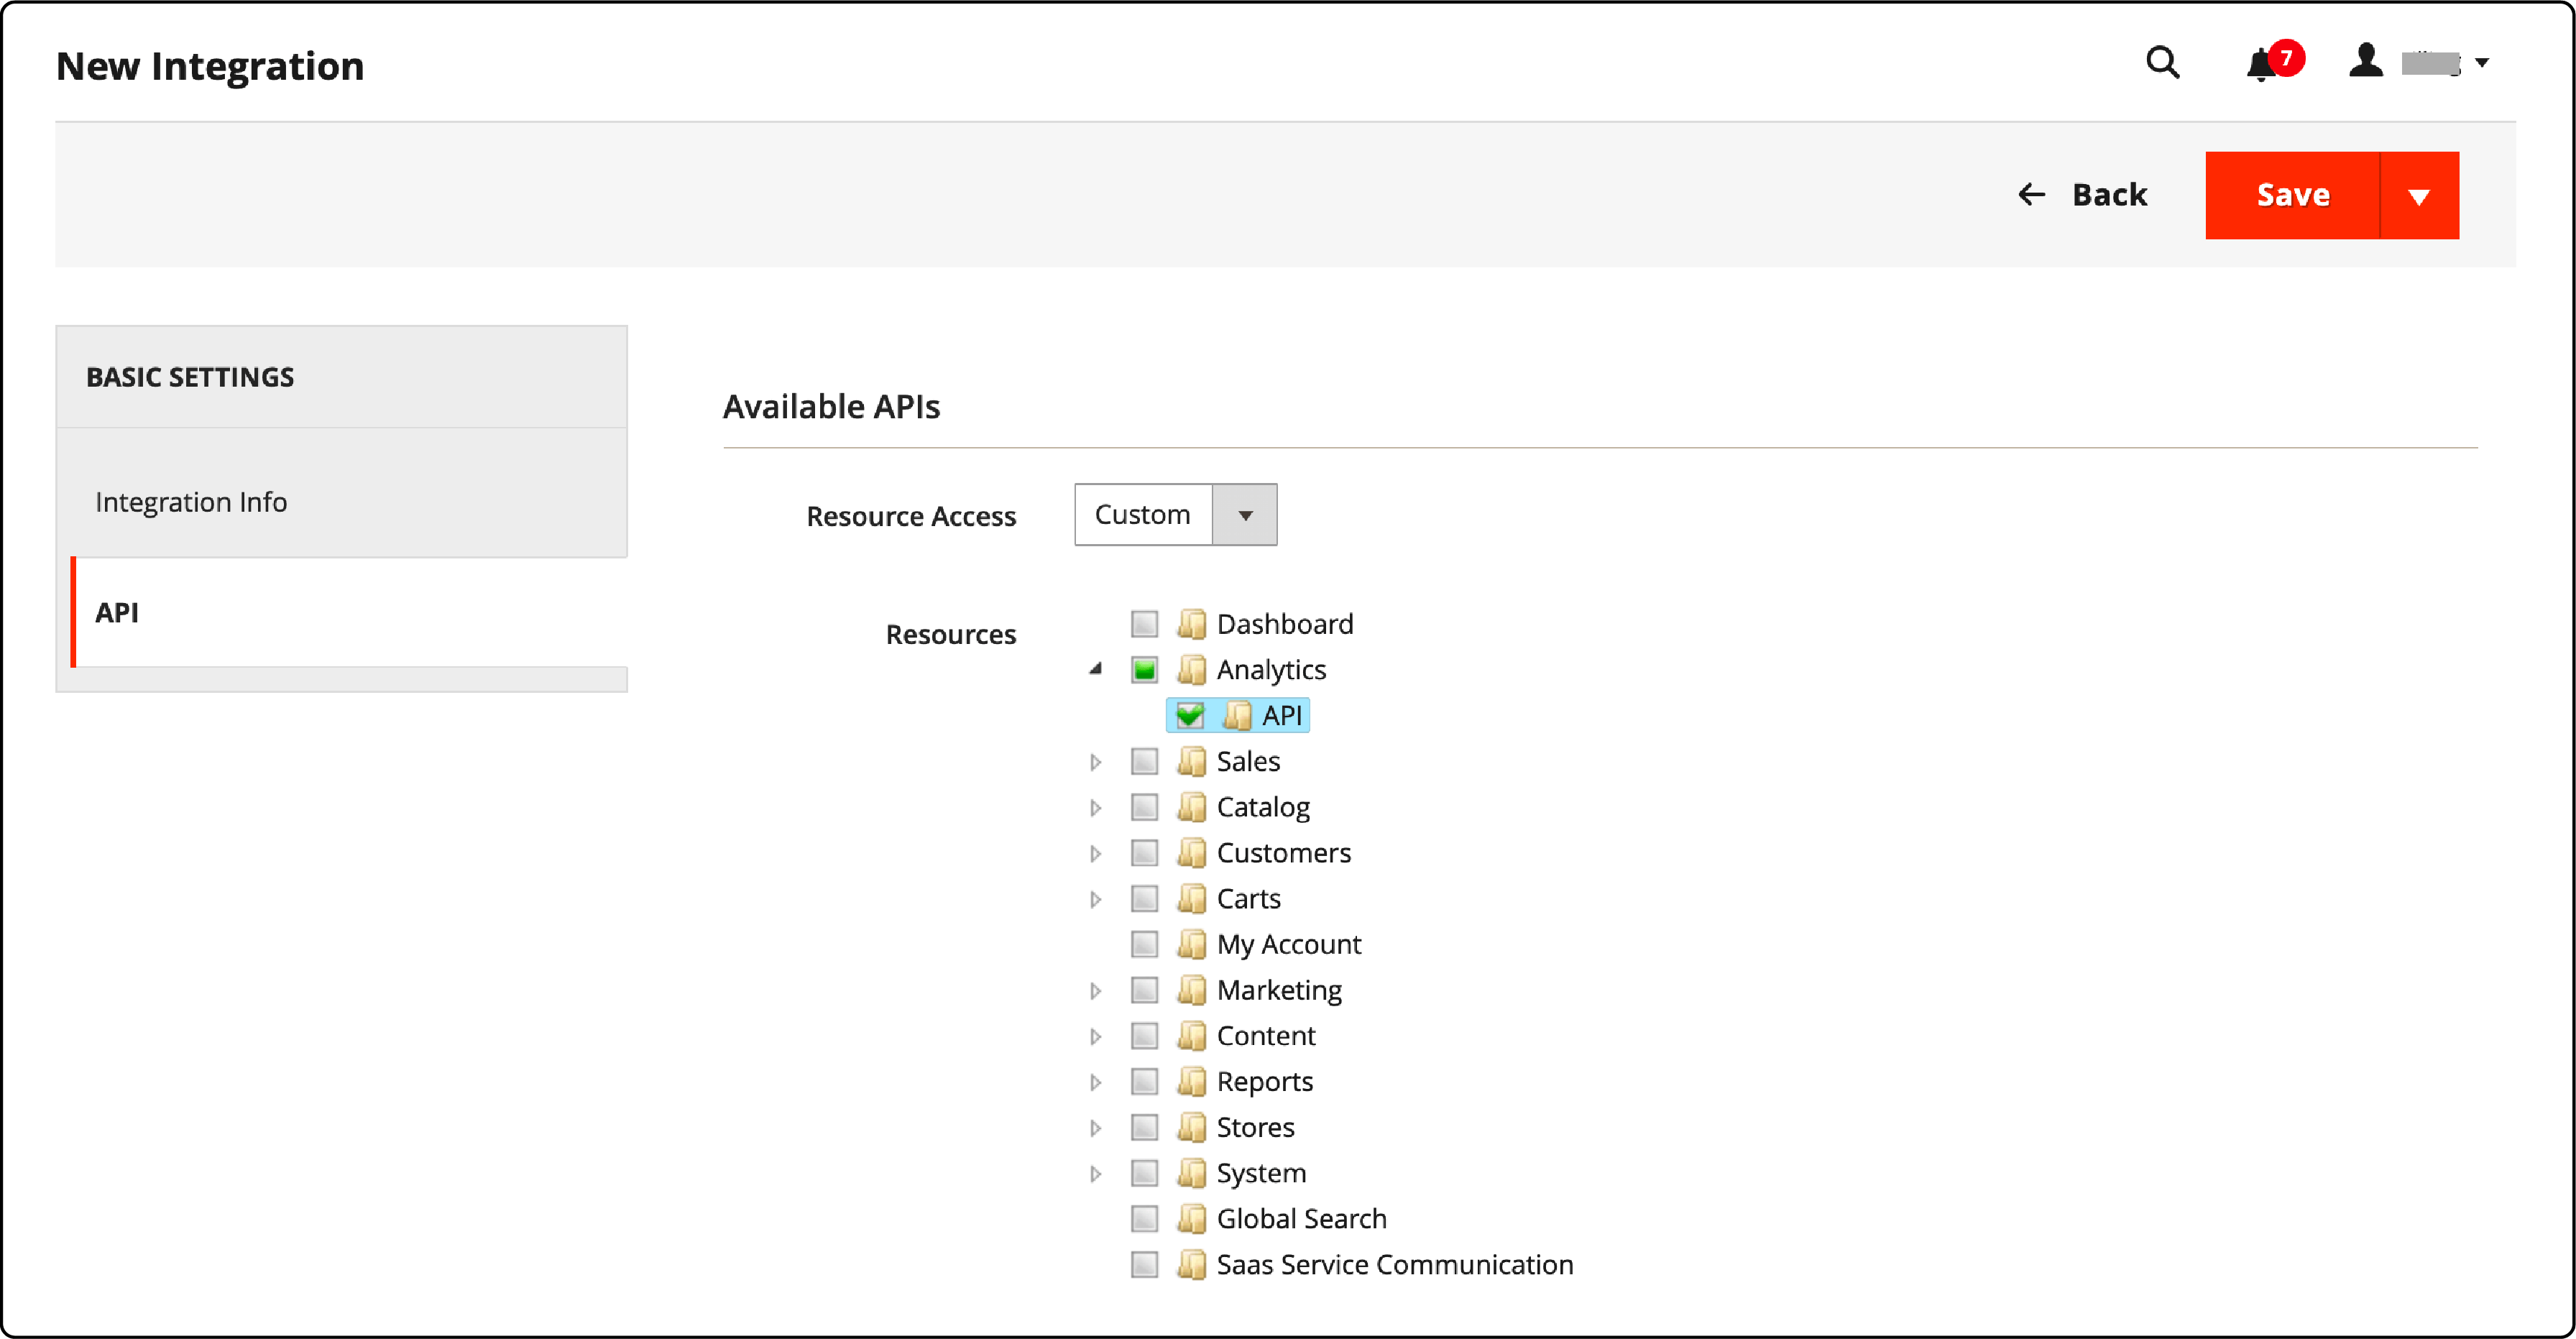
In the left panel, select API and proceed as follows:

- Set Resource Access to either All or Custom.
- For custom access, check the boxes for each required resource.
- Once the configuration is complete, click Save.
Activating an Integration in Magento 2
-
Access the Admin interface and navigate to System > Extensions > Integrations.
-
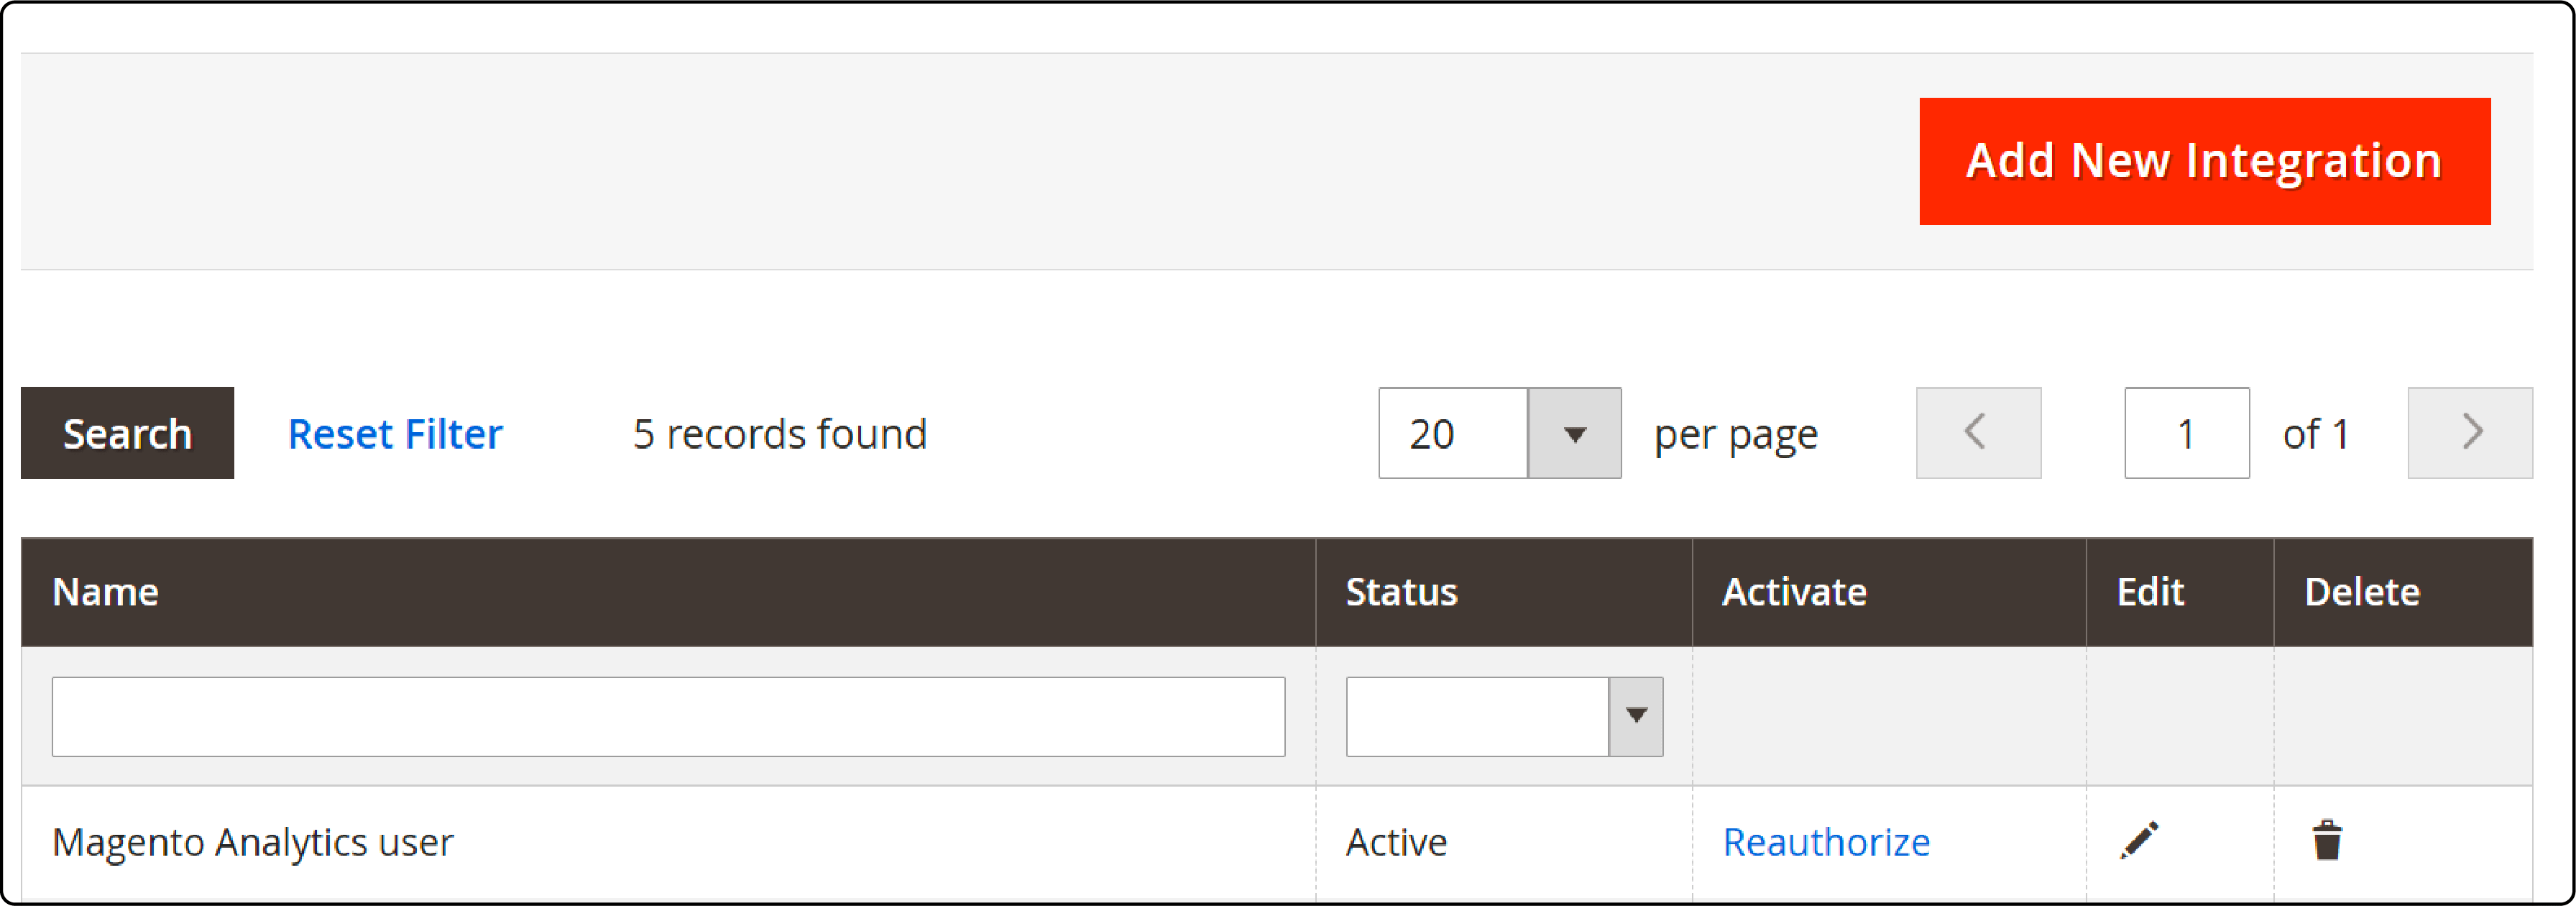
Locate the newly created integration and click the Activate link.
-
In the upper-right corner, click Allow.
-
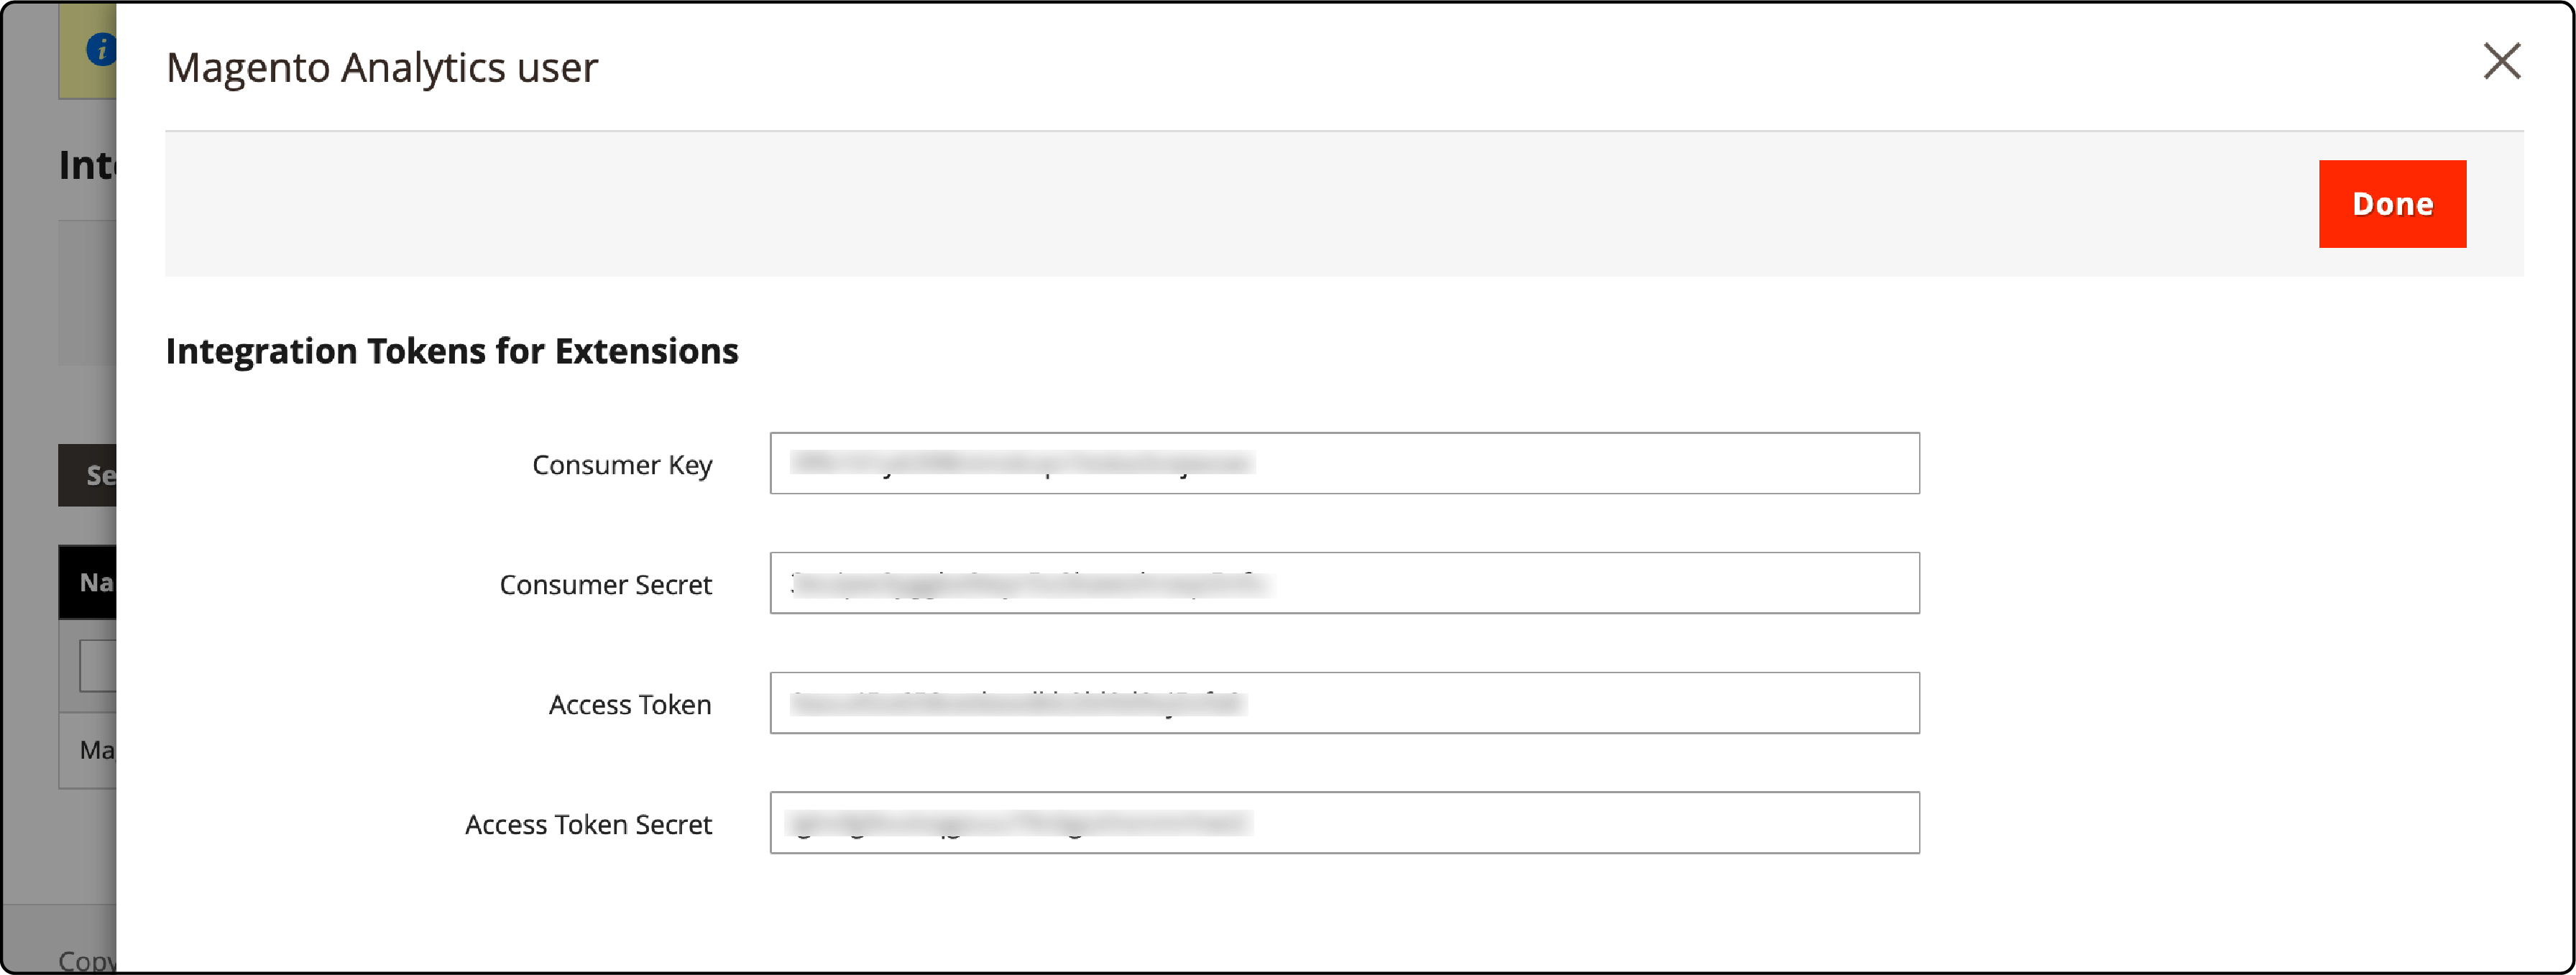
Integration Tokens for Extensions will be displayed. Safely copy this information to encrypted storage for integration use.

- In the upper-right corner, click Done.
Reauthorizing an Integration in Magento 2
-
Access the Magento Admin interface and navigate to System > Extensions > Integrations.
-
Identify the integration with an Active status.
-
In the Activate column, click Reauthorize.

-
Click Reauthorize to grant access to API resources.
-
Save the new integration tokens for extensions.
-
Click Done to complete the process.
Adjusting API Guest Access Security in Magento 2
-
Access the Admin Panel and navigate to Stores > Settings > Configuration.
-
In the left panel, expand Services and select Magento Web API.
-
Open the Web API Security Setting section.

-
Set Allow Anonymous Guest Access to Yes.
-
After changing, click Save Config to save your configuration.
How to Delete an Integration in Magento 2
-
Access Magento Admin and navigate to System > Extensions > Integrations.
-
Locate the integration you wish to delete and click the trashcan icon in the Delete column.
-
Confirm your action by clicking OK.
Creating an Integration in Magento 2 Programmatically
Step 1: Module Setup
Create a module file structure similar to other custom modules in Magento 2. The integration module should be under the /app/code// or the /vendor/ folder.
Run the following commands at /app/code//.
cd
mkdir -p app/code//{{vendor_name}}/{{module_name}}/etc/integration
mkdir -p app/code//{{vendor_name}}/{{module_name}}/Setup
Note: We will use MGT as the vendor and IntegrationManager as the module name.
Step 2: Set your module configuration file etc/module.xml
The etc/module.xml file provides basic information about the module. Change directories to the etc directory and create the module.xml file. You have to specify values for the following following information:
- Module name
- Module version
- Dependencies
<!--?xml version="1.0"?-->
Note: Since we will use the MagentoIntegrationModelConfigBasedIntegrationManager class in the installation script, you must add Magento_Integration as a dependency for our custom integration creator.
Step 3. Add your module’s composer.json file
Composer, a PHP dependency manager, requires the creation of a composer.json file for your module. This file enables Composer to install and update the necessary libraries your module depends on. You should position the composer.json file within your module's primary directory.
{
    "name": "MGT/integrationmanager",
    "description": "",
    "type": "magento2-module",
    "version": "1.0.1",
    "license": [
      "MIT"
    ],
    "autoload": {
      "psr-4": {
        "MGT\IntegrationManager\": ""
      },
      "files": [
        "registration.php"
      ]
    }
  }
Step 4. Create a registration.php file.
The registration.php registers the module with the Magento system.
Note: It should be placed in the module’s root directory.
MagentoFrameworkComponentComponentRegistrar::register(
    MagentoFrameworkComponentComponentRegistrar::MODULE,
    'MGT_IntegrationManager',
    __DIR__
);
Step 5. Develop an Installation Class for Integration
Navigate to your Setup directory and establish an InstallData.php file. This file installs integration configuration data into Magento's integration table.
namespace MGTIntegrationManagerSetup;
use MagentoFrameworkSetupModuleContextInterface;
use MagentoFrameworkSetupModuleDataSetupInterface;
use MagentoIntegrationModelConfigBasedIntegrationManager;
use MagentoFrameworkSetupInstallDataInterface;
class InstallData implements InstallDataInterface
{
    /**
     * @var ConfigBasedIntegrationManager
     */
    private $integrationManager;
    /**
     * @param ConfigBasedIntegrationManager $integrationManager
     */
    public function __construct(ConfigBasedIntegrationManager $integrationManager)
    {
        $this->integrationManager = $integrationManager;
    }
    /**
     * {@inheritdoc}
     */
    public function install(ModuleDataSetupInterface $setup, ModuleContextInterface $context)
    {
        $this->integrationManager->processIntegrationConfig(['testIntegration2']);
    }
}
Note: The InstallData script above will read data from some XML configuration files. It will then add the integration into Magento.
Step 6. Configure Integration Using XML Files
The Magento Integration module streamlines integration setup by handling third-party accounts, OAuth authorizations, user data, and security tokens and requests. For programmatic configuration, employ two key files:
-
api.xmlis located in theetc/integrationdirectory and is used to specify necessary resources. -
config.xmlis located in theetc/integrationdirectory and is employed for defining integration parameters.
Step 7. Define Required Resources
In the etc/integration/api.xml file, you specify which API resources the integration can access. Review the permissions outlined in each module's etc/acl.xml file to determine the necessary resources for an integration.
For instance, the test integration in the example below requires access to vital resources within the Catalog and Sales modules:
xml
<integration name="mp_Integration">
	<resources>


	</resources>
</integration>
Step 8: Configure Integration Parameters
For the integration to be automatically pre-configured with default values, your module can include these values in the configuration file. To enable this functionality, update the config.xml file in the etc/integration directory.
Step 9: Install the Module.
After completing the previous steps, execute the following standard commands to install the module. It will prompt the setup script to create the integration.
bin/magento setup:upgrade
bin/magento setup:di:compile
bin/magento cache:clean
Now, navigate to Magento Admin > Systems > Extensions > Integrations and click on the integration you need to view the result.
FAQs
1. How do I create an integration in Magento?
To create an integration in Magento, access the designated page within the admin panel. You'll define your integration by specifying OAuth credentials, including the URL where these credentials can be sent for token exchange. Defining your integration simplifies the integration setup for third-party applications and can be done manually or programmatically.
2. What role does OAuth play in integration creation?
OAuth plays a pivotal role in the integration creation process by enabling secure access to resources in Magento. Using OAuth for token exchange ensures a secure mechanism for third-party applications to access necessary web APIs. OAuth credentials authenticate your integration, ensuring a secure and reliable exchange process.
3. How can I ensure my integration is automatically pre-configured in Magento?
Integrations in Magento can be automatically pre-configured by enabling a feature within your module's configuration file. Developers can enable this feature by updating the config.xml file, streamlining the setup process, and ensuring default values are in place when setting up integrations.
4. What permissions does a test integration require in Magento?
Reviewing the permissions defined within the modules' etc/acl.xml file is crucial when setting up a test integration. For instance, a test integration might require access to resources within the Catalog and Sales modules to perform its intended functions.
5. What is the role of a developer in the integration process?
Developers play a significant role in the integration process by defining and configuring the integration module. They ensure the necessary OAuth credentials and access tokens are appropriately set up. They also ensure it works seamlessly within the Magento Open Source or Adobe Commerce platform to facilitate third-party resource access.
6. How do web APIs work in Magento integration?
Web APIs in Magento integration enable interactions between different systems or applications. They facilitate the exchange of data and functionalities between a merchant's store and third-party applications.
7. How does Magento integration impact product management in an online business?
Magento integration significantly influences product management in online businesses. It facilitates streamlined access to product-related data, enhancing software customization and development. By integrating with various systems like shopping carts and gateways, Magento simplifies and optimizes the overall product management process for ecommerce.
Summary
Magento integration enables access to specific resources, like customer data or catalogs, via OAuth authentication. It streamlines third-party application connections within Magento 2. This tutorial covered the manual and programmatic creation of integrations in Magento 2. It also offers insights into authorization, activation, reauthorization, deletion, and adjusting API guest access security.
Explore Magento 2 hosting for seamless integration experiences and optimized performance.


