Configure Magento 2 Private Sales and Events
Magento 2 Private sales and events are potent marketing tools for acquiring new leads and selling excess inventory to an established customer base. This feature allows Magento store owners to establish time-limited sales, restrict sales to specific members, or create dedicated private sale pages. This tutorial will provide detailed instructions on effectively setting up, managing, and optimizing Private Sales in Magento 2 Commerce.
-
Configuring the Catalog Events Carousel in Magento 2 Private Sales
-
Enabling and Creating the Catalog Carousel Widget in Magento 2 Private Sales
Key Takeaways
-
Discover the potential of Magento 2 Private Sales for exclusive member-only access and limited-time sales events.
-
Explore configurations to highlight ongoing and upcoming sales, creating urgency.
-
Learn how to manage invitations and access restrictions for targeted customer engagement.
-
Explore catering to VIP customers with personalized offers and exclusive deals.
-
Discover the importance of timing and duration for maximizing sales impact.
-
Learn to utilize scarcity tactics like countdown timers to prompt quicker purchase decisions.
What is Magento 2 Private Sales?
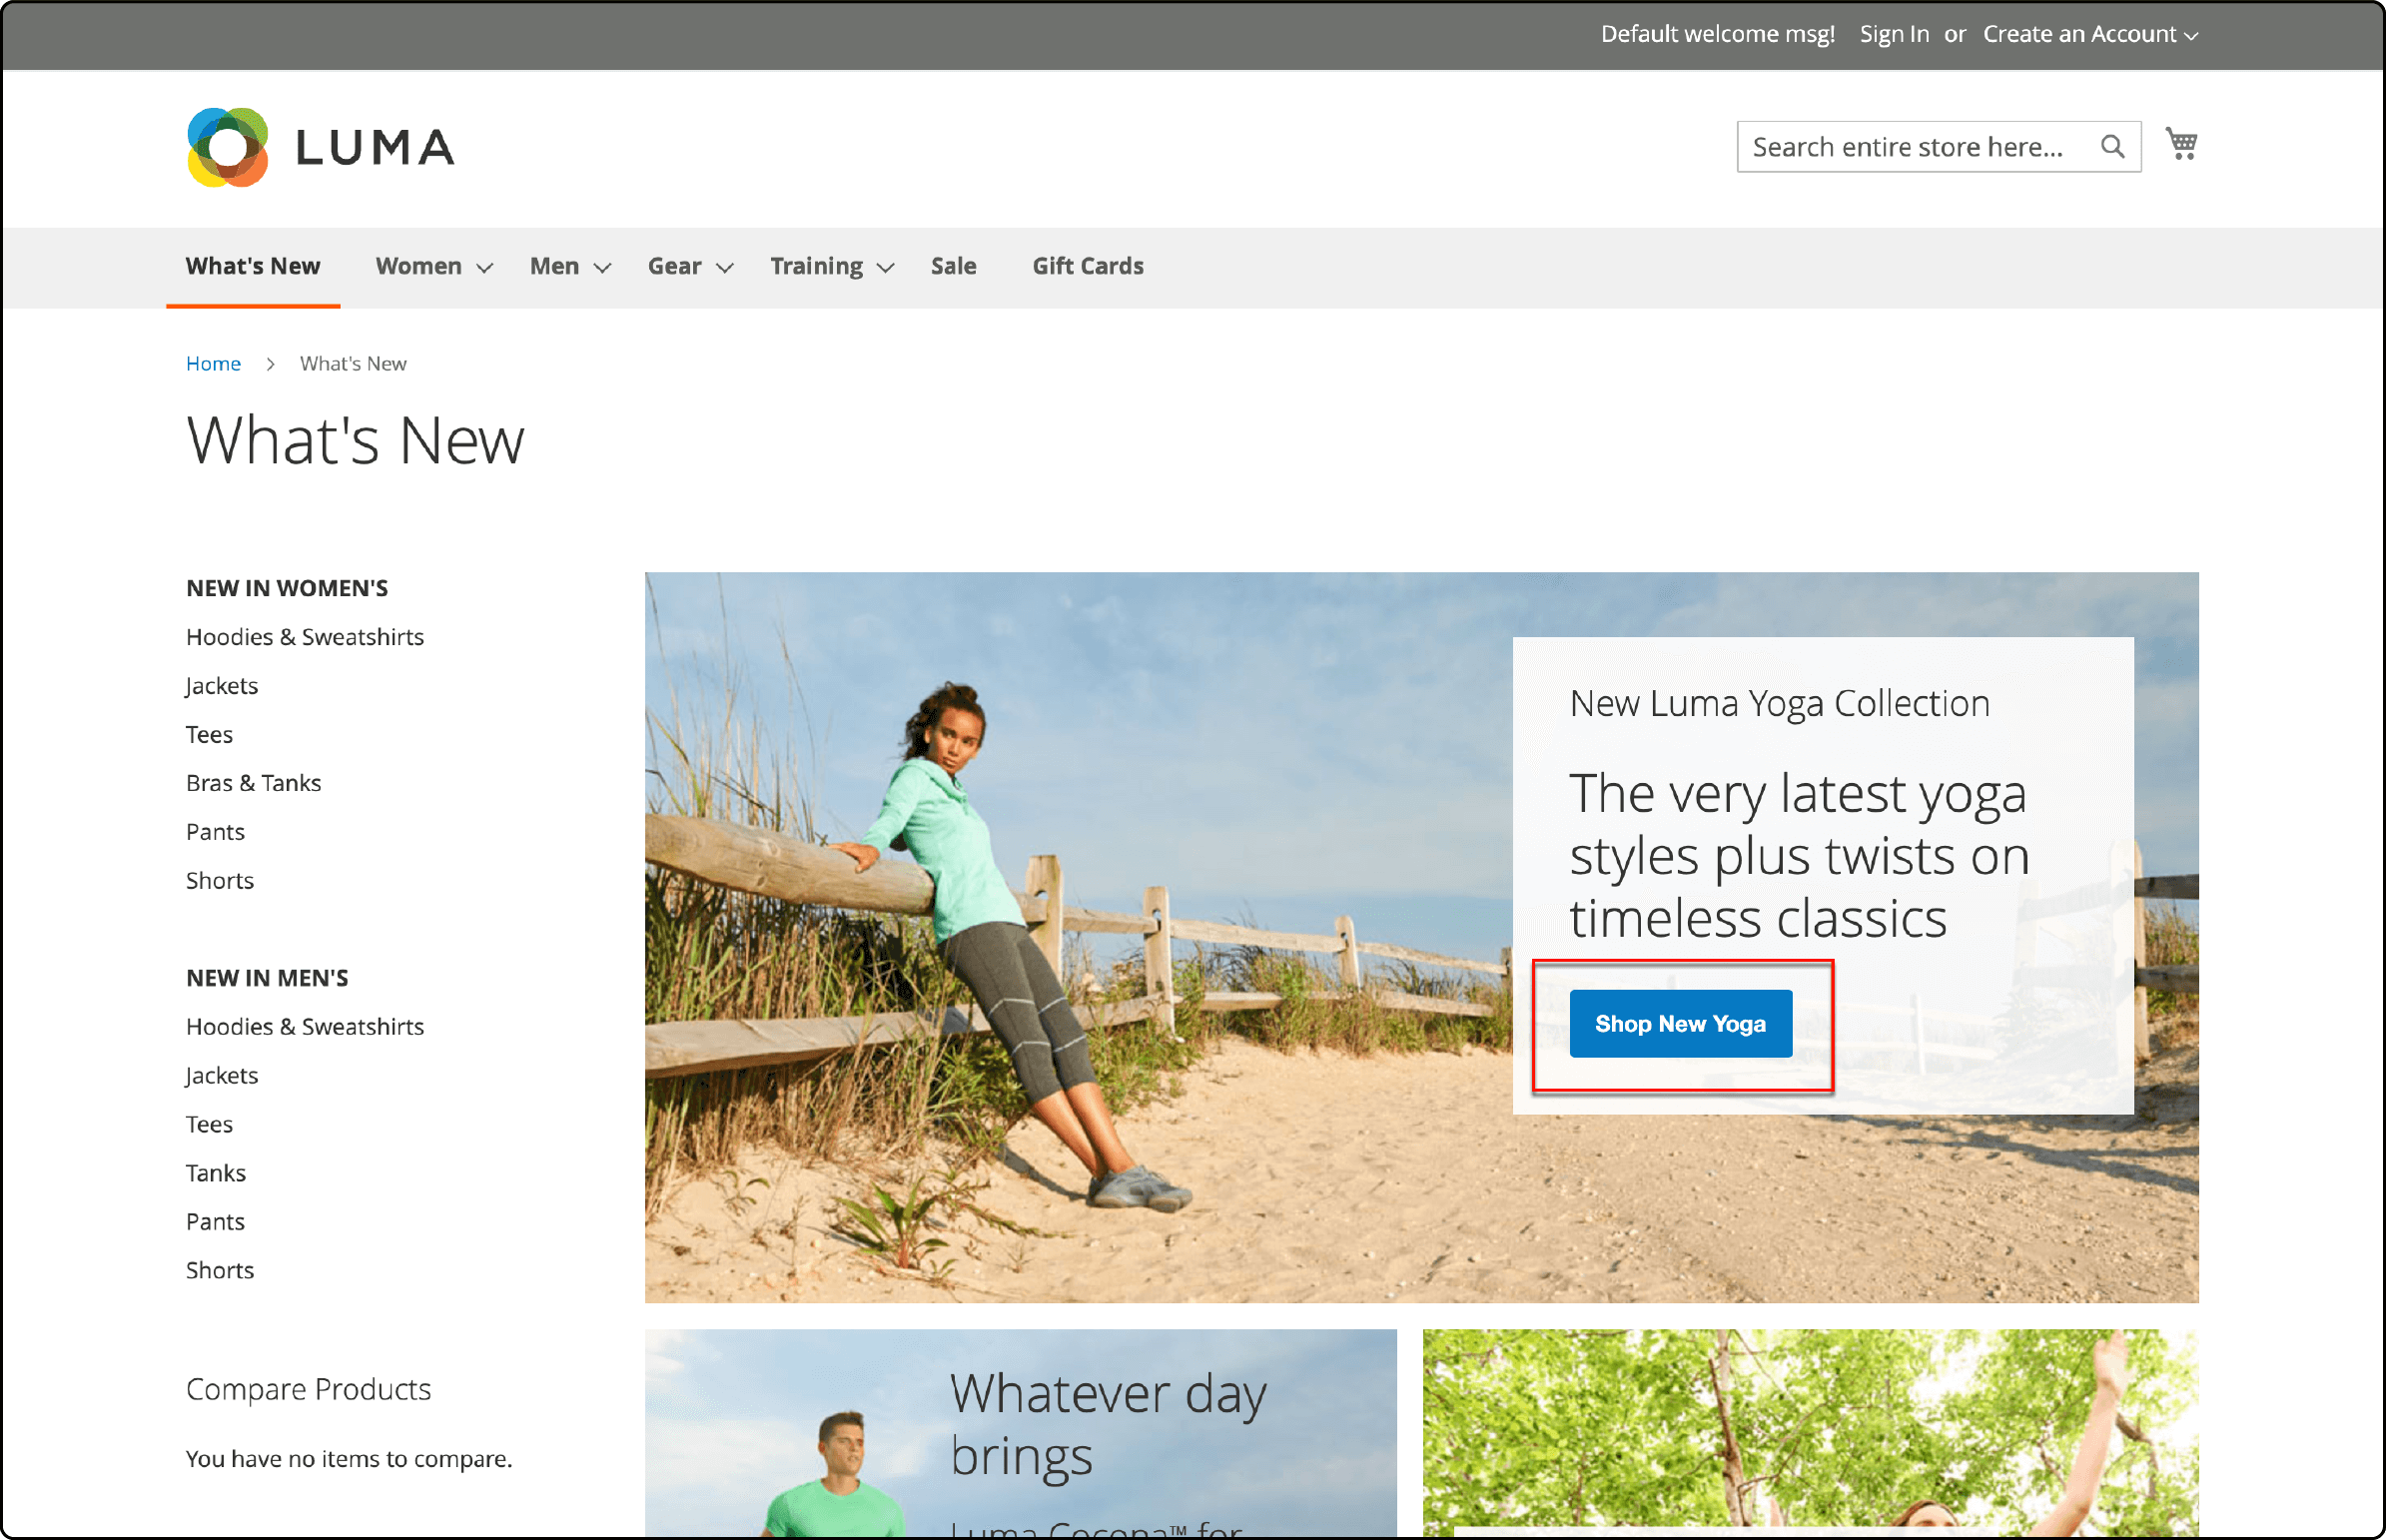
Magento 2 Private Sales, or catalog events, effectively leverage your existing customer base to generate interest and acquire new leads. This feature allows you to create time-limited sales, restrict sales to specific members, and establish dedicated private sale pages.
You also have the option to define invitations and event details. It helps enhance brand loyalty and generate excitement by offering exclusive access to member-only or private sales. This feature can also clear excess merchandise from your Magento inventory.
Note: Customer groups are valuable for setting up these exclusive member and VIP sales events.
Components for Managing Events in Magento 2 Private Sales
-
Categories: Each event is associated with a category from your catalog.
-
Event Duration: Event sales have defined starting and ending dates. You have the option to display a countdown ticker for the remaining time.
-
Catalog Event Carousel: When the Catalog Event widget is activated in the configuration, it can be placed on store pages to showcase open and upcoming events. It is also sorted by their end dates. Events with the same end date are ordered per the Magento configuration settings.
-
Websites: Category permissions are primarily determined by customer groups.
-
Category Permissions: Category permissions grant you precise control over the specific actions permitted within a given category.
-
Access Restrictions: Implement access restrictions to prevent public access to your Magento 2 site by redirecting users to a landing, login, or registration page.
-
Invitations: Email invitations are sent with a link to create an account in the store. You can restrict account creation to individuals who have received an invitation.
-
Private Sales Reports: Private Sales Magento Reports offer insights into invitations sent, customers invited, and conversion rates.
What is an Event Ticker in Magento?
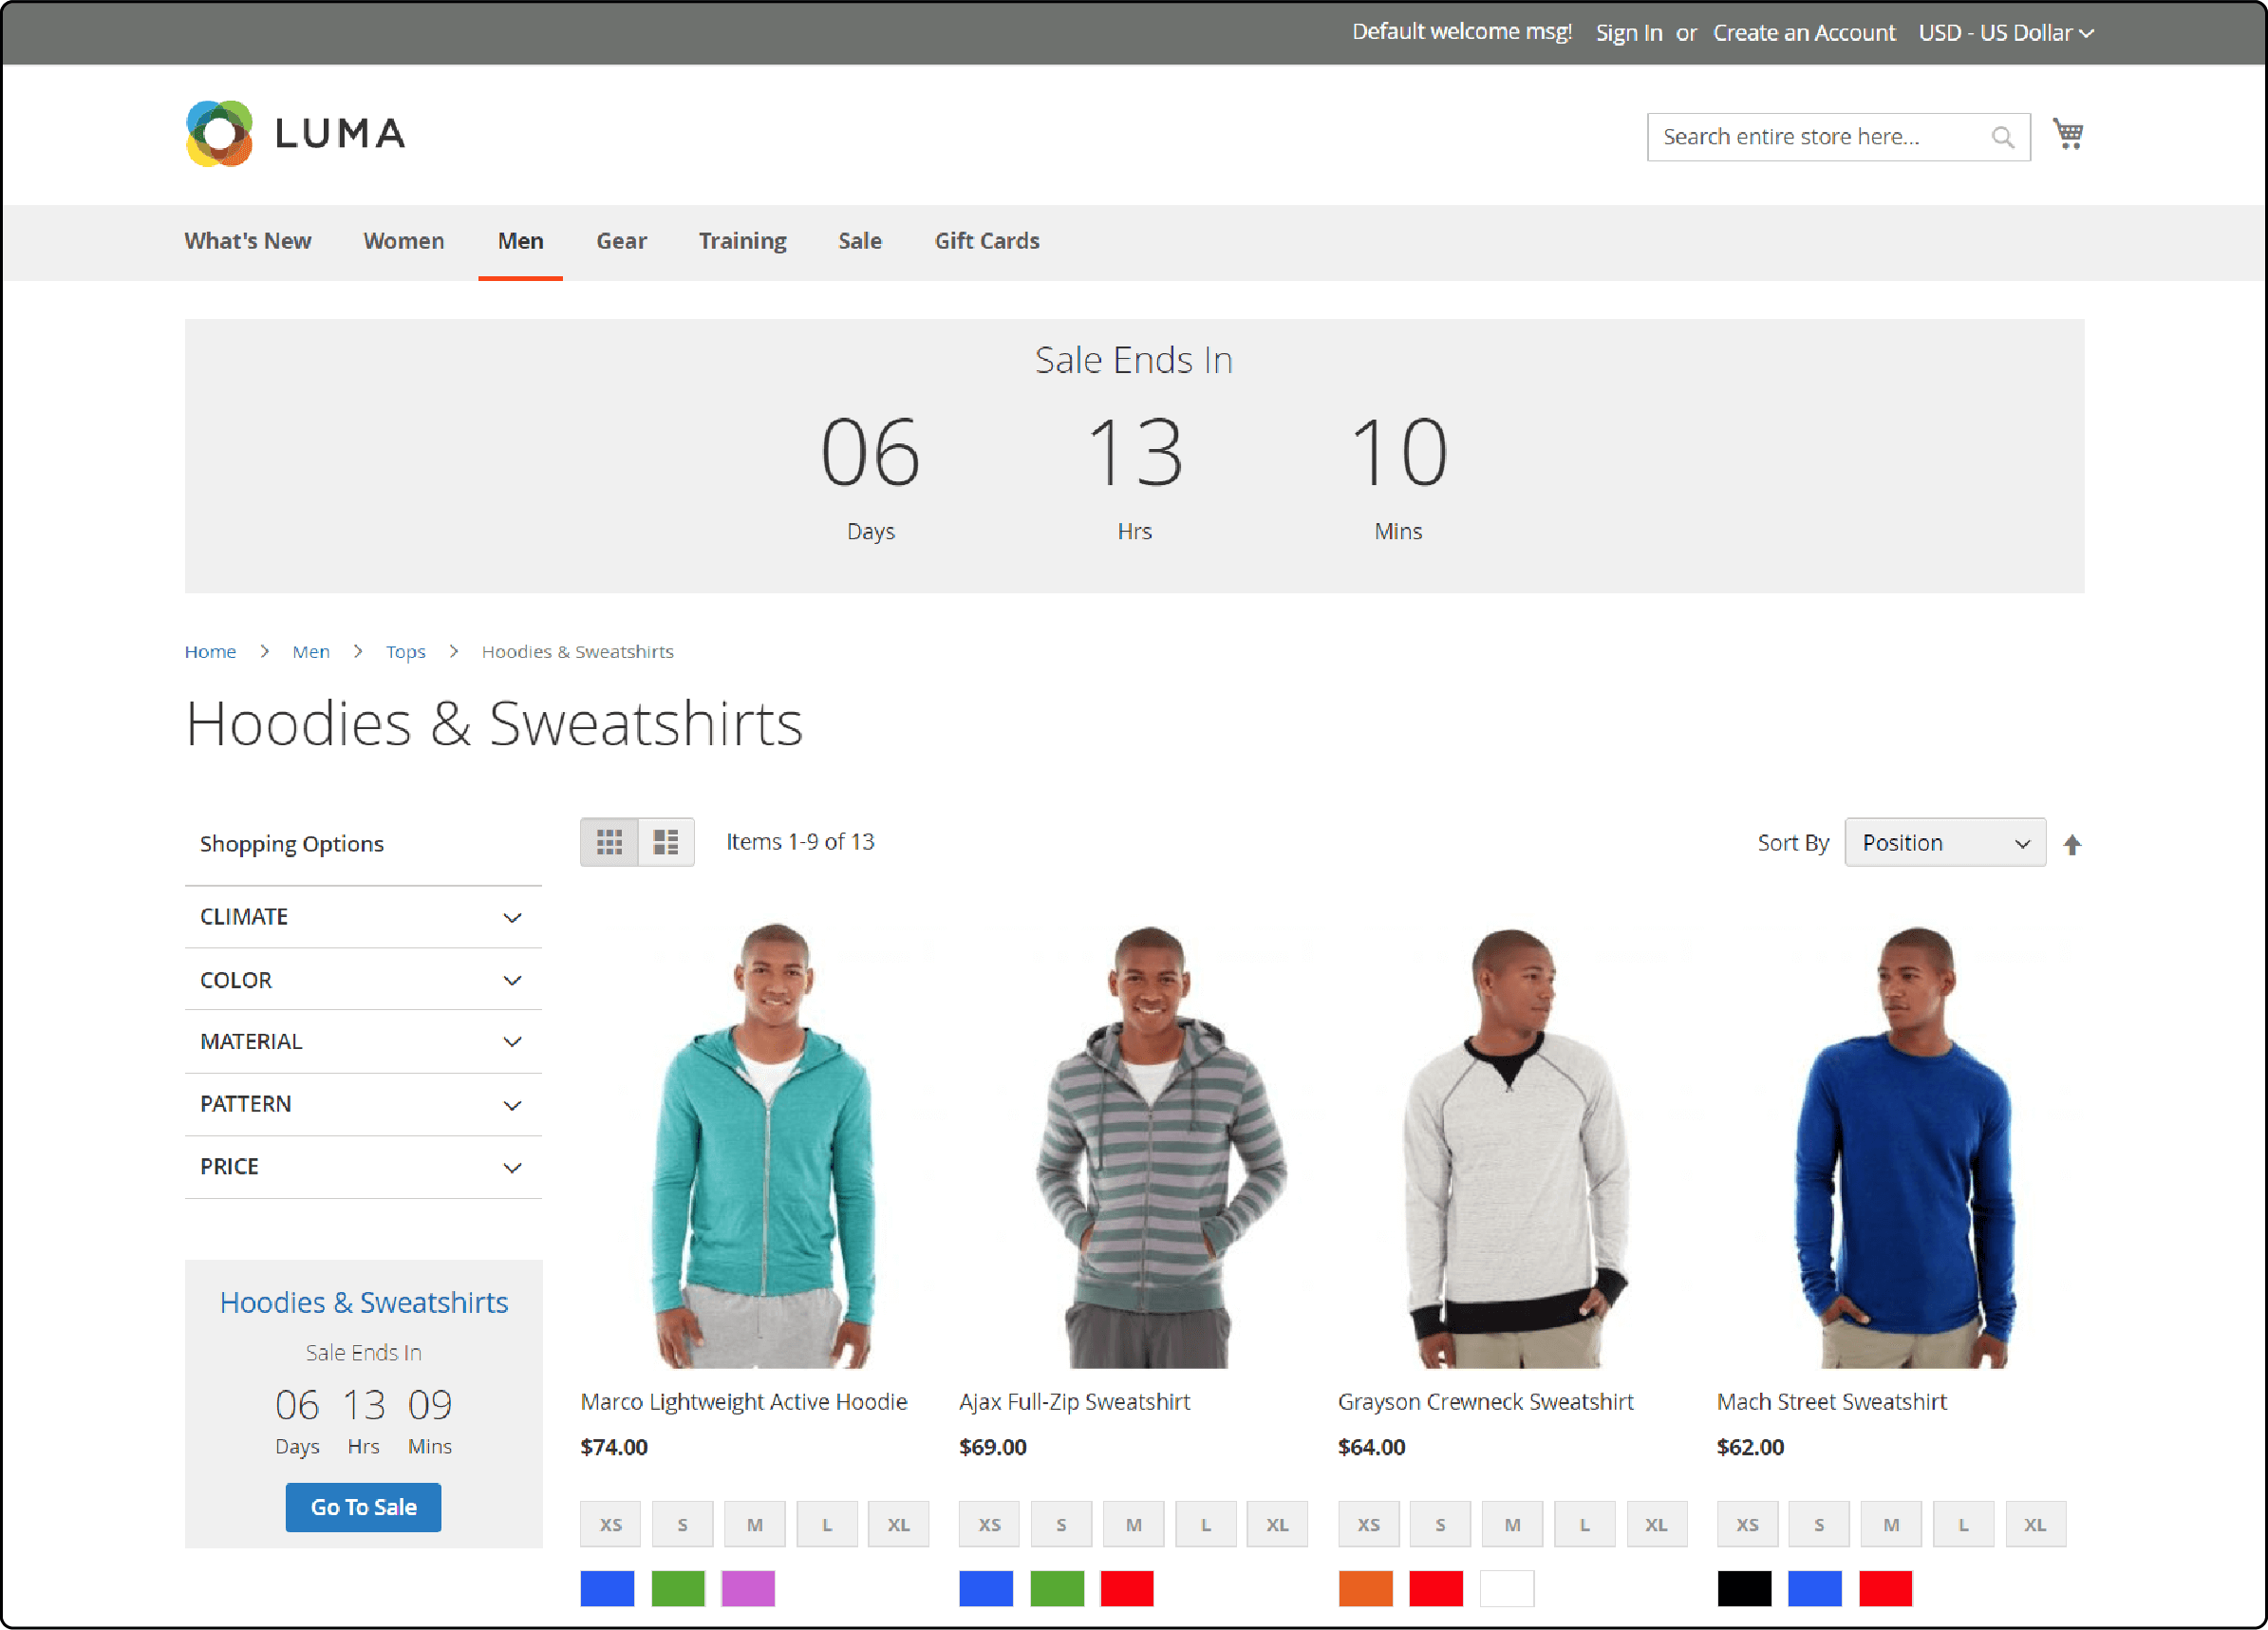
The Event Ticker block feature presents a countdown timer and displays start and end dates for:
- Currently open events
- Upcoming events
- Closed events
The placement of the ticker block depends on configuration settings. If the category page ticker is activated for an event, it will appear at the top of the category listing.
Similarly, if the product page ticker is enabled, it will be displayed at the top of the product page for any product associated with the category. Enabling the event ticker is accomplished during the event creation process.
Configuration: Magento 2 Private Sales
-
Navigate to Stores > Settings > Configuration.
-
In the left panel, expand Catalog and select Catalog.
-
Scroll down to the Catalog Events section.

-
In this section, you can:
- Enable Catalog Eventsfunctionality in both the backend and Magento storefront.
- Set a maximum number of events for a sidebar widget.
- Specify the number of events to scroll per click.
-
Once done, save this configuration.
Managing Access Restrictions in Magento 2 Private Sales
-
Ensure private sales are enabled.
-
Limit access to registered customers only, requiring them to log in before accessing private sale content. Non-registered customers must register first.
-
Go to Magento Admin Panel > Stores > Settings > Configuration.
-
Under General, in the left panel, select General and find the Website Restrictions section.

-
Enable Access Restrictions. In this section, you can:
- Enable access restrictions.
- Choose a restriction mode (Private Sales: Login Only or Private Sales: Login and Register).
- Specify a page for user redirection before accessing the site.
- Select a landing page that appears before logging in to private sales.
-
Set HTTP Response to 200 OK to inform search engine bots that the landing page is correct, indicating no other pages to index.
-
Save changes when done.
Note: Products from upcoming or closed events are unavailable for general sale. The "Add to Cart" button is not visible on the product list or page.
An exception exists when a product belongs to multiple Magento categories, and one of them has no selling restrictions. In this case, you will see the button but not the ticker block.
If a product is associated with a single category linked to a closed event, deleting the event will restore the "Add to Cart" button.
Managing Magento 2 Private Sales Events
- To access the Events Grid, go to Magento Admin panel > Marketing > Private Sales > Events.

-
The Event Grid columns contain the following options:
- ID: Internal ID of each event.
- Category ID: ID of the corresponding category.
- Category: Name of the related category.
- Start: Event start date.
- End: Event end date.
- Status: Indicates whether an event is Upcoming, Open, or Closed.
- Countdown Ticker: Specifies if the ticker appears on the Category or Product Page.
- Sort Order: Defines the sequence in which events are listed together.
- Action: Allows you to edit each event.
-
Utilize filters in each grid column for customization. Adjust the number of records displayed per page as needed.
Adding a Catalog Event in Magento 2
- Click Add Catalog Event above the right grid to create a new private sale event.
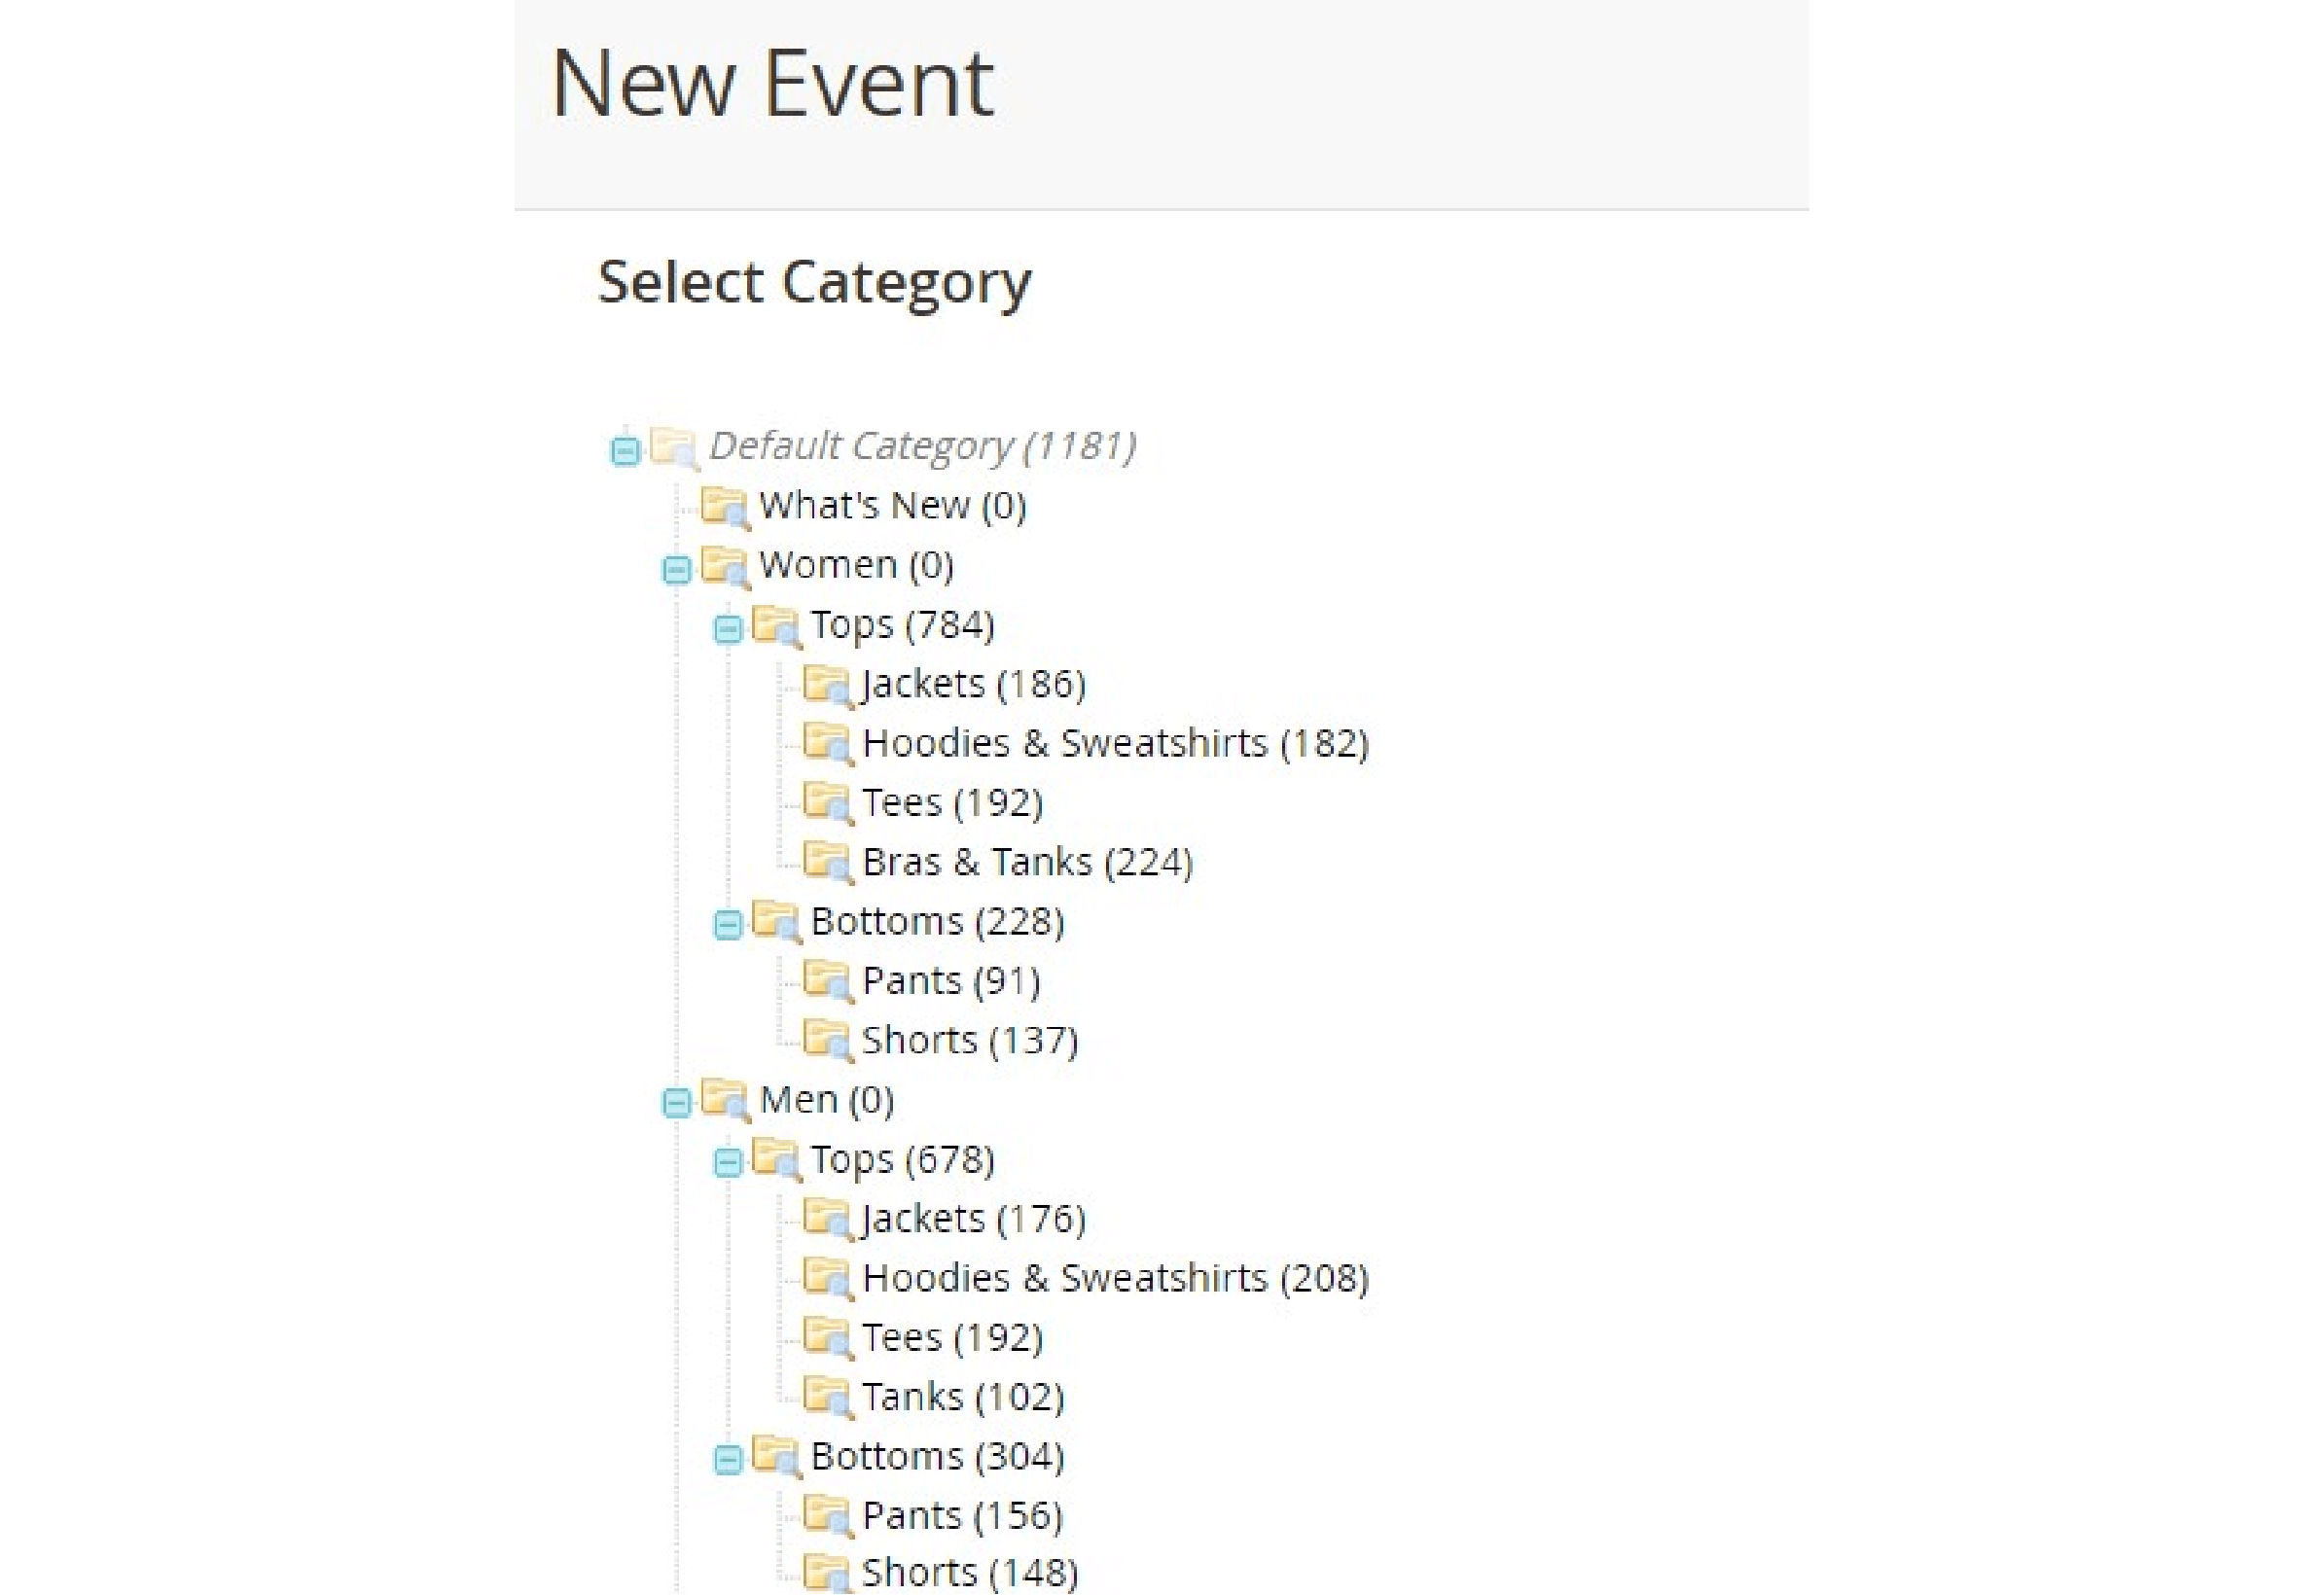
- You will be redirected to a new screen where you should:
- Select a category to associate with your new event.
- Specify the start and end dates for the event.
- Upload an image to showcase your sale.
- Set a sort order for the event.
- Choose whether to show or hide a countdown ticker for category and product pages.
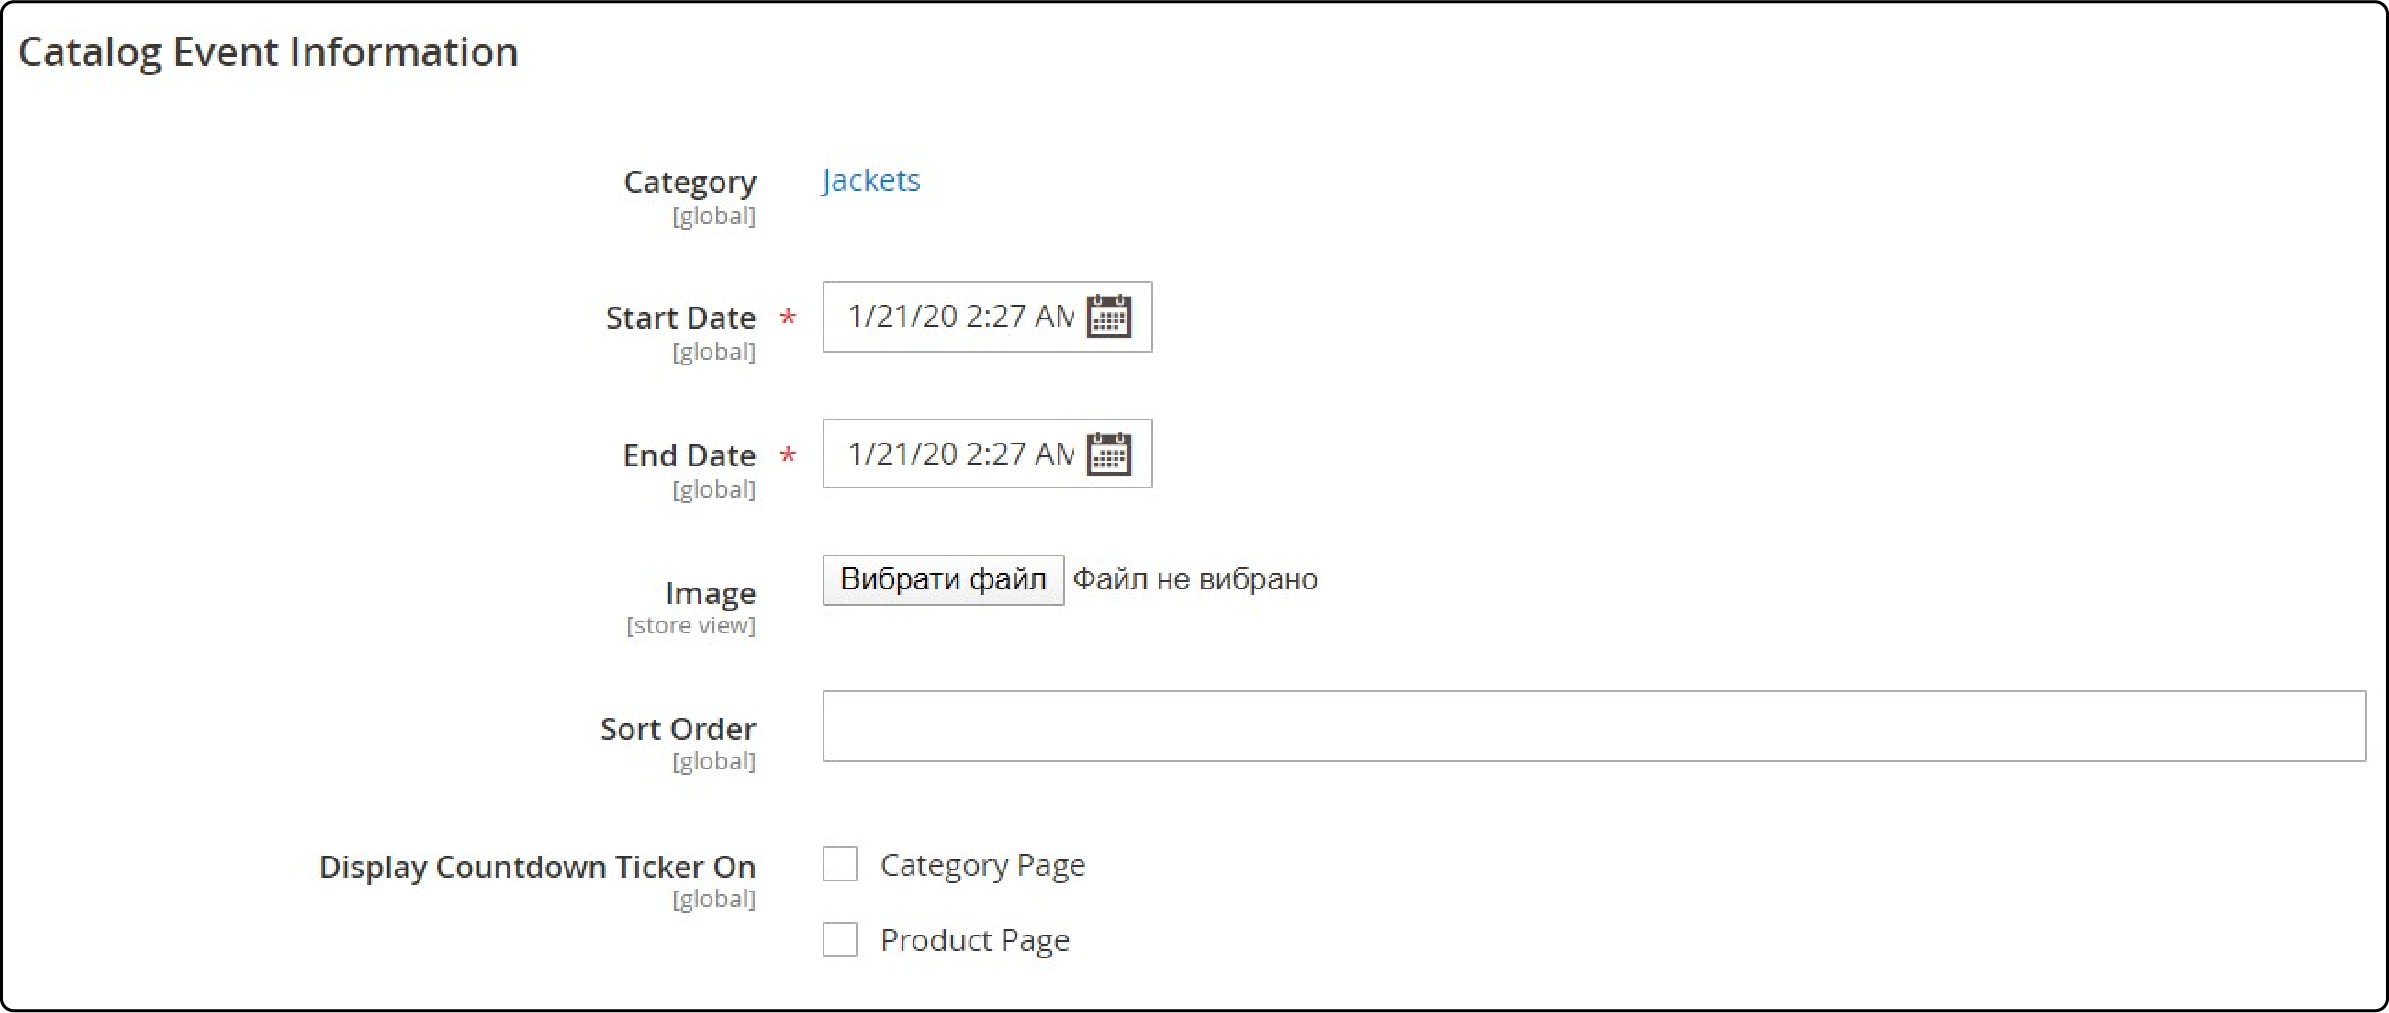
- Save the changes.
Editing Private Sales in Magento 2
Method 1: Using the Events Grid
-
Navigate to the Events grid.
-
Locate the event you want to edit in the Action column.
-
Edit the event as needed.
Method 2: Using Catalog >Categories
-
Go to Catalog > Categories.
-
Select the category associated with your event.
-
Click Edit Event in the upper-right corner.
-
Make the necessary edits on the event page.
Configuring the Catalog Events Carousel in Magento 2 Private Sales
The Catalog Events Carousel widget allows you to showcase a slider of upcoming events. Here's how to configure it:
-
Choose Display Location: As a store administrator, select the page and the area where you want to display the carousel.
-
Adjust Widget Parameters: Customize the widget by specifying the width and the number of events to be displayed simultaneously.
Enabling and Creating the Catalog Carousel Widget in Magento 2 Private Sales
To Create the Catalog Carousel Widget:
-
Access the necessary settings by going to Content > Elements > Widgets.
-
Click Add Widget in the upper-right corner above the grid.
-
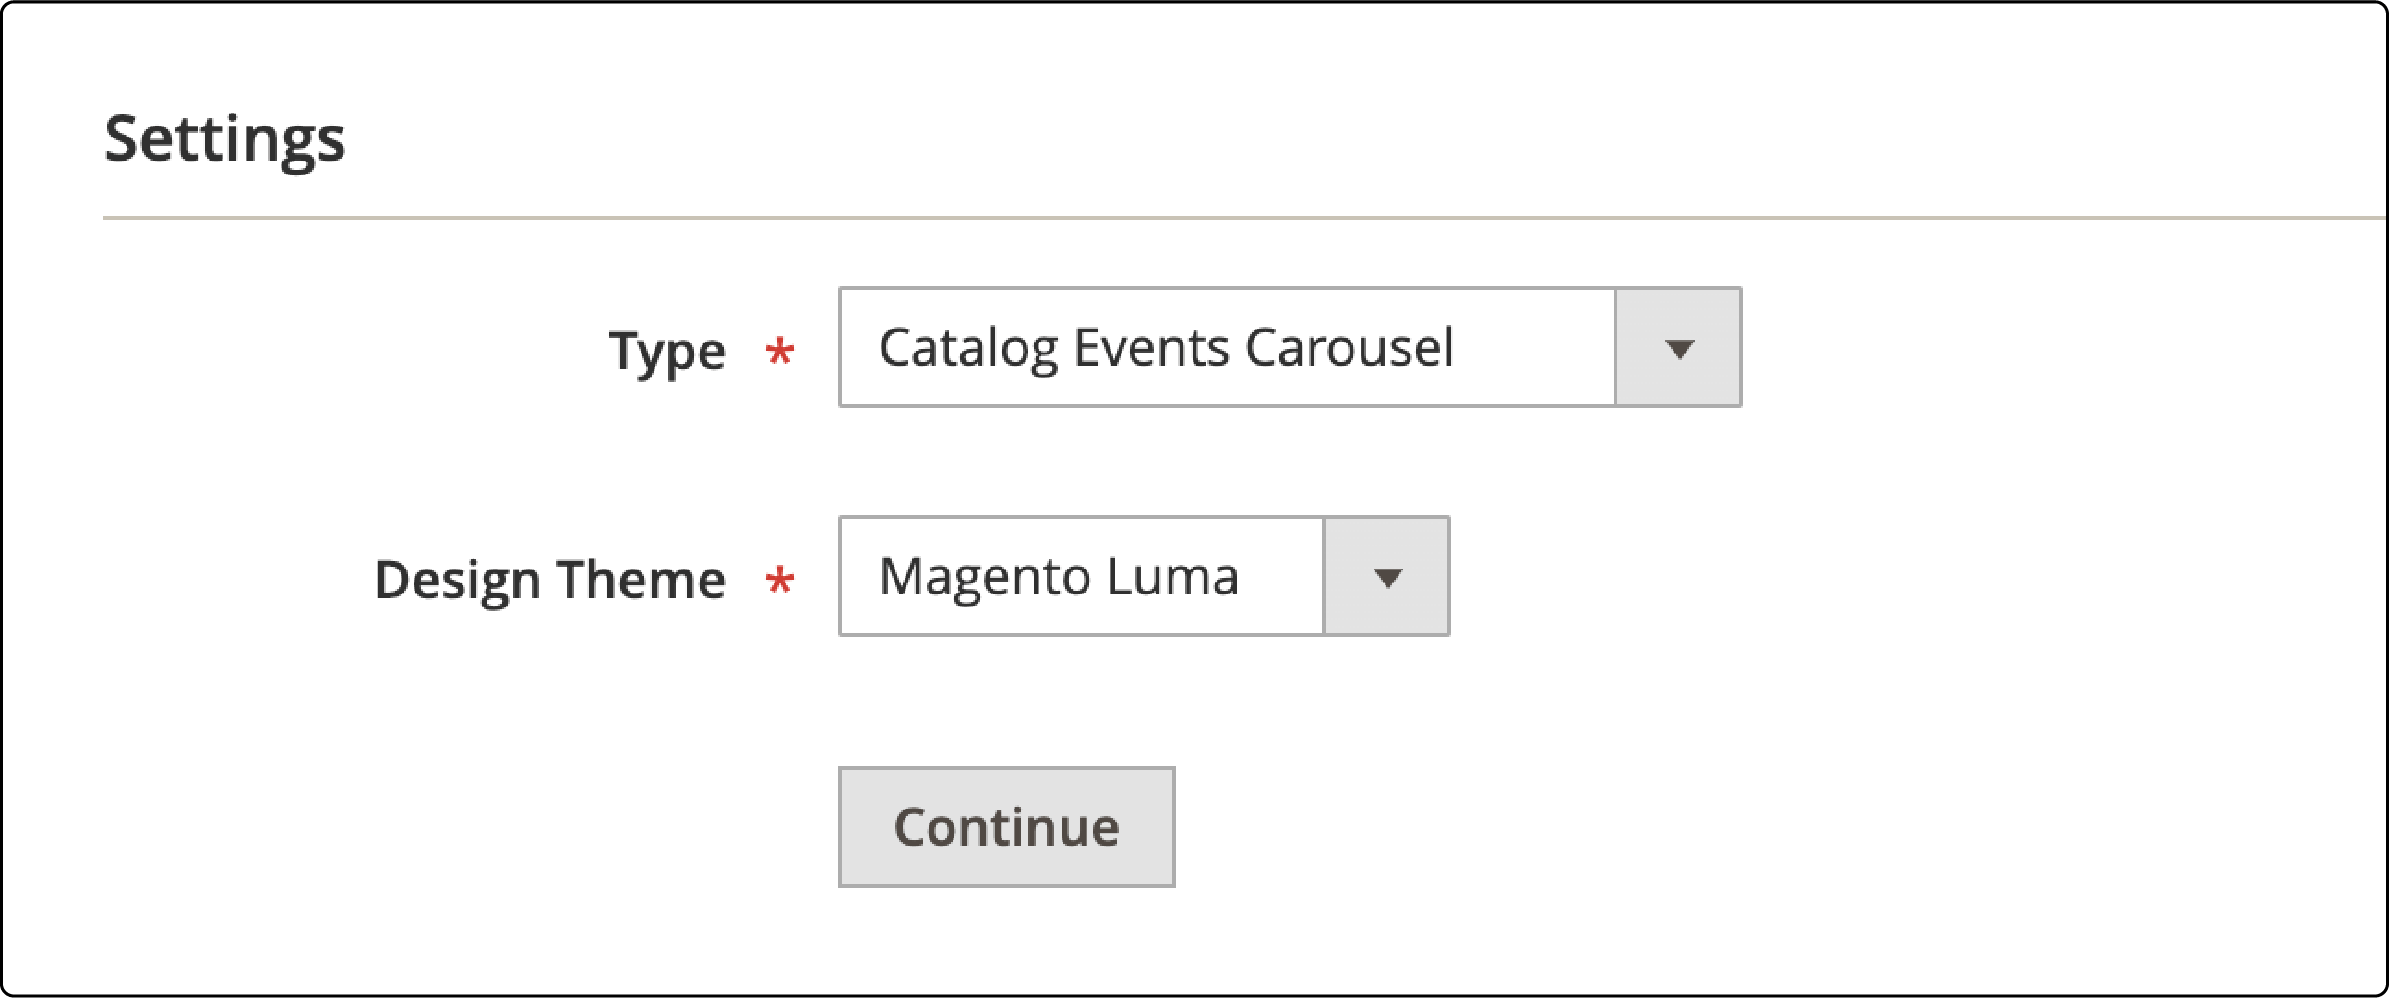
The new screen appears:
- Choose Catalog Events Carousel from the Type dropdown.
- Select the Design Theme used by the store.
- Click Continue.
-
To configure Storefront Properties:
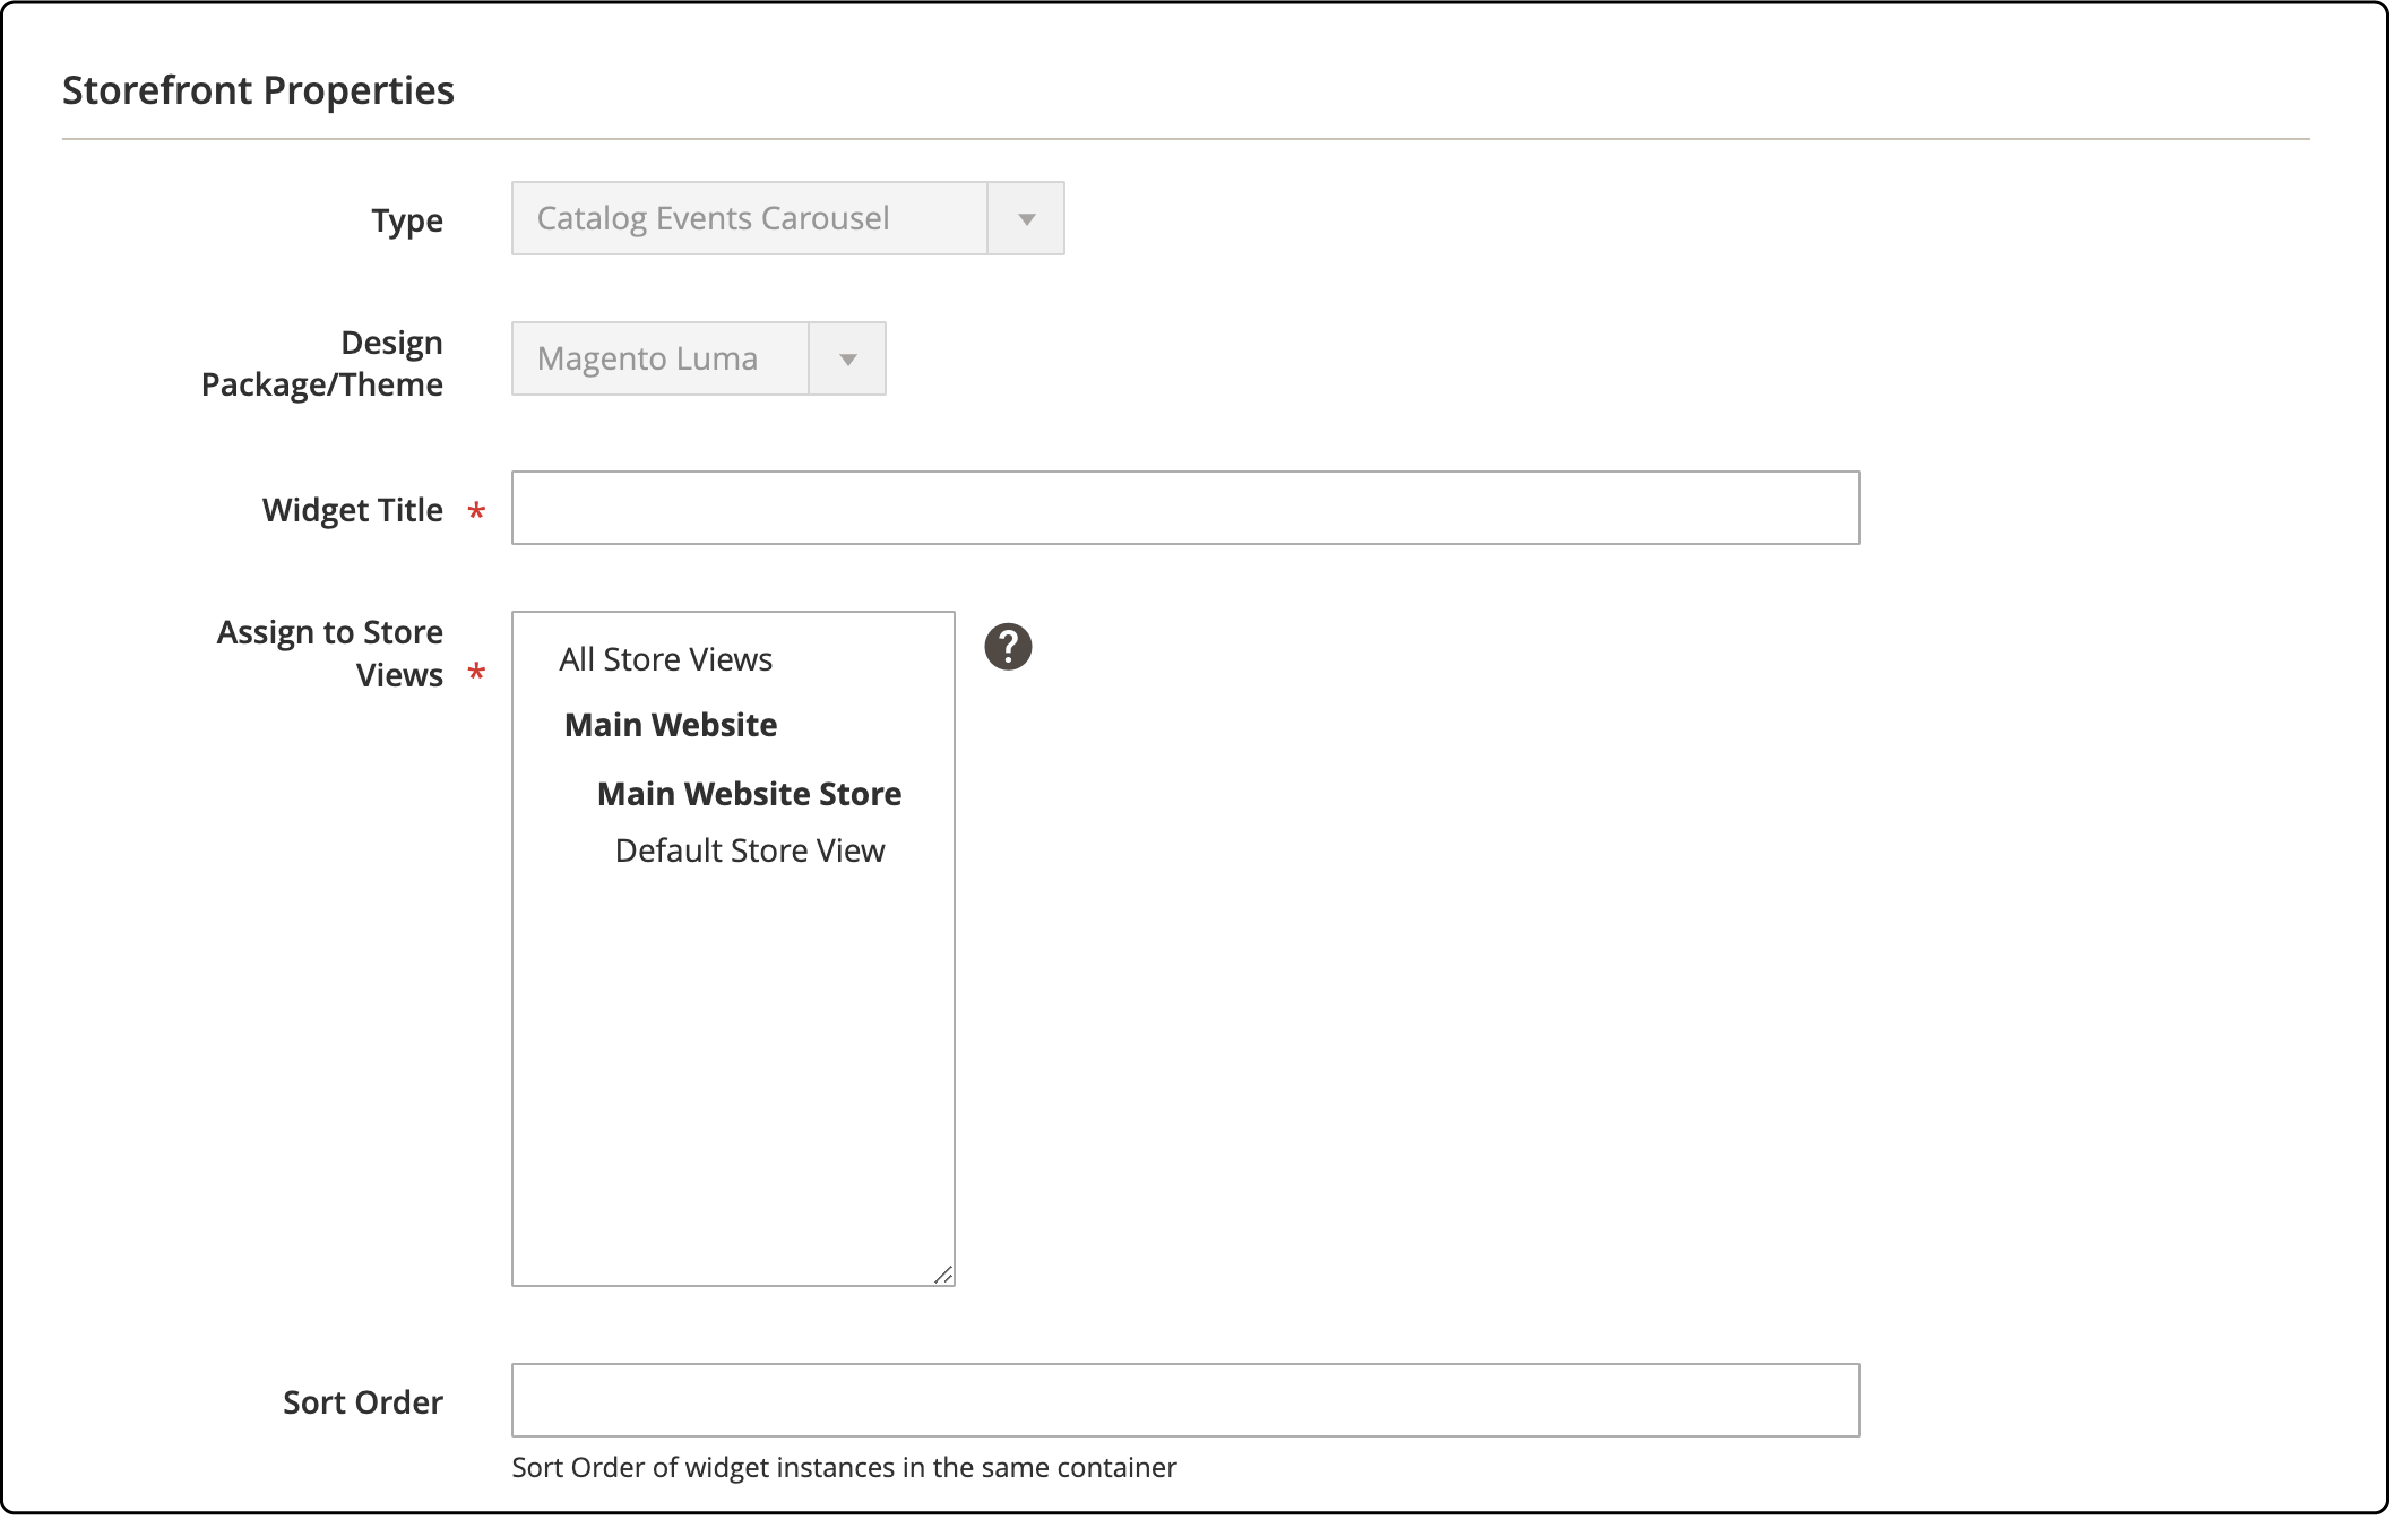
- Add a widget title.
- Select a store view.
- Specify a sort order.
- Click Add Layout Update to specify the widget location.

- Set the parameters as follows:
- Display On: Specified Page.
- Page: CMS Home Page.
- Container: Main Content Area, Sidebar Additional, or Sidebar Main.
Note: Repeat these steps to display the Events Carousel in another location.
- Configure Additional Options:
- Open the Widget Options tab on the left panel.
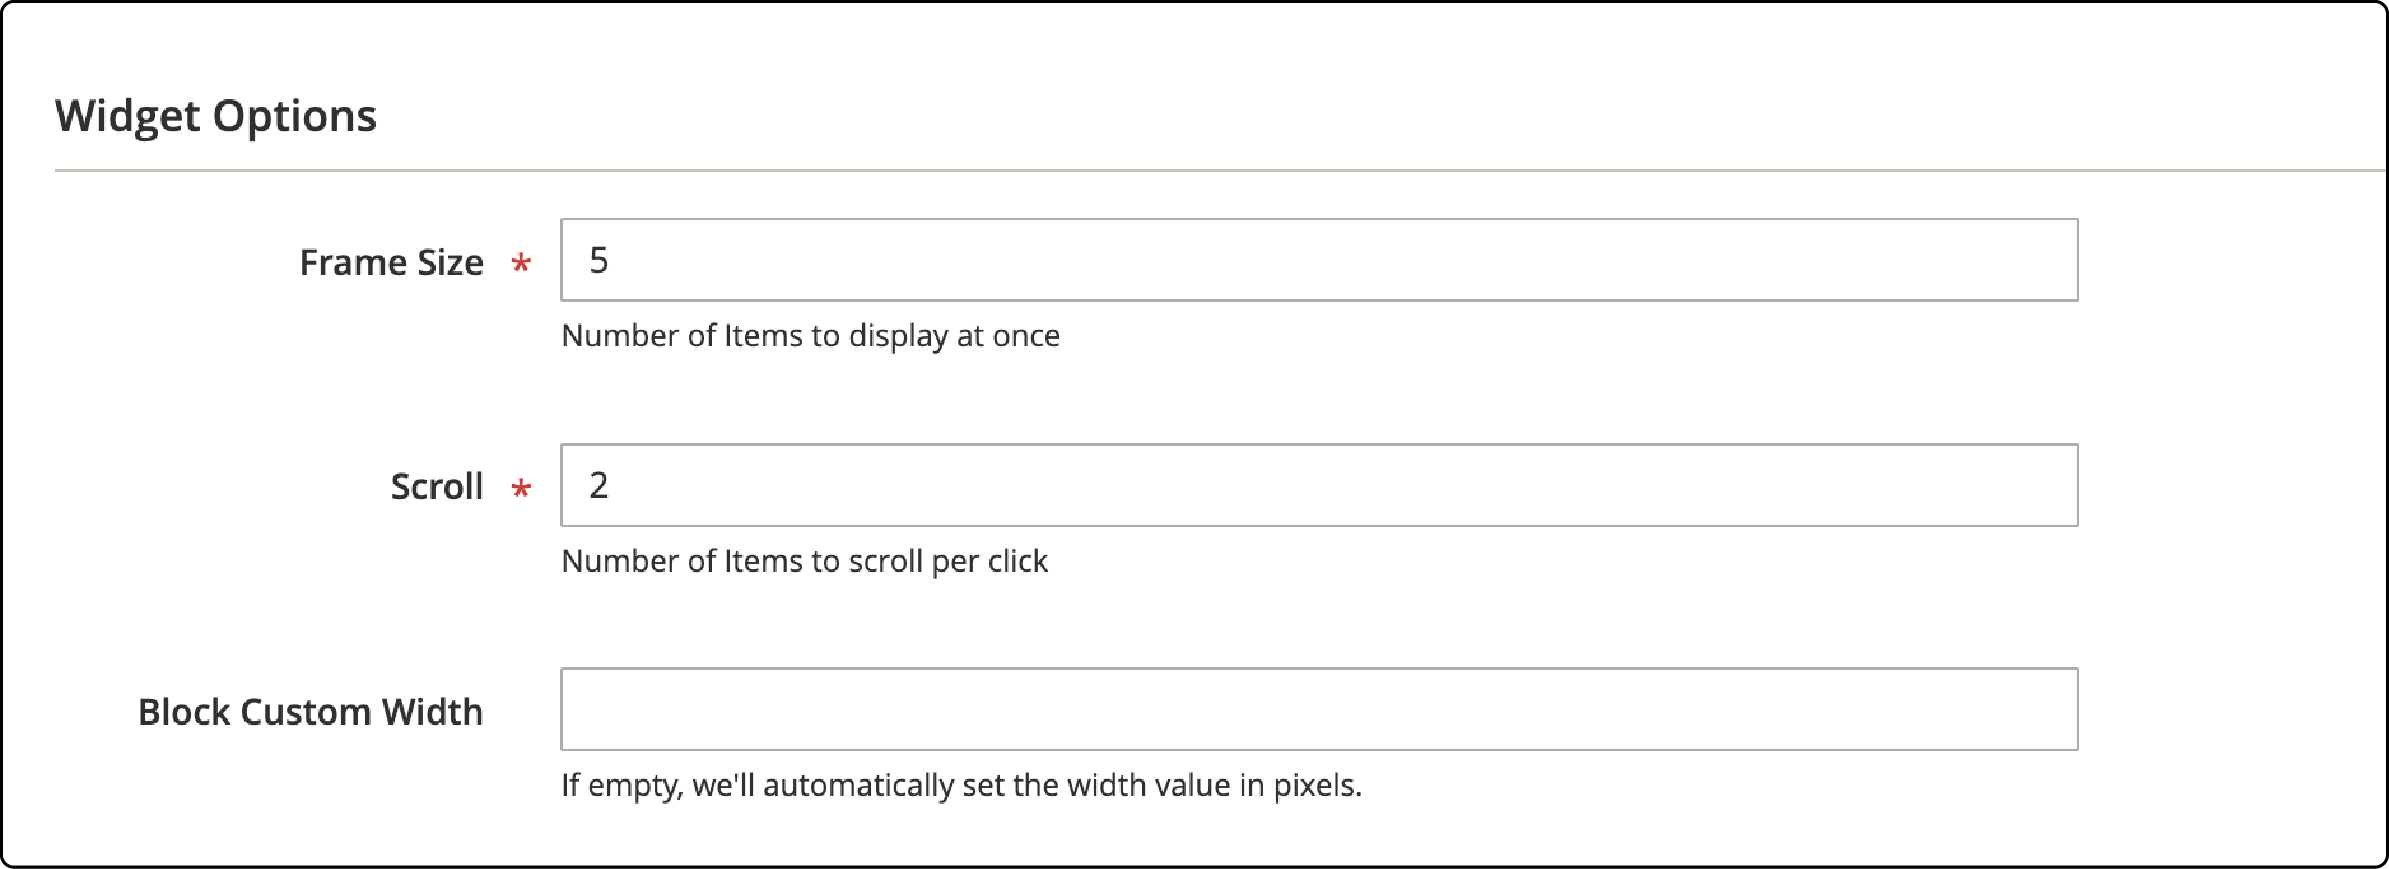
- Specify the number of events to display simultaneously in the Frame Size field in the slider.
- Set the number of events to scroll per click in the Scroll field.
- Optionally, enter the number of pixels to specify a custom width in the Block Custom Width field.
- Save the widget and refresh the cache.
Managing Invitations in Magento 2 Private Sales
Invitations in Magento 2 Private Sales are closely tied to customer accounts. Each invitation email provides a link to a Customer Login page. Registered customers can manage invitations within their dashboard, allowing them to create recipient lists and include custom messages.
When sending invitations, the system processes them in batches, and users can subsequently monitor the status of each invitation, which may either be accepted or canceled. This integration streamlines the invitation process for private sales events.
Configuring Invitations in Magento 2 Private Sales
-
Go to Stores > Settings > Configuration.
-
Expand Customers in the left panel and select Invitations.
-
In the General section:
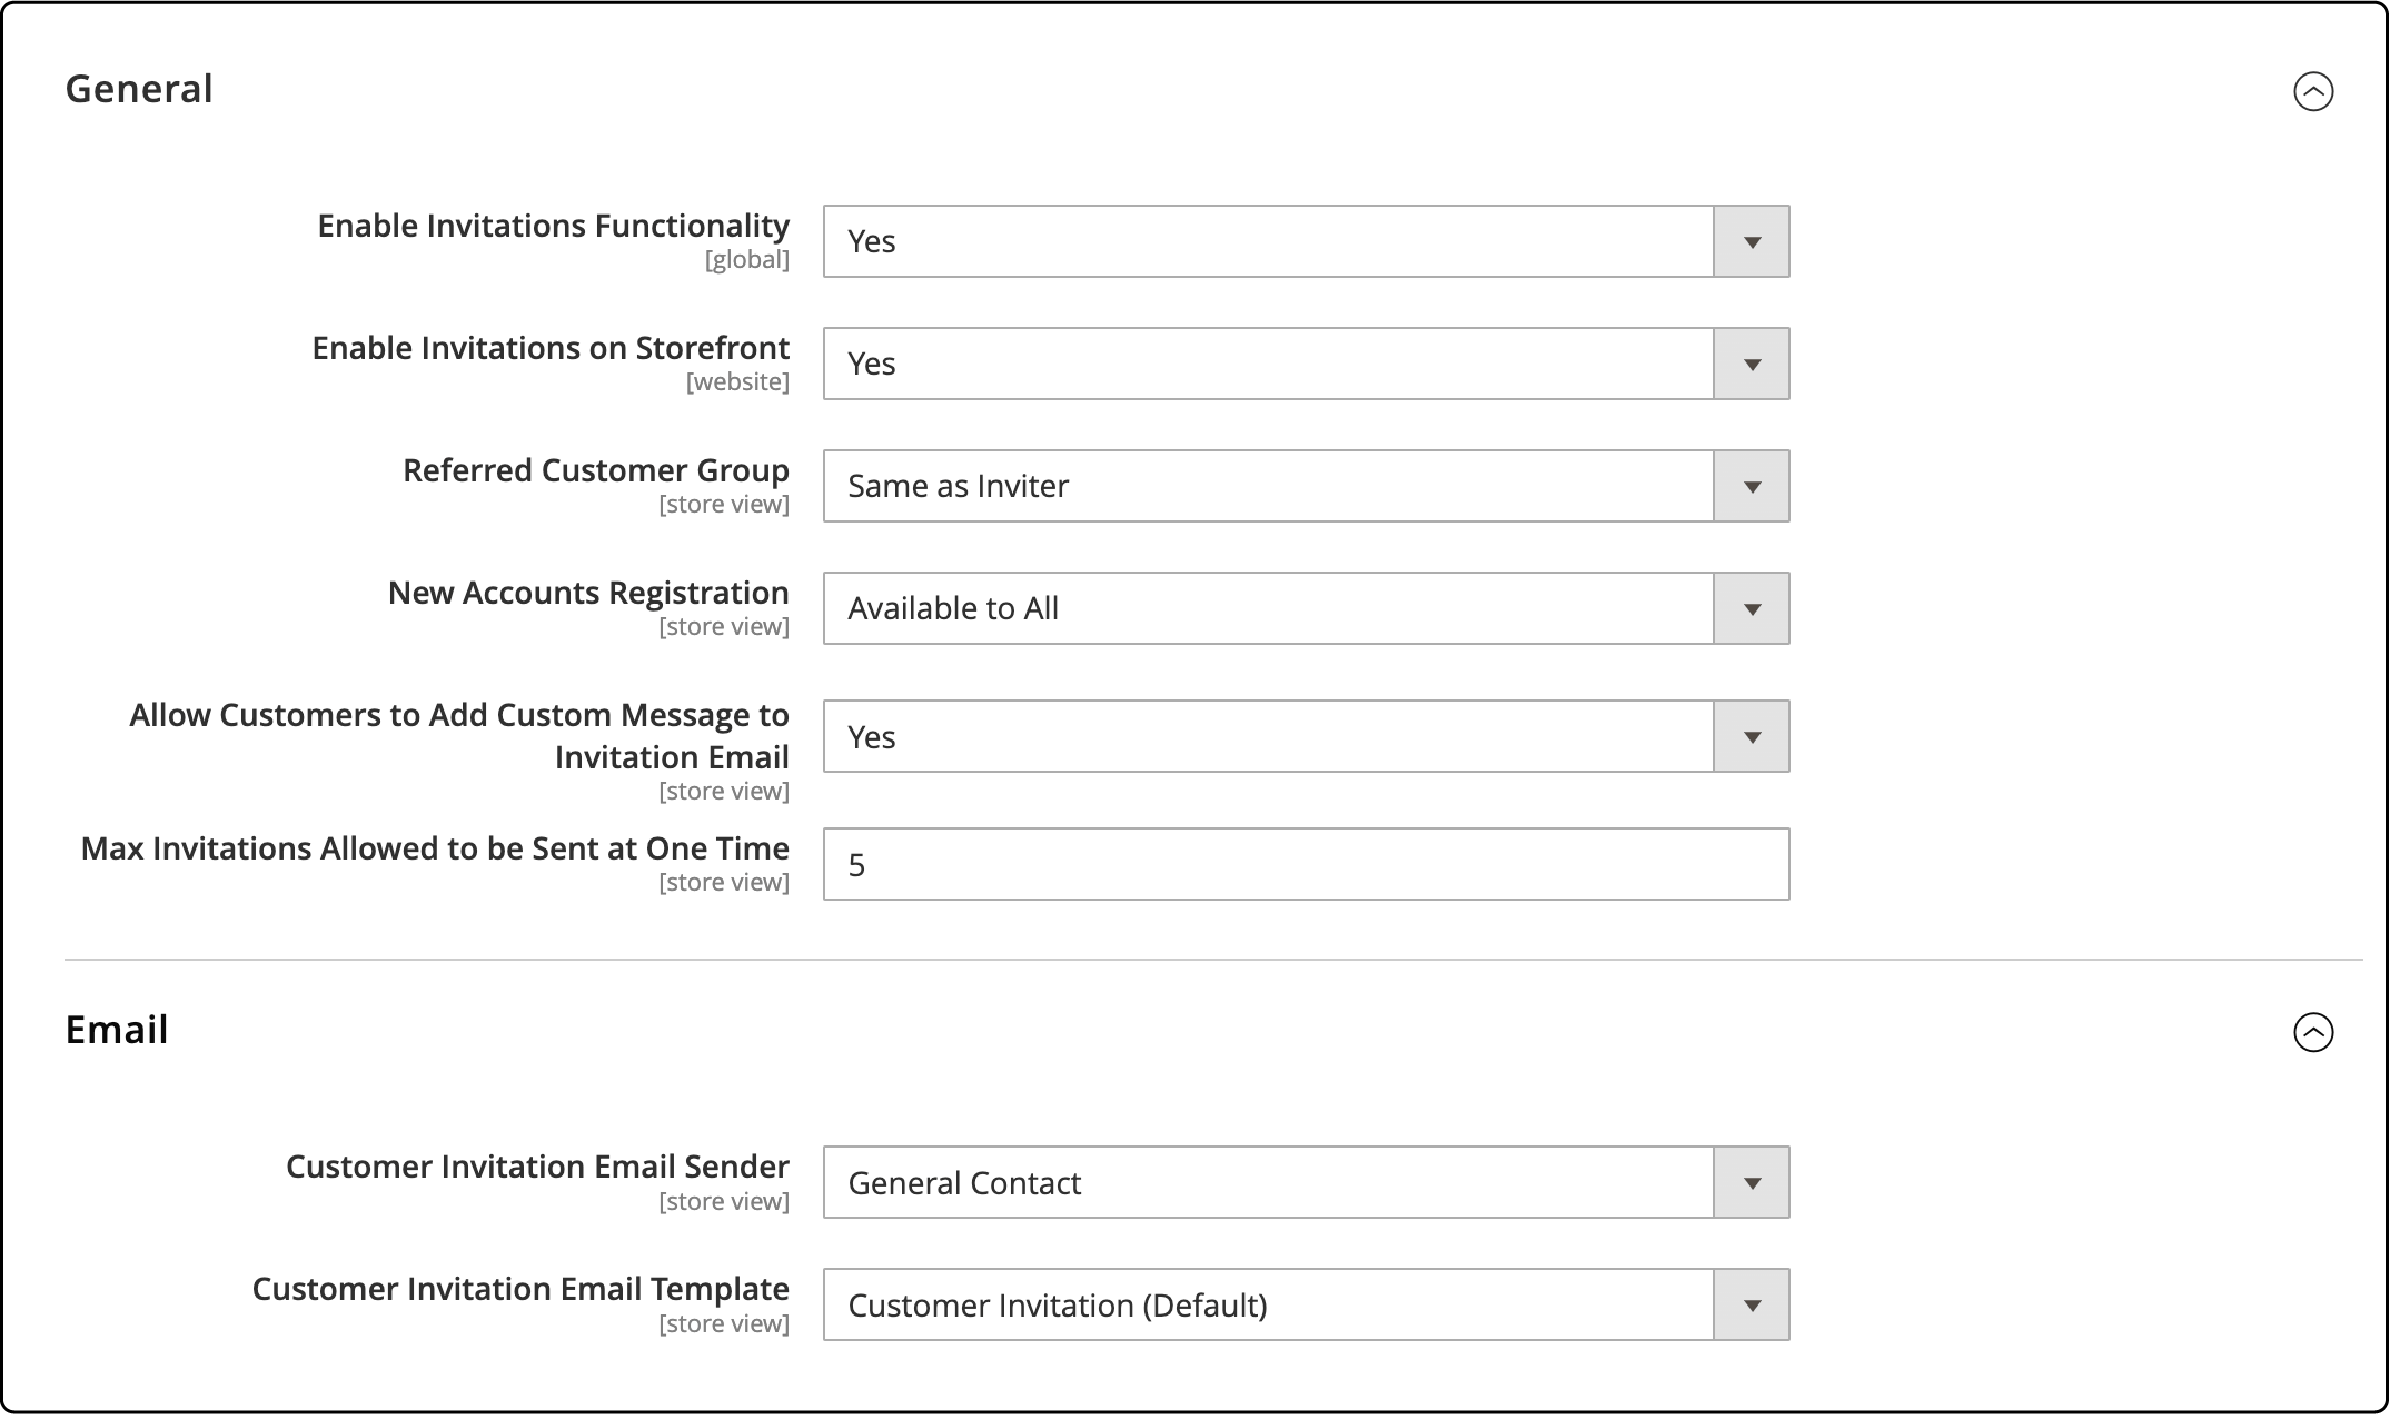
- Enable Invitations Functionality.
- Enable Invitations on Storefront to allow customers to manage invitations.
- Set Referred Customer Group to Same as Inviter or Default Customer Group from Configuration.
- Choose New Accounts Registration as By Invitation Only or Available to All.
-
Optionally, let customers add custom messages to invitation emails and limit the number of invitations sent simultaneously.
-
In the Magento Email settings section:
- Select the store identity for Customer Invitation Email Sender.
- Choose an email template for the invitation email.
-
Save the configuration when done.
Managing Invitation Emails
-
Access the grid of invitation emails at Marketing > Private Sales > Invitations.
-
The grid includes the following columns:
- Checkbox: Select to send or discard invitations in bulk.
- ID: Internal ID of an invitation.
- Email: Corresponding email address.
- Invitee: Related invitee.
- Sent: Date and time the invitation was sent.
- Registered: Date and time a customer was registered.
- Status: Indicates if the invitation was sent, not sent, accepted, or Dismissed.
- Valid Website: Corresponding website.
- Invitee Group: Customer group of the invitee.
Adding Invitations in Magento 2
-
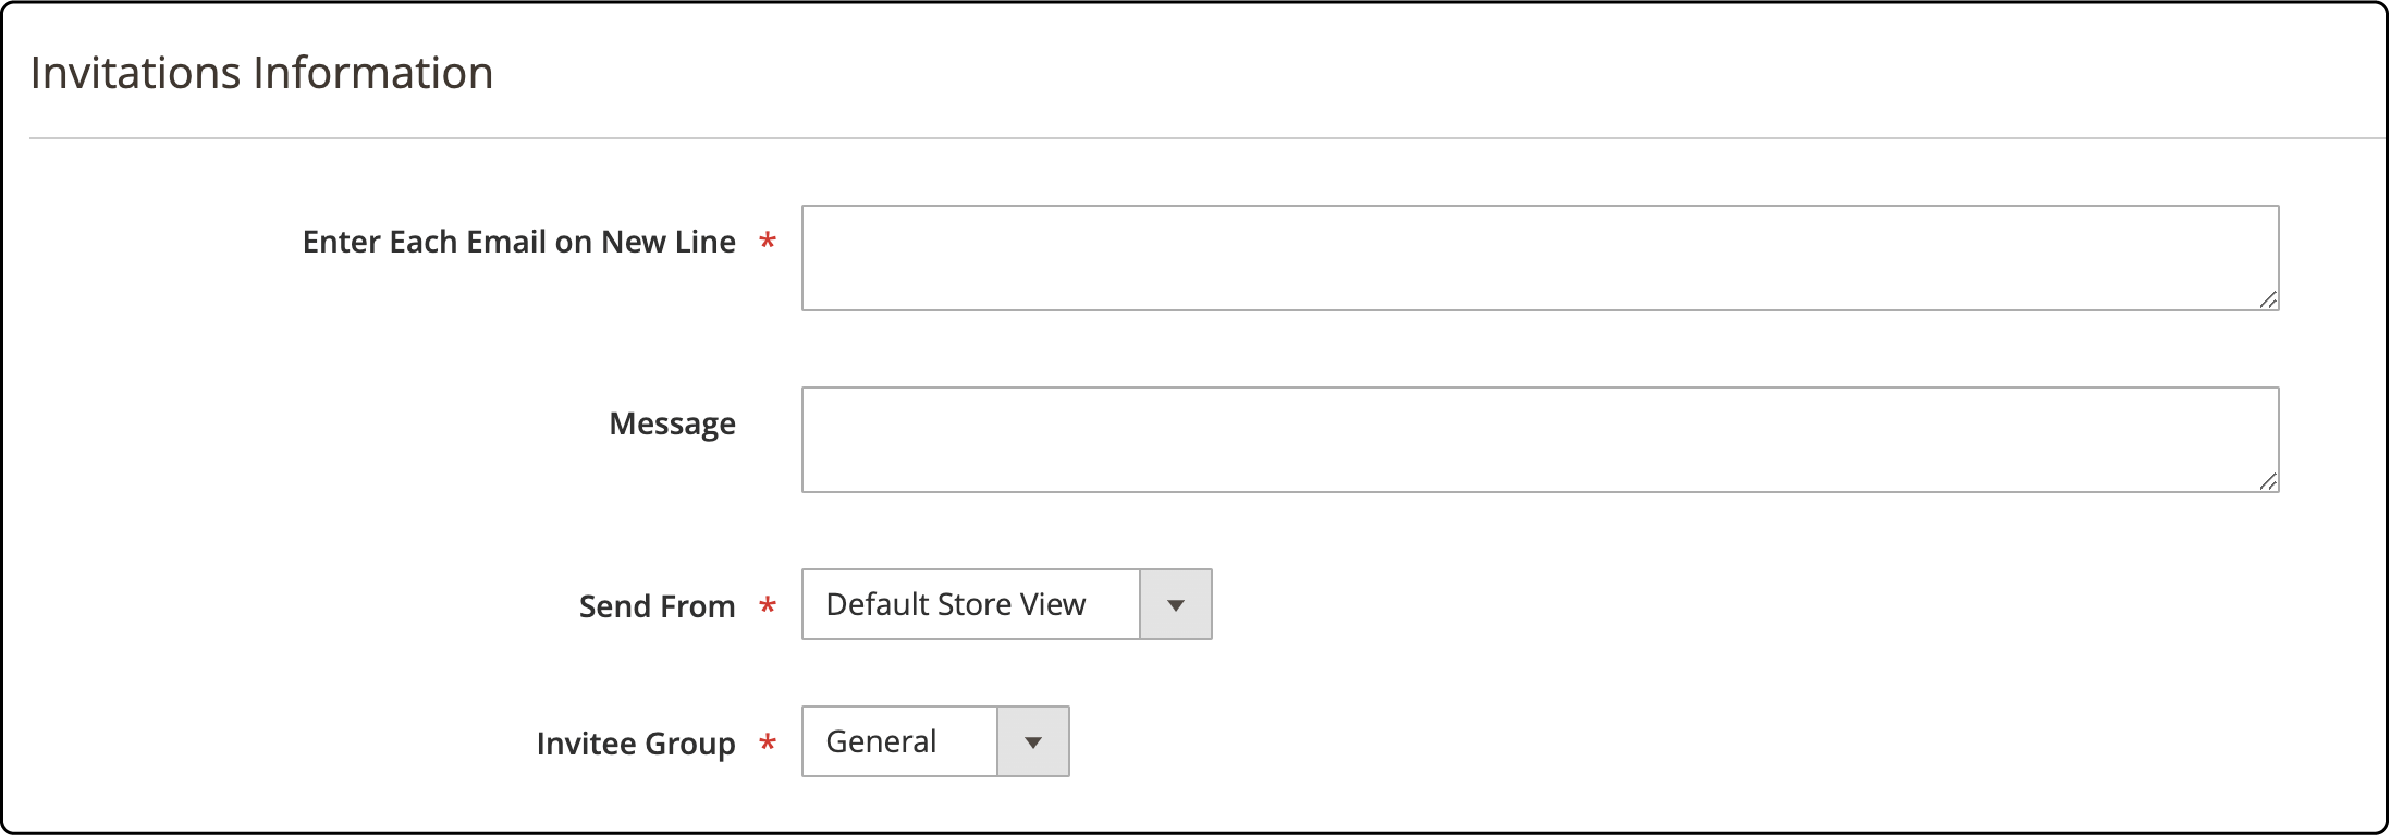
Click the Add Invitations button above the grid.
-
On the new screen, enter email addresses to invite new customers.
-
Add a custom message if desired.
-
Choose a sender.
-
Select an invitee group.
-
Save the invitation information.
Best Practices for Magento Private Sales
-
Timing and Duration: Carefully choose the timing of your private sales to align with when your customers are most active online. Create a sense of urgency by setting a limited duration for the sales event.
-
Targeted Audience: Identify specific Magento customer groups or VIP customers likely to be interested in exclusive offers and discounts. Tailor your promotions accordingly.
-
Urgency and Scarcity: Utilize countdown timers or limited stock notifications to prompt customers to make quick purchase decisions.
-
Personalization: Customize your offers for customer segments based on their preferences and shopping behavior.
FAQs
1. How do I configure the Catalog Event ticker to display on a specific page?
Access the Configuration settings in your Magento Admin panel to configure the Catalog Event ticker. Navigate to Catalog > Catalog Events. There, you can enable the ticker for both the backend and storefront. Specify the page and location where the ticker block will be displayed, enhancing the visibility of ongoing and upcoming events.
2. Can I limit sales to specific members or create exclusive member-only sales pages?
Magento 2 Private Sales allows you to limit sales to specific members. By utilizing Customer Groups, you can create exclusive sales accessible only to designated members or VIP customers. This feature lets you offer VIP treatment, creating a buzz and exclusive access for your best customers.
3. How can Magento 2 Private Sales help in managing surplus inventory?
Magento 2 Private Sales can create limited-time sales, perfect for clearing surplus inventory. You can establish dedicated private sale pages, offering exclusive access to members. Utilize this feature strategically to increase Magento sales while providing exclusive deals to your customer base.
4. What does the Event Ticker block display on category and product pages?
The Event Ticker block displays countdown timers for currently open, upcoming, and closed events. It appears at the top on category pages, showcasing ongoing and upcoming Magento events. Similarly, on product pages, it's displayed at the top for products associated with the category.
5. How does Magento 2 Private Sales cater to VIP customers?
Magento 2 Private Sales facilitates exclusive access to members only and VIP sales. You can offer VIP treatment to your best customers by implementing access restrictions and sending invitations. It allows you to personalize offers and promotions, enhancing the overall shopping experience for your VIP clientele.
Summary
Magento 2 Private Sales and Events are powerful tools for businesses. It allows exclusive access to members and creates limited-time sales to manage inventory effectively. This tutorial covered the setup, management, and optimization of Magento 2 Private Sales. From configuring Private sales to managing invitations and utilizing access restrictions, it provides a detailed guide for leveraging this feature-rich tool effectively.
Discover Magento server hosting services tailored to meet your store's requirements and enhance your customer’s shopping experience.


