
Magento Shipping Methods Made Easy: Step-by-Step Guide
Magento shipping methods are a vital component of your online business logistics. The choice of shipping methods directly affects client happiness and overall ecommerce success. Magento 2 boasts a variety of shipping options. It can be tailored to meet the specific needs of your customers. This article provides an in-depth guide to setting up shipping methods in Magento 2. We will discuss the various shipping options available, such as flat rate, table rate, and complimentary shipping.
We will delve into how to determine handling fees and shipment costs. We will also supply a thorough, step-by-step walkthrough for modifying shipping methods in Magento 2. The guide will touch upon shipping carriers like FedEx, UPS, USPS, and DHL.
To maximize Magento 2's shipping capabilities, we will share proven strategies for refining shipping methods. Following these recommendations can lower shopping cart abandonment rates and improve Magento sales!
Overview of Magento 2 Shipping Methods
What do Magento shipping options entail?
Magento 2 offers an extensive selection of shipping options. You can customer the shipping to align with your eCommerce store requirements.
The default Magento shipping methods include:
1. Flat rate shipping
With this method, a consistent rate is applied to every order. The rate is independent of the Magento 2 dimensional shipping, weight, or destination. The option is particularly suitable for small businesses offering a limited range of products .
2. Table rate shipping method
Shipping costs are determined based on the destination, weight, and order value. The option allows you to establish multiple shipping rules for distinct product sets or customer segments. It makes it more flexible than flat-rate shipping.
3. Free shipping
Magento 2 allows you to provide free shipping under specific conditions. It includes order value or customer category. It includes order value or customer category. It is essential to account for shipping expenses to ensure profitability. It can be based on a minimum purchase. You can also set up a cart price rule that is applied when certain conditions are met.
How to decide which Magento 2 shipping method is suitable for my business?
In deciding between flat rate and table rate shipping options, carefully consider your business's and customers' unique requirements.
Flat-rate shipping is easy to implement and well-suited for smaller businesses. Table rate shipping offers more customization and caters well to larger enterprises.
It's vital to incorporate handling fees and shipment charges when setting up shipping options in Magento 2. Handling fees cover the expenses of packaging materials and labor. The shipping charges are levied by FedEx, UPS, and USPS.
The following section will provide detailed steps to configure shipping options in Magento 2.
Setting Up Shipping Methods in Magento 2
There are several options to choose from when it comes to setting up shipping methods in Magento 2.
In this section, we will provide a step-by-step guide on adding and configuring shipping methods in Magento 2.
1. Flat Rate
A flat Rate is a simple approach that applies a fixed delivery charge to every order. It removes factors such as weight, dimensions, or destination. The method is ideal for businesses with a small product range or those aiming to streamline their delivery process.
To enable Flat rate shipping in Magento 2, follow these instructions:
-
Log in to your Magento 2 Admin Panel. Go to Stores → Configuration → Sales → Shipping Methods.
-
Scroll down to the Flat Rate section. Click on it to expand the settings.
-
Configure the
Enabledfield to Yes to enable this shipping method. -
Add a Title for the shipping method. This title will be visible to customers during checkout.
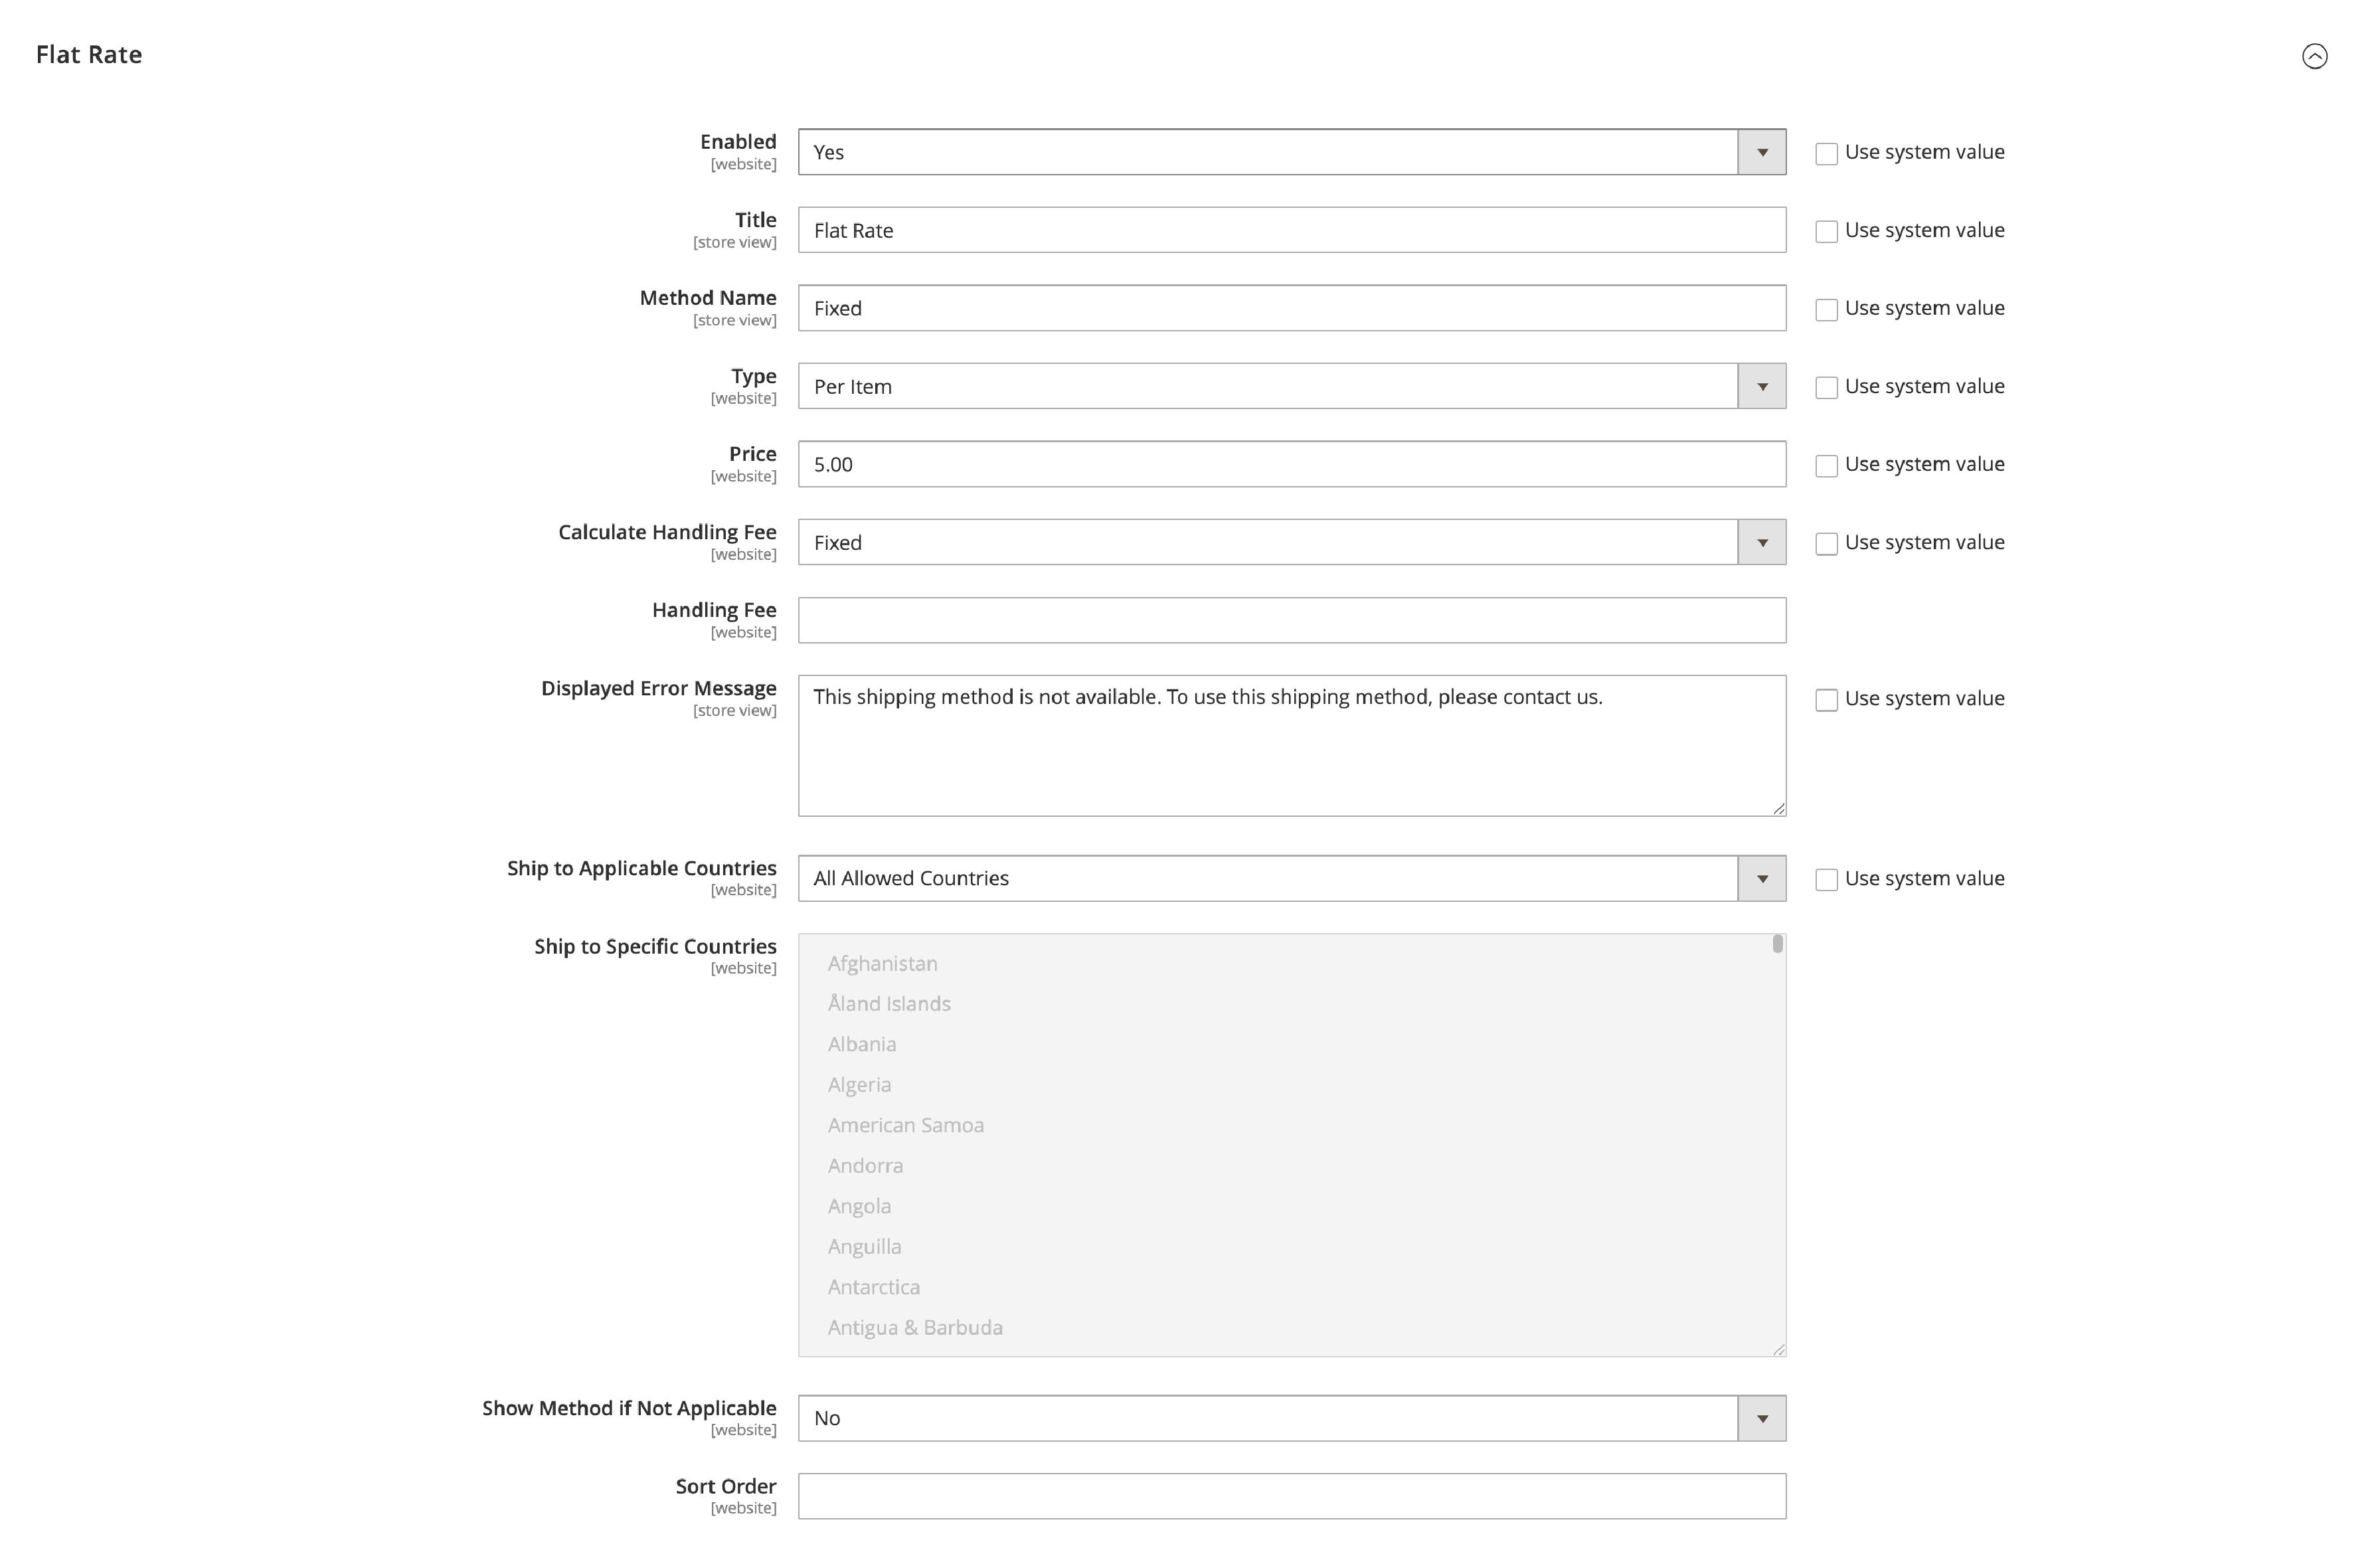
- Now, we set the Type field to either Per Order or Per Item.
- If you choose Per Order, the shipping fee will be charged once for the entire order.
- If you choose Per Item, the shipping fee is charged for each item in the order.
-
Set the shipping Price field to the shipping amount you want to charge.
-
Choose the Handling Fee if you’d like to add a handling fee to the shipping cost.
-
Select the Ship to Applicable Countries option. You can allow shipping to all countries or restrict it to specific countries based on your needs.
-
Save your settings with the
Save Configbutton.
2. Free Shipping Method
Free Shipping allows you to provide customers free delivery based on specific criteria. It includes cart value, product types, or customer groups.
To enable Free Shipping in Magento 2, follow these instructions:
-
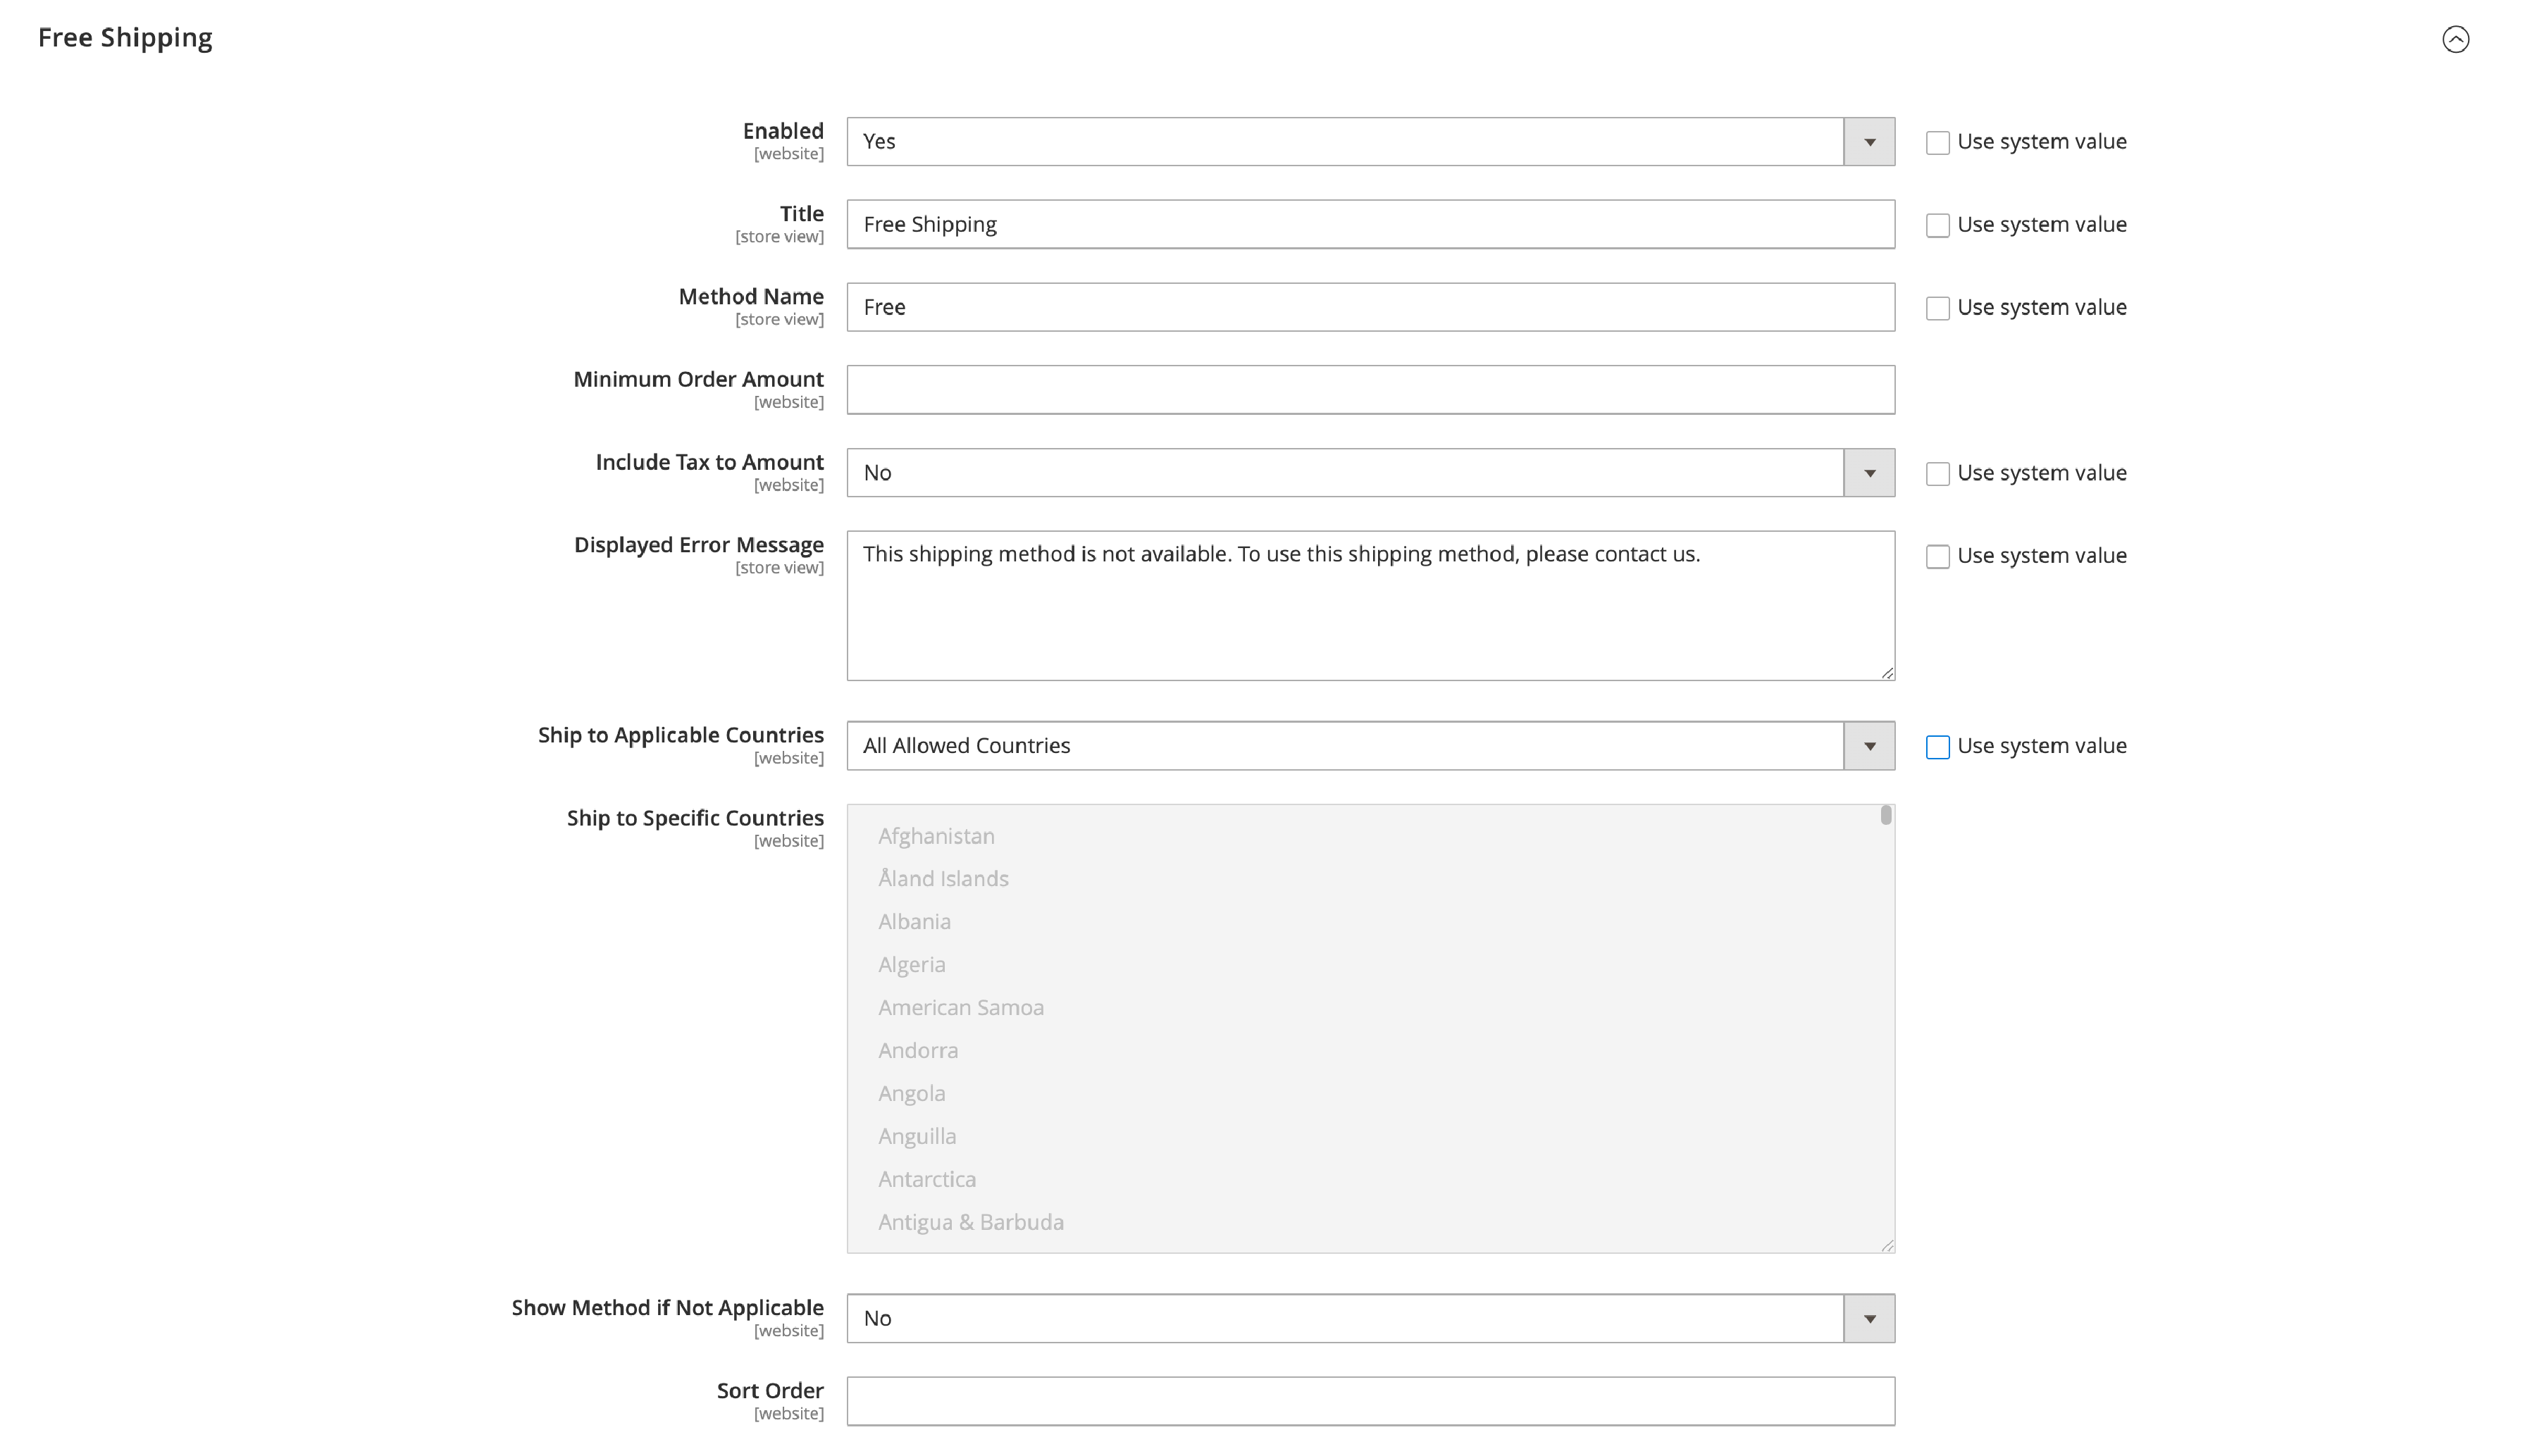
Go to the Free Shipping section and click on it to expand the settings.
-
Set the Enabled field to Yes if you want to enable this shipping method.
-
Add a Title for the shipping method. The title is visible to customers during checkout.
-
Set the Minimum Order Amount field. It is the amount customers must spend, number of item in the cart to qualify for free shipping.
-
Set the Maximum Order Amount field. It is the maximum amount customers can spend to qualify for free shipping. You can leave this field blank if there is no maximum limit.
-
Select the Ship to Applicable Countries option. You can allow free shipping to all countries or restrict it to specific countries.
-
Add the
Include Taxto Amount option to include tax in the minimum order amount. It includes Magento 2 estimate shipping and tax. -
Select the Free Shipping method for each applicable shipping carrier. Note that the shipping carrier might not offer free shipping. In that case, it will not be available for selection. It will estimate shipping methods Magento 2.
-
Save the changes with the Save Config button.
3. Table Rates Method
Table Rates are a versatile delivery method that lets store owners establish a delivery fee structure. It is based on destination, weight, price, and quantity of shipped items.
To enable Table Rates in Magento 2, follow these instructions:
-
Log in to your Magento Admin Panel and go to Stores → Configuration.
-
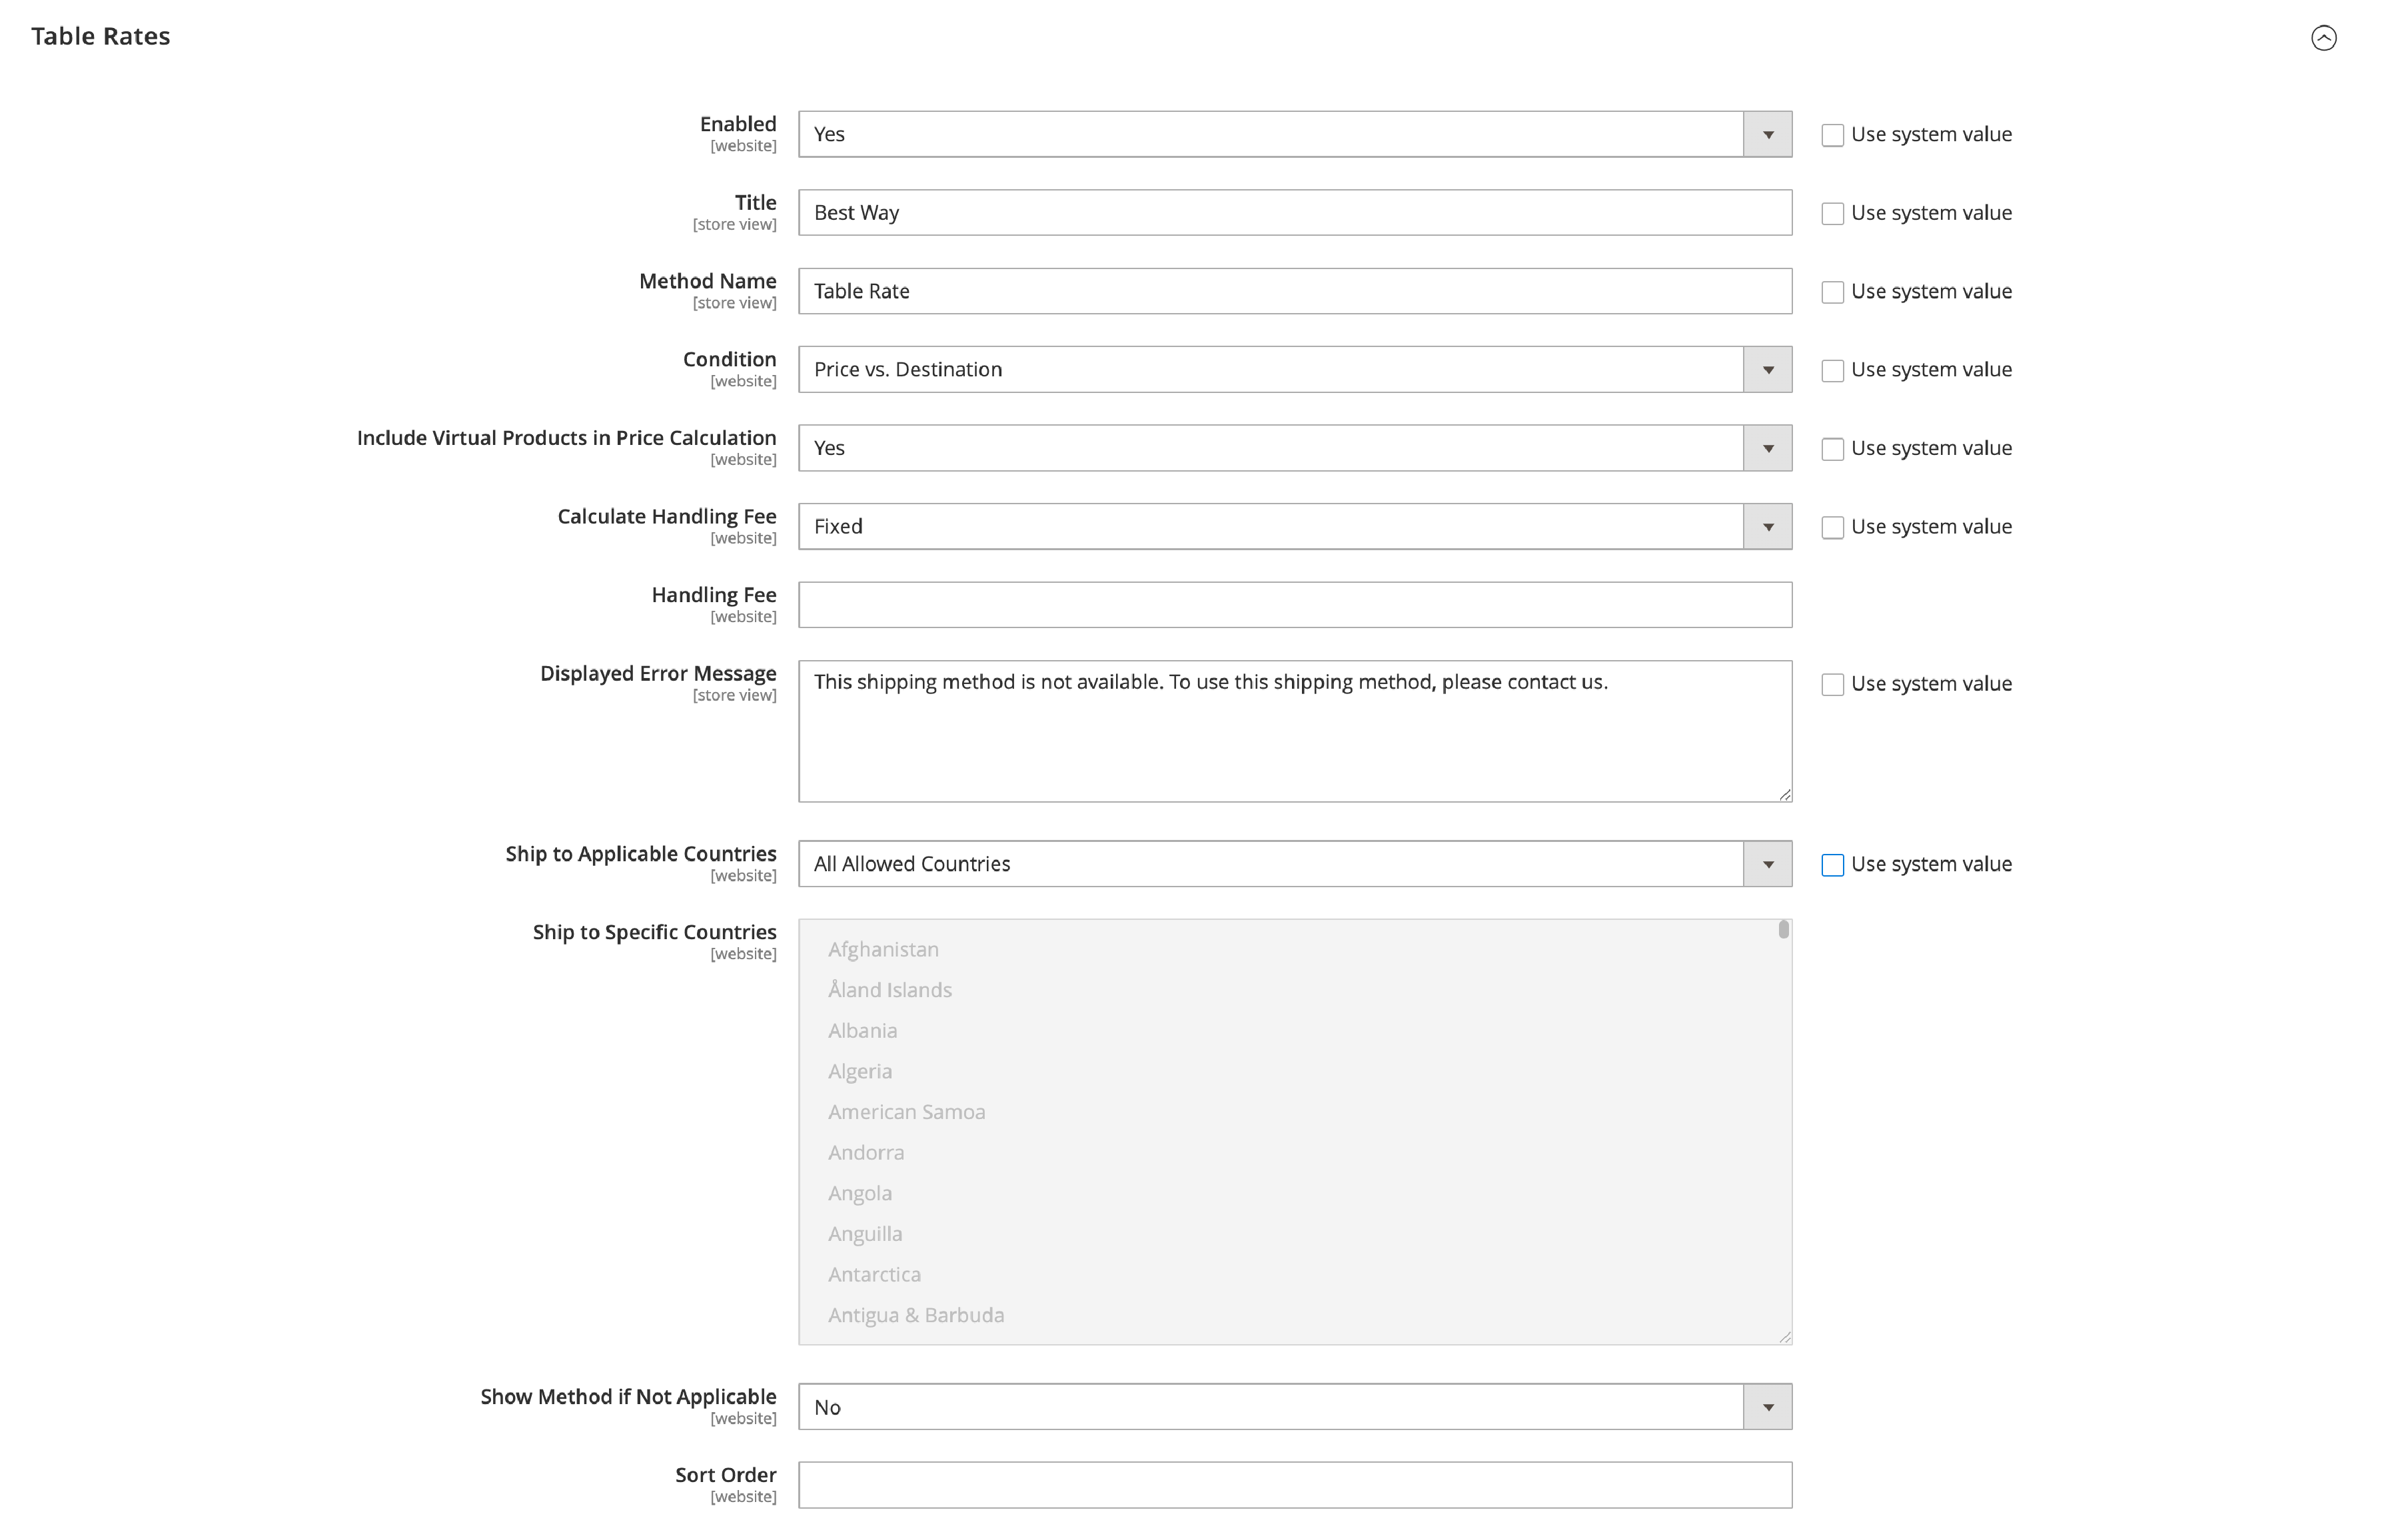
Next, go to Sales → Shipping Methods → Table Rates.
-
Once enabled, store owners can set up their table rates by clicking Configure next to the Table Rates option. Here, you can define the shipping cost calculation rules. You can add Magento 2 auto select shipping method.
-
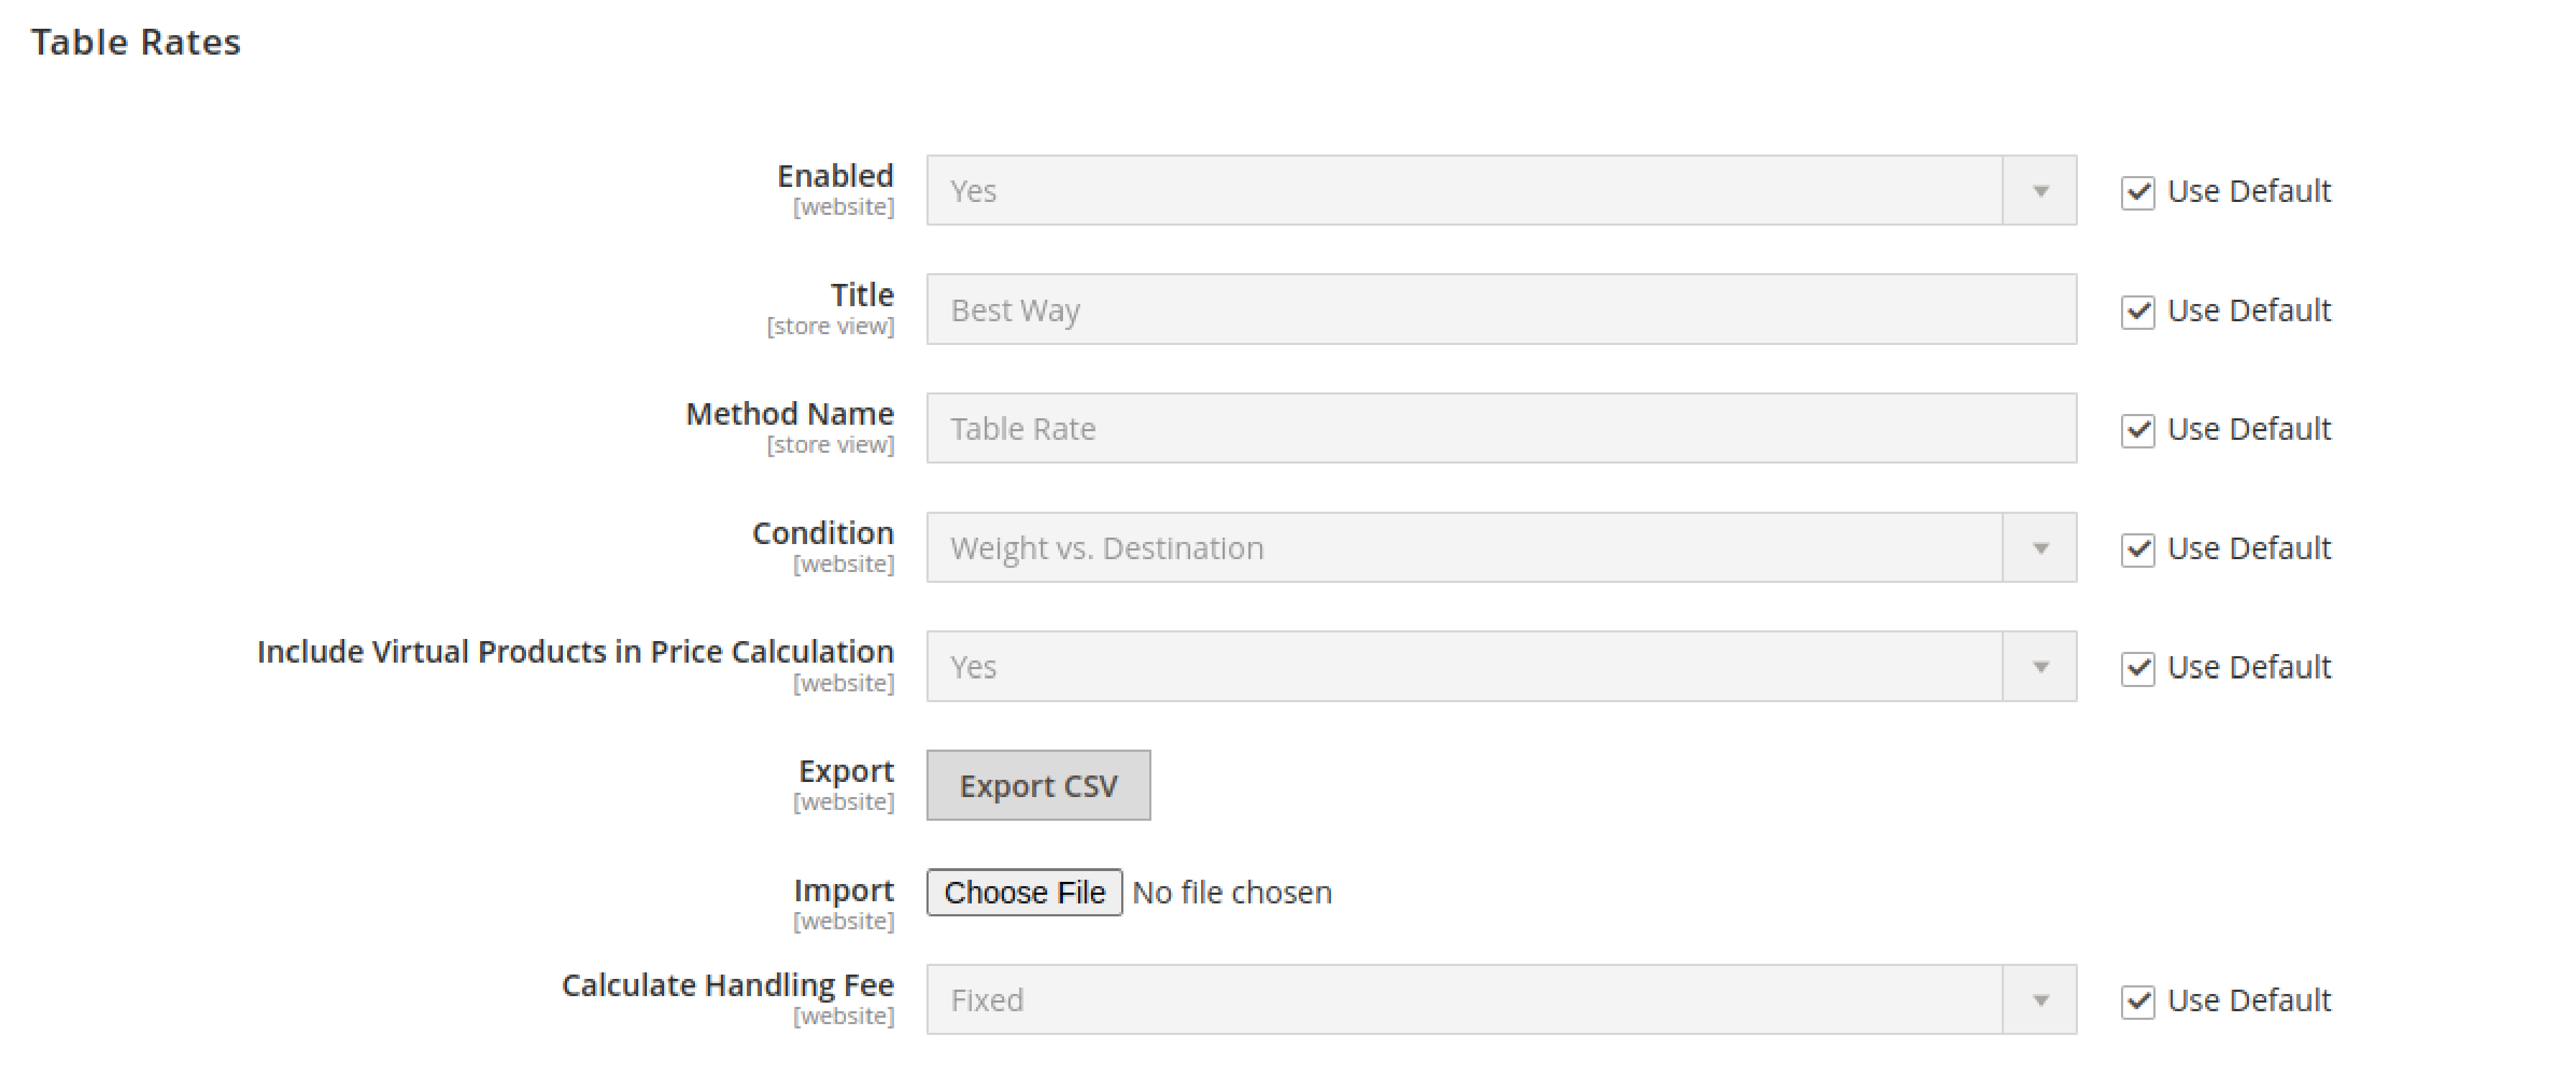
Choose the Condition based on which the shipping cost calculation is determined. For example, it can be Weight vs. Destination as a condition. The shipping cost will be based on the weight of the shipped items and the shipment’s destination.
-
Define the shipping rates based on the chosen condition.
-
Do this by Selecting the
Add New Shipping Ratebutton. Add the shipping rates information such as shipping destination, weight, price, and quantity. -
Save the changes by clicking on the Save Config button.
Note: Although virtual products don’t require shipping, you still need to determine whether to include virtual product prices in Table Rate price calculations.
You can set it in Include Virtual Products in Price Calculation.
To apply these changes, you must choose the Store View in the admin view of Magento 2. Set Store View to Main Website or any other website where the configuration applies.
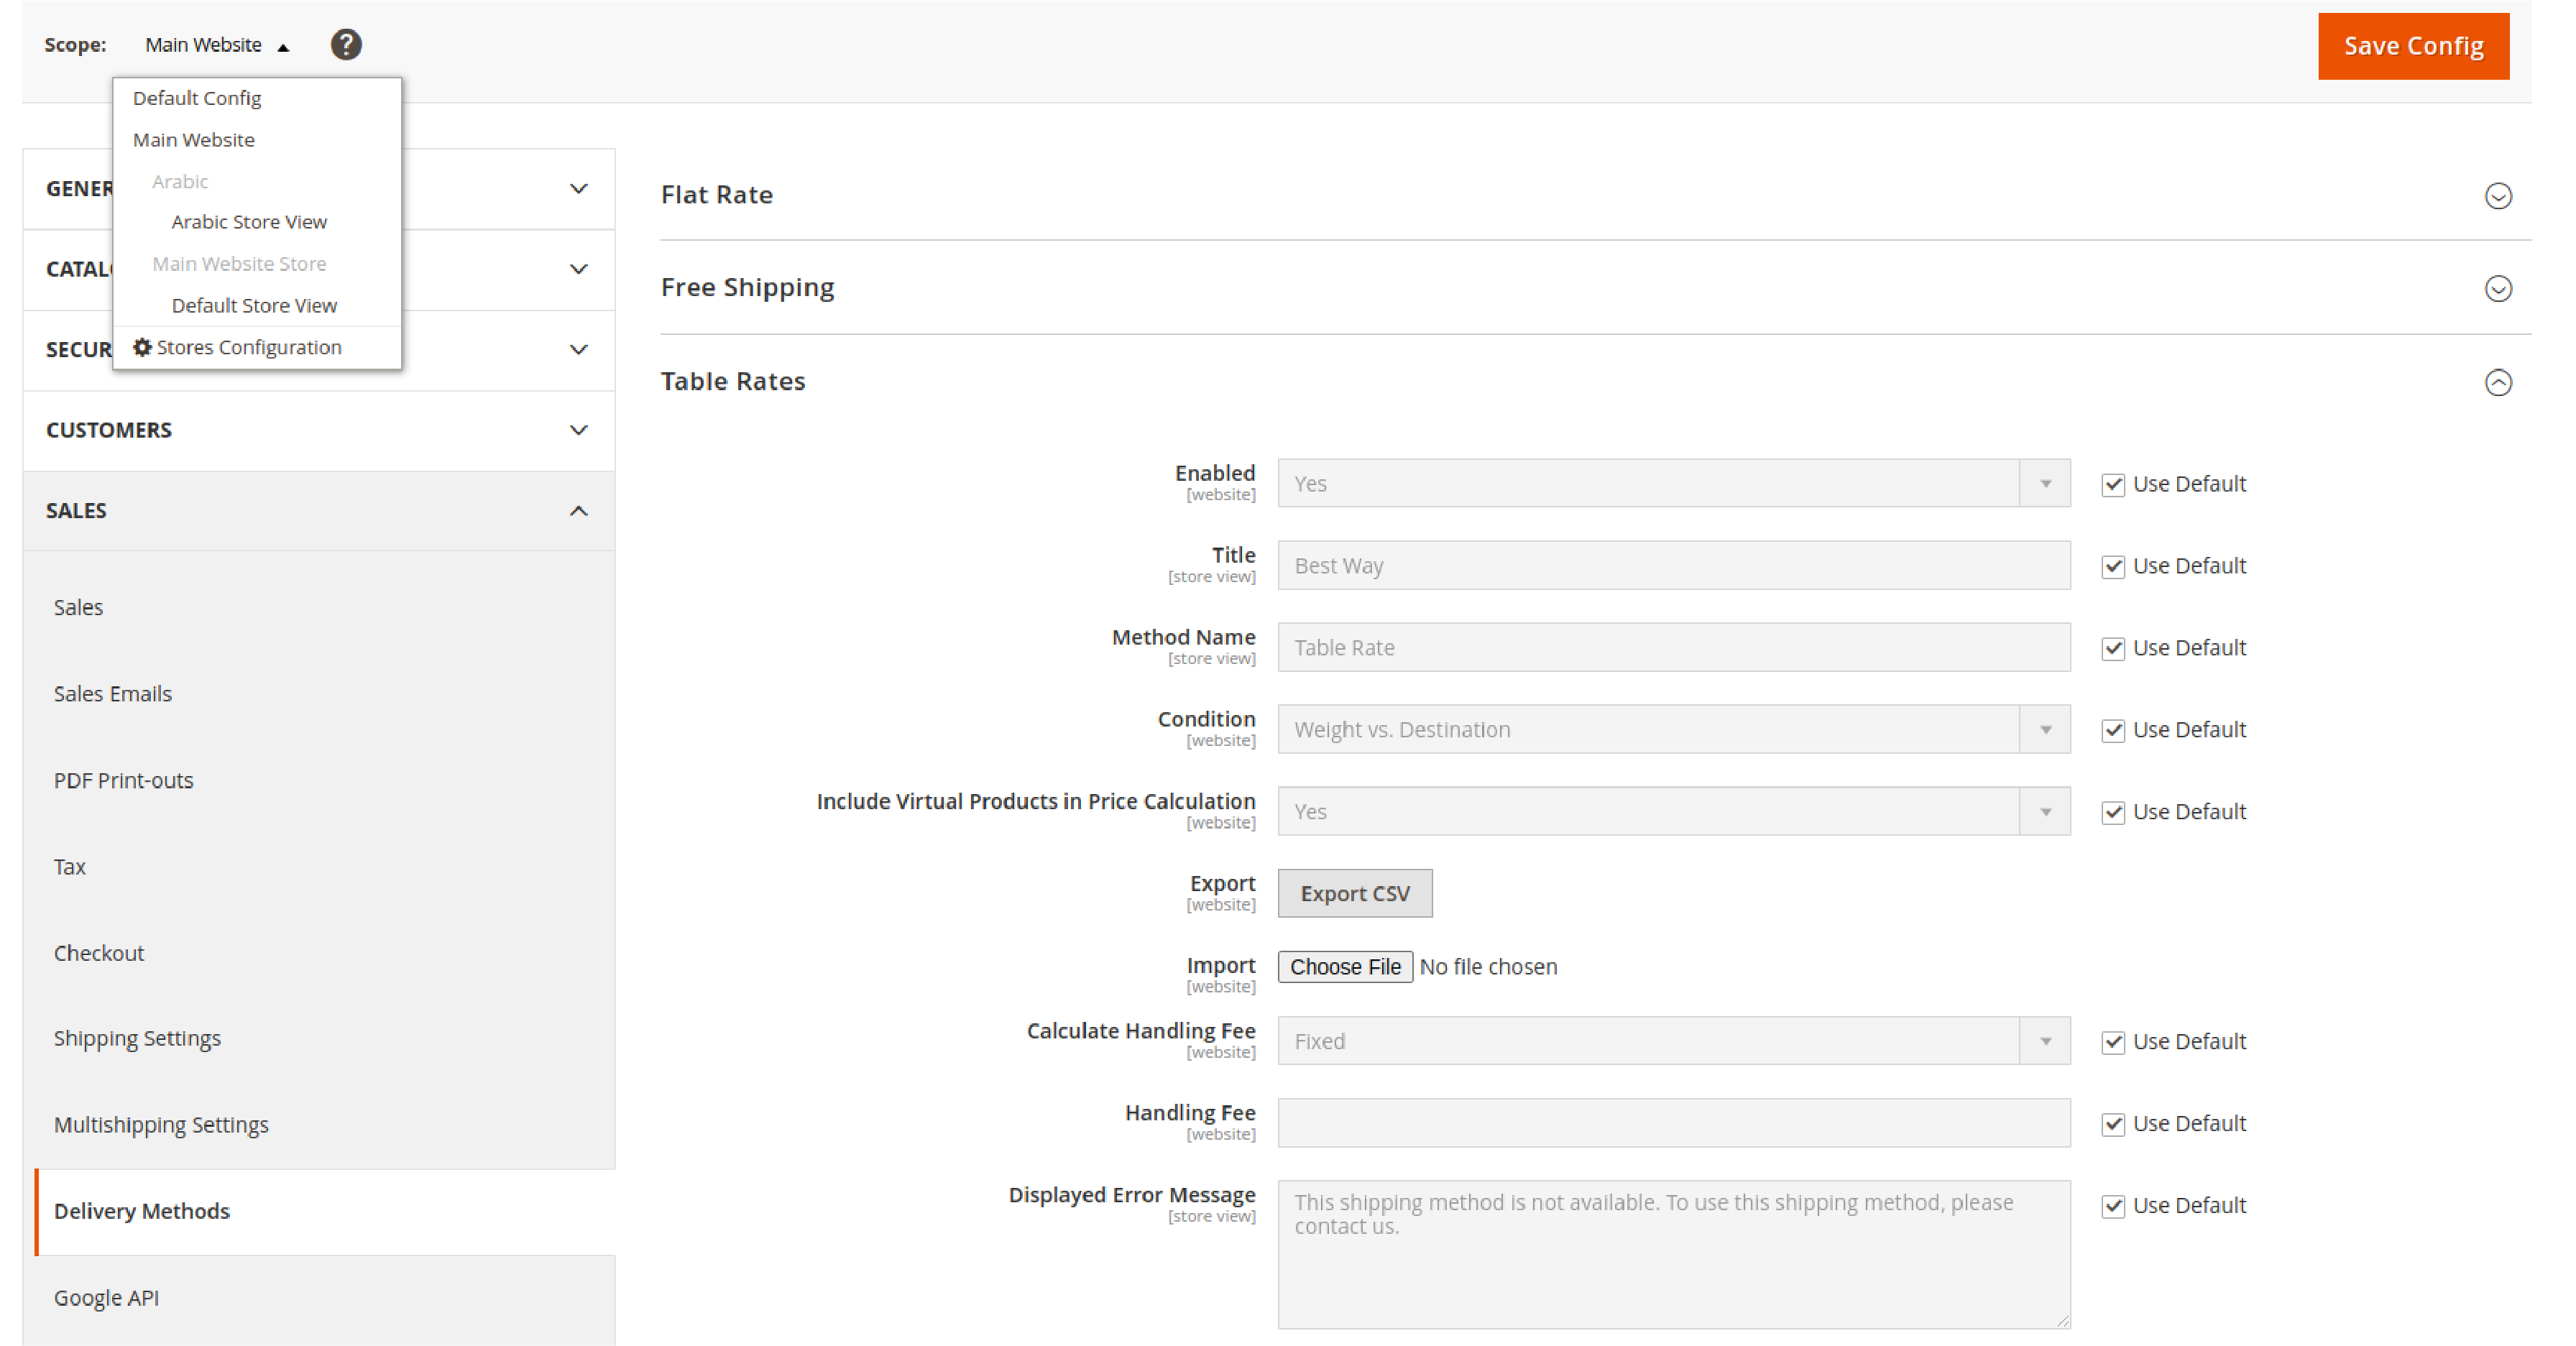
You will see these two new options under your table rate section:
How to Export Table Rate Data
Here is how to export the table rate file:
- To download the file, click on Export CSV;
- Save the
tablerates.csvfile to your computer; - Open the file in a spreadsheet document.

How to Import Table Rate Data
Here is how to import the table rate file:
- Navigate to the
Table Ratessection of your store configuration. - In the upper-left corner, set Store View to the website on which the method is enabled.
- Click
Choose Fileand select your completed tablerates.csv file to import the rates. - Once uploading is done, click on the
Save Configbutton.
You can go through the payment process using a different address. It ensures that you have calculated the shipping and handling rate correctly.
4. In-Store Pickup for Magento 2
In-Store Pickup is a shipping method that enables customers to collect their online purchases at a physical store. It's easy to integrate this feature into your Magento 2 eCommerce platform, giving your customers the convenience of choosing this option.
To set up In-Store Pickup in Magento 2 , follow these simple steps:
-
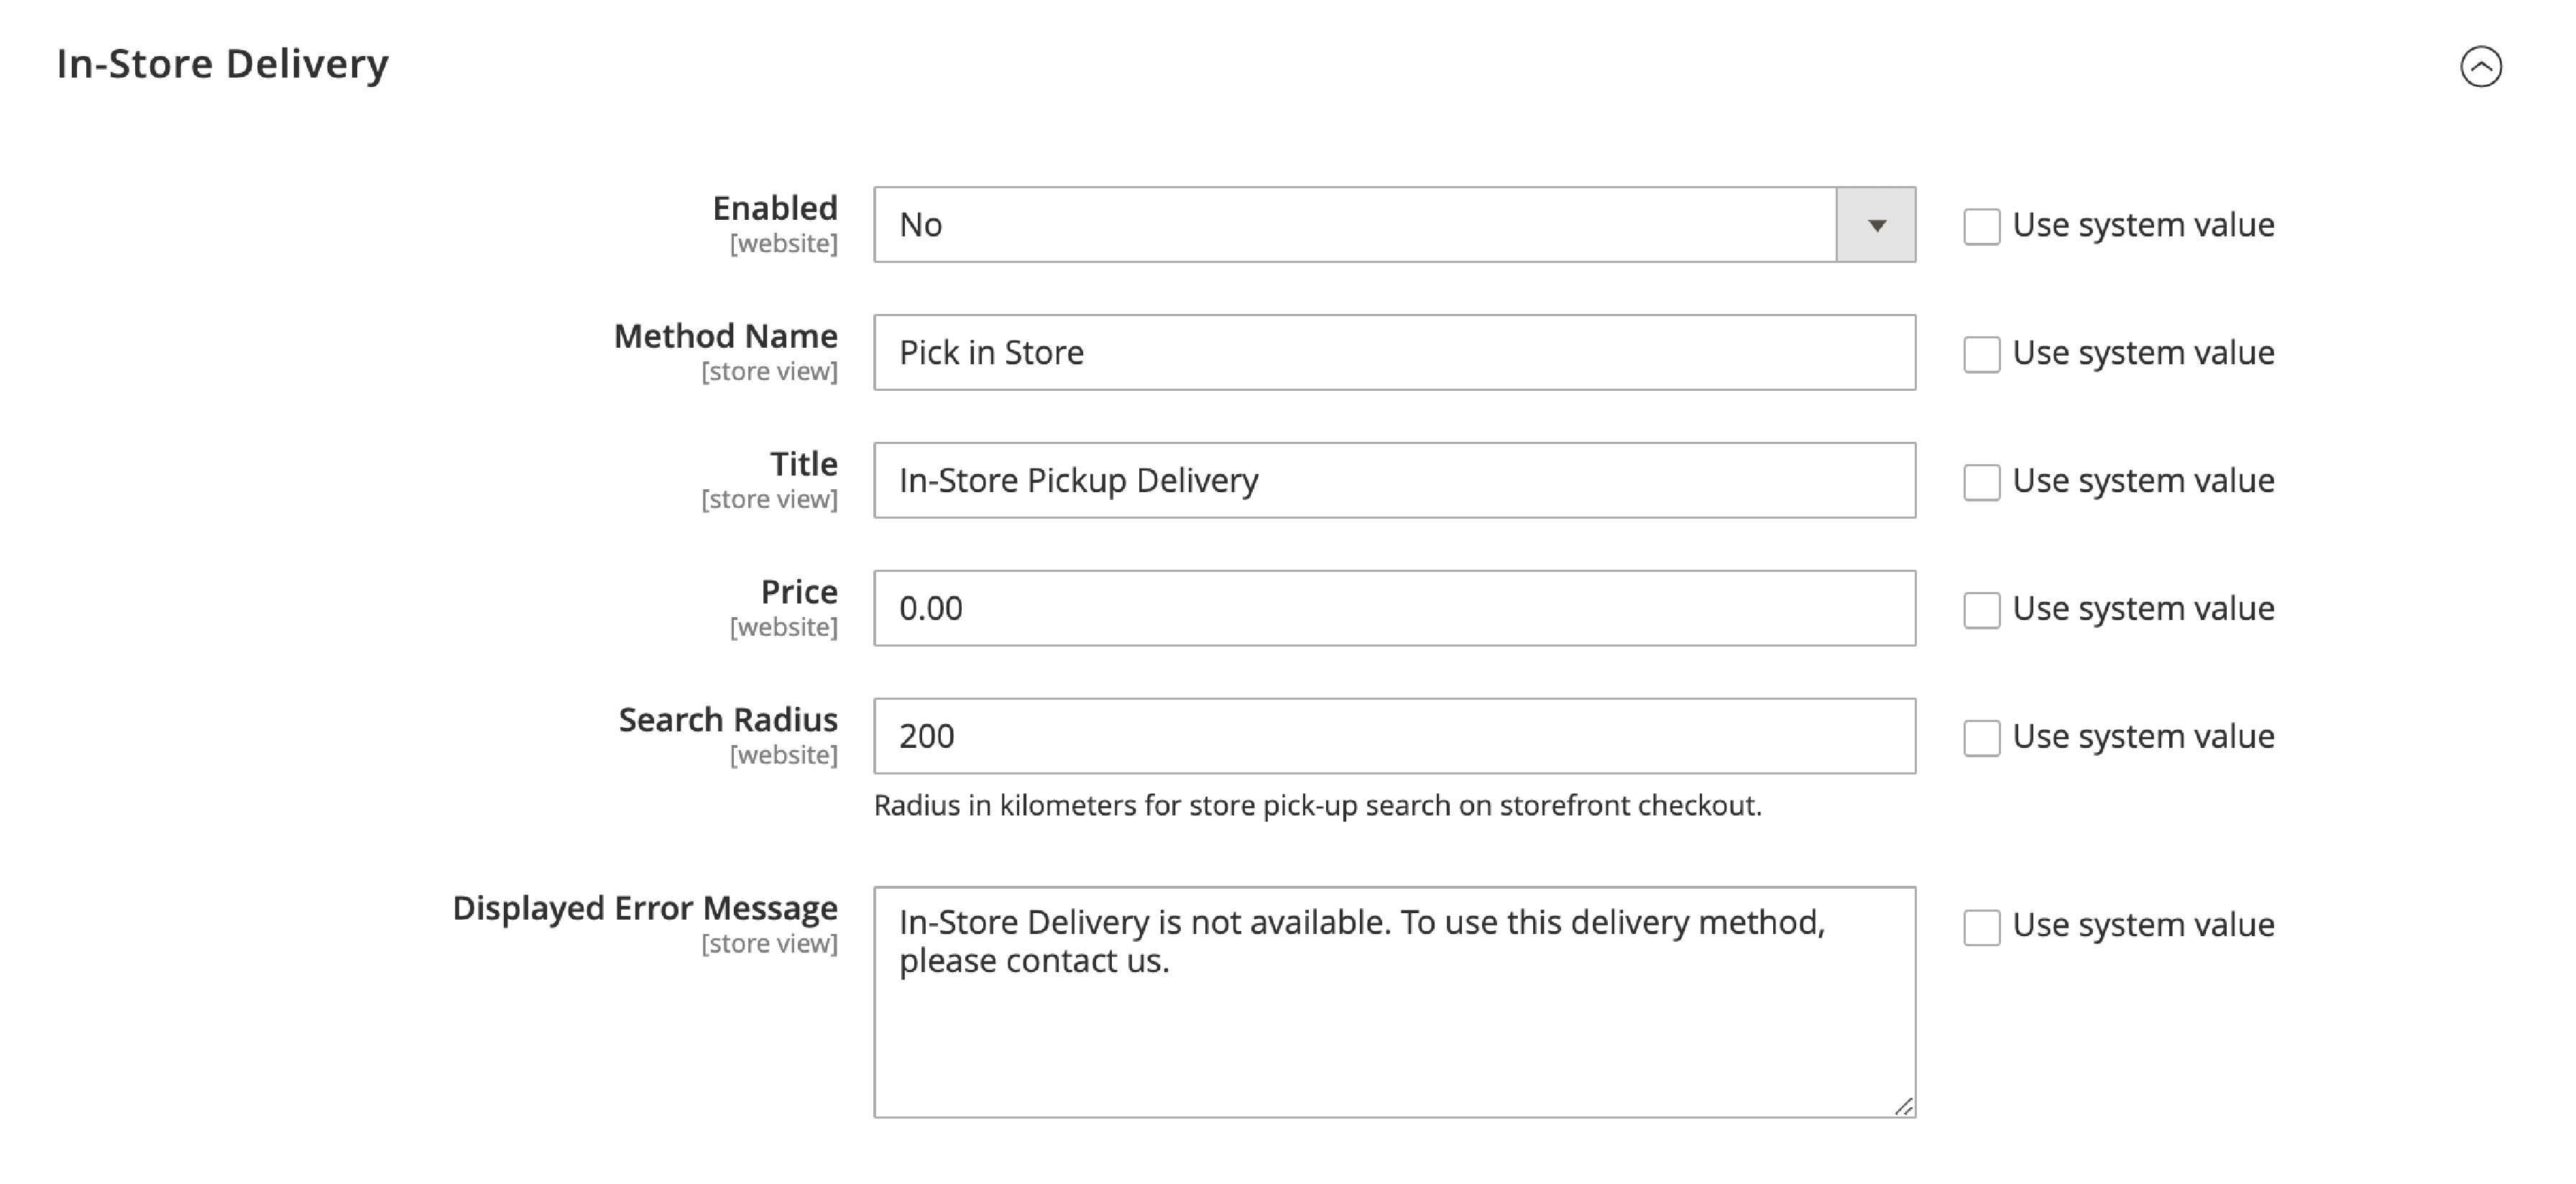
Navigate to Stores > Settings > Configuration > Sales > Delivery Methods in the Magento admin panel.
-
Expand the In-Store Delivery section. Set Enabled to Yes.
-
Add a descriptive Method Name to display in the shopping cart.
-
Enter a Title to display during checkout.
-
Set the Price for your in-store pickup service. Leave it as “0.00” if you want to offer it for free.
-
Enter the Search Radius (in Kilometers) to search for a pickup location during the customer checkout process.
-
Add an error message in the Displayed Error Message text area or use the default message.
-
Click on Save Config to save changes.
Configure Magento 2 Shipping Carriers
Configuring shipping carriers can be a daunting task, especially for those who are new to Magento 2. With four shipping carriers, including FedEx, UPS, USPS, and DHL, it can be overwhelming to decide which carrier to use and how to set it up properly.
In this section, we will provide a complete guide to configuring these shipping carriers in Magento 2, so you can select the best carrier for your needs and confidently set it up.
I. FedEx Configuration
FedEx (Federal Express) is an international courier delivery service. It offers shipping services to over 220+ countries.
FedEx can be integrated into Magento 2 through the FedEx API. You get real-time shipping quotes, package tracking, and label printing.
Follow these steps to configure FedEx in Magento 2:
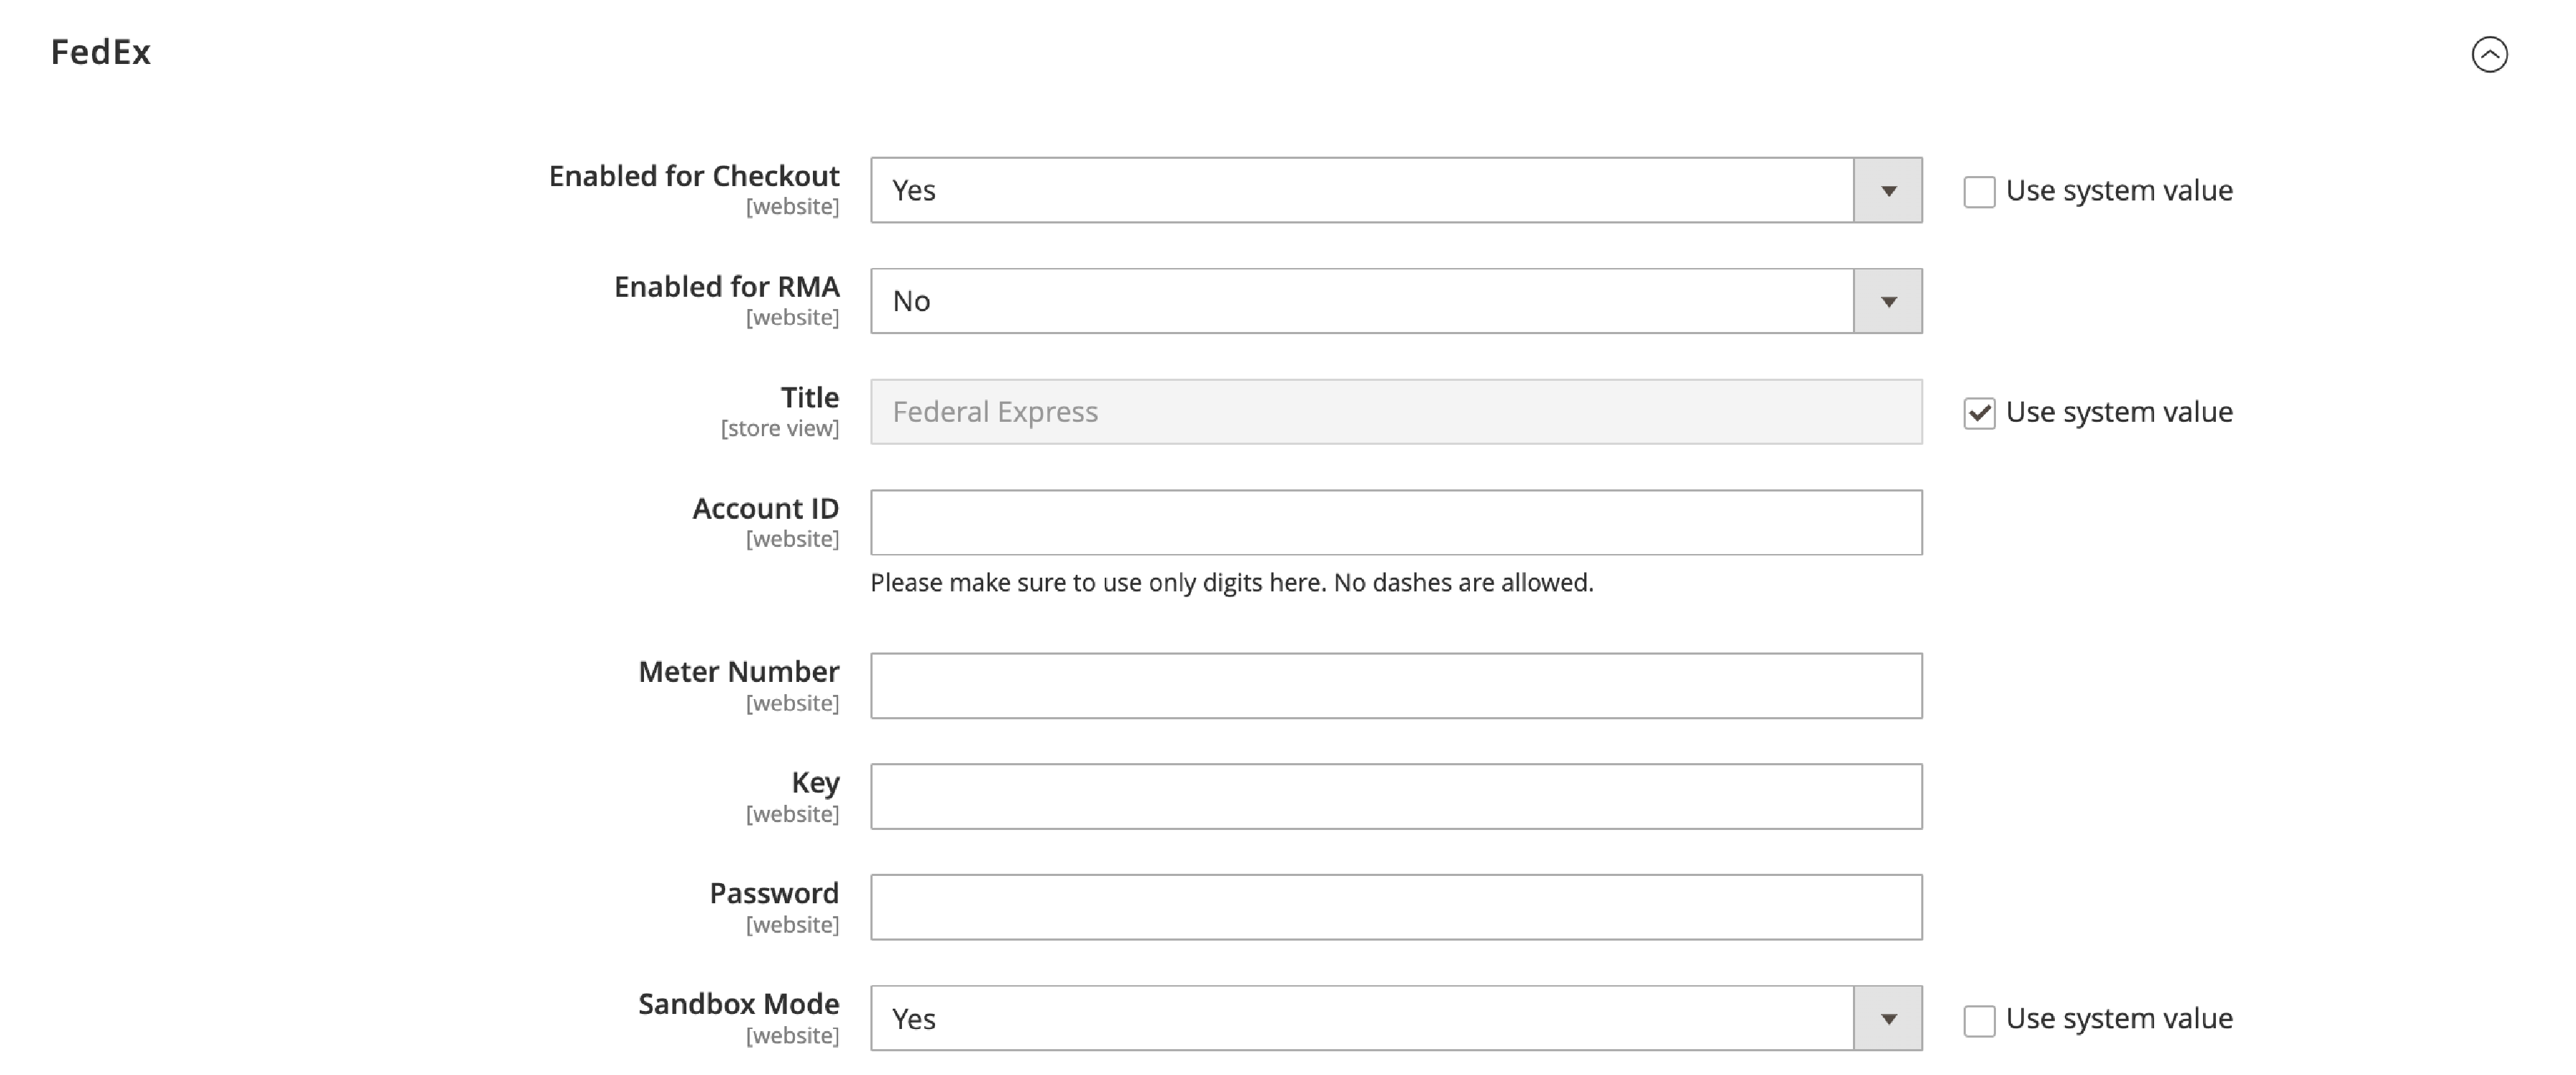
1. Enable FedEx for Checkout
-
To begin, enable FedEx for checkout by selecting "Yes" in the
Enabledfor Checkout field. -
You'll need to fill in information specific to your FedEx account, including your account ID, meter number, key, and password.
-
If you're testing FedEx in a safe environment, change the
Sandbox Modeto "Yes”. -
Specify the Web-Service URL (Production). It is the required URL depending on the Sandbox Mode setting.
2. Set up FedEx Packaging
-
Choose the method you prefer for calculating the weight of multiple packages shipped together.
-
Define the Packages Request Type in the menu.
-
Specify the type of cartons you use to pack your store's products. Select the Packaging from the list, and the content type used to package products ordered from your store.

-
From the list, select the Dropoff method.
-
Specify the
Weight Unitof your package. -
Specify the Maximum Package Weight to determine the weight supported. The default for FedEx is 150 pounds.
3. Determine the FedEx Handling Fee.
Specify how you want to calculate the handling fee, whether as a percentage or a fixed fee, and how it should be applied. You can choose to calculate this fee per order or package.

-
Specify Calculate Handling Fee method to calculate handling fees.
-
Define
Handling Appliedto specify how handling fees are applied. -
Specify the amount charged as a Handling Fee. It is based on the method used to calculate the amount.
4. Choose FedEx Delivery Methods.
Choose the delivery option that best matches your business model, whether it's Business to Consumer (B2C) or Business to Business (B2B).
-
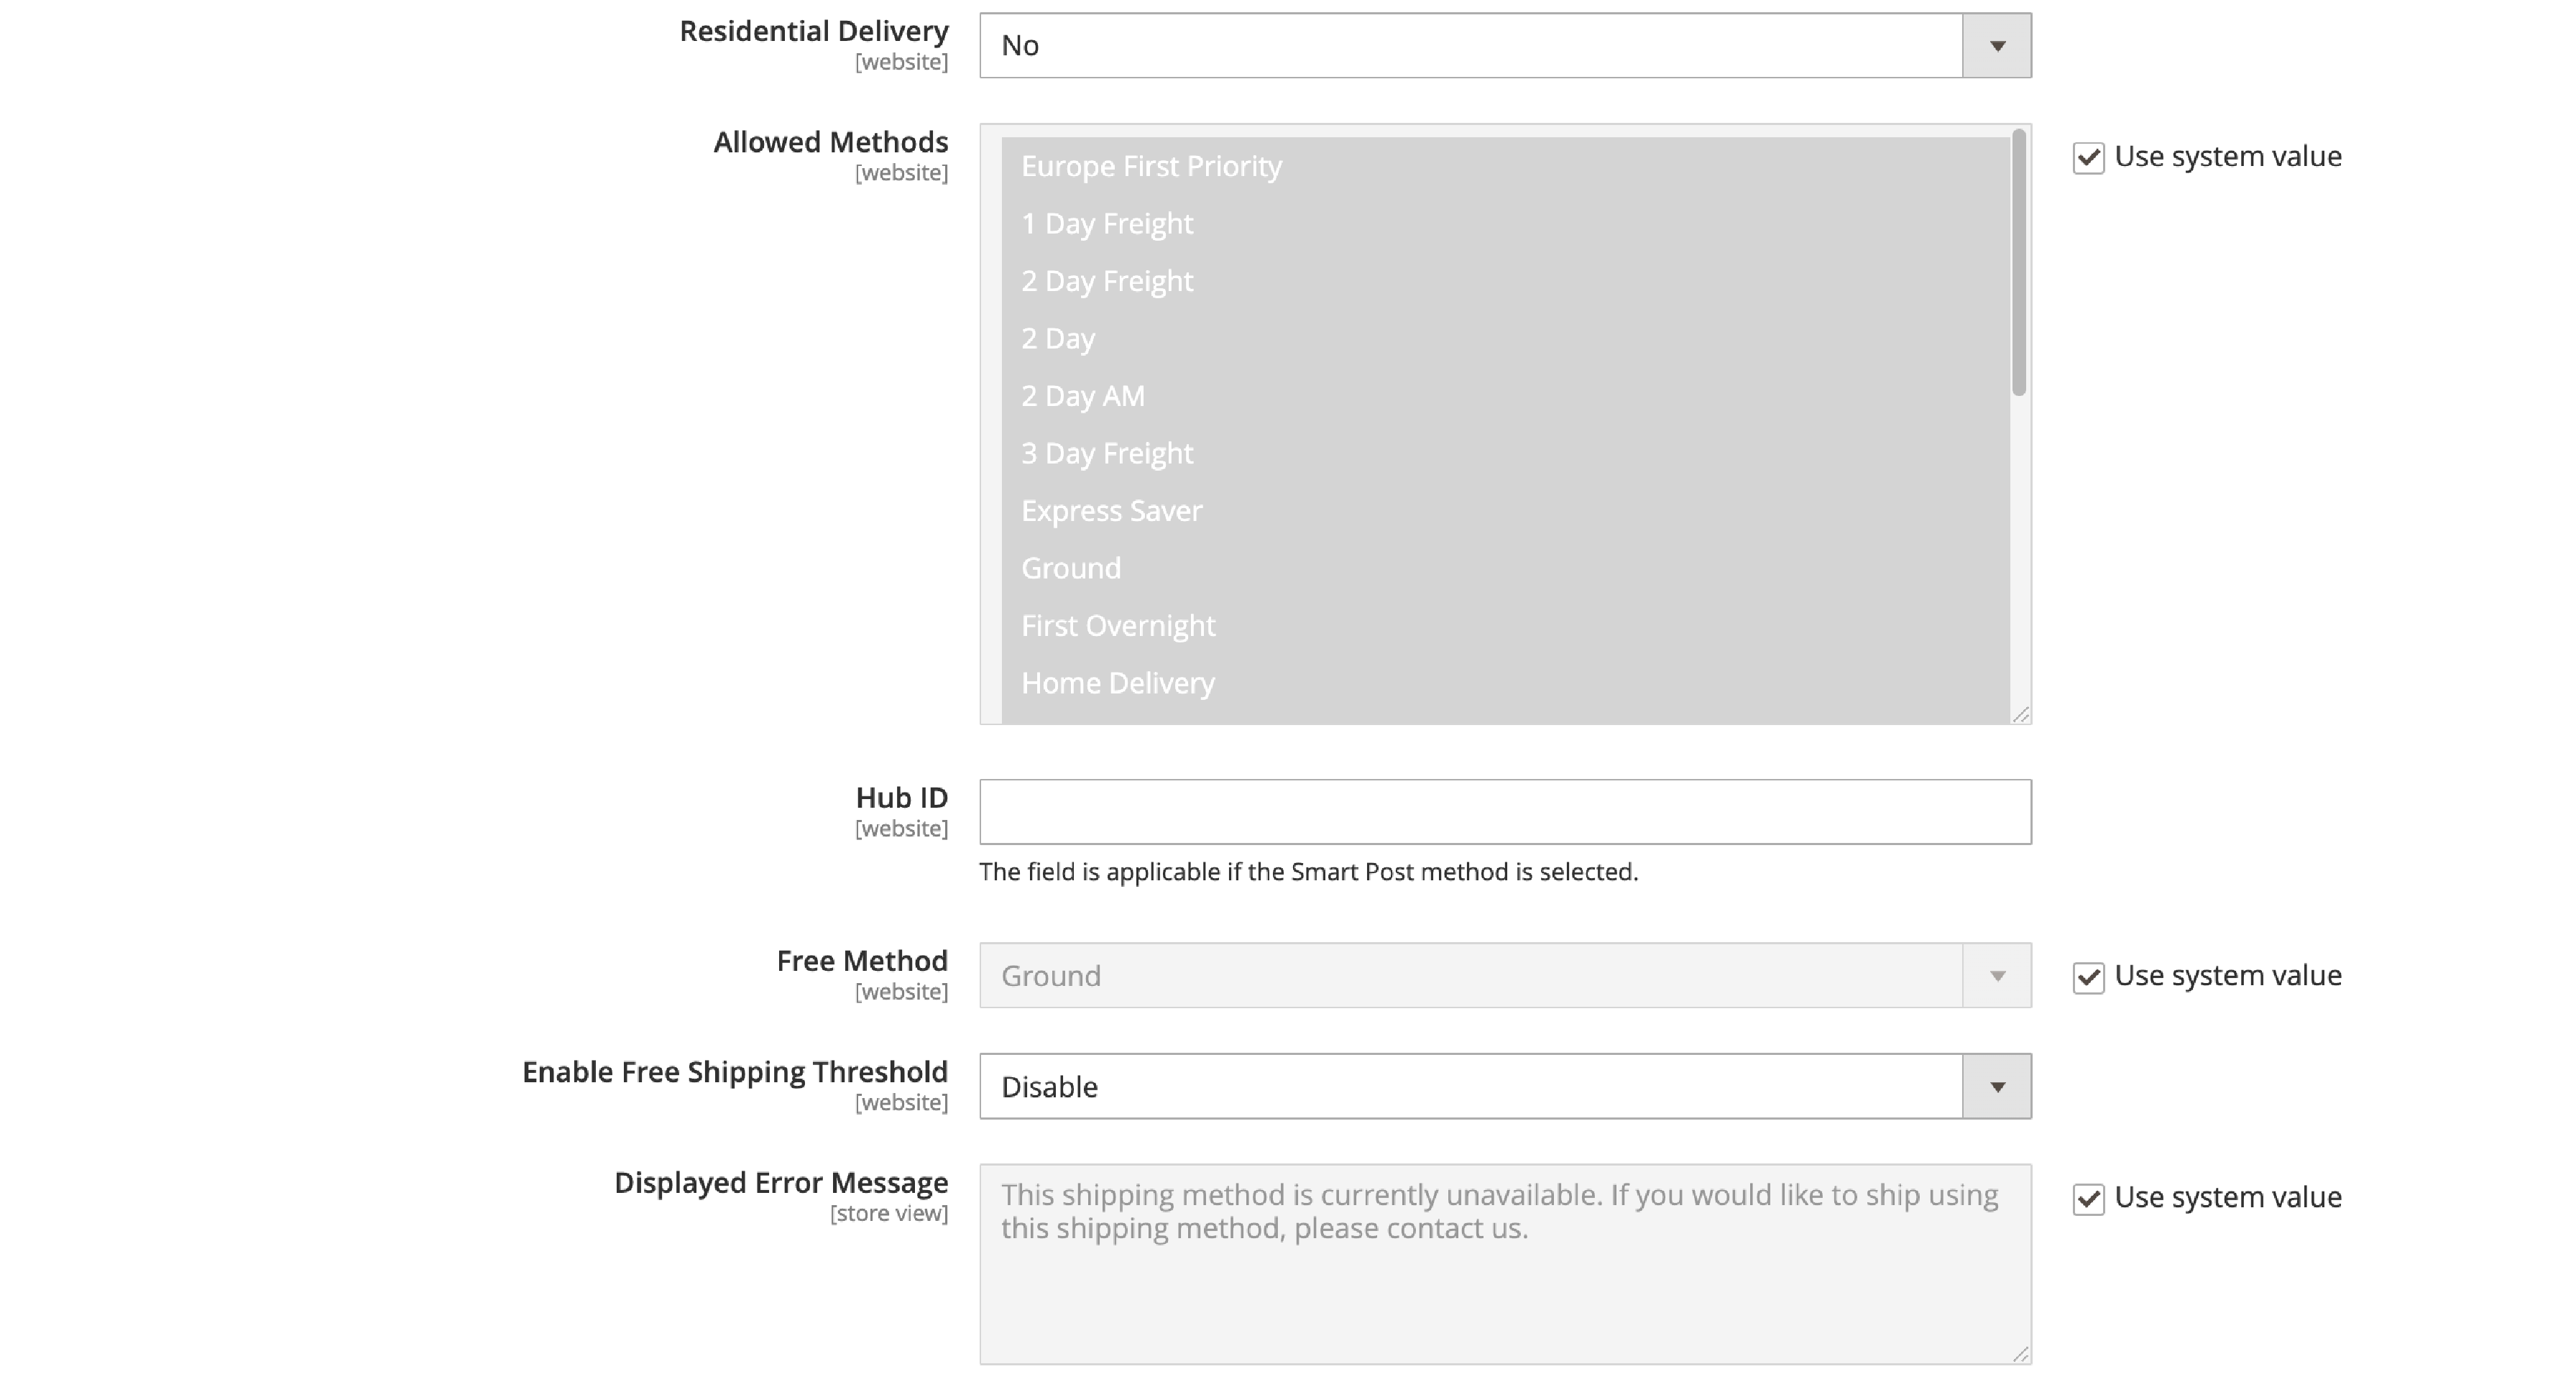
Configure the Residential Delivery as Yes – For B2C deliveries/No – For B2B deliveries.
-
Select the
Allowed Methodsfrom the list that specify the shipment you support. It is based on the FedEx account, the frequency of shipments, and international shipments. You may choose only to provide ground transportation.
-
Hub ID: An ID provided by FedEx used with the Smart Post method.
-
Select the
Free Methodfor free shipping offers. -
Enable Free Shipping Threshold: Determines if a minimum order amount is required for free shipping.
-
If you Enable the Free Shipping Threshold, the next field appears: -Free Shipping Amount: specifies the minimum order amount required for free shipping.
-
Add the Display Error Message that appears when FedEx is unavailable. You can use the default message or make a custom message.
By following these steps, you can easily configure FedEx in Magento 2 and offer your customers a range of shipping options.
II. UPS Set Up
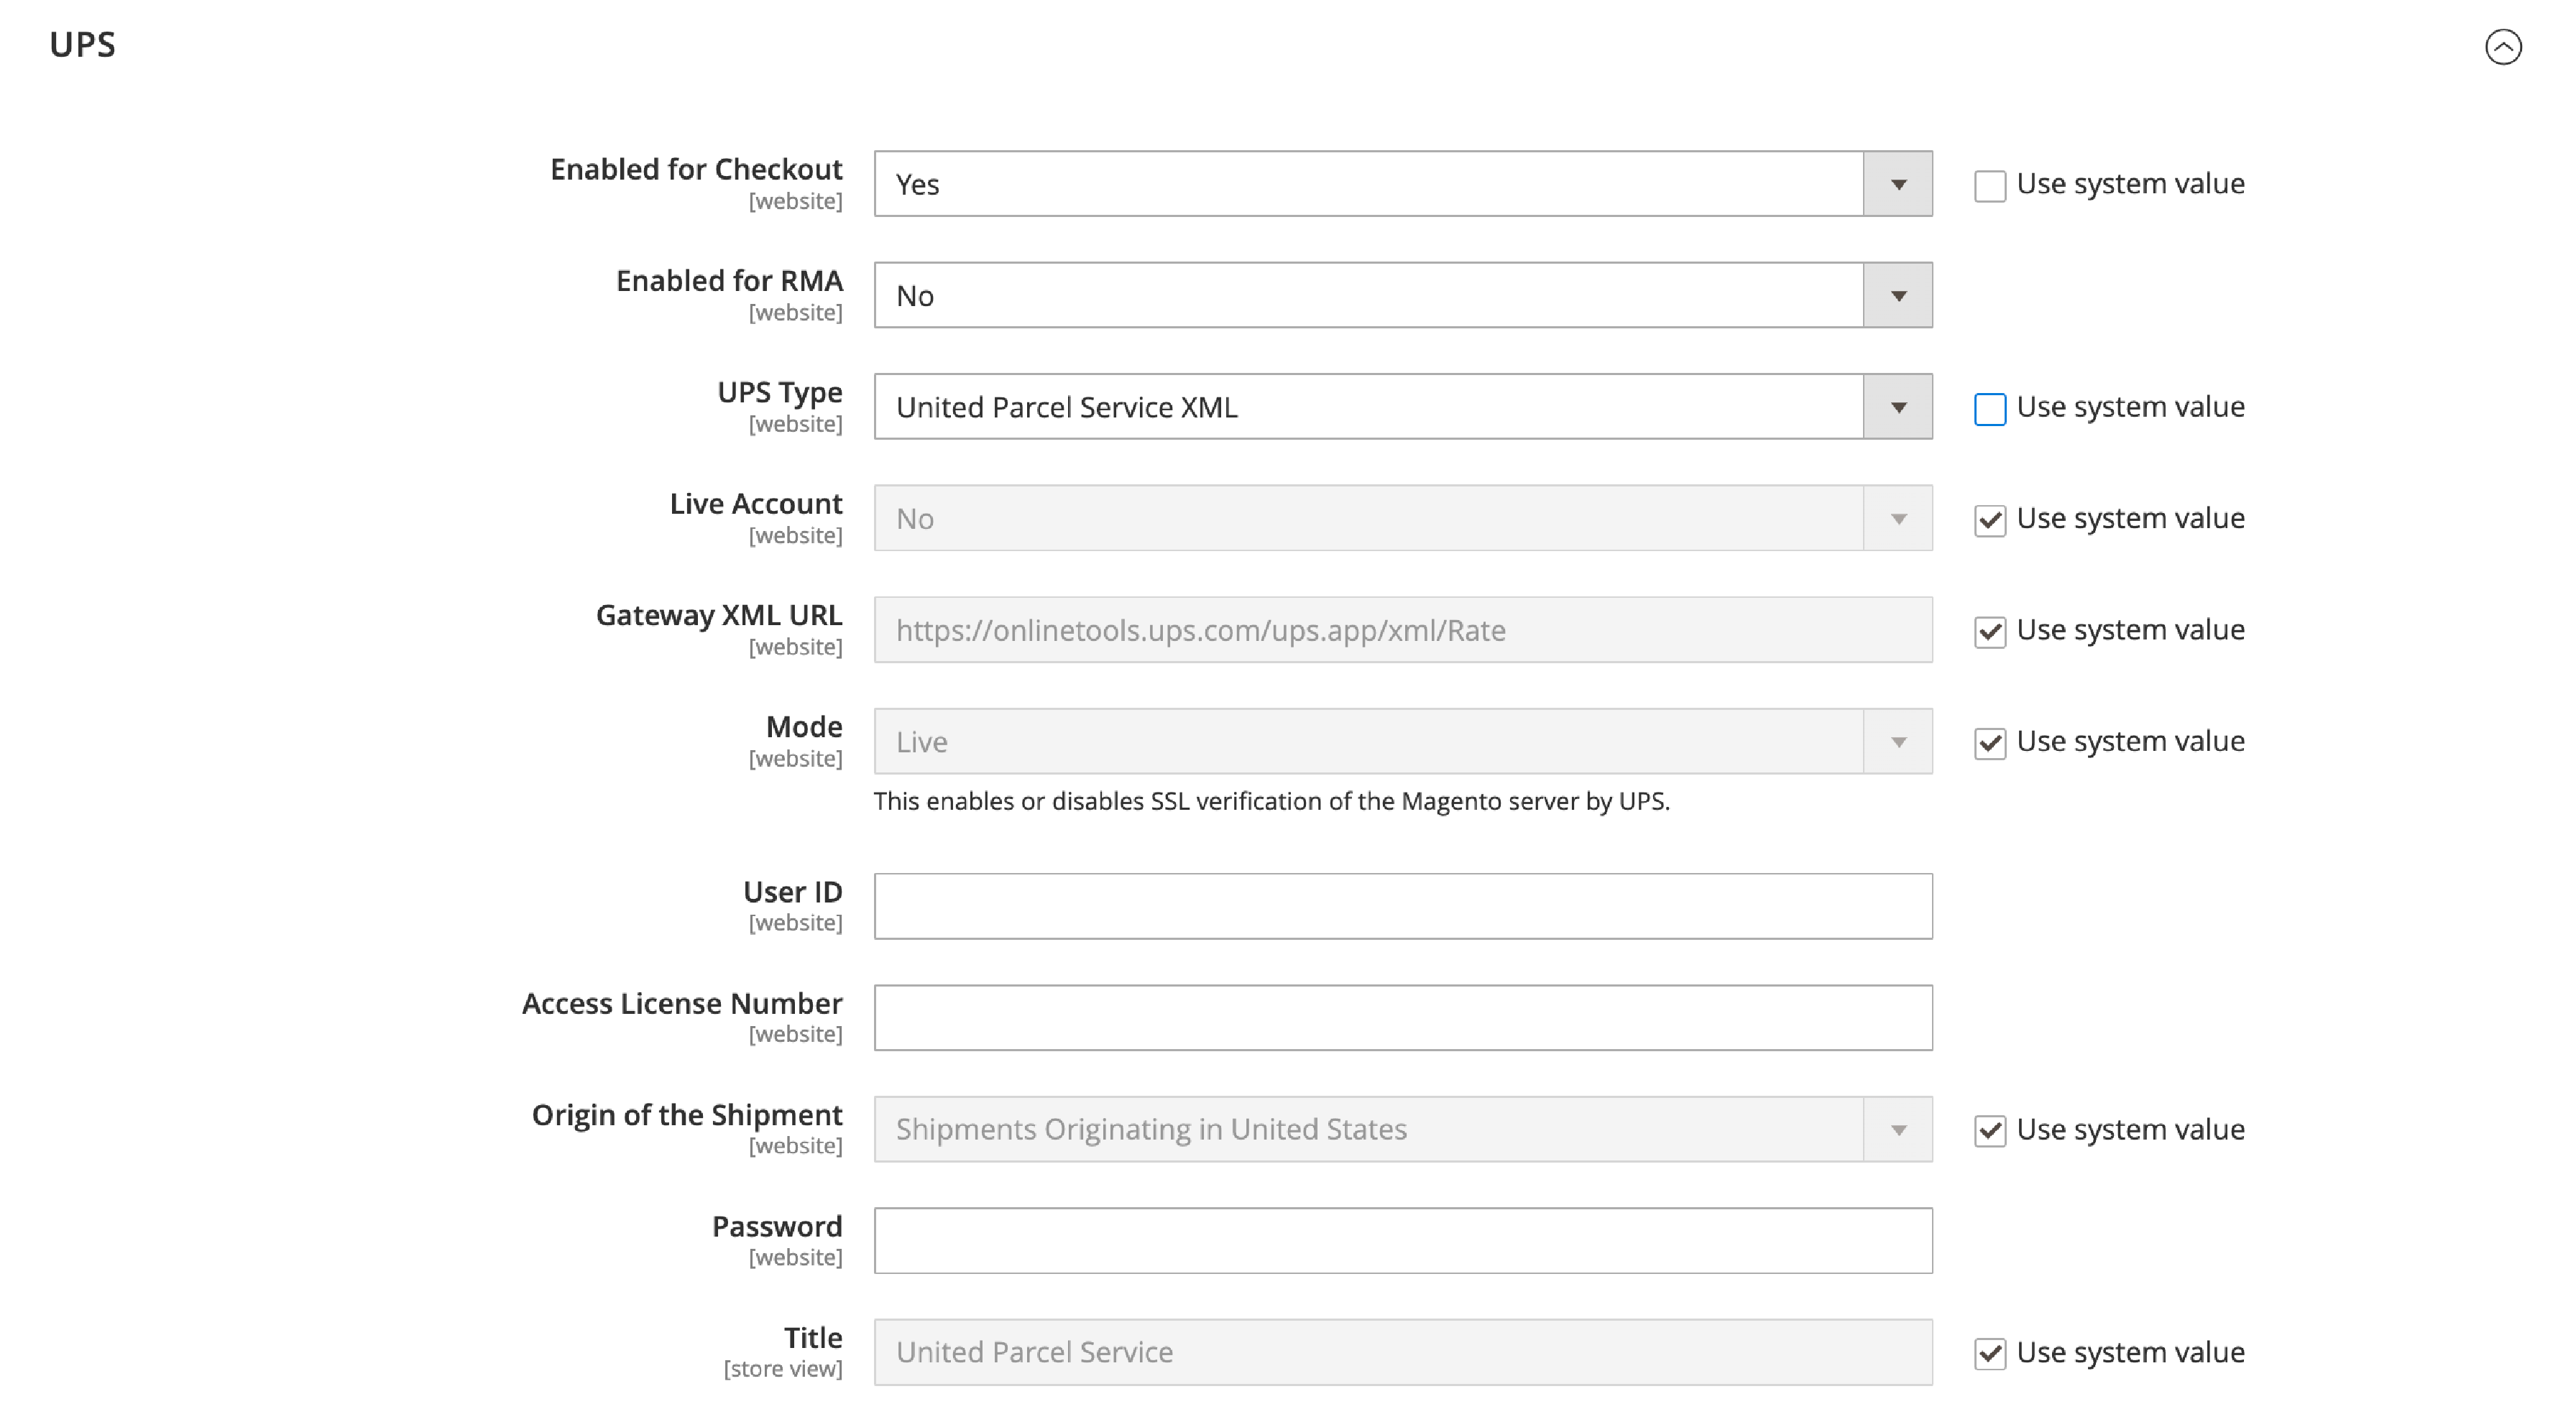
UPS is another popular shipping carrier that offers a range of services to customers. It is a global package delivery service that offers a variety of shipping options. To configure UPS in Magento, follow these steps:
1. Set up a UPS XML Account.
Enable UPS for checkout by selecting "Yes" in the Enabled for Checkout field. Then, fill in the following information for your UPS account:
-
Gateway URL: Your URL that connects to the UPS system to retrieve dynamic shipping rates.
-
Access License Number: Your UPS shipper account access license number
-
User ID: Your UPS shipper account user ID
-
Origin of the Shipment: The region or country where your product shipment originates (UPS XML Only)
-
Password: Your UPS shipper account password
-
Specify the Title that describes this shipping method during checkout.
2. Set up UPS Package Information
- Choose how you want to calculate weight for multi-pack shipments by selecting either "Use origin weight" or "Divide to equal weight".

- Then, select the type of container used for package shipping, and specify the Destination Type (business or residential).
At Containers, there are 8 UPS container setup options:
- Customer Packaging
- UPS Letter Envelope
- Customer Packaging.
- UPS Letter Envelope.
- UPS Tube
- UPS Express Box
- UPS Worldwide 25 kilo
- UPS Worldwide 10 kilo
3. Set up UPS Allowed Methods
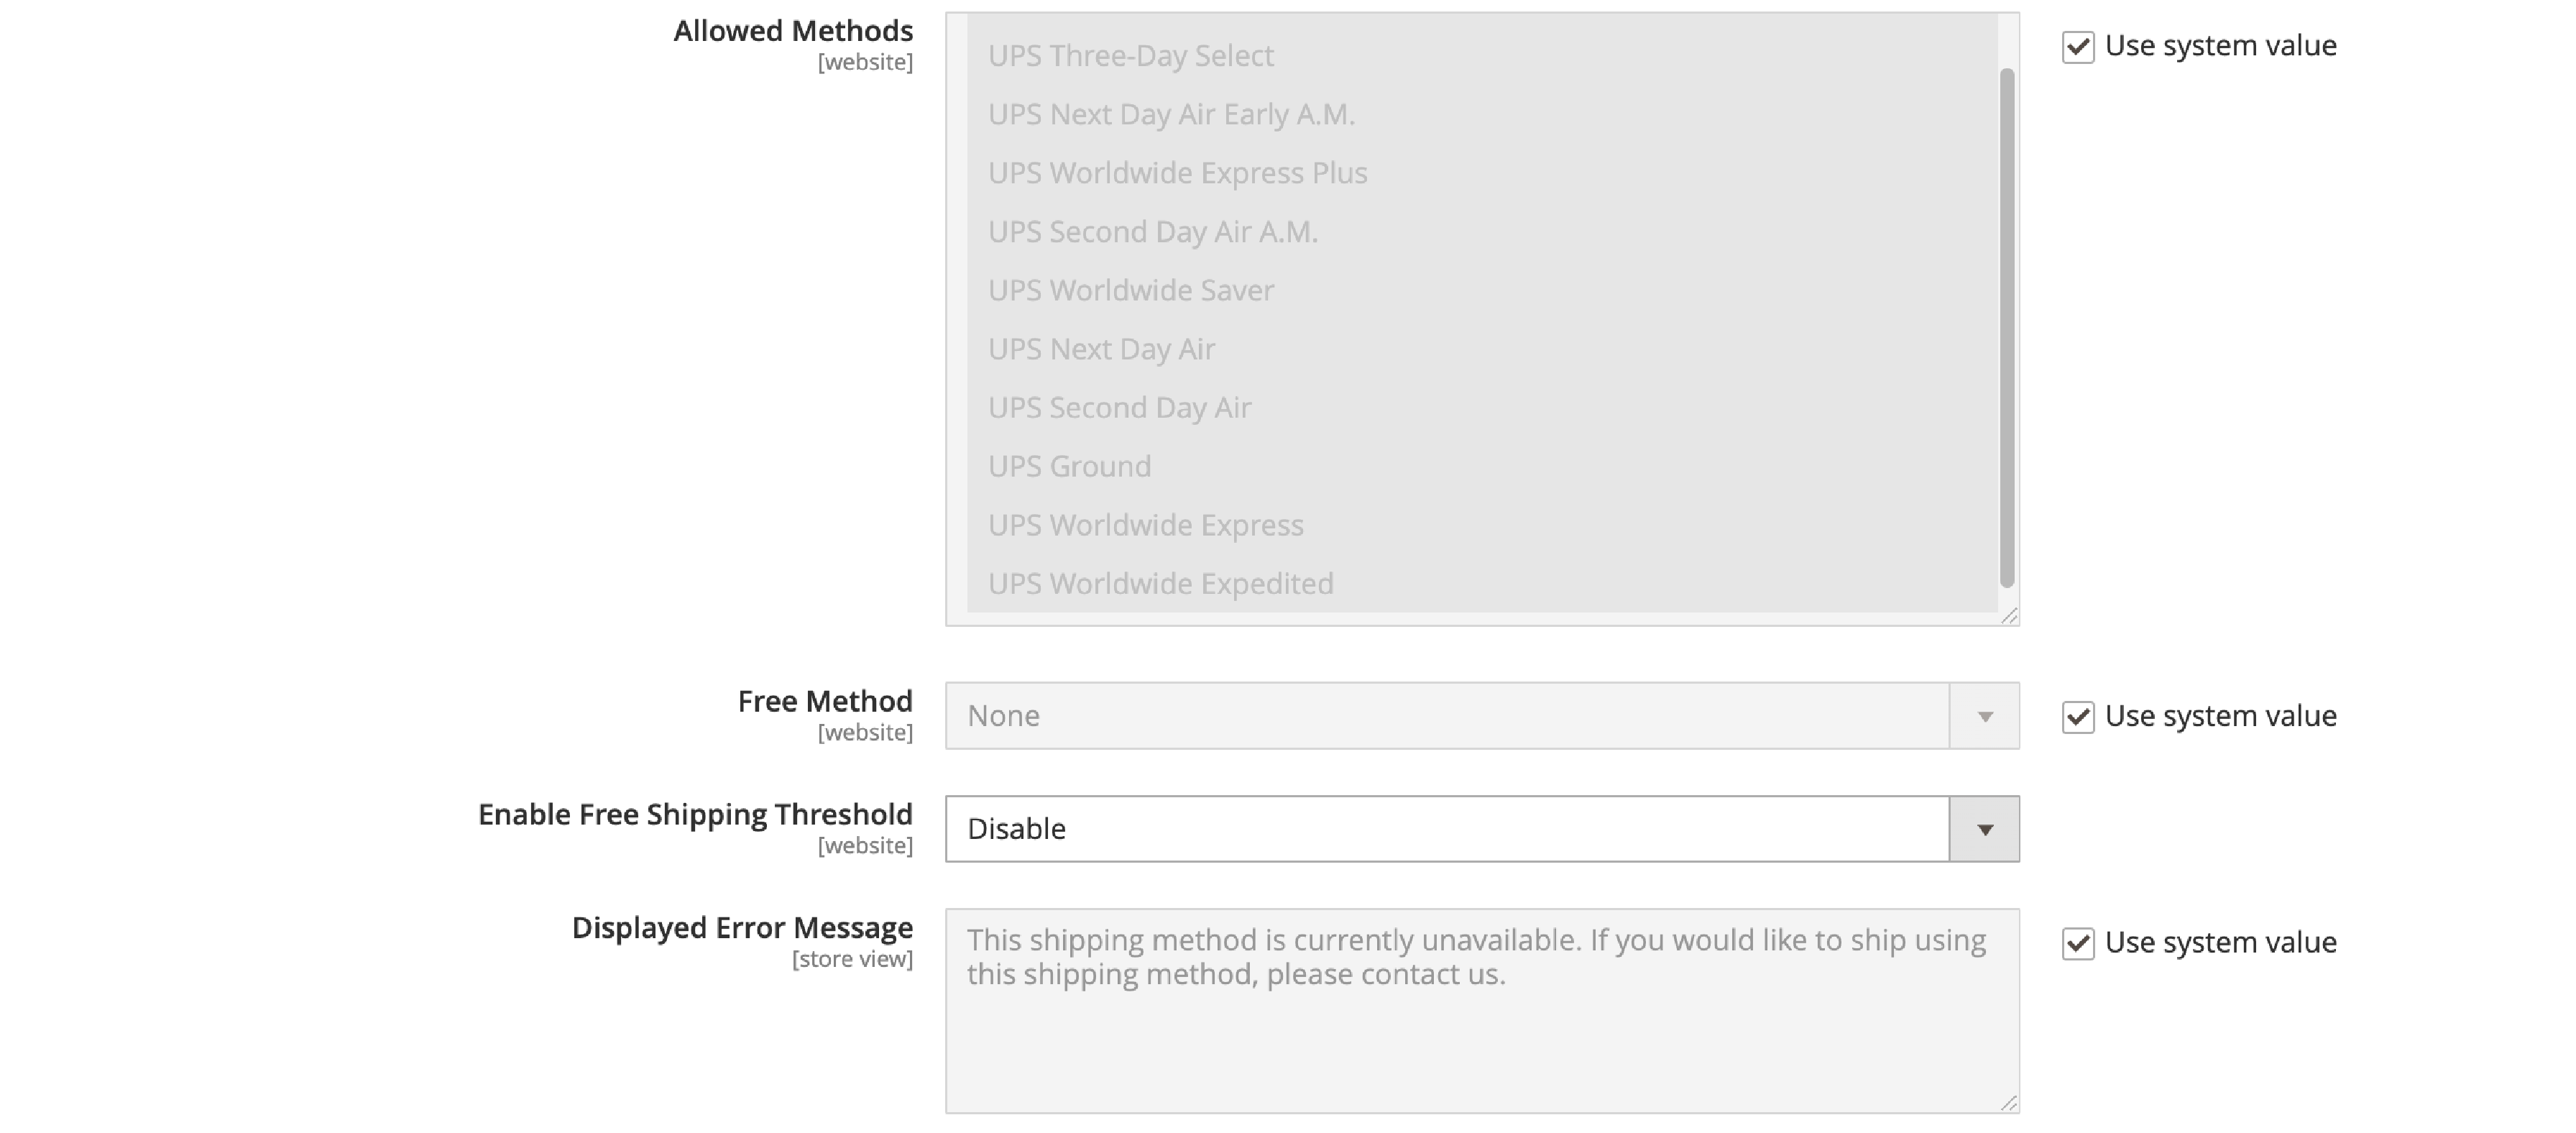
Specify on the Magento 2 create a new shipping method that UPS offers customers. Determine your free shipping method through UPS. You can also set up the Minimum Order Amount for Free Shipping and adjust the error message displayed when UPS is unavailable.
4. Set up UPS Applicable Countries and other settings
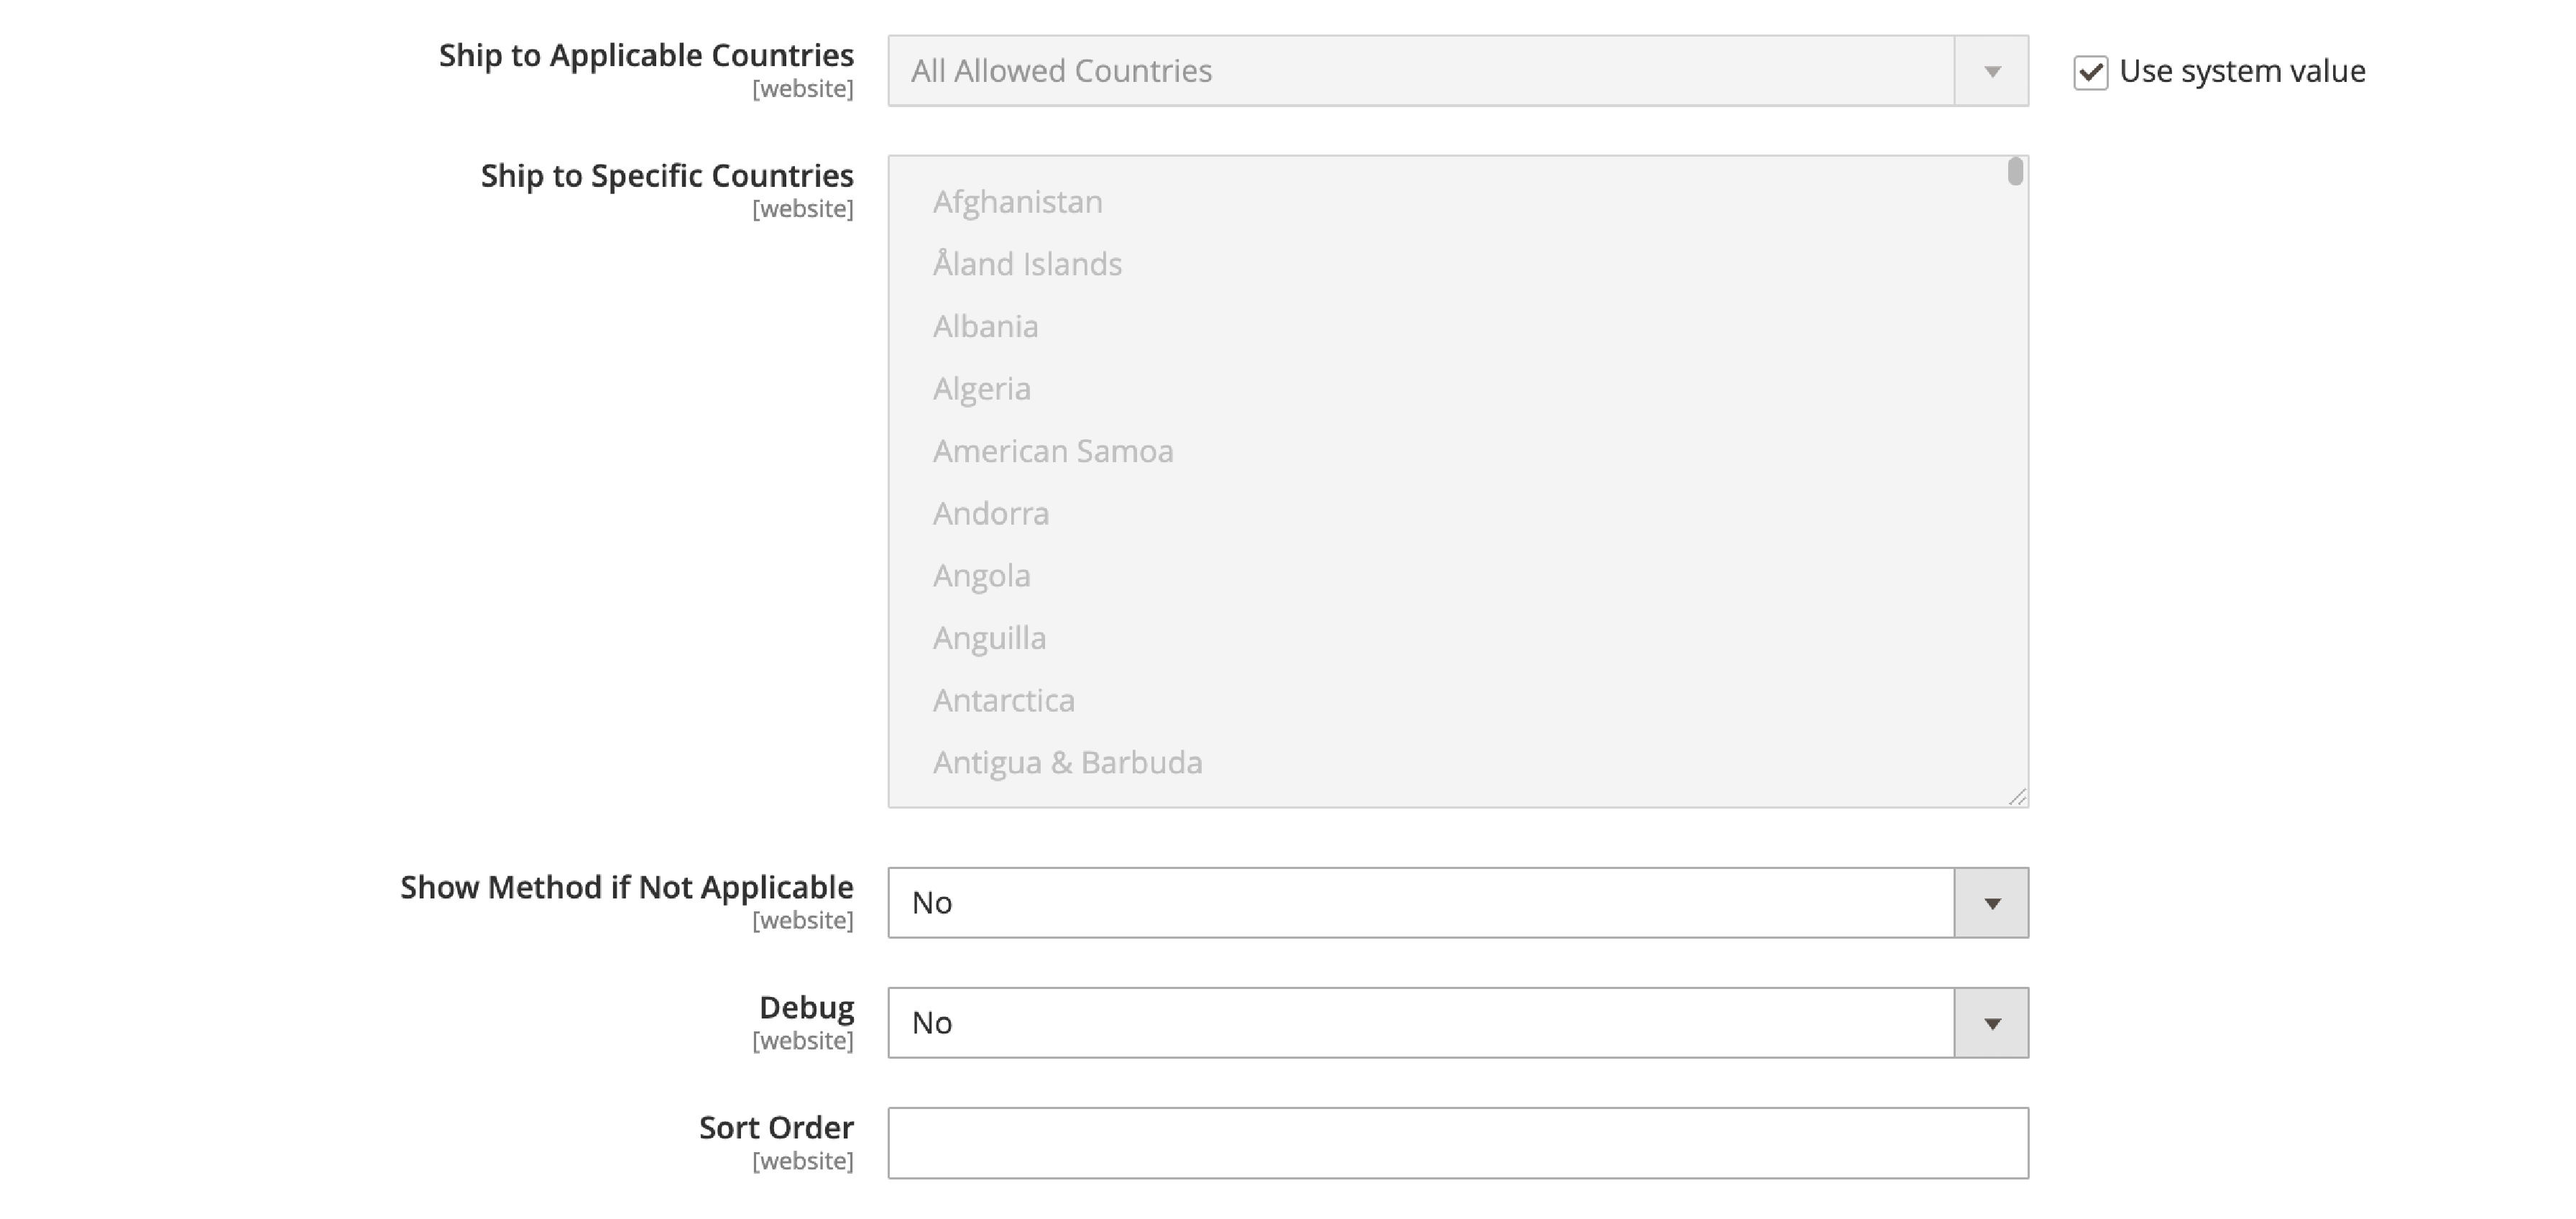
Specify which country customers can use UPS, and set the Displayed Error Message, Sort Order, and Debug as necessary.
III. USPS Settings
USPS is another popular shipping carrier that can be easily configured in Magento 2. Here's how:
1. Set up a USPS Account.
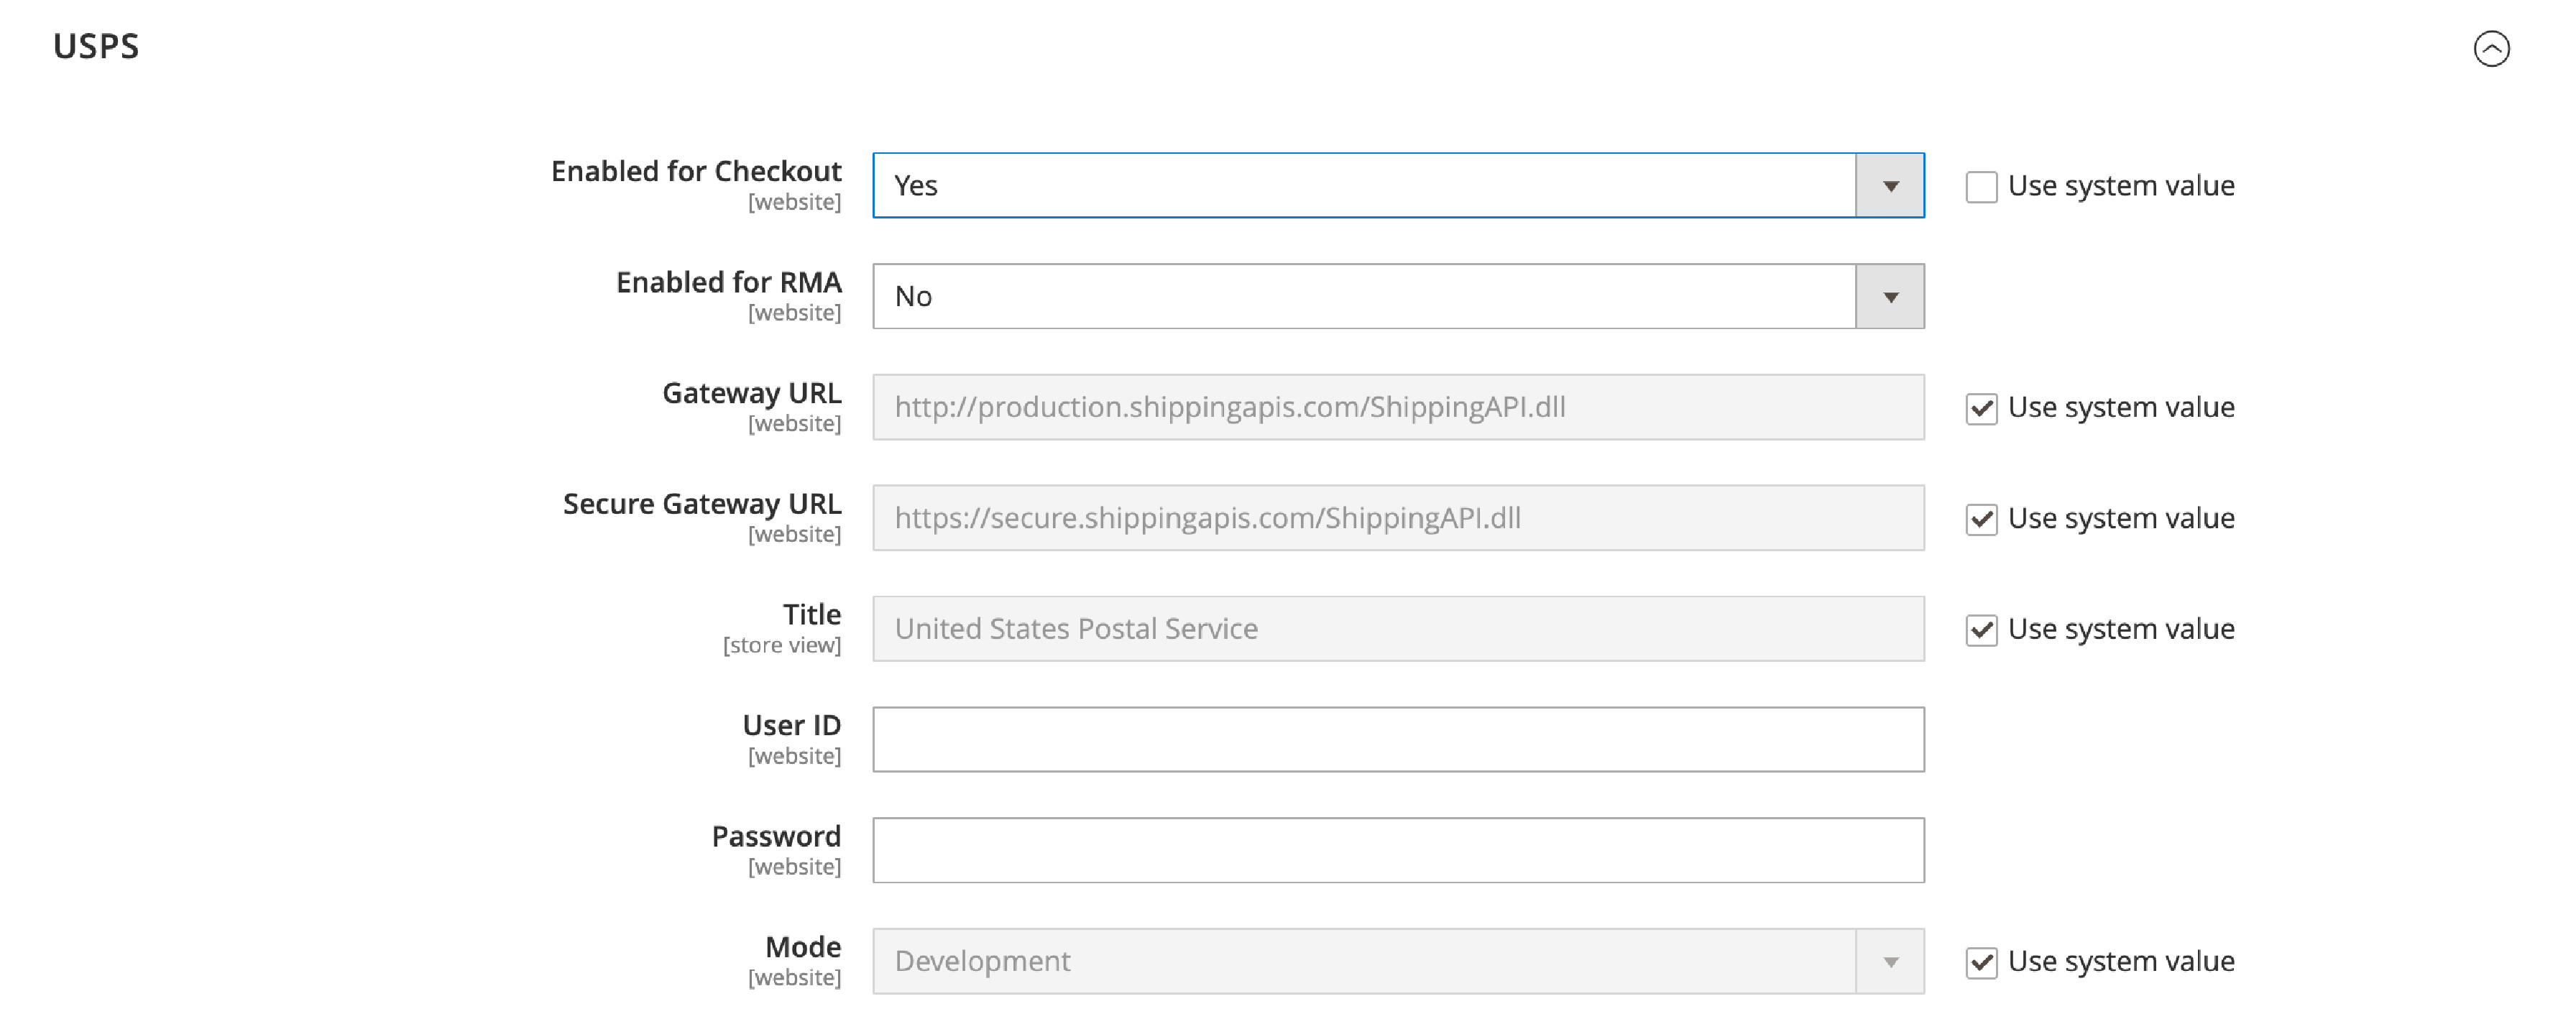
To get started, you'll need to set up a USPS account. Once you have your account set up, you'll need to fill in the following information in Magento 2:
-
Gateway URL: Your URL connecting to the USPS system to retrieve shipping rates.
-
Secure Gateway URL: Your secure URL linking to the USPS system over a secure socket layer (SSL) to retrieve shipping rates
-
User ID: Your USPS shipper account user ID
-
Password: Your USPS shipper account password
-
Choose a Mode: either Live or Development.
2. Set up USPS Packaging
Next, set up your packaging options for USPS. You'll first need to determine how to calculate the weight for multi-pack shipments. USPS offers two options:
- Use origin weight (multiple requests)
- Divide to equal weight (one request).
Next, you'll need to choose the type of container to pack your shipments according to the order.
At Container, you can choose one of five options:
- Variable
- Flat Rate Box
- Flat Rate Envelope
- Rectangular
- Non-rectangular

USPS requires dimensions for package sizes to calculate shipping rates. Set your typical shipment package size at Size:
- Regular
- Large
- Oversize
Configure the Maximum Package Weight as specified by USPS. Customers who order more than the maximum package weight can't select USPS shipping.
3. Set up USPS Handling Fee.

The USPS Handling Fee is similar to Step 3 in FedEx. The settings include:
- Calculate Handling Fee
- Handling Applied
- Handling Fee
4. Set up USPS Allowed Methods, USPS Applicable Countries
To set up USPS Allowed Methods and USPS Applicable Countries.
- Allowed Methods
- Minimum Order Amount for Free Shipping
- Displayed Error Message
- Ship to Applicable Countries
- Show Method if Not Applicable
- Debug
- Sort Order
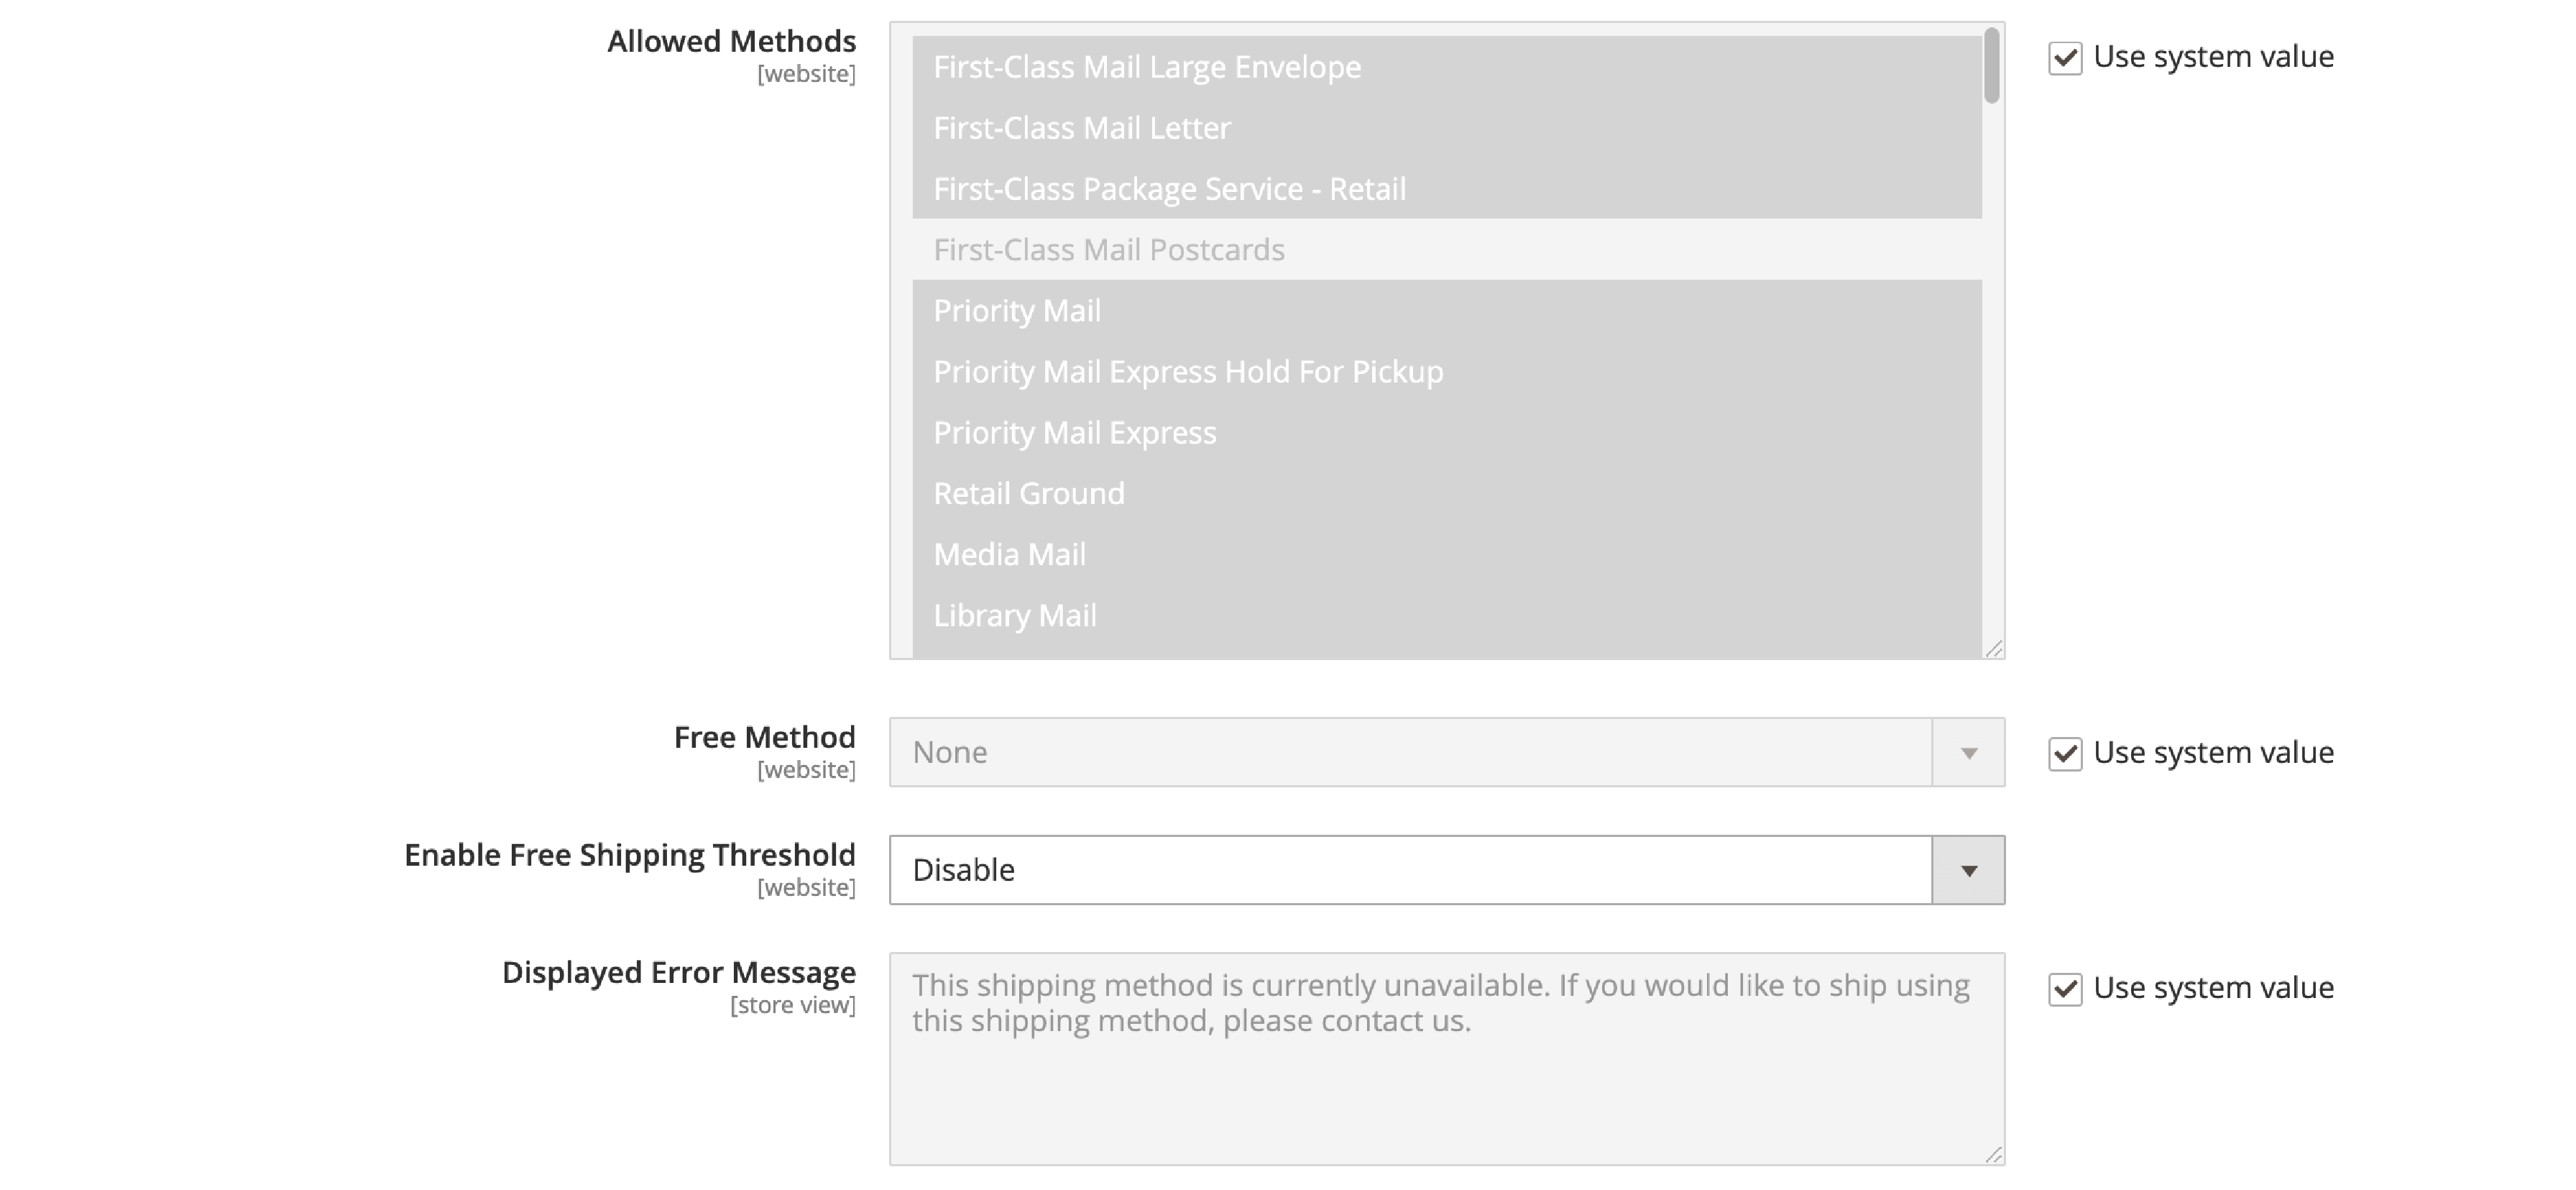
With these steps, you can easily configure USPS as a shipping carrier for your Magento 2 store.
IV. Magento DHL Shipping Method
1. Set up DHL Account.
Set up DHL Account in Magento 2 shipping methods At Enabled for Checkout, select Yes to make DHL shipping method available at your customer’s checkout page.

Fill up the following information:
-
Gateway URL: The URL that DHL gives you. If not, just enter the default Gateway URL.
-
Access ID: Your DHL shipper account access ID
-
Password: Your DHL shipper account password
-
Account Number: Your DHL shipper account number
2. Set up DHL Package.
-
At Handling Applied, you can choose Per Order or Per Package.
-
Select how the Handling Fee is calculated. At > * Select how the Handling Fee is calculated.
-
At Calculate Handling Fee, choose to calculate in Fixed Fee or Percentage. Add the amount to be paid for the handling fee at the Handling Fee.
-
Specify the unit of weight in the shipping calculations. You can choose either Kilograms or Pounds. For orders over 70kg, if you allow DHL to split it into smaller units for better shipping.
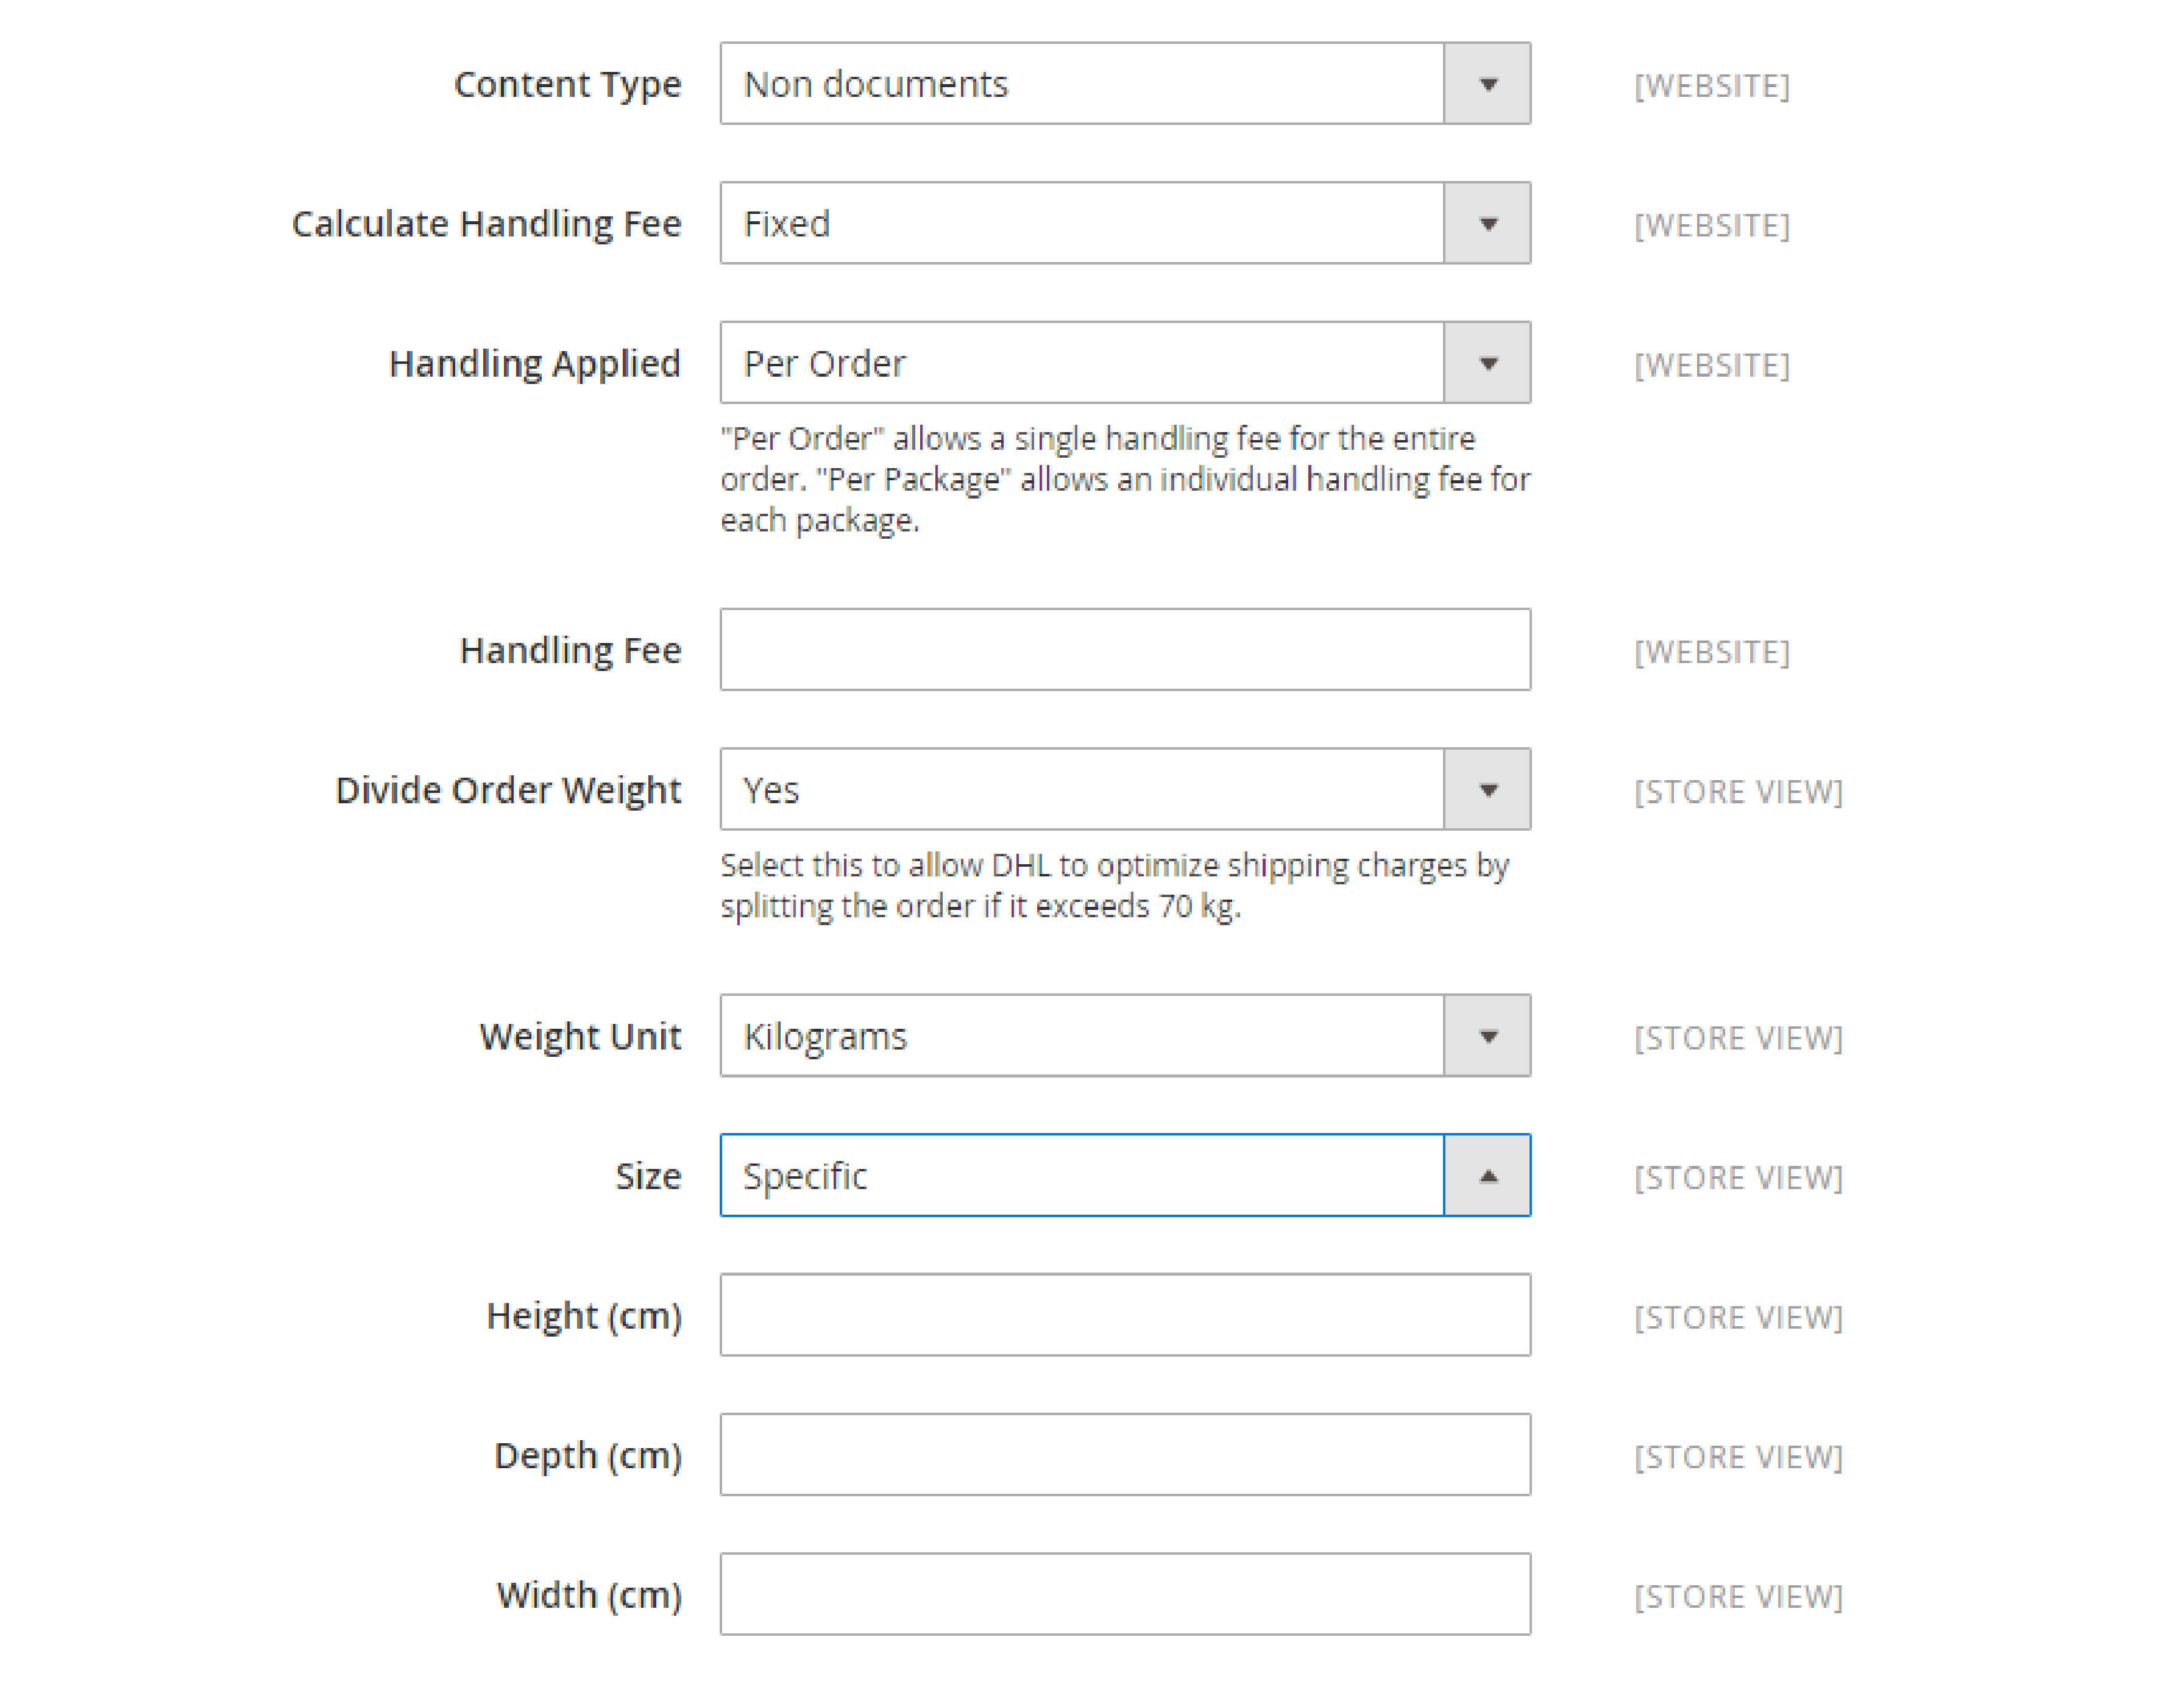
Specify the size of the package. At Size, you have 2 options:
- Specific: If your packages have custom sizes, add details such as Height (cm), Depth (cm), and Width (cm)
- Regular: With this option, your packages will follow standard DHL packaging methods.
3. Set up DHL Allowed Methods, DHL Applicable Countries, Minimum Order Amount
Here you configure Magento DHL integration with the following settings:
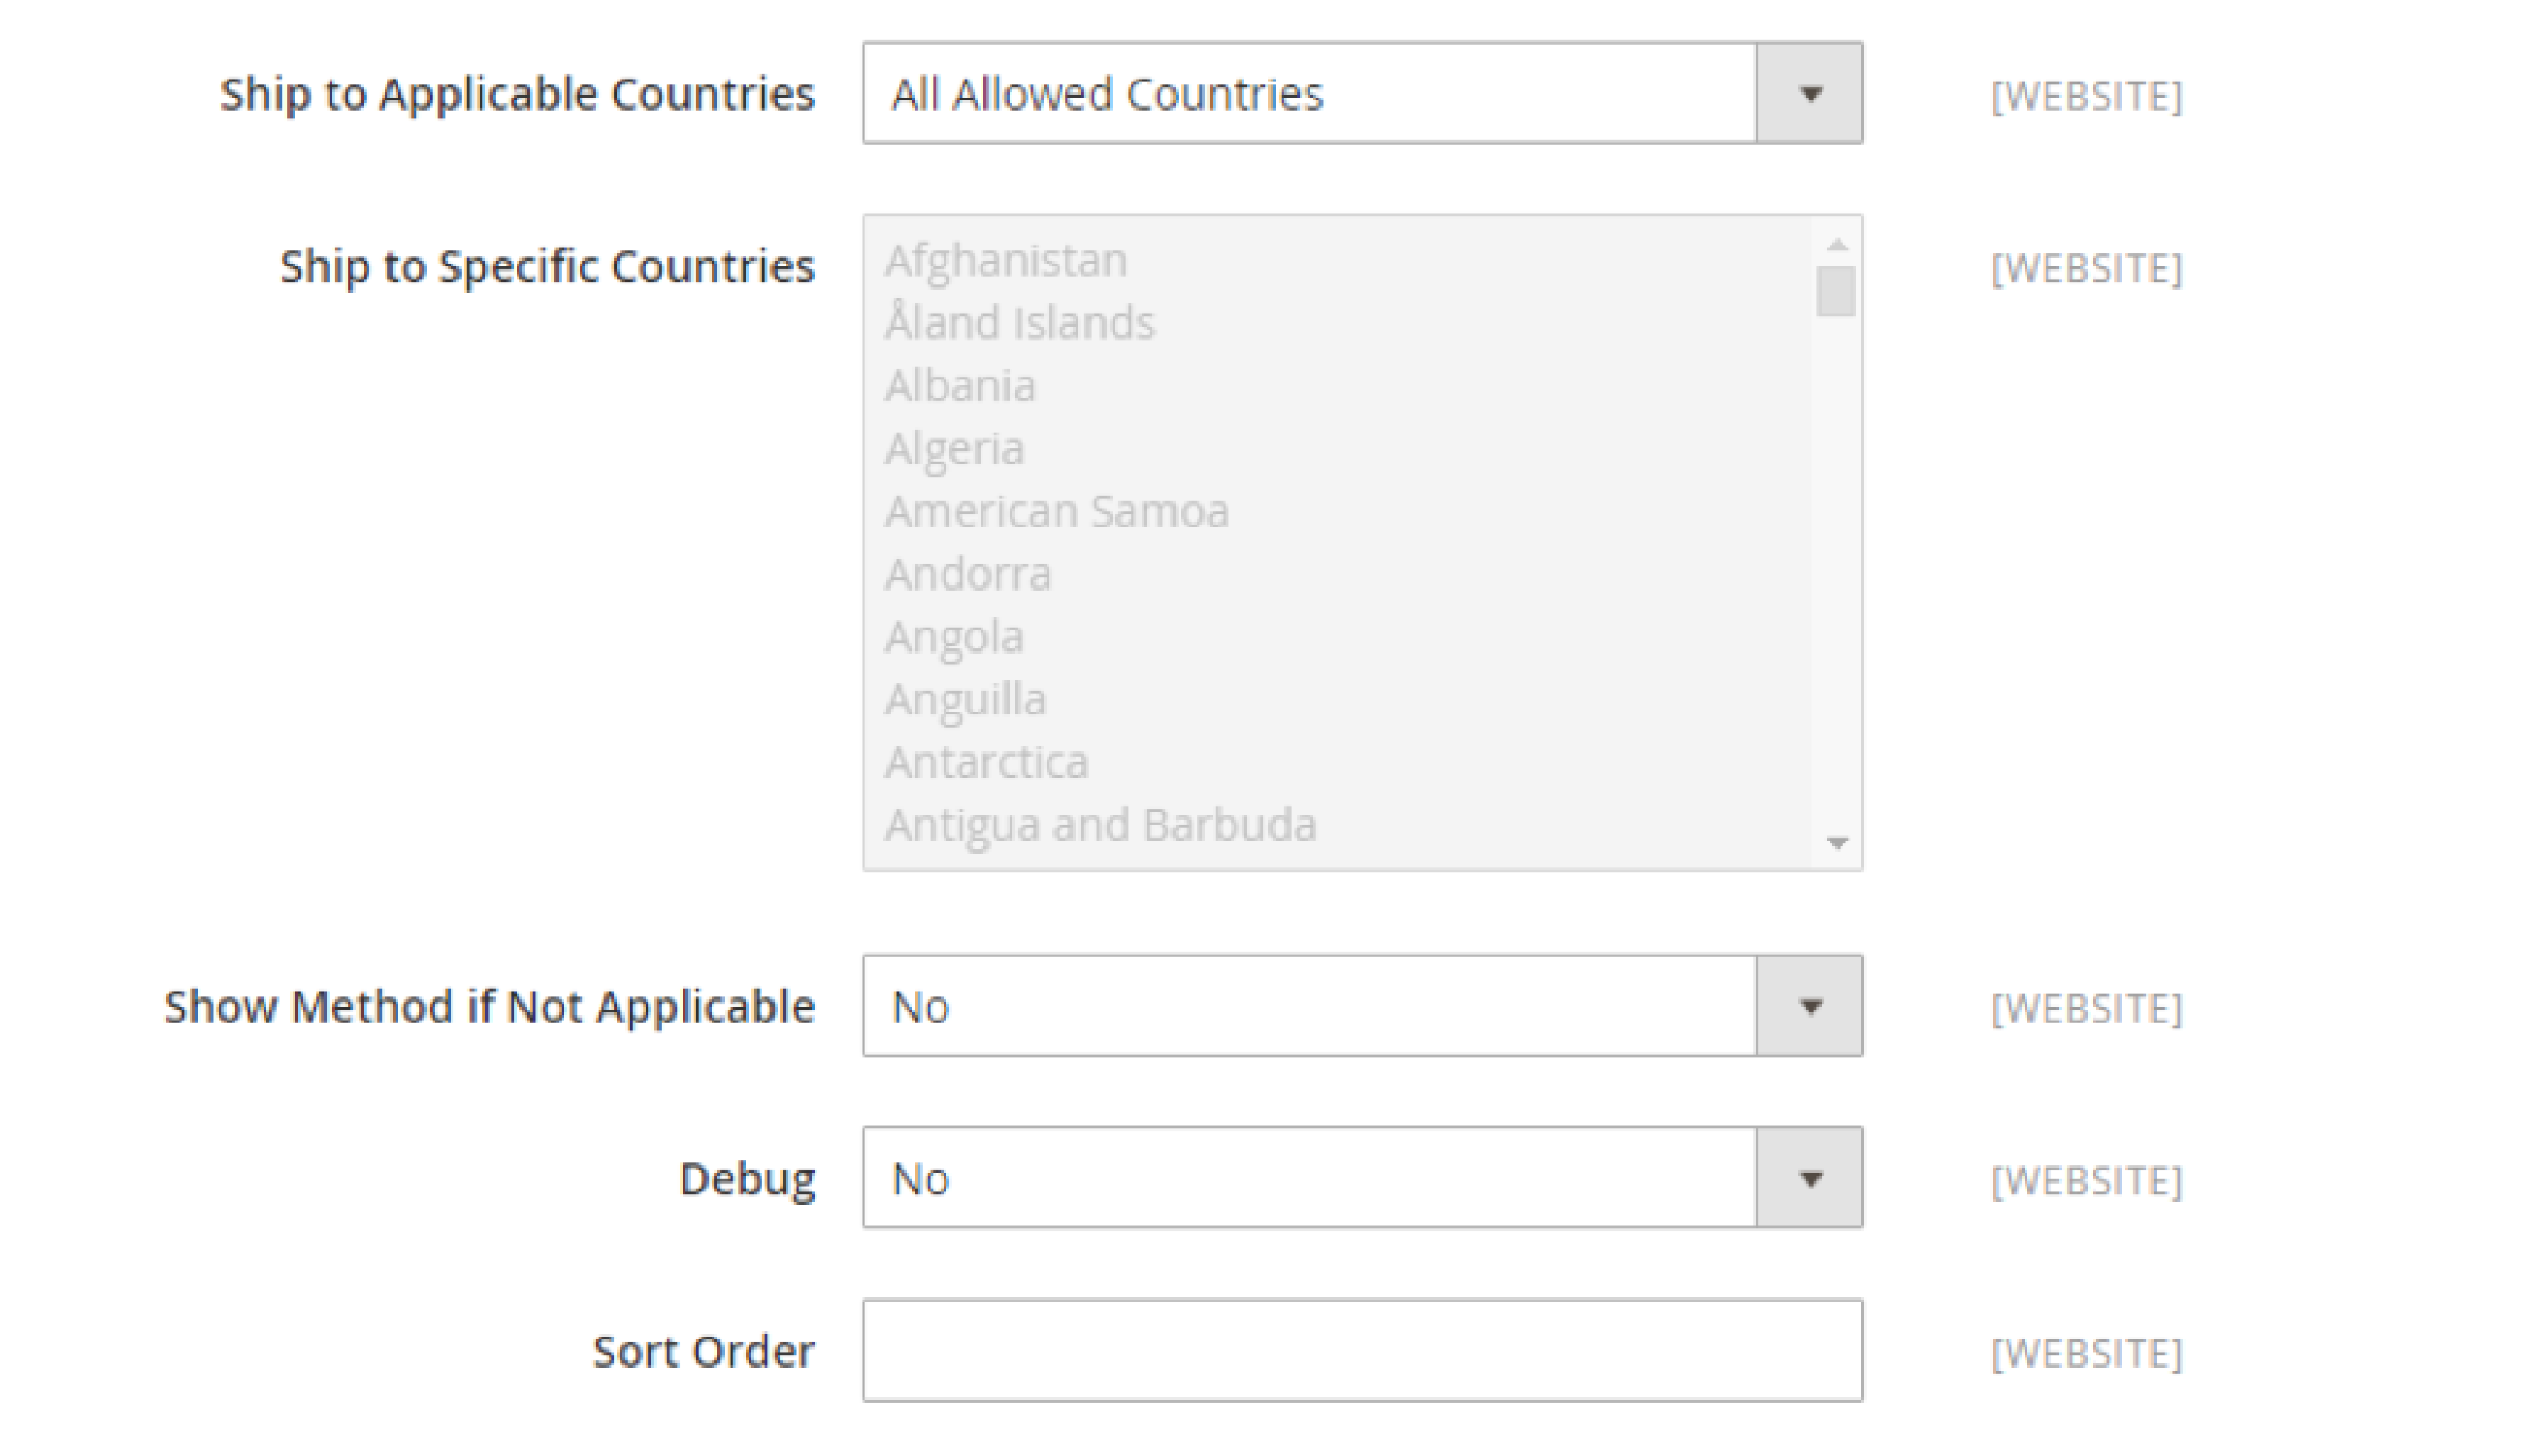
- Allowed Methods
- Ready Time
- Displayed Error Message
- Free Method
- Minimum Order Amount for Free Shipping
- Ship to Applicable Countries
- Ship to Specific Countries
- Show Method if Not Applicable
- Debug
- Sort Order
Best Practices for Magento 2 Shipping Methods
We have compiled a list of best practices to follow when setting up and configuring shipping methods in Magento 2. Optimizing shipping methods to improve customer experience:
1. Offer multiple shipping options
Giving your customers the ability to choose from multiple shipping options can significantly improve their experience. Some customers prefer a faster shipping method, while others prefer a cheaper option. By offering Magento 2 multiple shipping addresses, you allow your customers to choose the option from the shopping cart that best suits their needs.
2. Set realistic shipping rates:
Shipping rates can be a significant factor in a customer's purchase decision. Setting realistic shipping rates that reflect the actual shipping cost based on the product is essential. Customers may be deterred from purchasing if your shipping rates are too high. On the other hand, if your shipping rates are too low, you may lose money on shipping.
3. Provide tracking information:
Providing tracking information to your customers can help them keep track of their package and alleviate any concerns about their order. You can set up tracking information in Magento 2 by integrating with shipping carriers like FedEx, UPS, USPS, or DHL.
4. Set shipping methods based on order value or weight.
You can set up shipping methods in Magento 2 based on order value or weight. This allows you to offer different shipping options based on the size or value of the order. For example, you may offer free shipping for orders over a specific value. Or you can make a flat rate shipping fee for orders below a certain weight.
5. Use table rates to set up complex shipping rules.
Table rates allow you to set up complex shipping rules based on order value, weight, and destination. This is particularly useful for businesses that ship products internationally and must account for different shipping rates based on the destination.
Frequently Asked Questions
Here are some common questions related to Magento 2 shipping methods, along with their answers:
1. What are the different courier shipping methods available in Magento 2?
Magento 2 offers several shipping methods, including USPS, UPS, FedEx, DHL,etc. You can also create a custom shipping method in Magento 2.
2. How do I set up and configure shipping methods in Magento 2?
You can set up and configure shipping methods in Magento 2 by navigating to Stores > Configuration > Sales > Shipping Methods. From there, you can select the shipping methods you want to enable, configure their settings, and set shipping rates.
3. How do I calculate handling fees in Magento 2 shipping?
To calculate handling fees in Magento 2 shipping, you can navigate to Stores > Configuration > Sales > Shipping Settings and enter the handling fee amount. You can also configure handling fees on a per-product basis, if desired.
4. How do I consult my USPS shipper account user ID to optimize shipping methods?
A: To consult your USPS shipper account user ID in Magento 2, you can navigate to Stores > Configuration > Sales > Shipping Methods > USPS. Enter your user ID in the "User ID" field. It will enable you to optimize your shipping methods for USPS.
Summary
With Magento 2, store owners can access various shipping carriers and methods. You can configure the methods to meet their specific needs. By following the best practices outlined in this article, store owners can provide a seamless shipping process for their customers.
It's important to remember that there is no one-size-fits-all approach to shipping methods. Some experimentation may be necessary to find the best fit for your store. Carefully evaluate the available options and test different configurations carefully. You can then optimize your shipping methods to provide the best possible experience for your customers.
Get more Magento-related tutorials and how-tos on the Magento tutorials.


