
Magento 2 VAT Number Validation: 5 Configuration Steps
Are you seeking to enhance your Magento 2 store's checkout process? Magento 2 VAT Number Validation feature enables store owners to validate VAT numbers in real time during checkout. It ensures tax compliance across different countries, streamlining the tax calculation process. This tutorial will guide you through enabling VAT ID Validation in Magento 2.
Key Takeaways
-
Discover how VAT ID validation in Magento 2 ensures correct taxes at checkout.
-
Learn how customers input their VAT ID during registration in Magento 2.
-
Explore how Magento 2 handles VAT ID validation during checkout.
-
Understand how to set up tax rules for VAT ID validation in Magento 2.
-
Follow the 5 simple steps to configure VAT ID validation in Magento 2.
What is VAT ID validation in Magento 2?
VAT ID validation in Magento 2 is important for store owners conducting business within the European Union (EU). It helps the tax calculation process by automatically finding the correct tax for B2B transactions. It does so based on the locations of both the merchant and the customer. Magento 2 verifies VAT numbers in real time using the European Commission's web services. It ensures accurate tax charges during checkout.
This validation process is essential for compliance with tax regulations across EU countries. It distinguishes between transactions. It includes transactions where:
- Both parties are located in the same country
- Both parties are involved in different EU countries.
When the merchant and customer are in the same EU country, VAT is charged. VAT is not applied if both are in different EU countries and are registered EU business entities. It enhances the accuracy of tax calculations.
Magento 2 allows store administrators to configure customer groups. These groups can be automatically assigned during various stages. It includes account creation or address updates. This feature is particularly useful for differentiating between domestic and intra-EU sales.
Note: For merchants selling virtual or downloadable products, the VAT rate should be based on the customer's location. It should be regardless of whether the sales are intra-union or domestic. It requires setting up individual tax rules for different product classes.
Customer Registration Workflow for VAT ID validation in Magento 2
When VAT ID validation is turned on in Magento 2, new customers get a chance to enter their VAT ID number during registration. This step is mainly for shoppers who are registered VAT customers. It helps the store identify business clients and apply the correct tax rules.
Customers fill in their VAT ID along with their address and save it. Magento 2 sends this information to the European Commission server for validation. This check makes sure the VAT ID is correct and follows the rules. Based on what the server says, Magento 2 automatically places the customer into one of the default Magento customer groups. These groups help the store manage tax settings and customer privileges correctly.
However, if a customer or an admin updates the VAT ID or the address it’s linked to, the assigned group might change. Also, during checkout, Magento 2 can temporarily switch the customer’s group. It is done to ensure that taxes are applied properly for that specific order.
If needed, Magento store owners can skip VAT ID validation for certain customers right from the Customer Information page. This option allows store owners to manage customer accounts more personally when necessary.
Checkout Workflow for VAT ID validation in Magento 2
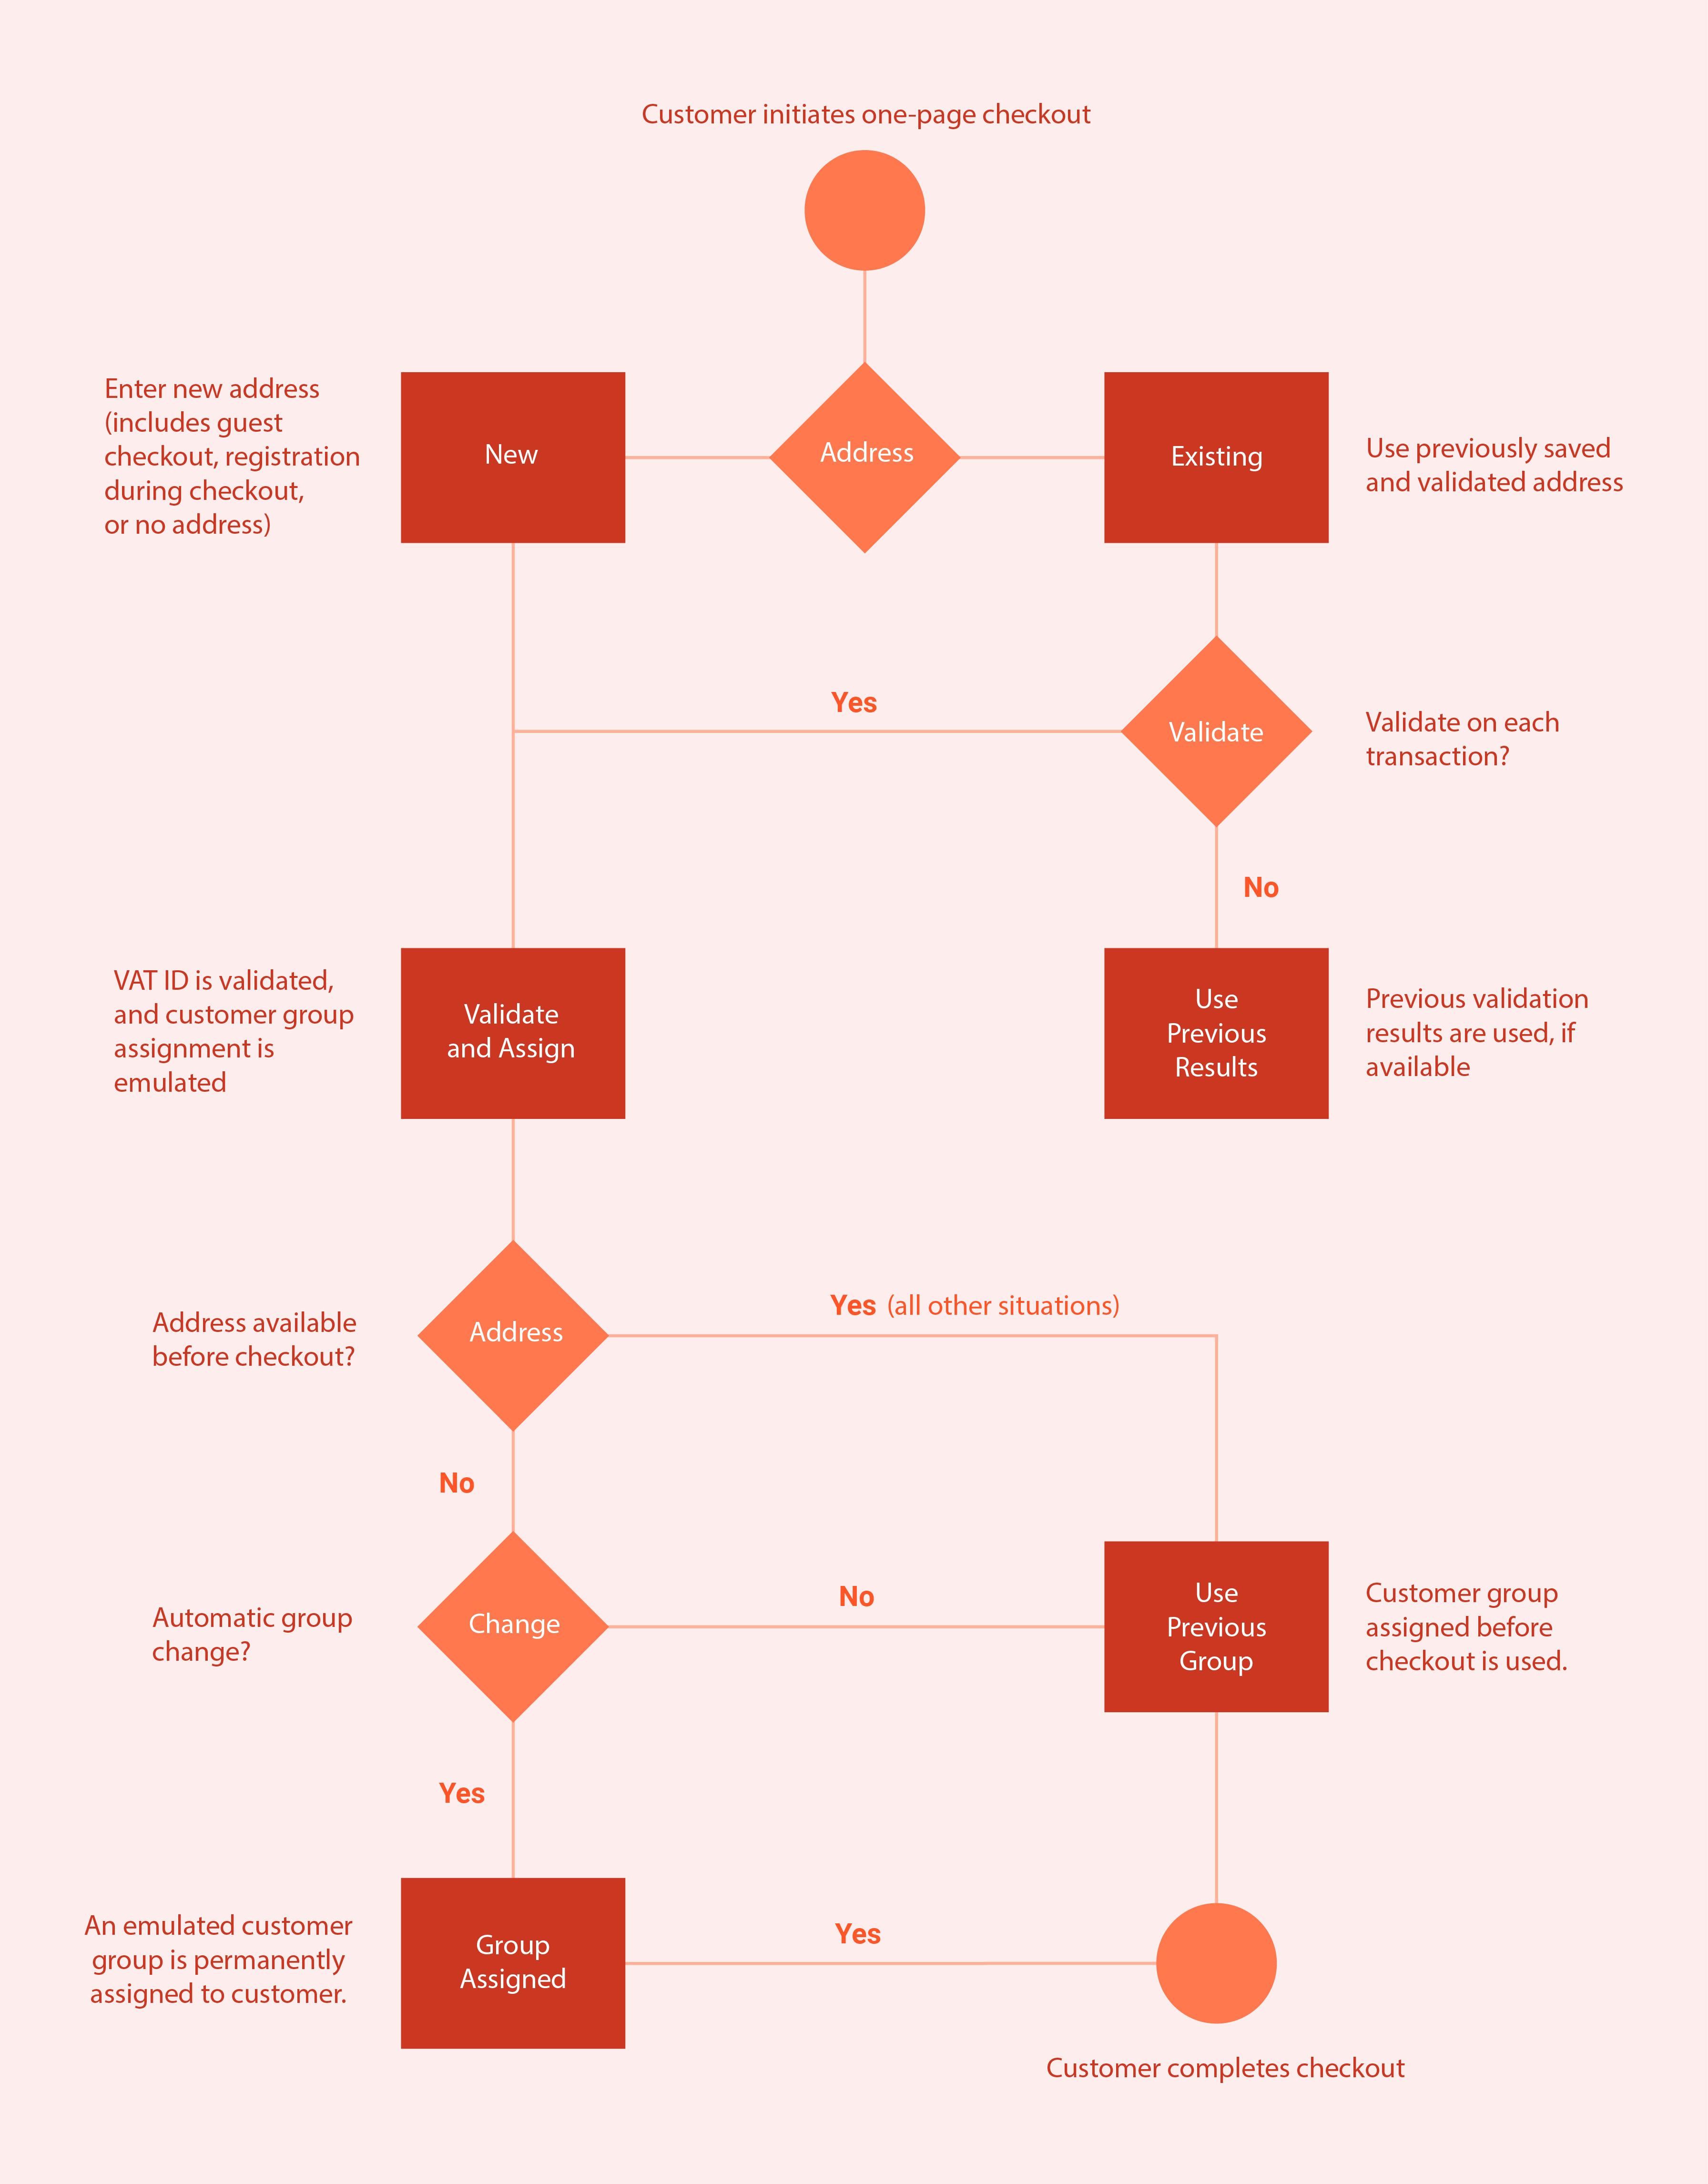
During checkout in Magento 2, if a customer’s VAT number is checked, details like the VAT request identifier and the date of the request are recorded. It is under the Comments History of the order.
The way Magento 2 handles VAT ID validation and any potential change in the customer's group at checkout is influenced by two settings:
- Validate on Each Transaction
- Disable Automatic Group Change
These settings allow store owners to fine-tune the VAT validation process according to their business needs.
When a customer chooses to pay using external payment methods, the checkout process is managed entirely by the external payment platform. It includes Google Express Checkout, PayPal Express Checkout, or similar services. In these instances, the "Validate on Each Transaction" setting doesn't apply. The customer's group remains unchanged during checkout.
Tax Rules Required for VAT ID Validation
First, create customer groups that match the types of customers you have. Next, set up tax classes, rates, and rules related to these groups. After that, turn on VAT ID validation for your store and finish setting it up.
-
Customer Groups: You'll categorize your customers into groups. These could be based on whether they are businesses or individual shoppers. It decides whether or not they should be charged VAT.
-
Tax Classes: Magento products and customers need to be assigned to tax classes. These classes help determine how much tax should be applied to different items or services you sell.
-
Tax Rates: These are the specific percentages of tax that apply to products or services. It is based on where your customer is and where you are. You'll set different rates for different regions or countries, following their VAT rules.
-
Tax Rules: Tax rules use the customer groups, tax classes, and tax rates to figure out the right amount of tax to charge. For VAT ID validation, you'll create rules that apply when a business customer provides a valid VAT number.
| Tax Rule #1 | |
|---|---|
| Customer Tax Class | These are categories for your customers. You'll need three types: One for customers from your own country. One for customers who enter a VAT ID that isn't formatted right. One for customers whose VAT ID doesn't check out. |
| Product Tax Class | Product tax classes include a class for products of all types, except bundle products and virtual products. |
| Tax Rate | It should be set to the VAT rate that's used in your country. |
| Tax Rule #2 | |
|---|---|
| Customer Tax Class | A class for intra-union customers. |
| Product Tax Class | It includes every type of product except virtual products. |
| Tax Rate | For sales to other EU countries (except where your store is located). The rate is currently 0%. |
| Tax Rule #3 | (Required for virtual and downloadable products) |
|---|---|
| Customer Tax Class | A class for domestic customers. A class for customers with invalid VAT ID. A class for whom VAT ID validation failed. |
| Product Tax Class | A class for virtual products. |
| Tax Rate | It should match the VAT rate used in your country. |
| Tax Rule #4 | (Required for virtual and downloadable products) |
|---|---|
| Customer Tax Class | A class for intra-union customers. |
| Product Tax Class | A class for virtual products. |
| Tax Rate | For sales to other EU countries (except where your store is located), the rate is currently 0%. |
5 Steps to Configure VAT ID Validation in Magento 2
Step 1: Establish Customer Groups for VAT
For VAT ID validation, Magento 2 assigns customers to one of four groups based on their VAT ID status:
- Local customers
- EU customers
- Customers with an invalid VAT ID
- Customers with a VAT ID verification failure
You have the option to use default groups or create new ones specifically for VAT purposes. Assign each group accordingly to match the outcome of the VAT ID checks.
Step 2: Set Up Tax Classes, Rates, and Rules for VAT
Three components define each tax rule:
- Customer Tax Classes
- Product Tax Classes
- Tax Rates
Create the tax rules to use VAT ID Validation effectively.
- Tax rules include tax rates and tax classes.
- Tax classes are assigned to customer groups.
Step 3: Activate VAT ID Validation Settings
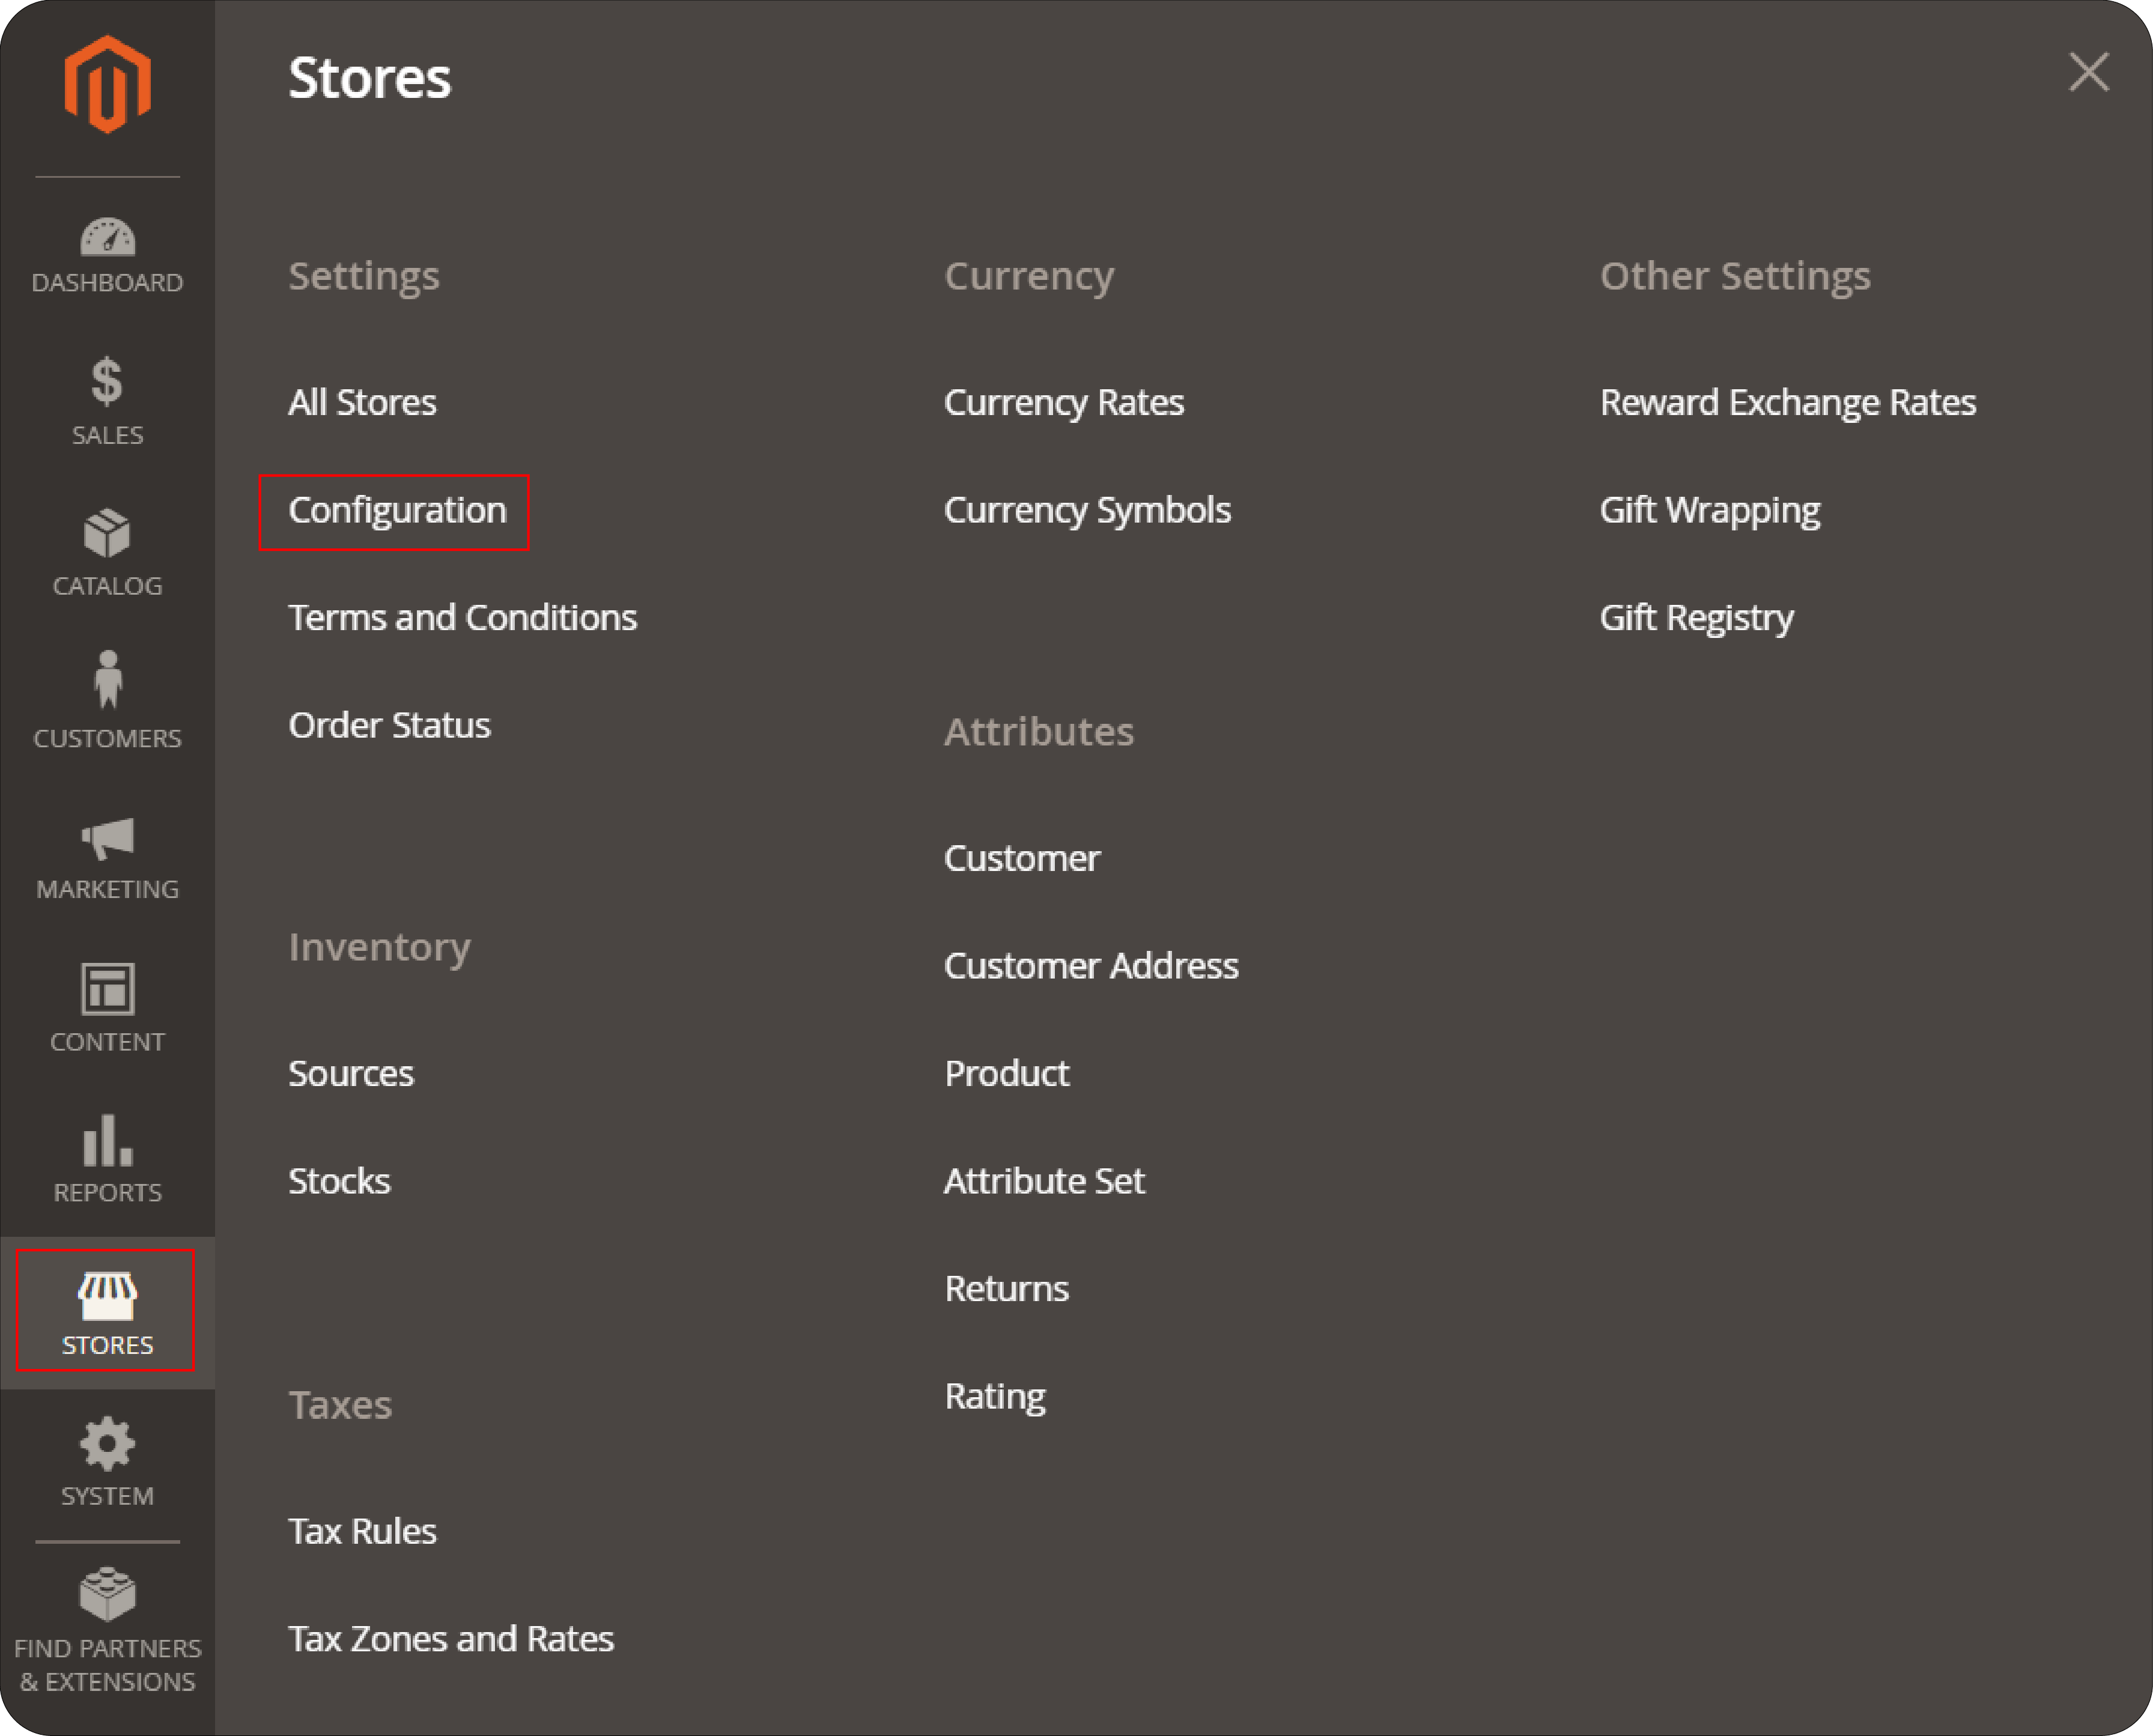
- Navigate to the Magento Admin sidebar and select Stores > Settings > Configuration.
-
If necessary, choose the correct Store View for which you're configuring settings.
-
In the Configuration menu, under Customers, click on Customer Configuration.
-
Look for the Create New Account Options section and expand it.
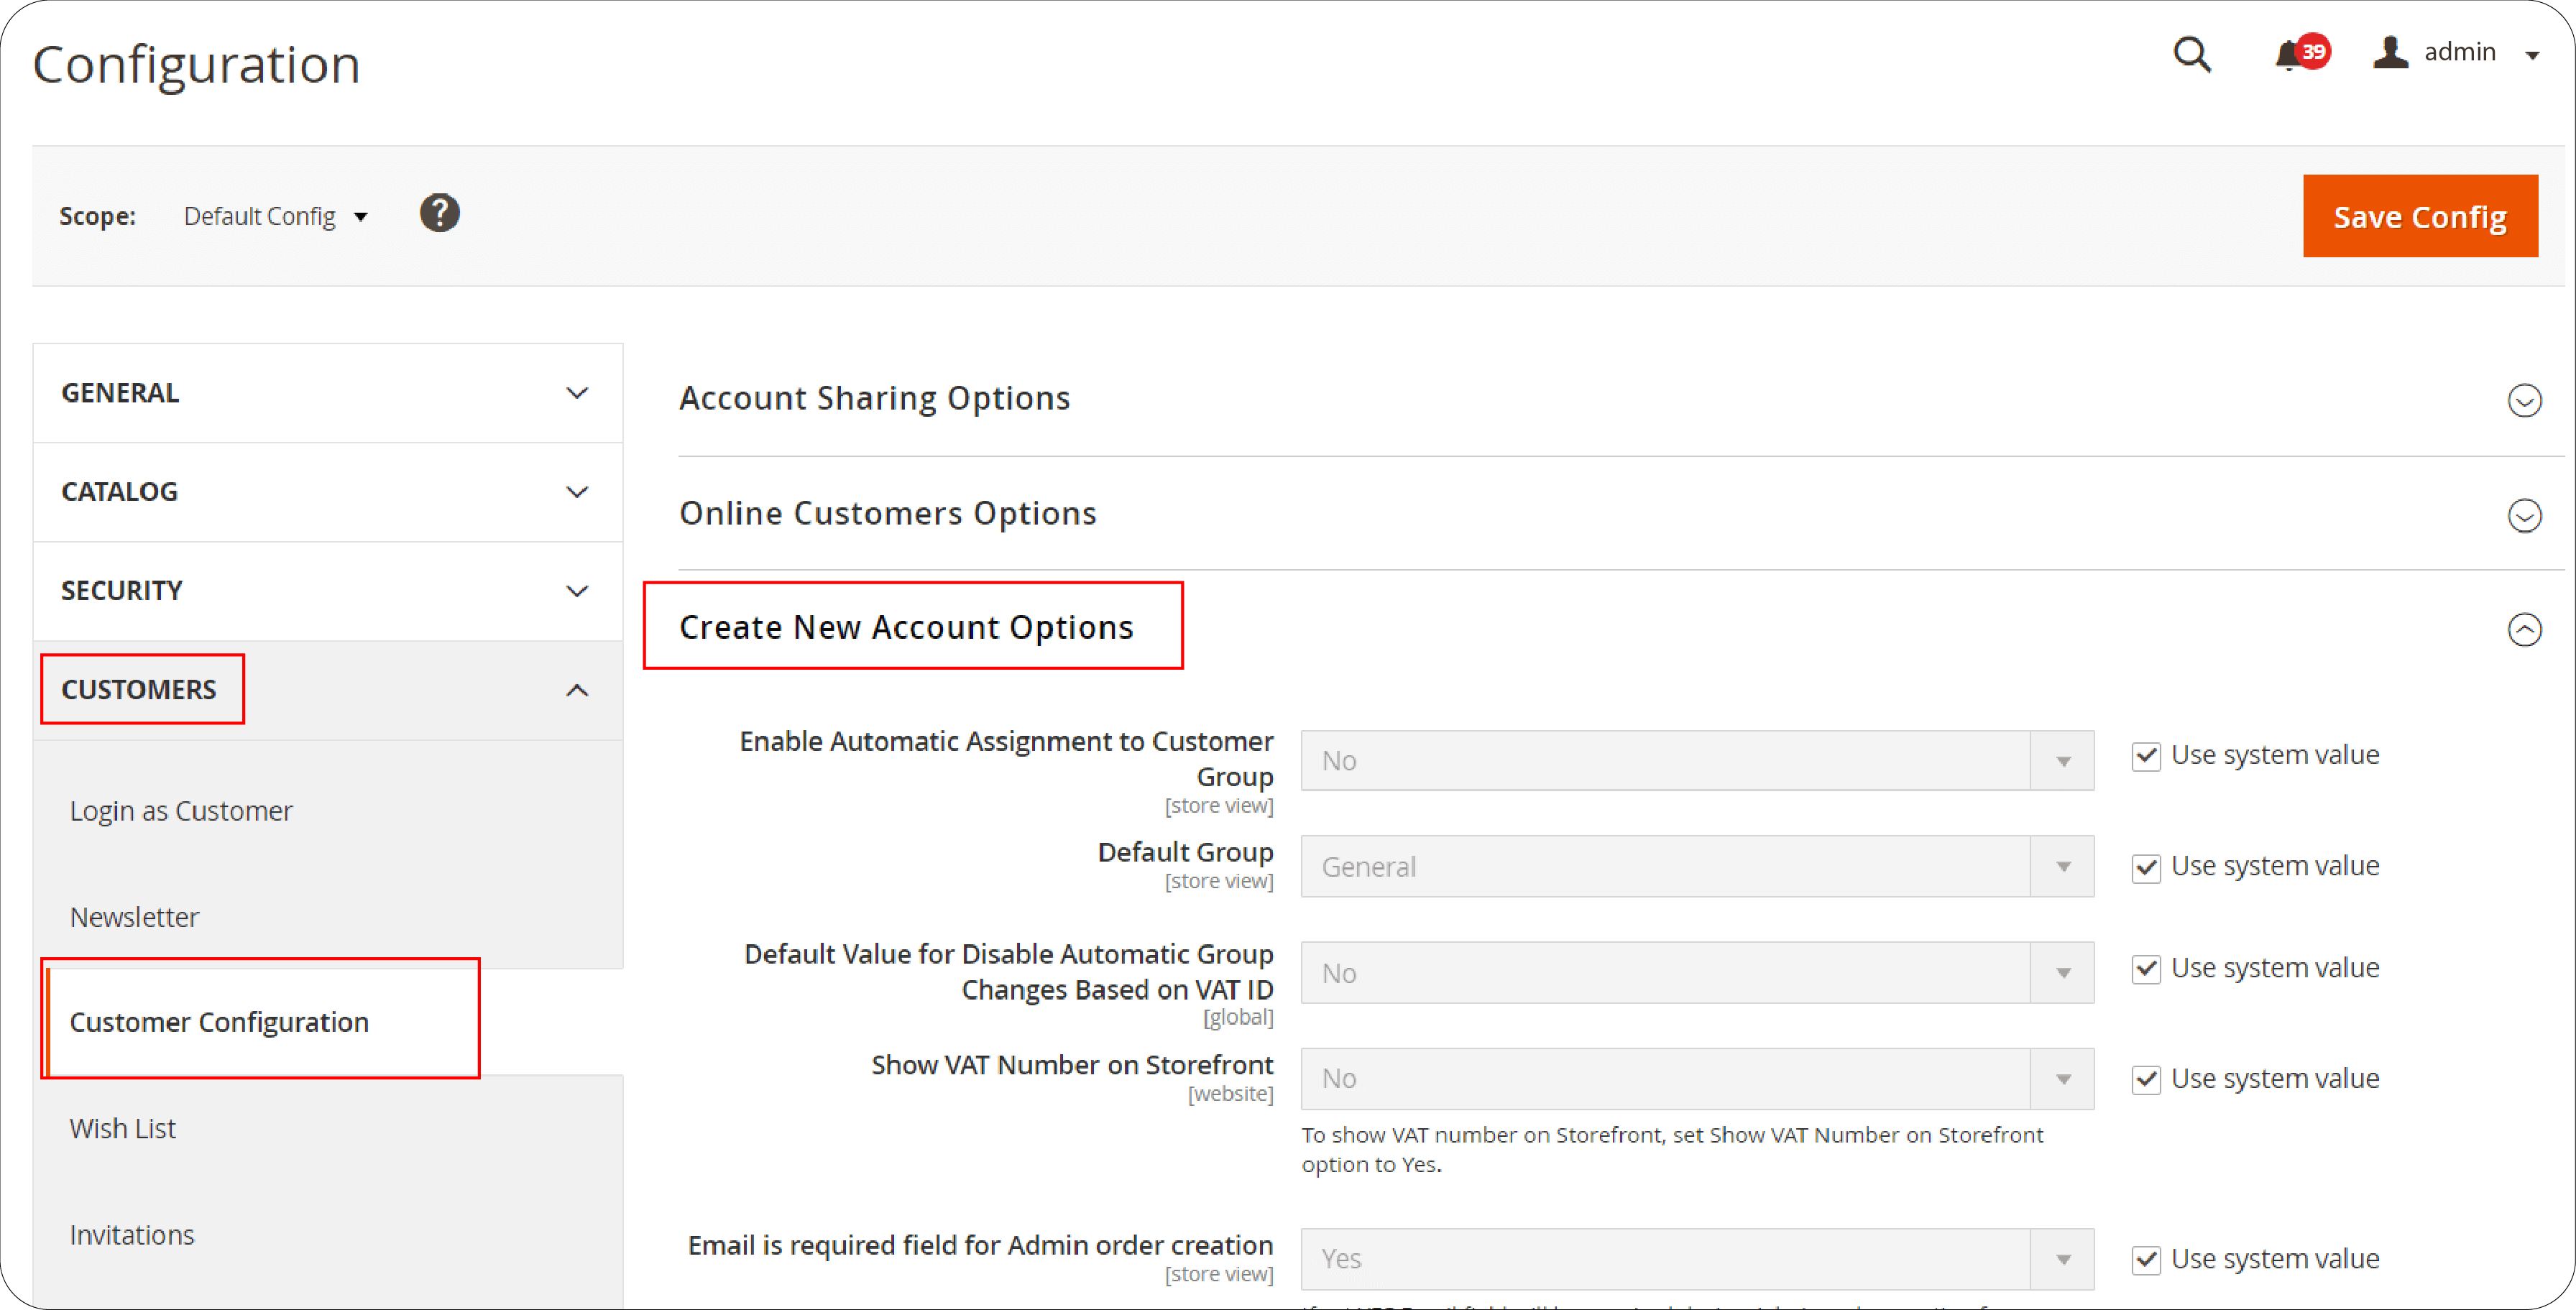
- Change Enable Automatic Assignment to Customer Group to Yes. Then, fill in the necessary fields:
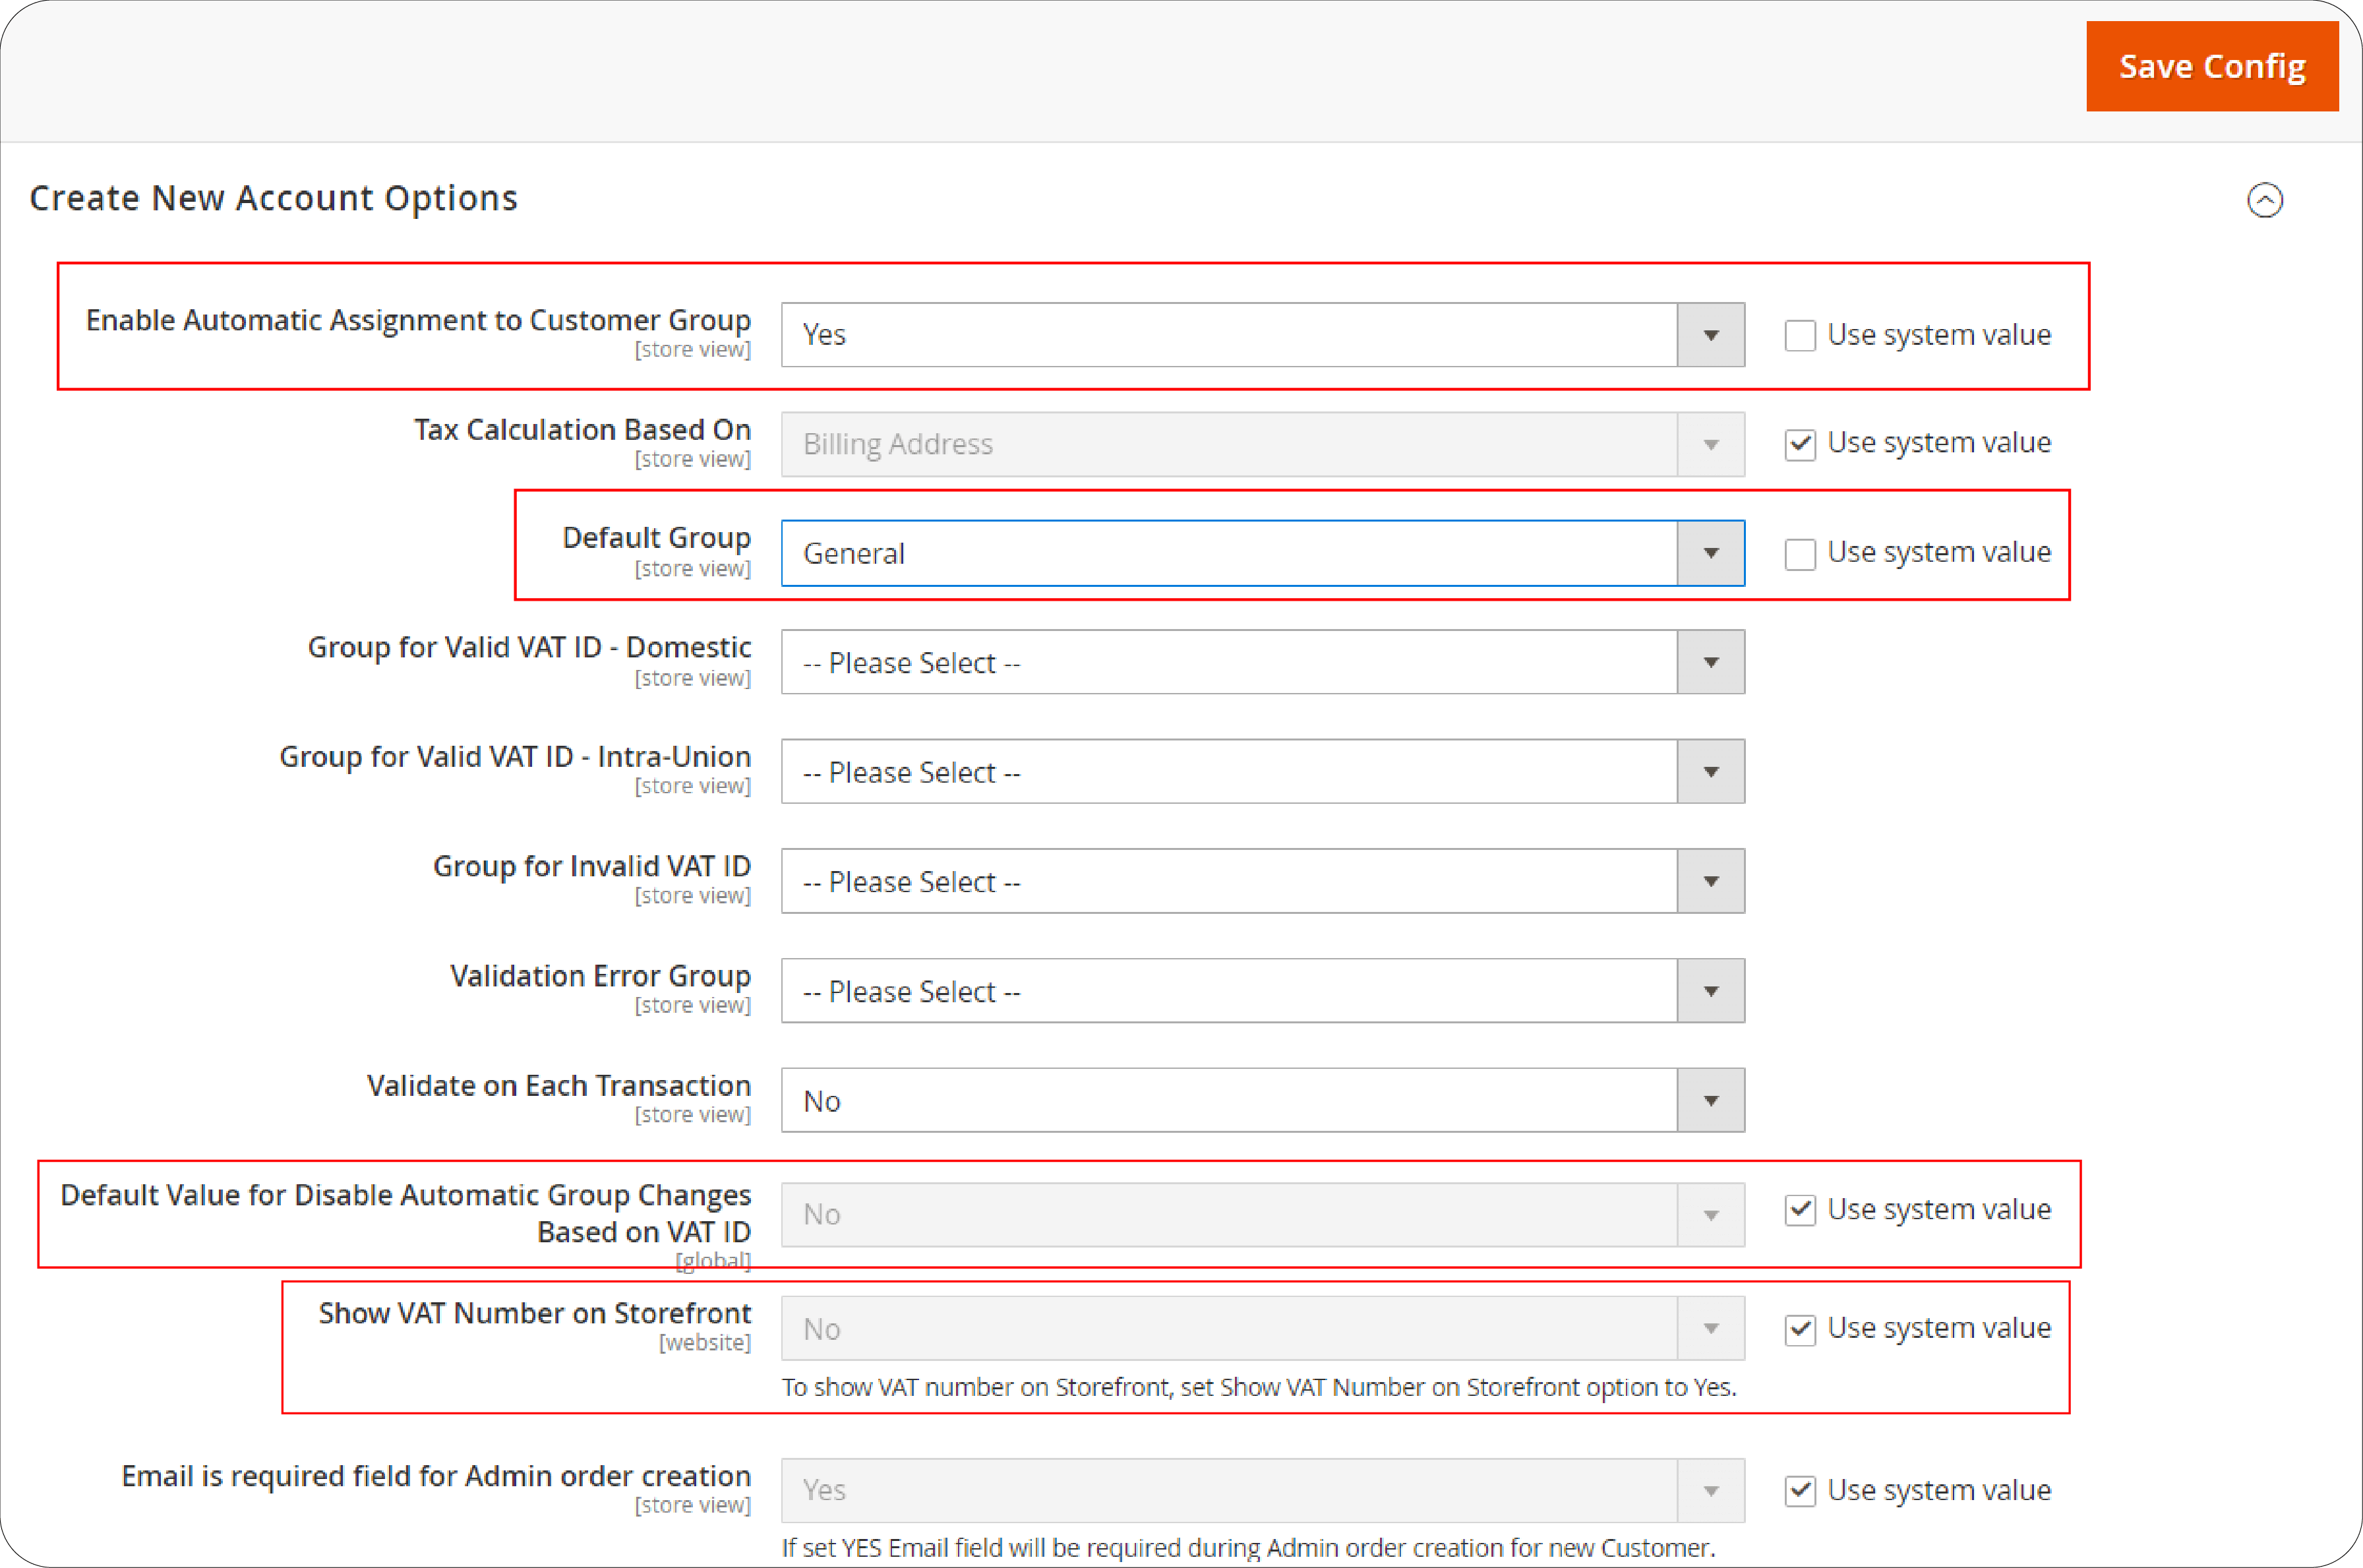
- Default Group: Choose the default customer group.
- Default Value for Disable Automatic Group Changes Based on VAT ID: Set this according to your preference.
- Show VAT Number on Storefront: Decide if you want VAT numbers displayed on your site.
- After adjusting these settings, click Save Config to apply the changes.
Step 4: Register Your VAT ID and Country
- In the Magento 2 Admin sidebar, go to Stores > Settings > Configuration.
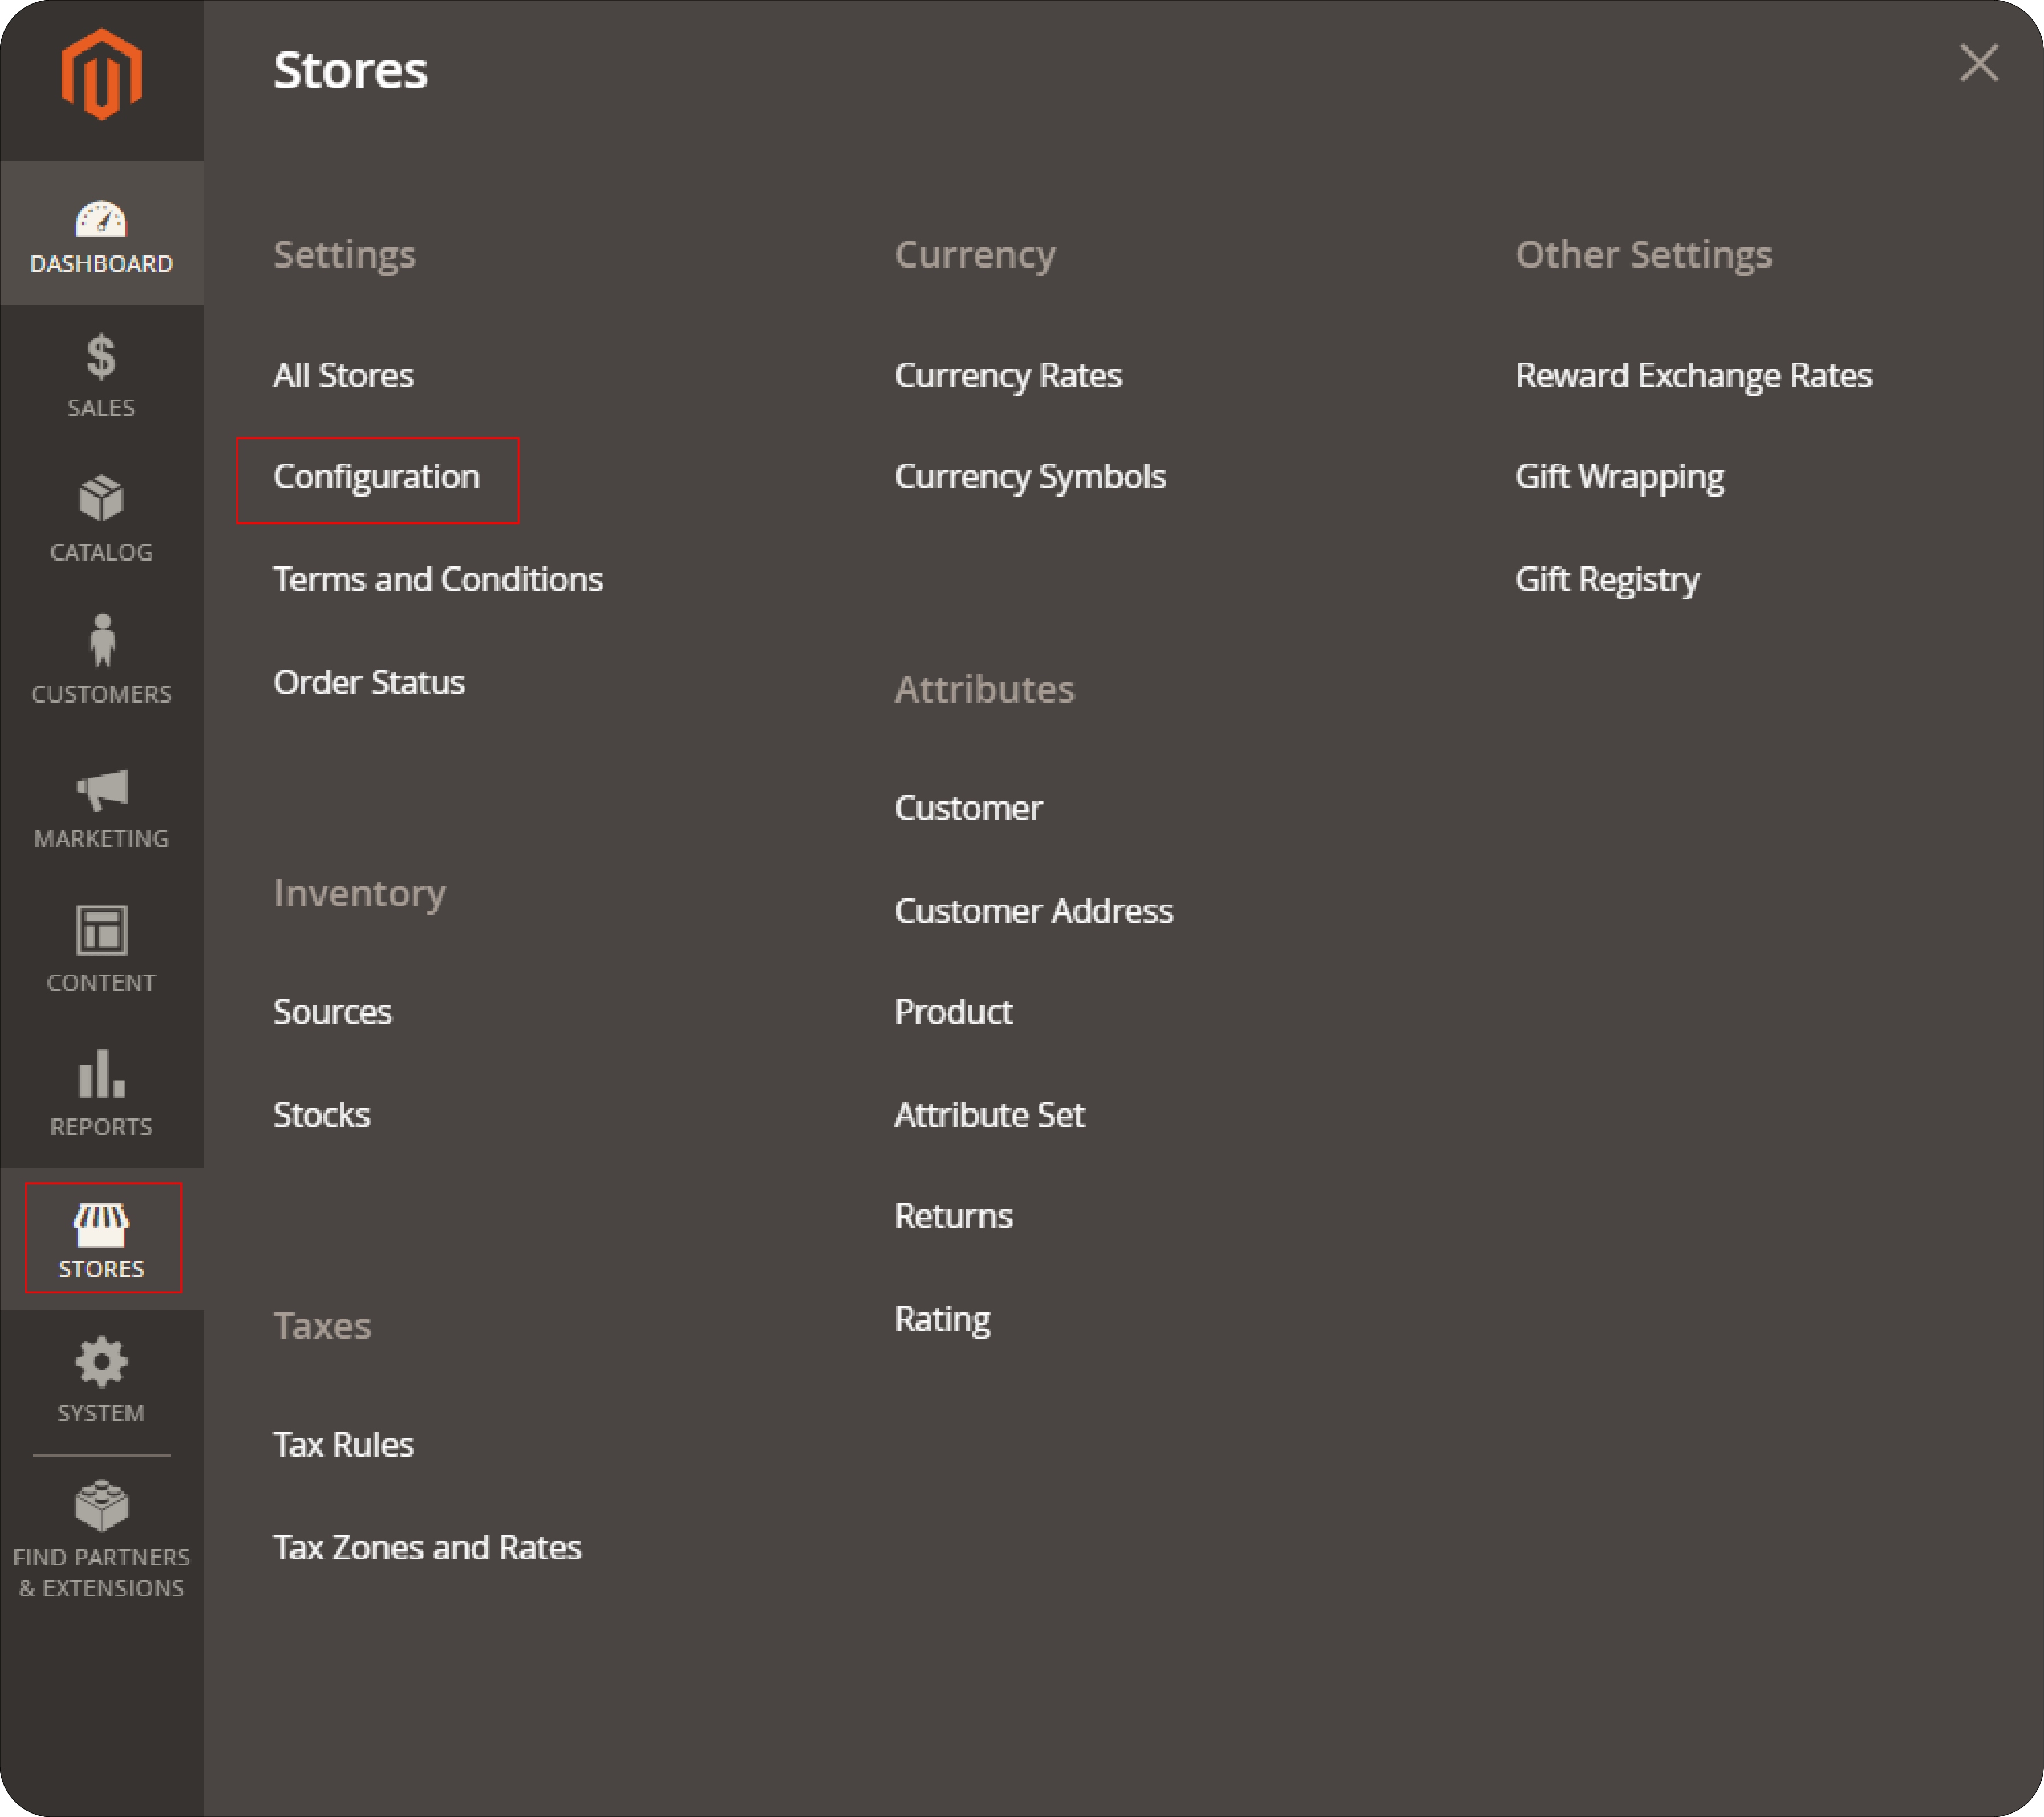
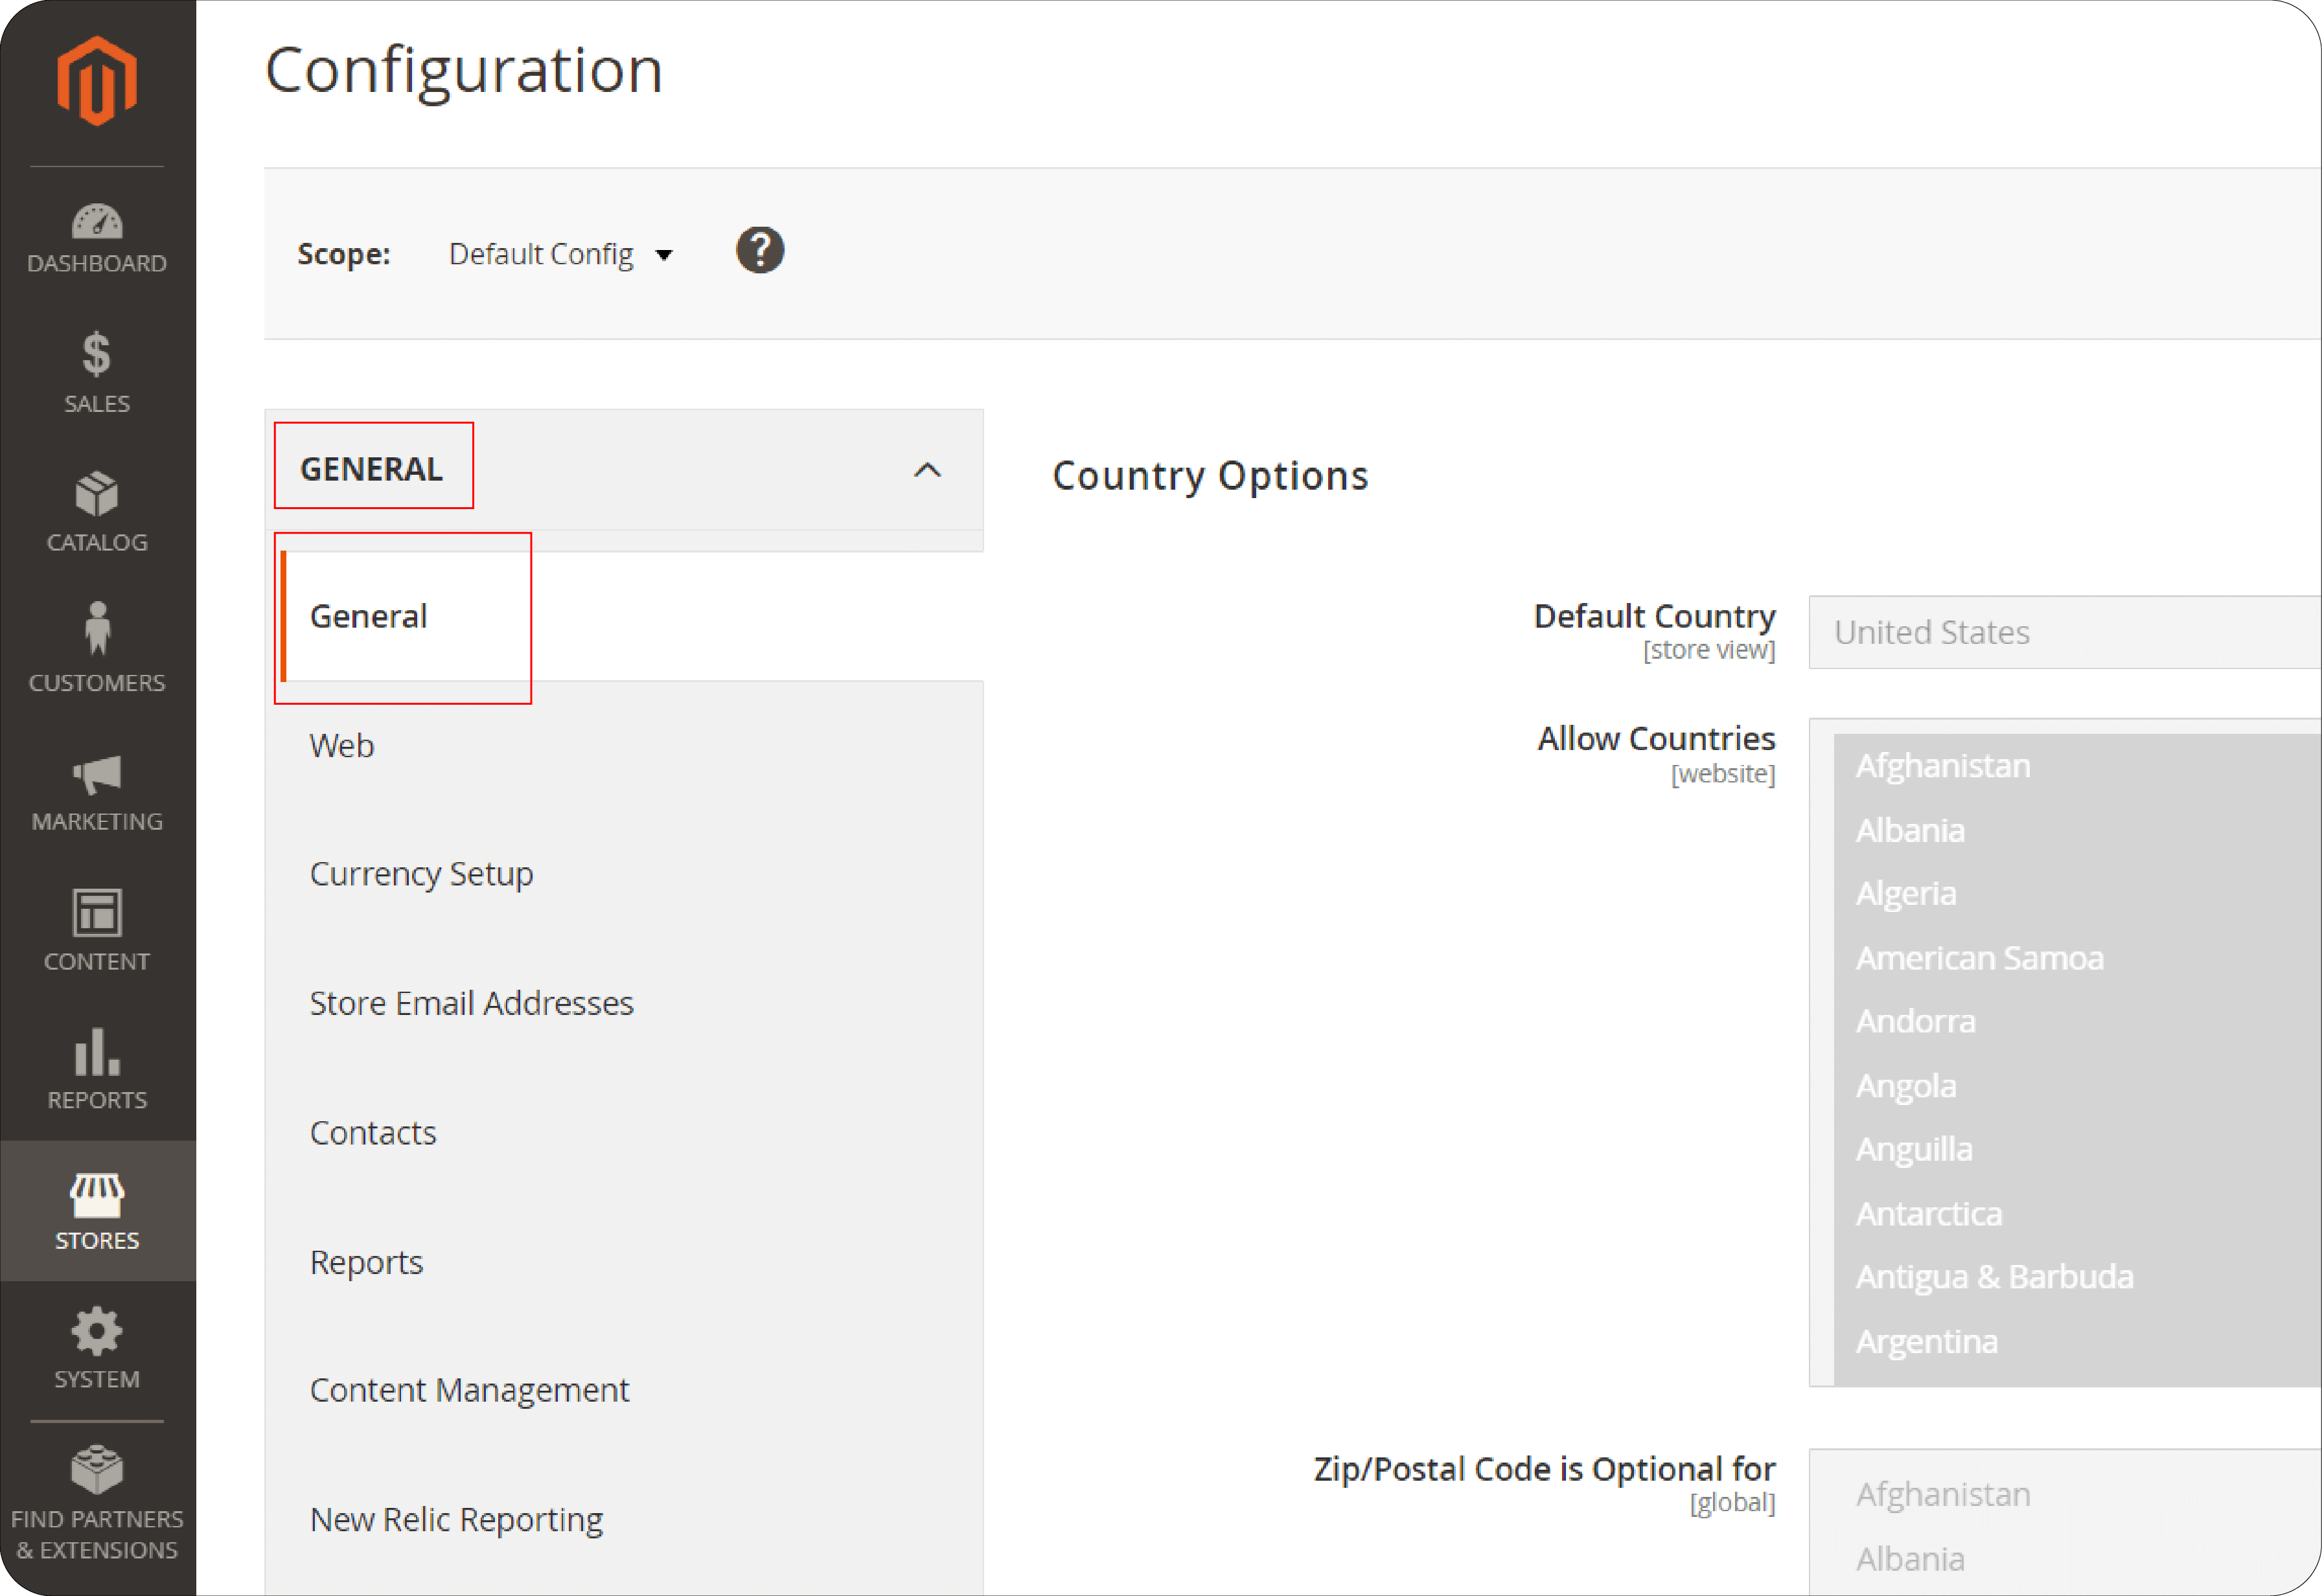
- From the Configuration menu, under General, select the General option again.
- Scroll to the Store Information section and expand it.
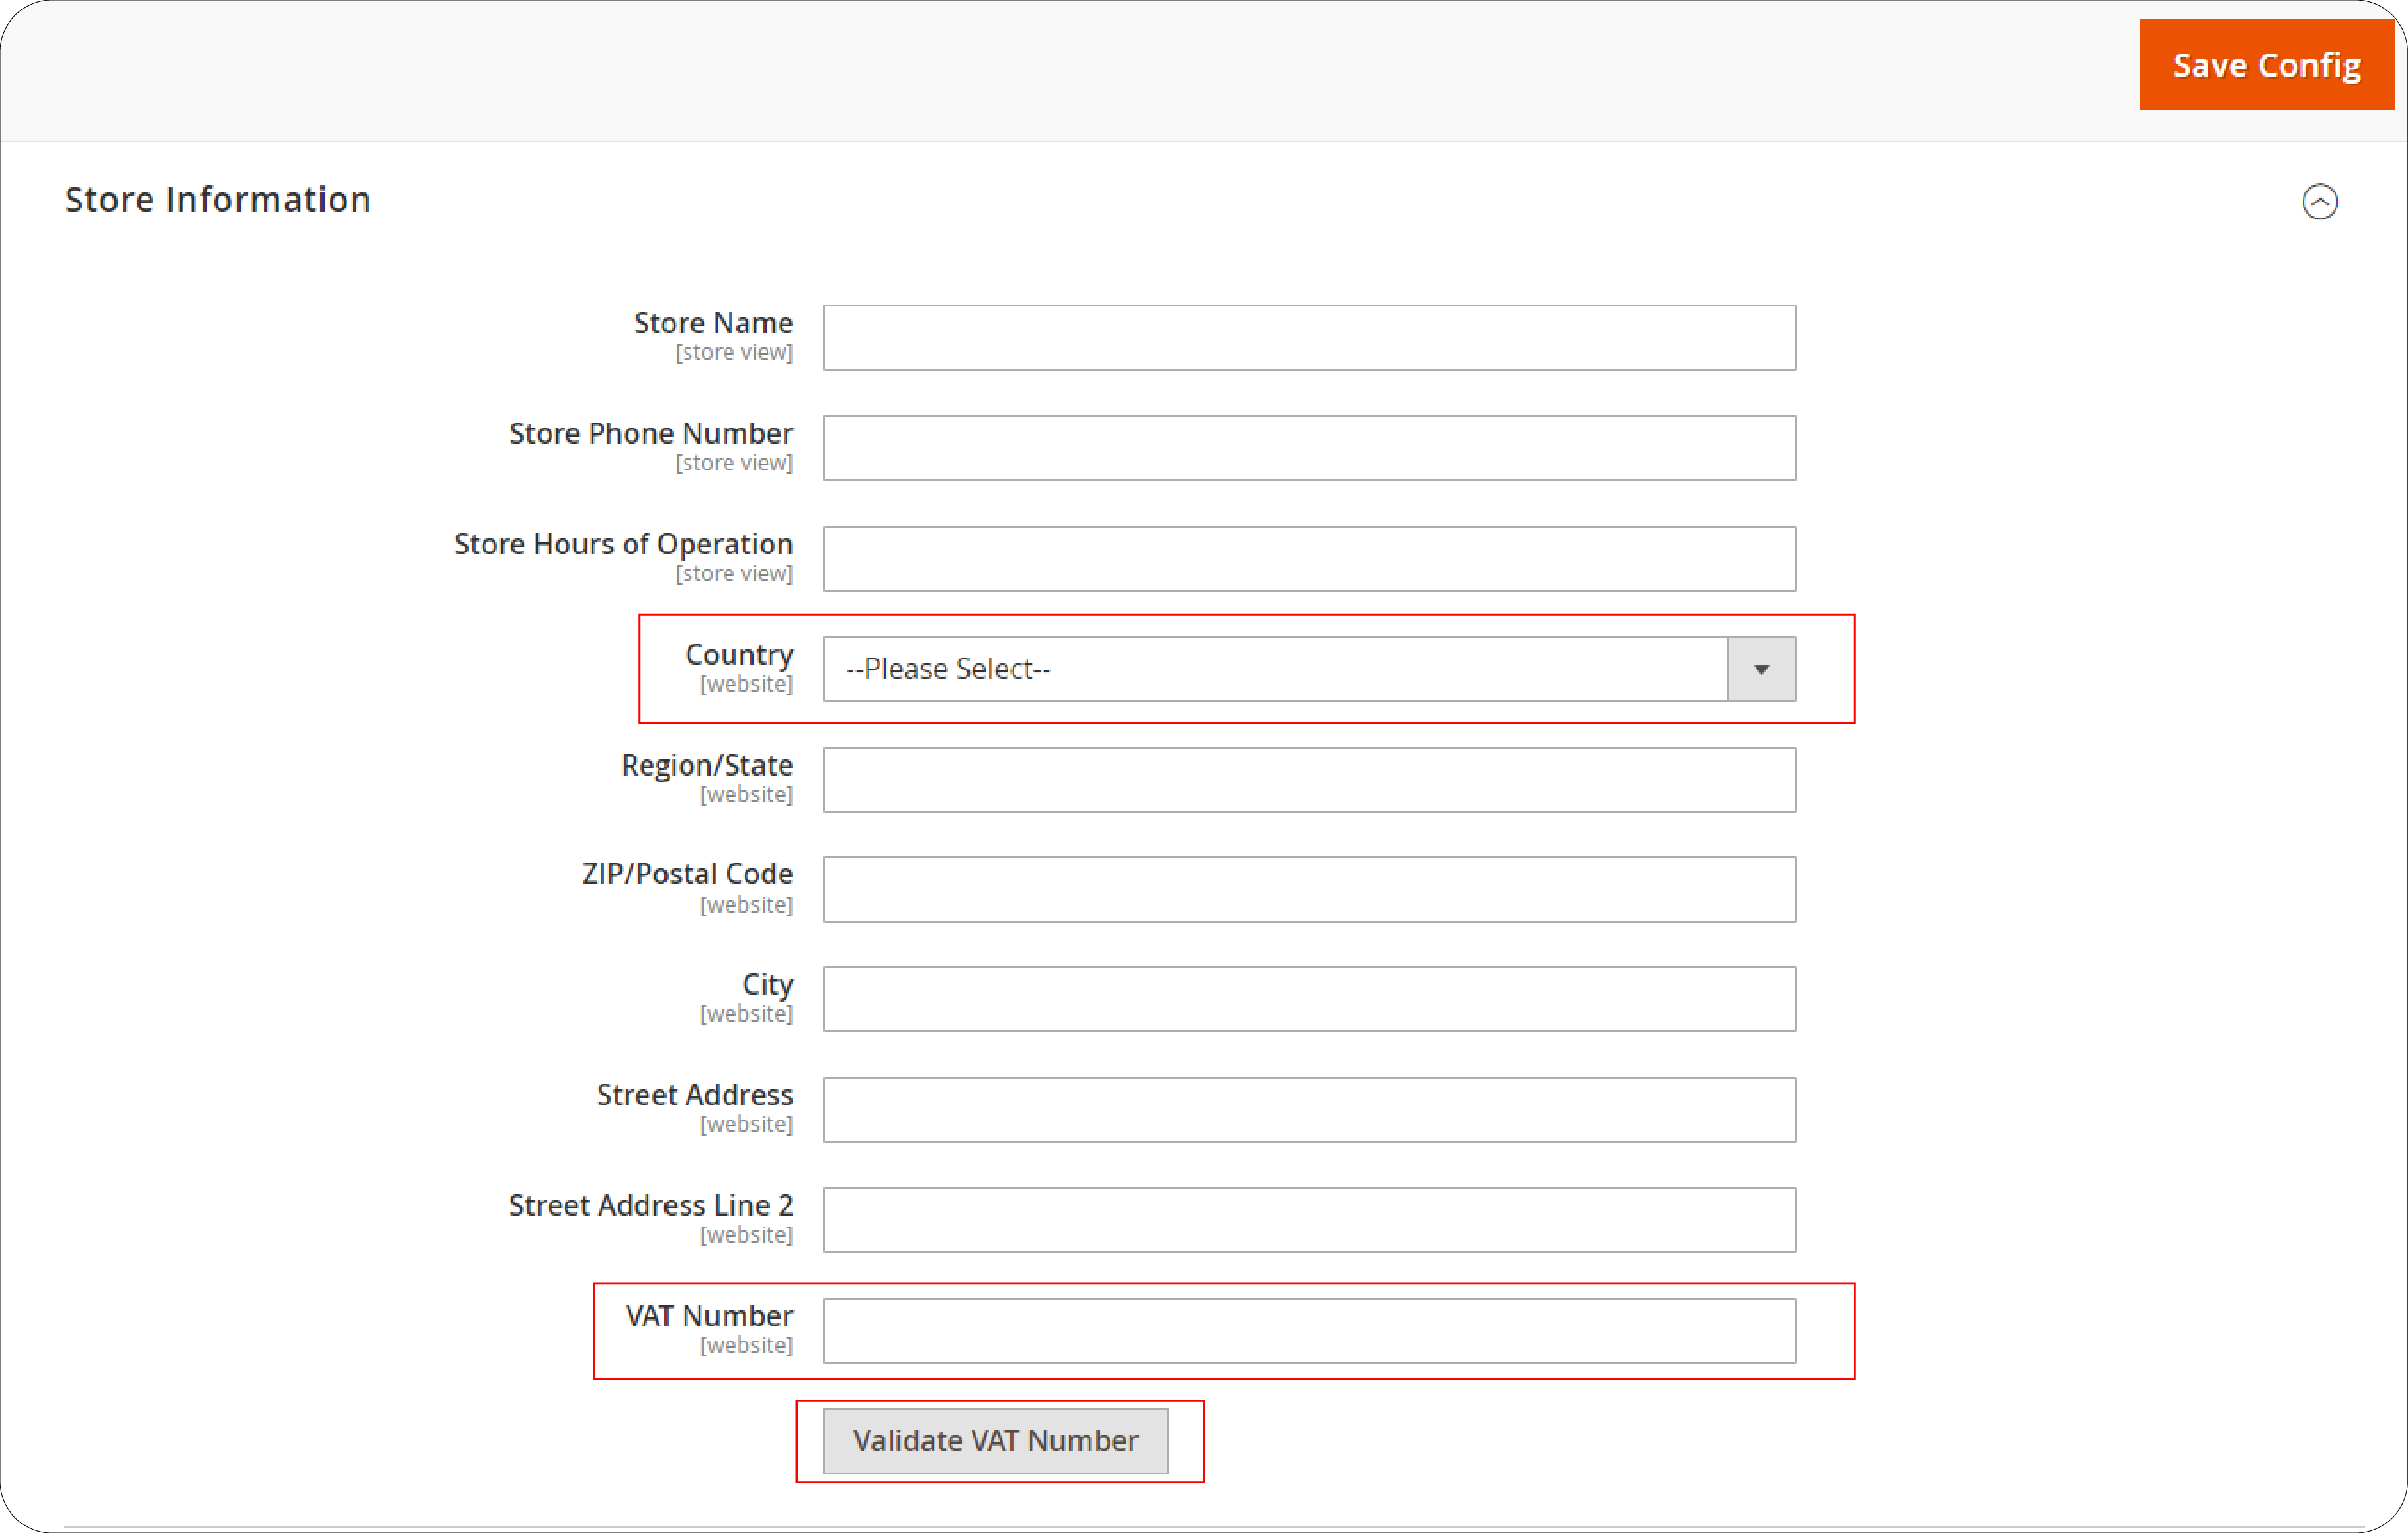
-
Here, Select your Country from the dropdown menu.
-
Next, Enter your VAT Number in the designated field. Click the Validate VAT Number button to check its validity. The validation result will be displayed instantly.
-
Once you've entered and validated your VAT number, make sure to Save Config to apply your settings.
Step 5: Confirm EU Member Countries Selection
- Go to Stores > Setting> Configuration section, under General. Locate and expand the Countries Options section.
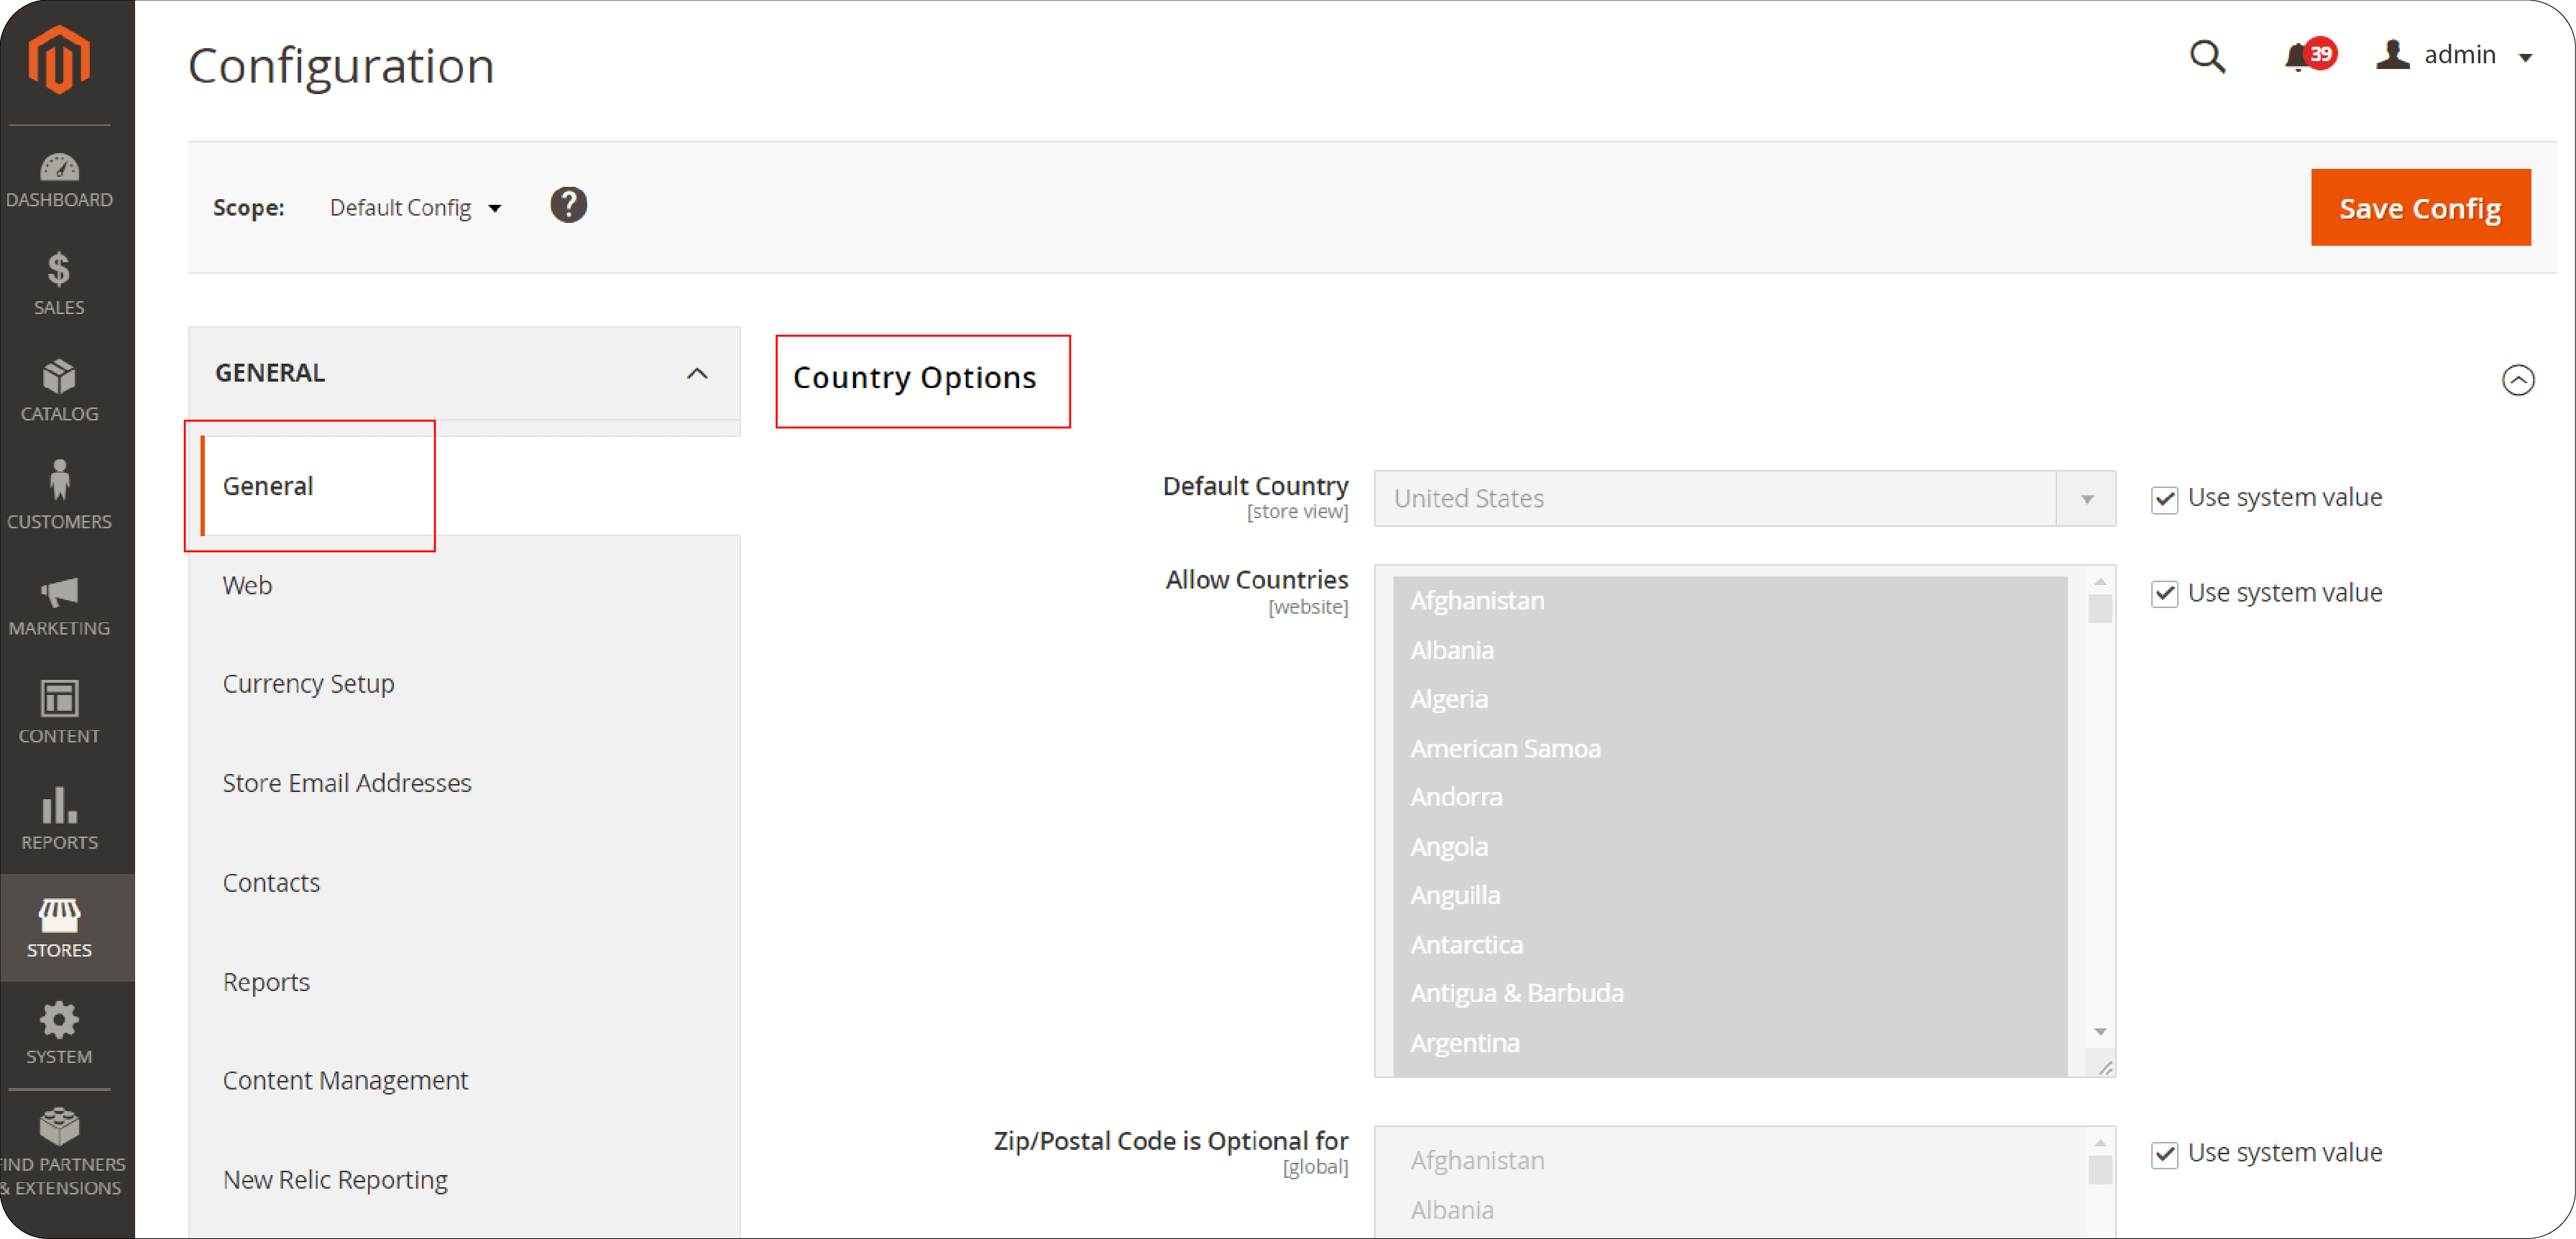
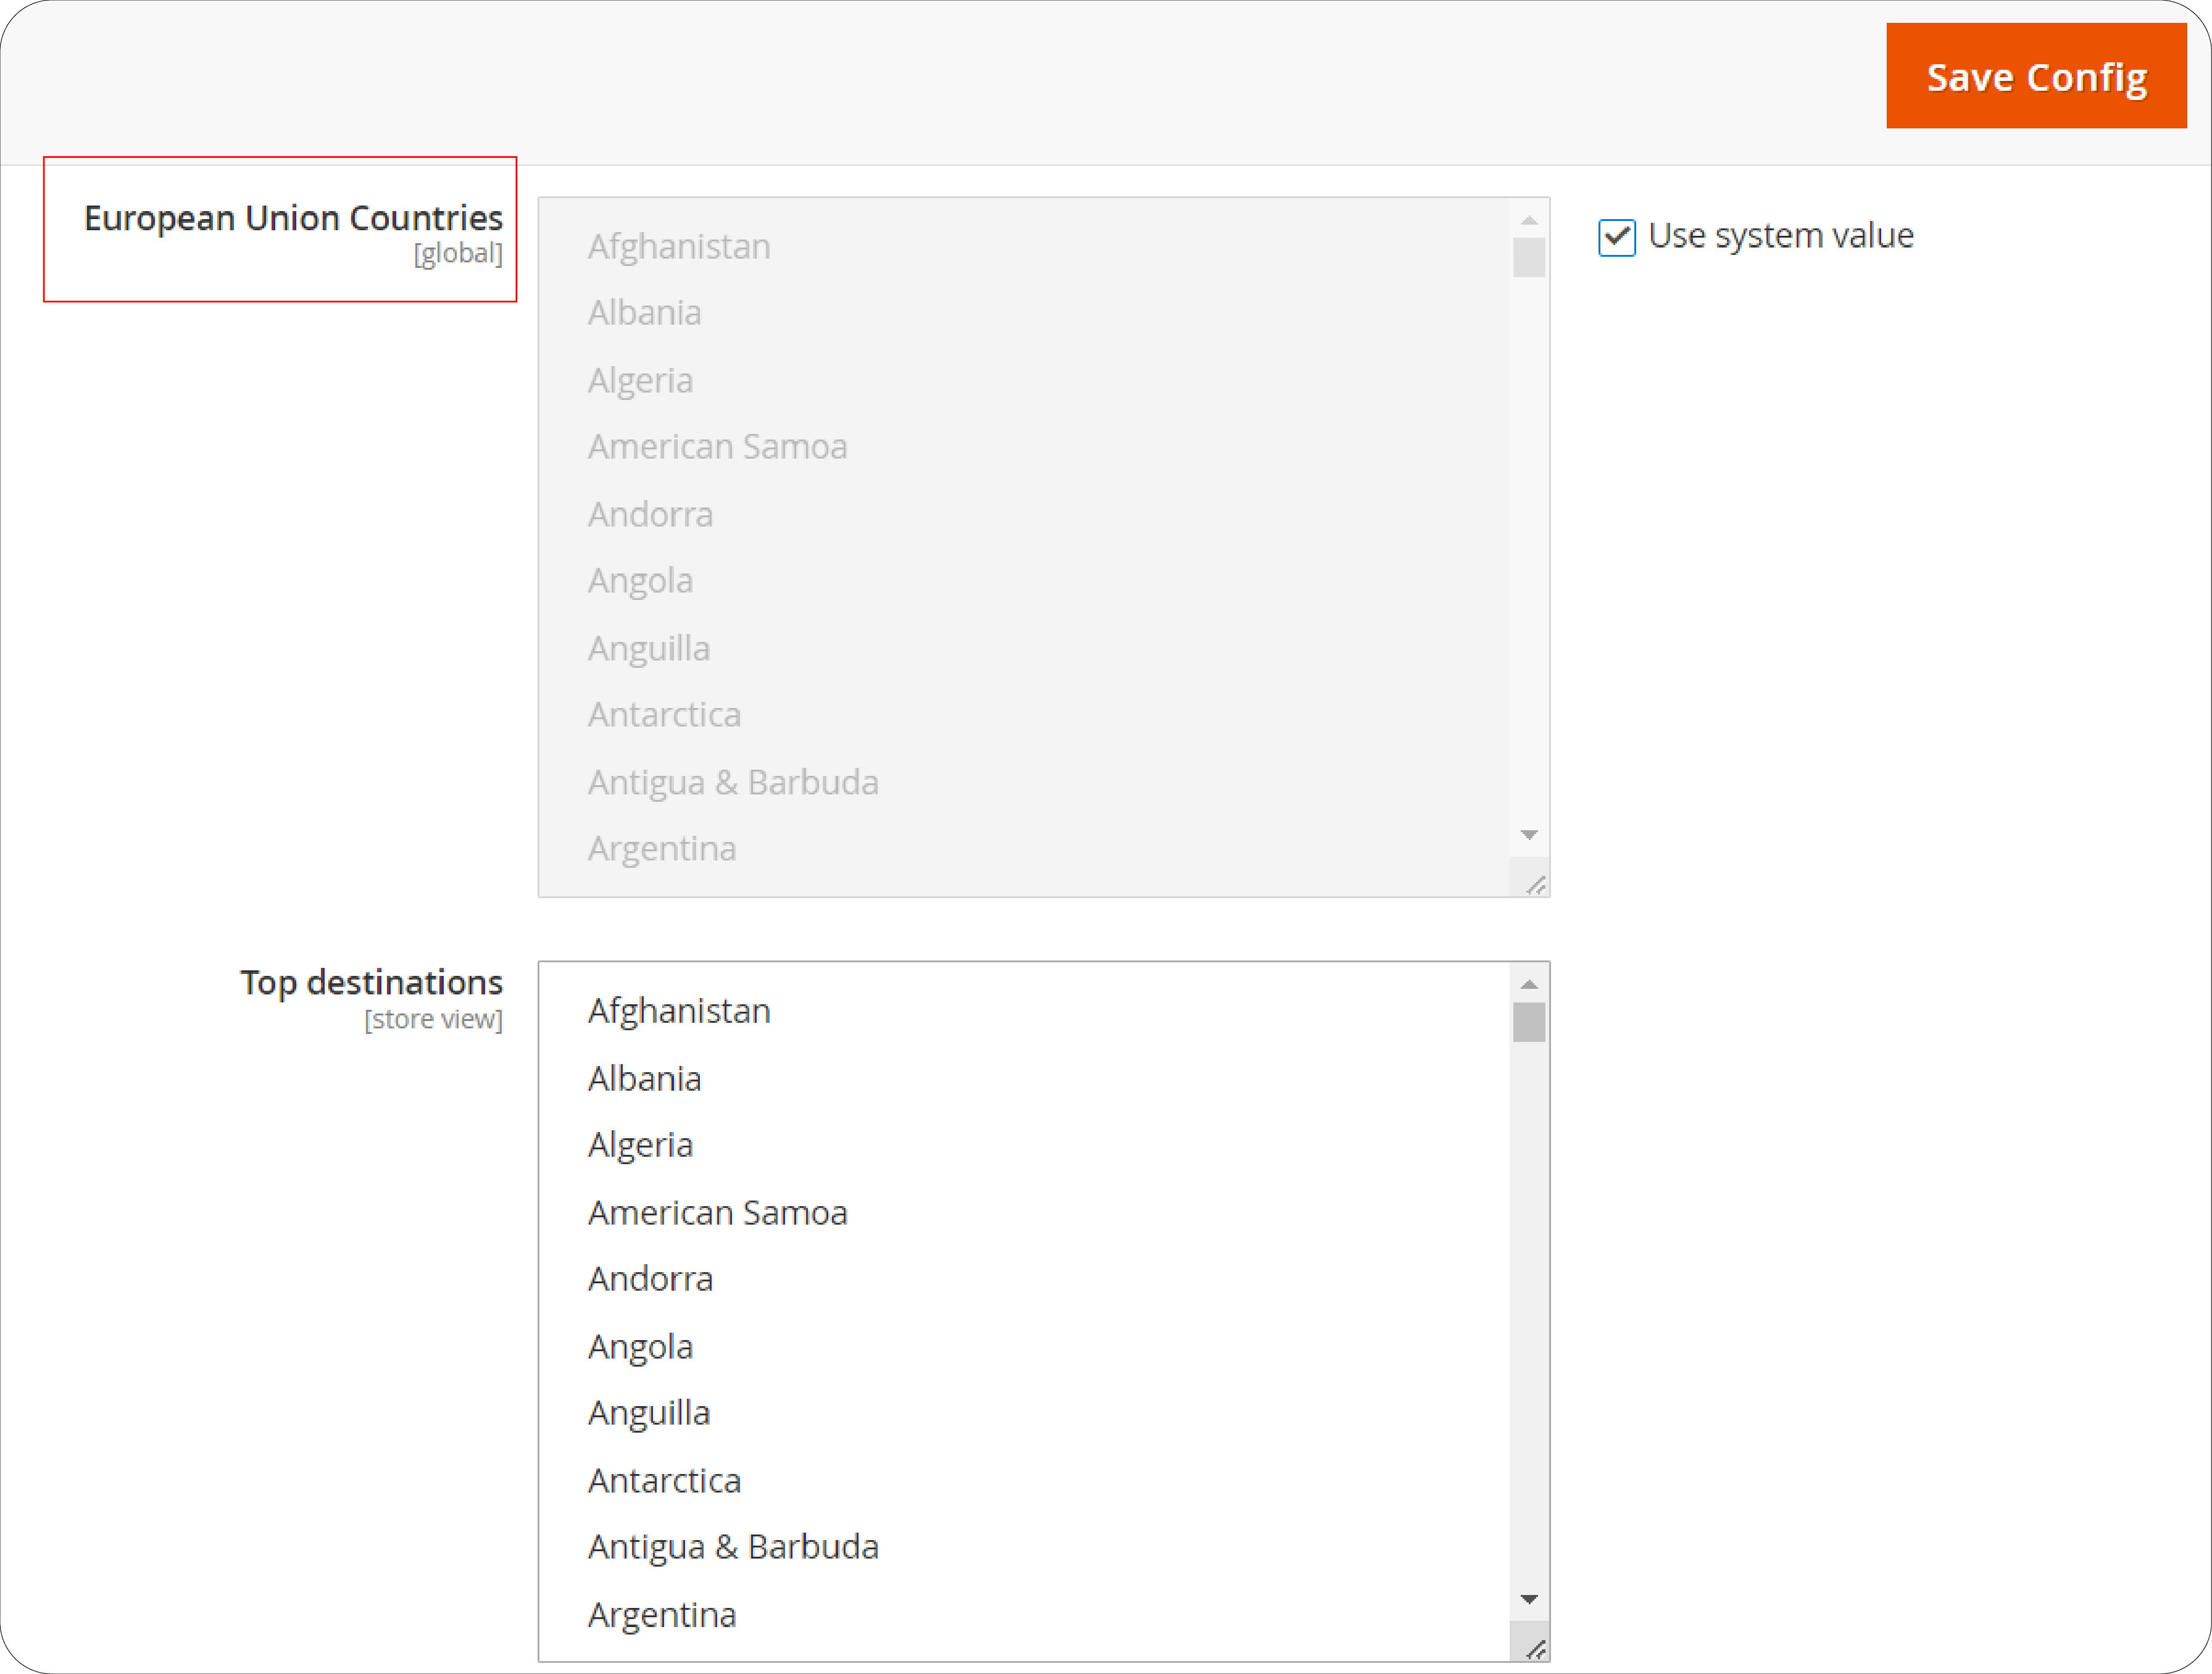
- Scroll to the European Union Countries list. Check to make sure all current EU member countries are included.
-
If you need to update this list, deselect the Use system values checkbox. Then, while holding the Ctrl key (PC) or Command key (Mac), click to select or deselect countries.
-
After making any necessary adjustments, click Save Config to finalize your changes.
FAQs
1. What is Magento 2 VAT number validation?
Magento 2 VAT number validation is a feature that allows store owners to validate VAT numbers during the checkout process. It ensures Magento compliance by verifying VAT numbers in real time. It is based on the locations of both the merchant and the customer.
2. How can I enable VAT number validation in Magento 2?
To enable VAT number validation in Magento 2, you need to navigate to the configuration settings in your Magento 2 store. From there, you can set up the VAT ID validation by configuring customer groups, tax classes, rates, and rules related to VAT.
3. How do I set up Magento 2 VAT number validation?
Setting up Magento 2 VAT number validation involves configuring customer groups, tax classes, rates, and rules. Additionally, you must activate VAT ID validation settings in the Magento 2 admin panel. It ensures VAT numbers are validated during checkout.
4. Can I show VAT numbers on my Magento 2 store?
Yes, you can choose to show VAT numbers on your Magento 2 store. You can enable the option in the configuration settings. It allows customers to input their VAT numbers during registration or checkout for validation.
5. How do I use Magento 2 VAT number validation?
To use Magento 2 VAT number validation, you need to configure the settings in your Magento 2 store. It enables VAT ID validation during checkout. It ensures that VAT numbers entered by customers are validated in real time to ensure tax compliance.
6. Where can I learn more about Magento 2 VAT number validation?
You can learn more about the solution for Magento 2 VAT number validation by referring to the official Magento documentation. You can also seek assistance from Magento experts. Additionally, you can explore online resources and forums for tips and best practices.
7. How does Magento 2 validate VAT numbers for external payment methods?
Magento 2 validates VAT numbers during orders using external payment methods by recording details like the VAT request identifier and the date of the request. It is found in the Comments History of the order. The “Validate on Each Transaction” setting doesn't apply in these cases, and the customer's group remains unchanged during checkout.
Summary
Magento 2 VAT Number validation feature is essential for EU merchants looking to streamline their checkout process and ensure tax compliance. By following these five simple steps, you can:
-
Create customer groups that reflect your buyers' VAT status.
-
Define tax classes, rates, and rules that map to your customer groups.
-
Enable VAT ID validation in your store configuration.
-
Enter your VAT ID and country for seamless validation.
-
Confirm your list of EU countries for accurate tax application.
Explore reliable Magento managed hosting solutions to ensure smooth and efficient operation of Magento 2 VAT Number Validation on your online store.


