
ACL In Magento 2: Access Control Lists and Permissions
Are you looking to enhance your admin control in Magento 2? ACL in Magento 2 helps manage and restrict access within the admin panel.
This tutorial will cover the features and integration steps of ACL in Magento 2.
Key Takeaways
- Create and configure access rights for ACL rules.
- Add new roles and limit users to access to specific modules.
- Use ACL rules to authorize orders to restrict.
- Troubleshoot common "call that object" issues in Magento ACL.
- Best Practices for accessing control rules with a control list.
-
6 Steps To Secure Web API Endpoints To Create Custom Resources In Magento 2
-
2 Steps To Execute The Product Quantity Update API In Magento
-
Best Practices For Accessing Control Rules With New ACL Rules
What Is ACL In Magento 2?
ACL in Magento 2 is a security system that manages permissions for admin users.
By using ACL, you can assign specific roles and permissions to various users. You can ensure that each user only has access to the resources they need to perform their job. It allows store owners to control what different admin users can see and do in the admin panel. ACL rules in Magento 2 are defined in the acl.xml file within a module. These rules determine which resources are accessible to different user roles.
ACL rules enable an admin to restrict user permissions within their eCommerce system. It ensures that users can only make changes in areas they are responsible for.
For instance, ACL rules can be used to grant specific users access to certain features. Examples include menus, controllers, or API endpoints based on their role. Customer support staff may only have access to the customer and order sections. However, sales staff may have access to both these sections and the marketing section.
Features Of ACL In Magento
1. Granular Permission Control
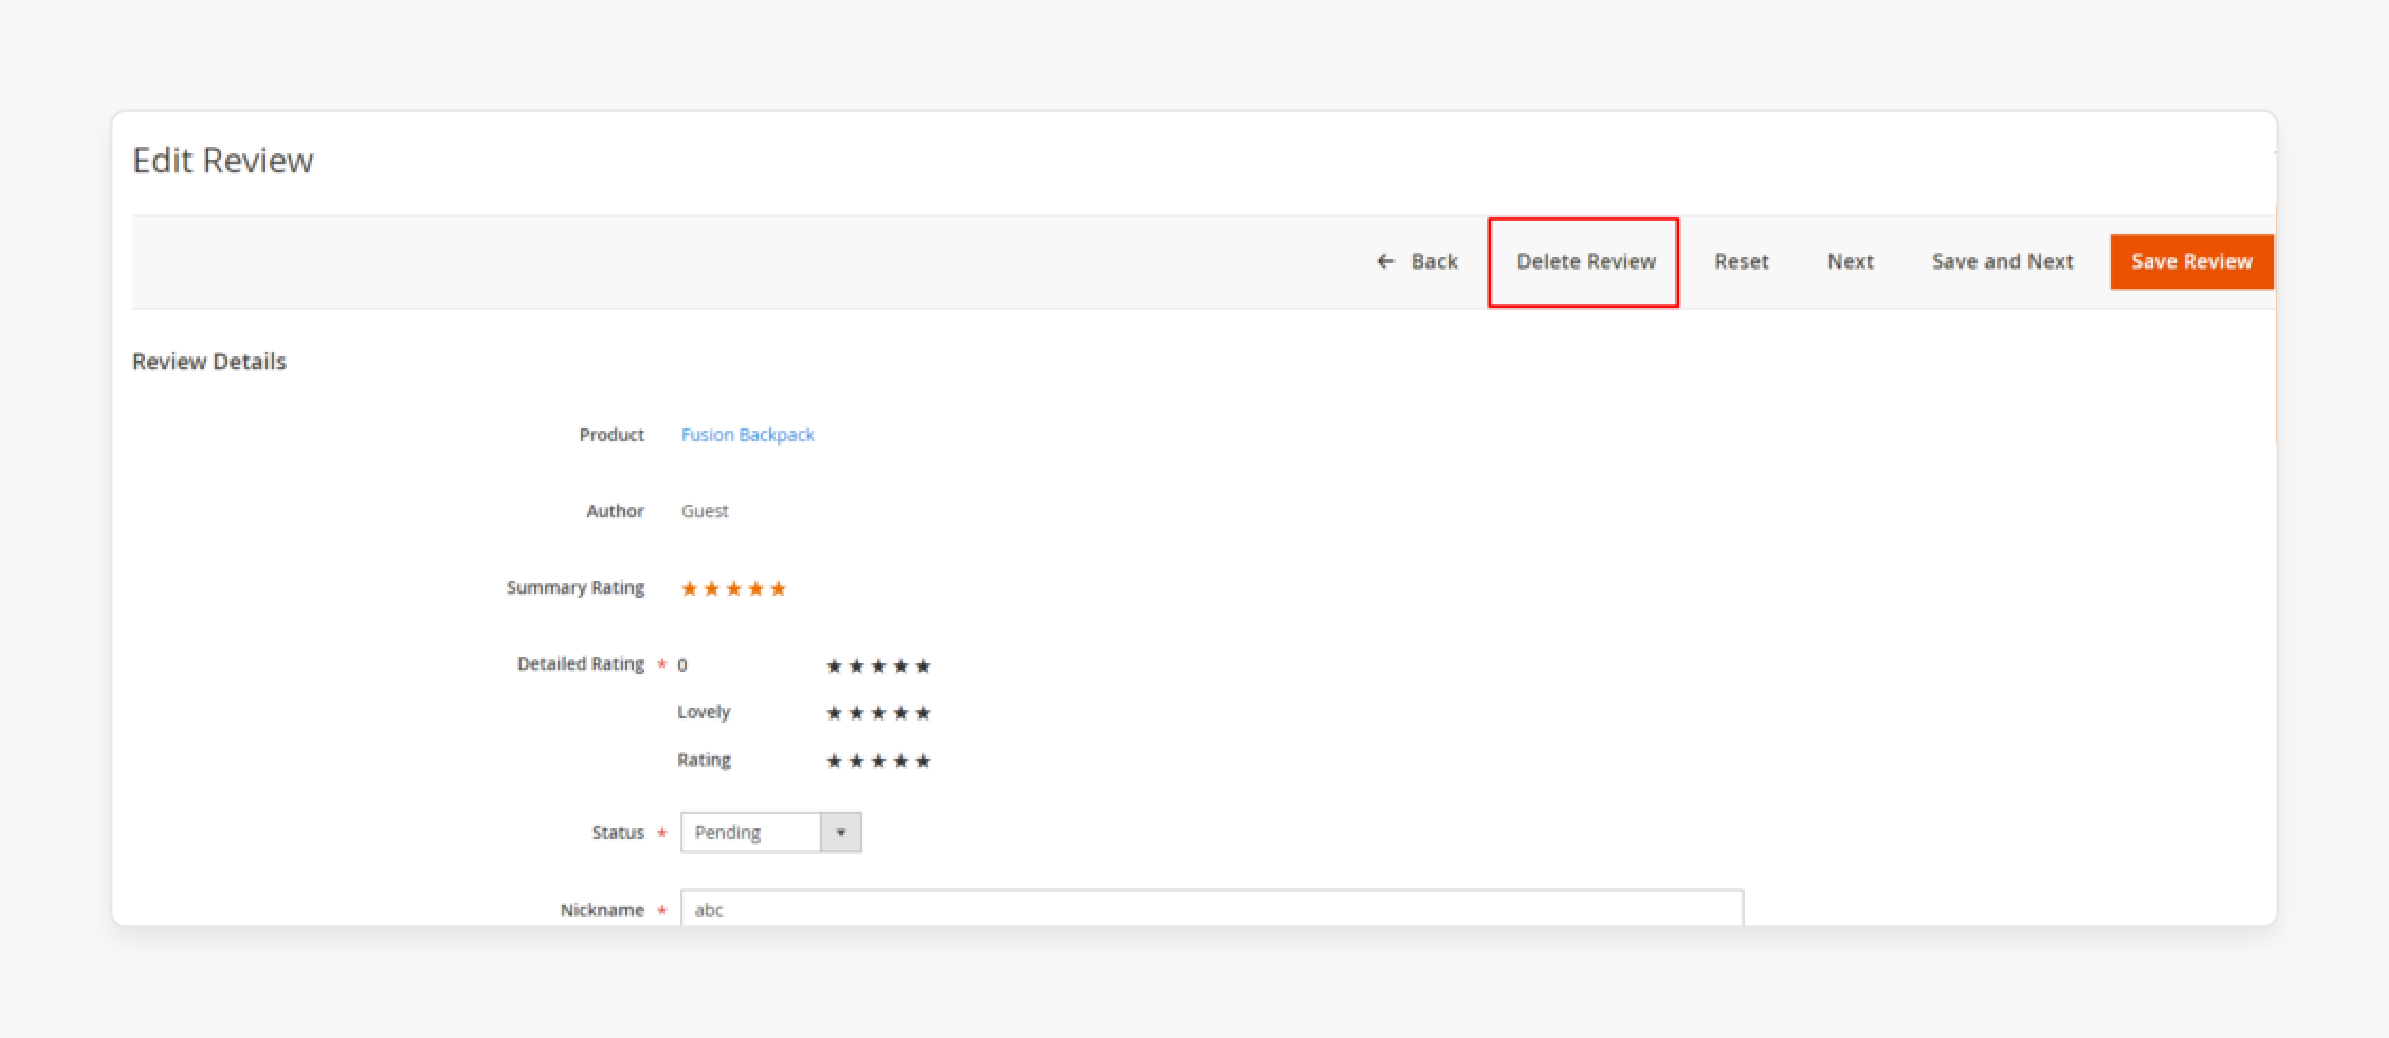
ACL allows you to define permissions at various levels - from broad sections. For example, "Manage Products" to specific actions like "Delete Product Reviews". This granularity means you can tailor each user's access precisely to their job role. It reduces the risk of accidental changes or deliberate misuse.
2. Hierarchical Structure
Magento 2's ACL is structured hierarchically, mirroring the admin panel's organization. Thus, it makes it intuitive to set up and manage permissions as they cascade down from parent to child resources.
For example, granting access to "Catalog" automatically includes sub-sections like "Products" and "Categories" unless explicitly restricted.
3. Dynamic UI Adaptation
When a user logs in, the admin panel dynamically adapts based on their permissions. Menu items, buttons, and even form fields they don't have access to are hidden. It not only enhances Magento security but also simplifies the user interface for each admin. It also reduces confusion and potential errors.
4. Role-Based Access Control (RBAC)
ACL rules in Magento 2 allow for the implementation of RBAC. You can create roles that align with job functions. For example,
- Content Manager
- Order Processor
- Inventory Manager
Assign permissions to these roles rather than individual users. This approach:
i. Simplifies user management
ii. Ensures consistency in permissions across similar job functions. iii. Makes it easier to audit and adjust permissions as your business processes evolve.
5. Separation of Duties
ACL rules allow you to enforce the principle of separation of duties, a key security concept. For example, you can ensure that the person who creates invoices cannot also approve them. This, in turn, reduces the risk of fraud.
6. Compliance Support
For businesses in regulated industries, ACL rules maintain compliance with standards. Examples include PCI DSS or GDPR. You can restrict access to sensitive customer data only to those employees who need it. You can then maintain logs of who accessed what.
7. Customization for Multi-Store Setups
In Magento 2 multi-store environments, ACL rules can be used to create store-specific roles. It allows you to have managers for specific stores. It is useful for those who will be able only to access and modify content for their assigned store. It enhances security and prevents cross-store errors.
How ACL Works In Magento Backend Menu?
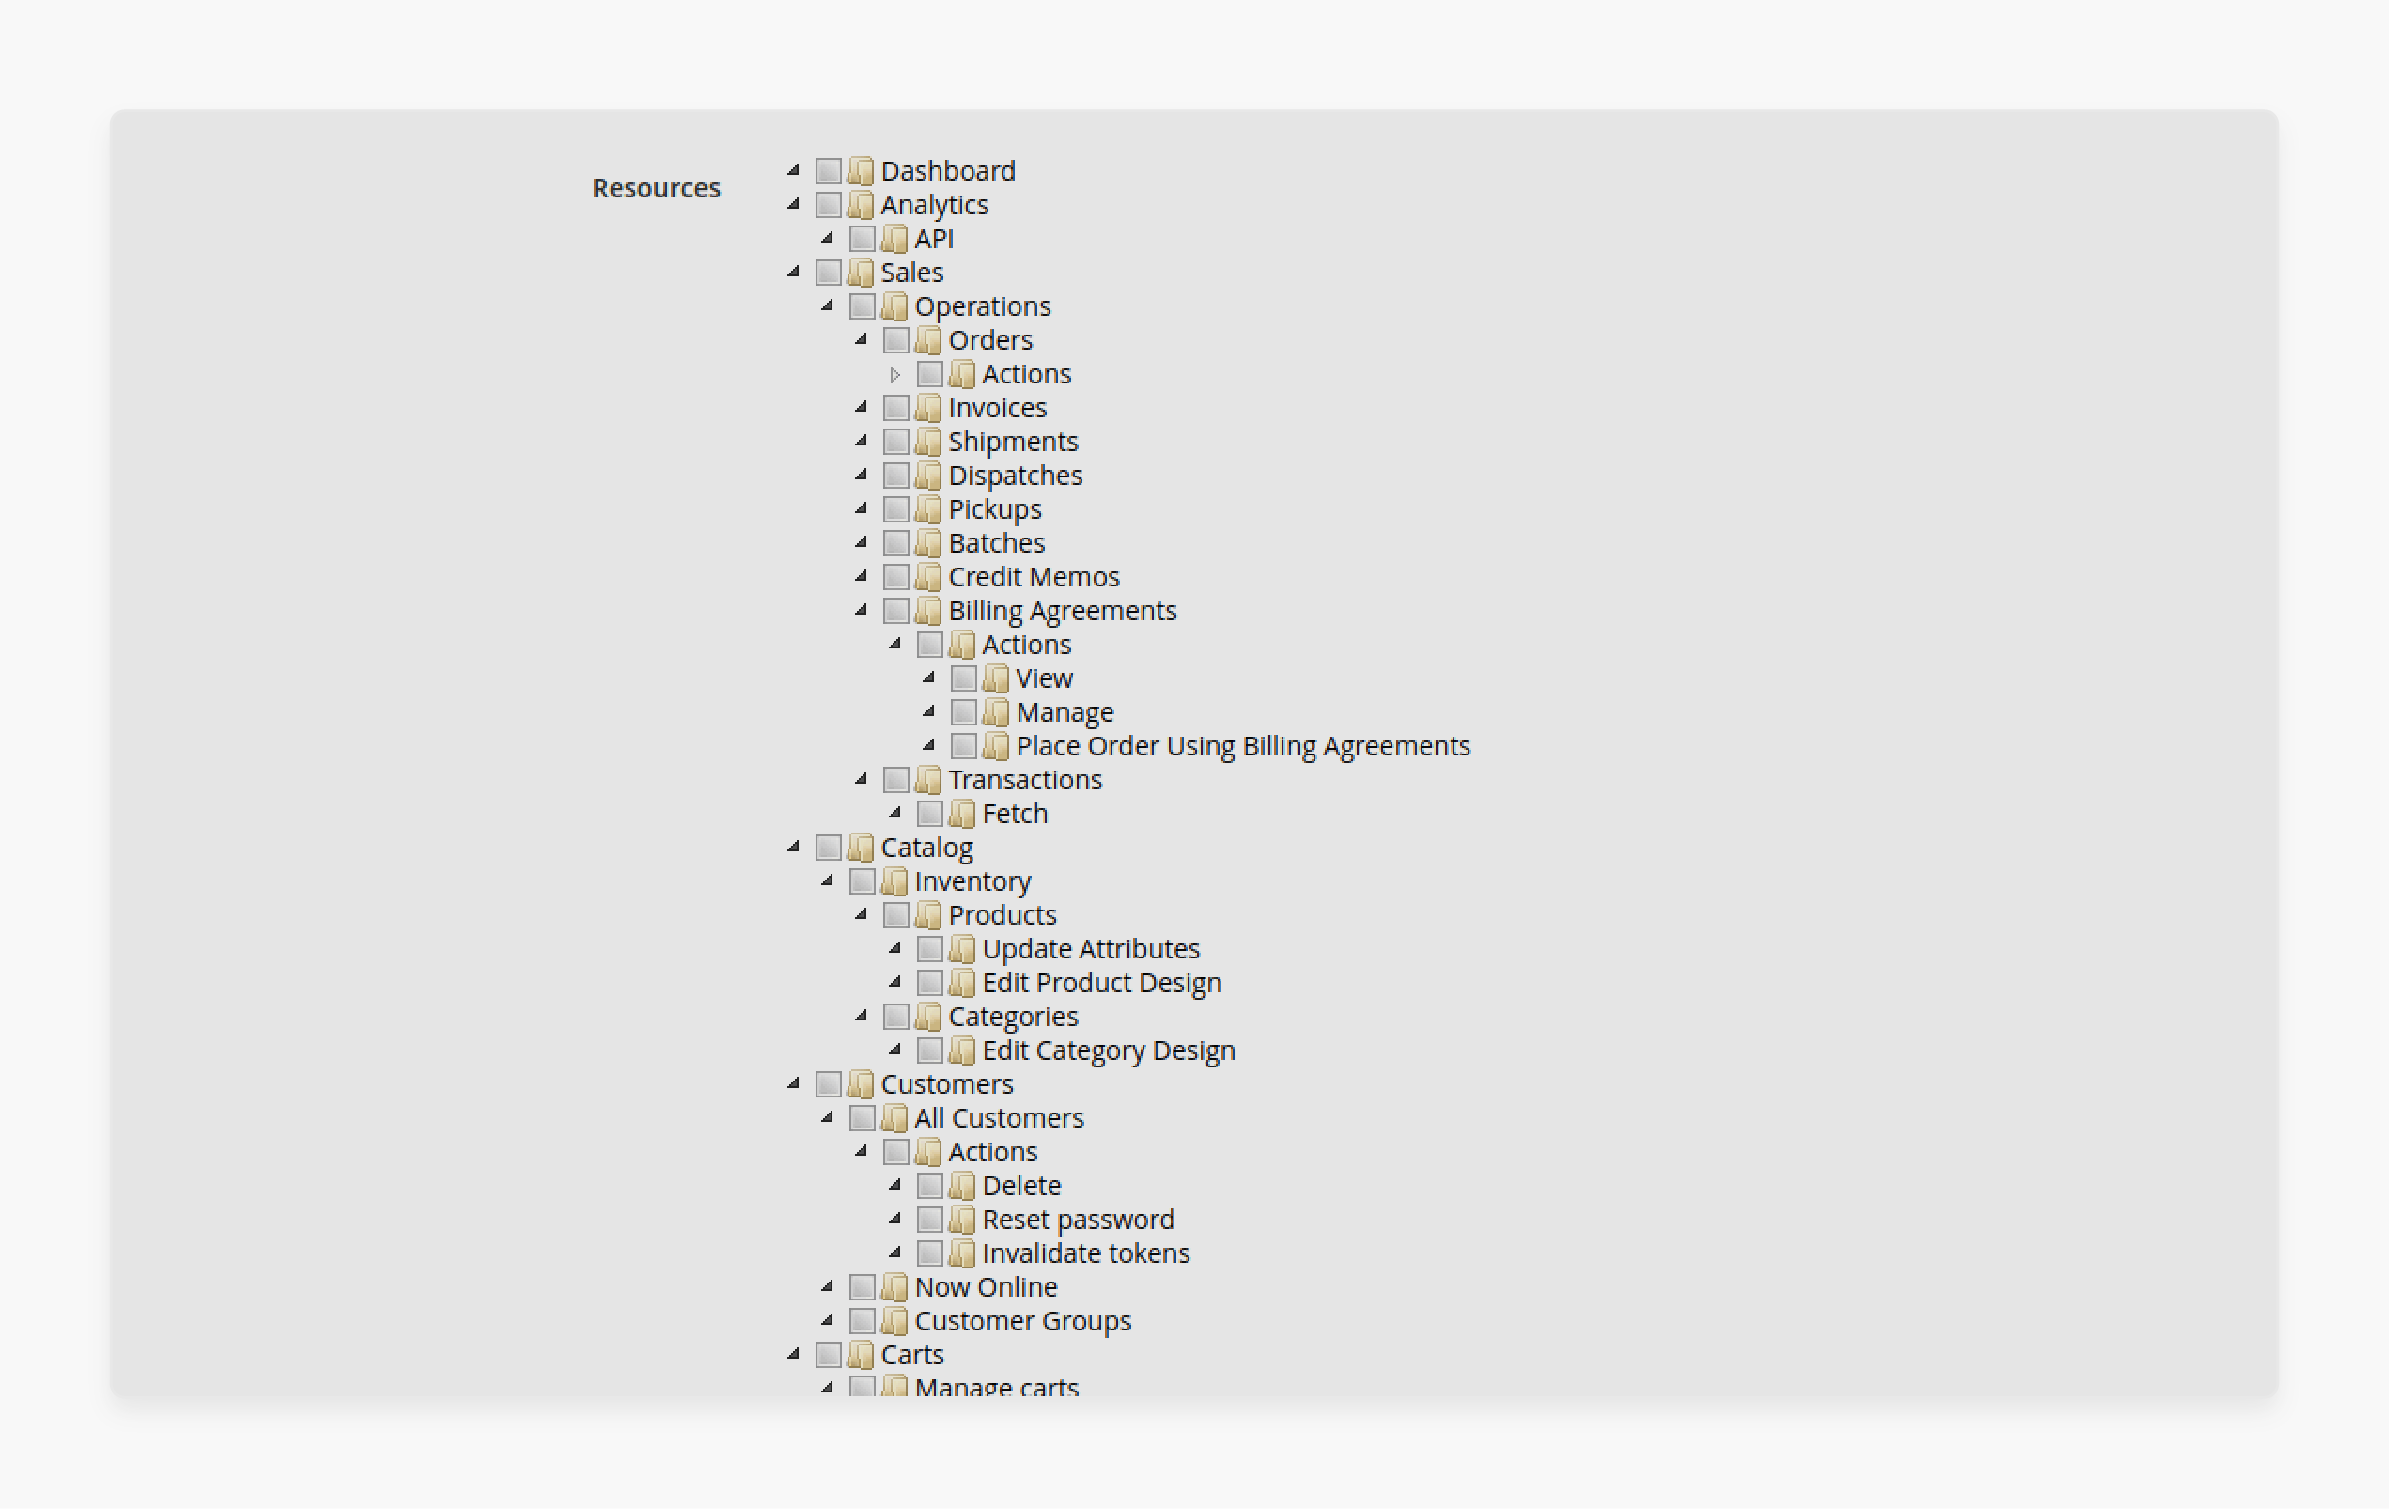
When a user logs in to a system, the authorization system immediately applies rules. These rules determine what actions the user is permitted to perform. The system owner can:
- Define resources (areas of the system)
- Create unlimited logical roles with specific permissions
- Assign a set of Access Control List (ACL) rules to each role.
An access control rule defines the specific permissions granted to users within the system. It can be configured in System > User Roles > Add/Edit Role > Role Resources.
1. Magento 2 ACL Resource
Each ACL rule controls access to a specific system feature. Configure a set of rules that align with the roles needed to operate your online store effectively.
To add ACL rules to your module:
-
Controller Access: Your admin application controller must implement an
_isAllowedmethod. You can also define a constantADMIN_RESOURCE. It determines if a user can access the URL endpoint. - Menu Item: Each menu item requires a specific ACL rule to control its visibility for the logged-in user. Configuration fields in System > Configuration also require specific ACL rules.
- Custom Rules: Additional rules specific to your module can be added. These rules will help check current users against specific permissions. Look up existing rule IDs and create custom ACL rules.
2. Define Custom Resources
- Ensure your new module is registered and tested before adding resources.
- To register a resource in your system, use the
acl.xmlfile located inapp/code/{vendor}/{module}/etc/acl.xml. - Each resource is defined as a child of
Magento_Backend::admin. - Resources have an ID, title, and sort order attribute, for example:
- ID: A unique string used as the identifier for this resource. It is used in defining resources in the Admin menu, configuration. It is also used to limit access to your module controller.
- Title: Displayed in the menu bar.
- Sort Order: Determines the position of the menu item.
- Flush Magento cache and verify the results in the resource tree.
3. Apply ACL Rules
- Admin Menu: ACL resources can hide menu items if the store owner does not permit access.
For example, add an ACL resource to a custom menu in app/code/Vendor/HelloWorld/etc/adminhtml/menu.xml:
<add id="Vendor_HelloWorld::helloworld" title="Hello World" module="Vendor_HelloWorld" sortOrder="51" resource="Vendor_HelloWorld::helloworld"/>
-
System Configuration: Use ACL resources to control access to specific sections. Add the following code to
app/code/Vendor/HelloWorld/etc/adminhtml/system.xml: -
Controller Authorization: Magento provides the
Magento\Framework\AuthorizationInterface. It is used to validate the currently logged in user against a specific ACL in admin controllers. Use the$this->_authorizationvariable to check resources:
For example, in vendor/magento/module-customer/Controller/Adminhtml/Index.php:
protected function _isAllowed()
{
return $this->_authorization->isAllowed('Magento_Customer::manage');
}
Alternatively, define admin resources using the const ADMIN_RESOURCE. For instance, in the core Magento 2 shipping module:
const ADMIN_RESOURCE = 'Magento_Sales::shipment';
Using this constant eliminates the need for the _isAllowed method.
When users try to access a feature via URL without the necessary permissions, they will be denied access. It ensures proper security and control.
6 Steps To Secure Web API Endpoints To Create Custom Resources In Magento 2
- Create a
webapi.xmlfile in your extension at the following path:app/code/Vendor/Extension/etc/webapi.xml. - Create an
acl.xmlfile in your extension at the following path:app/code/Vendor/Extension/etc/acl.xml. - Now, create a
di.xmlfile in your extension at the following path:app/code/Vendor/Extension/etc/di.xml. - Create a
ProductUpdateInterface.phpfile in your extension at the following path:app/code/Vendor/Extension/Api/ProductUpdateInterface.php. - Create a
ProductUpdateApi.phpfile in your extension at the following path:app/code/Vendor/Extension/Model/Api/ProductUpdateApi.php. - Revalidate the assigned path and content for webapi.xml and acl.xml.
2 Steps To Execute The Product Quantity Update API In Magento
Step 1: Generate Admin Authorization Token
- Generate an admin authorization token. This token is required to authenticate your requests, such as.
- API Type: POST
-
URL:
{{Base_url}}/rest/all/V1/integration/admin/token - Parameters:
{
"username": "string",
"password": "string"
}
-
Response:
"authorization_token"
Step 2: Execute Product Quantity Update API
Use the authorization token obtained in the previous step to call the Product Quantity Update API.
-
API Type: POST
-
Headers: Authorization: Bearer authorization_token
-
URL:
{{Base_url}}/rest/V1/vendor-extension/updateproductquantity -
Parameters:
{
"productSku": "simple",
"productQty": 10
}
- Response:
{
"status": true,
"message": "Product quantity updated successfully."
}
Note: You need to pass the admin authorization token in the API header to execute this API. If the authorization token is valid, it will return a success response.
3 Steps To Create Access Control List Rules In Magento2
The following table describes the resource attributes that are used here:
| Attribute | Description |
|---|---|
| id | Unique string in the format Vendor_ModuleName::resourceName. |
| title | Title displayed in the menu bar. |
| modules | Module containing the current menu. |
| sortOrder | Position in which the menu is displayed. |
| parents | Another menu that is the parent of the current menu. |
| action | URL of the page displayed after clicking the menu. Format: front_name/controller_path/action. |
| resources | ACL rule to restrict access. |
Step 1: Define Custom Admin User Roles
- Create an
etc/acl.xmlfile in your module to add custom resources to the resource tree.
File: app/code/Vendor/MyModule/etc/acl.xml
- To clear the Magento cache, include the code given below:
bin/magento cache:clean
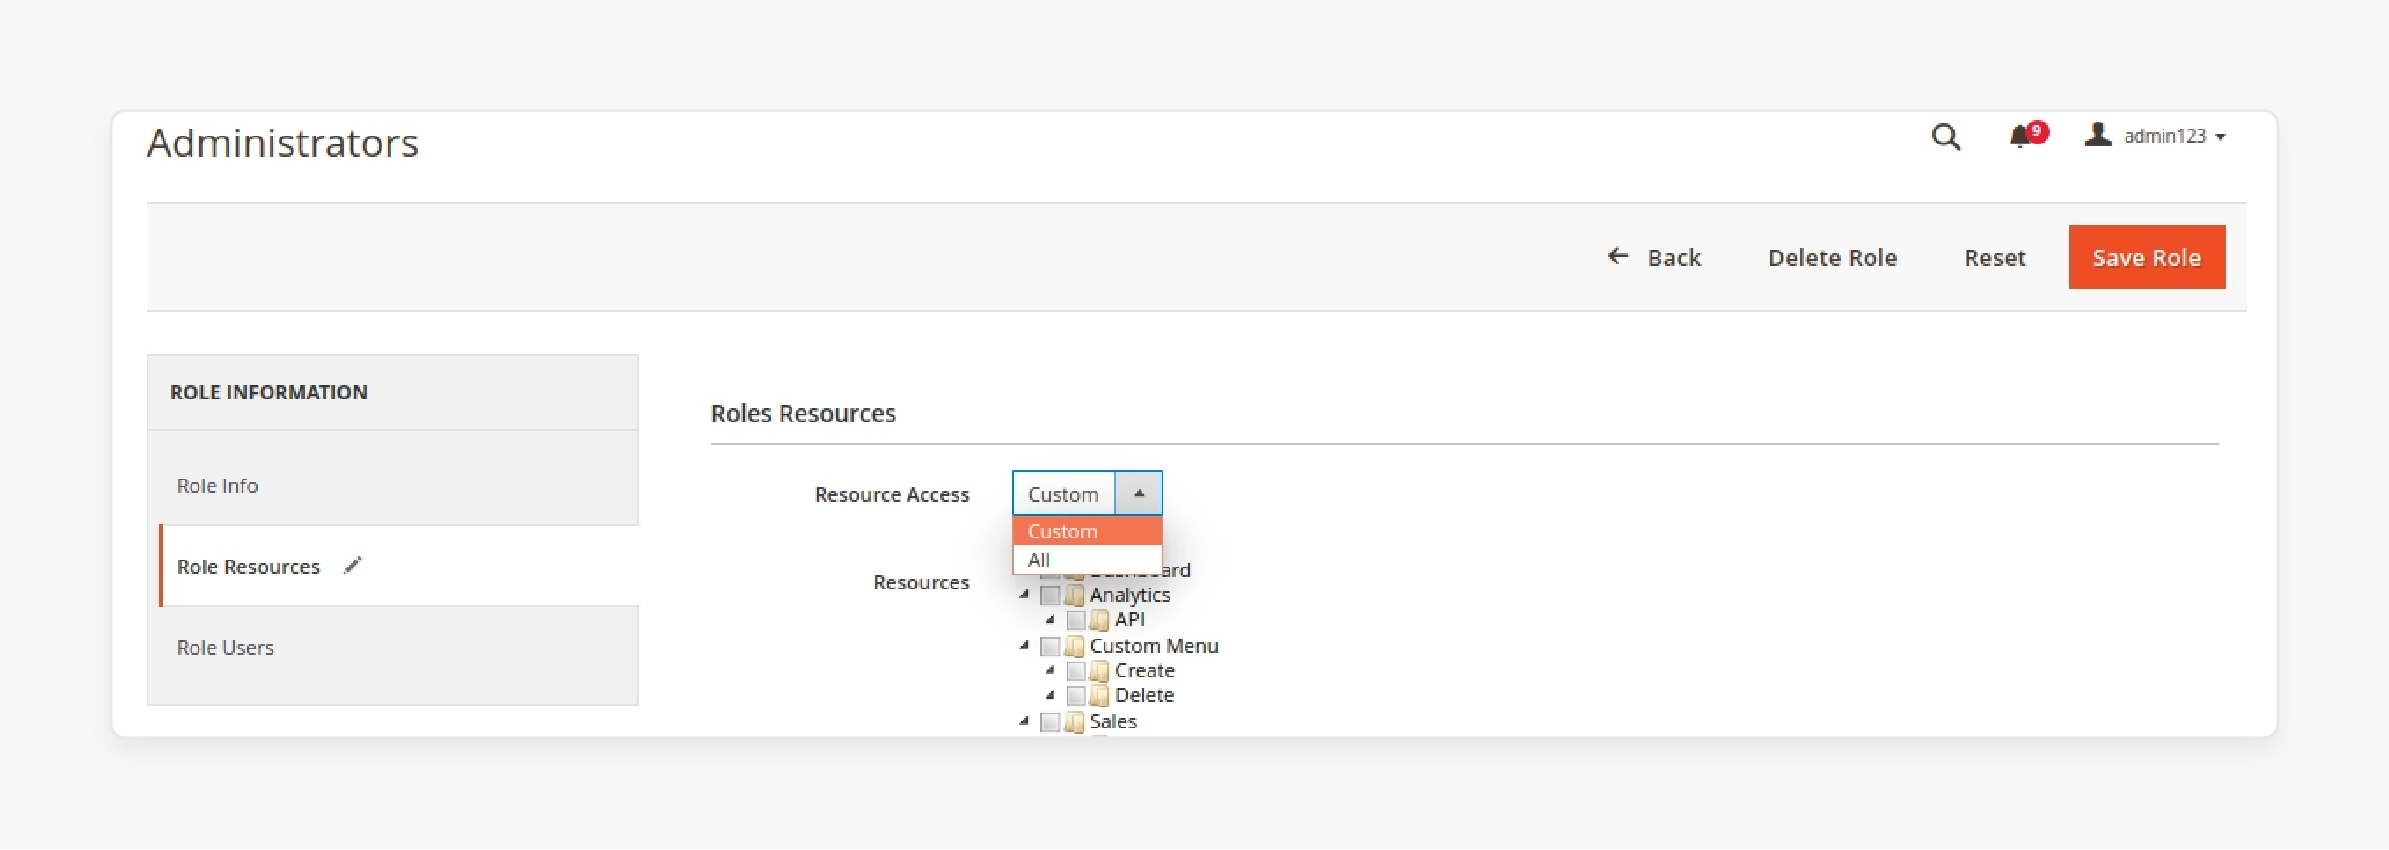
- Navigate to System > Permissions > User Roles.
- Click on the 'Add New Role' button.
- Enter values for "Role Name" and "Your Password".
- Click the 'Role Resources' tab.
- Select 'Resource Access' as Custom.
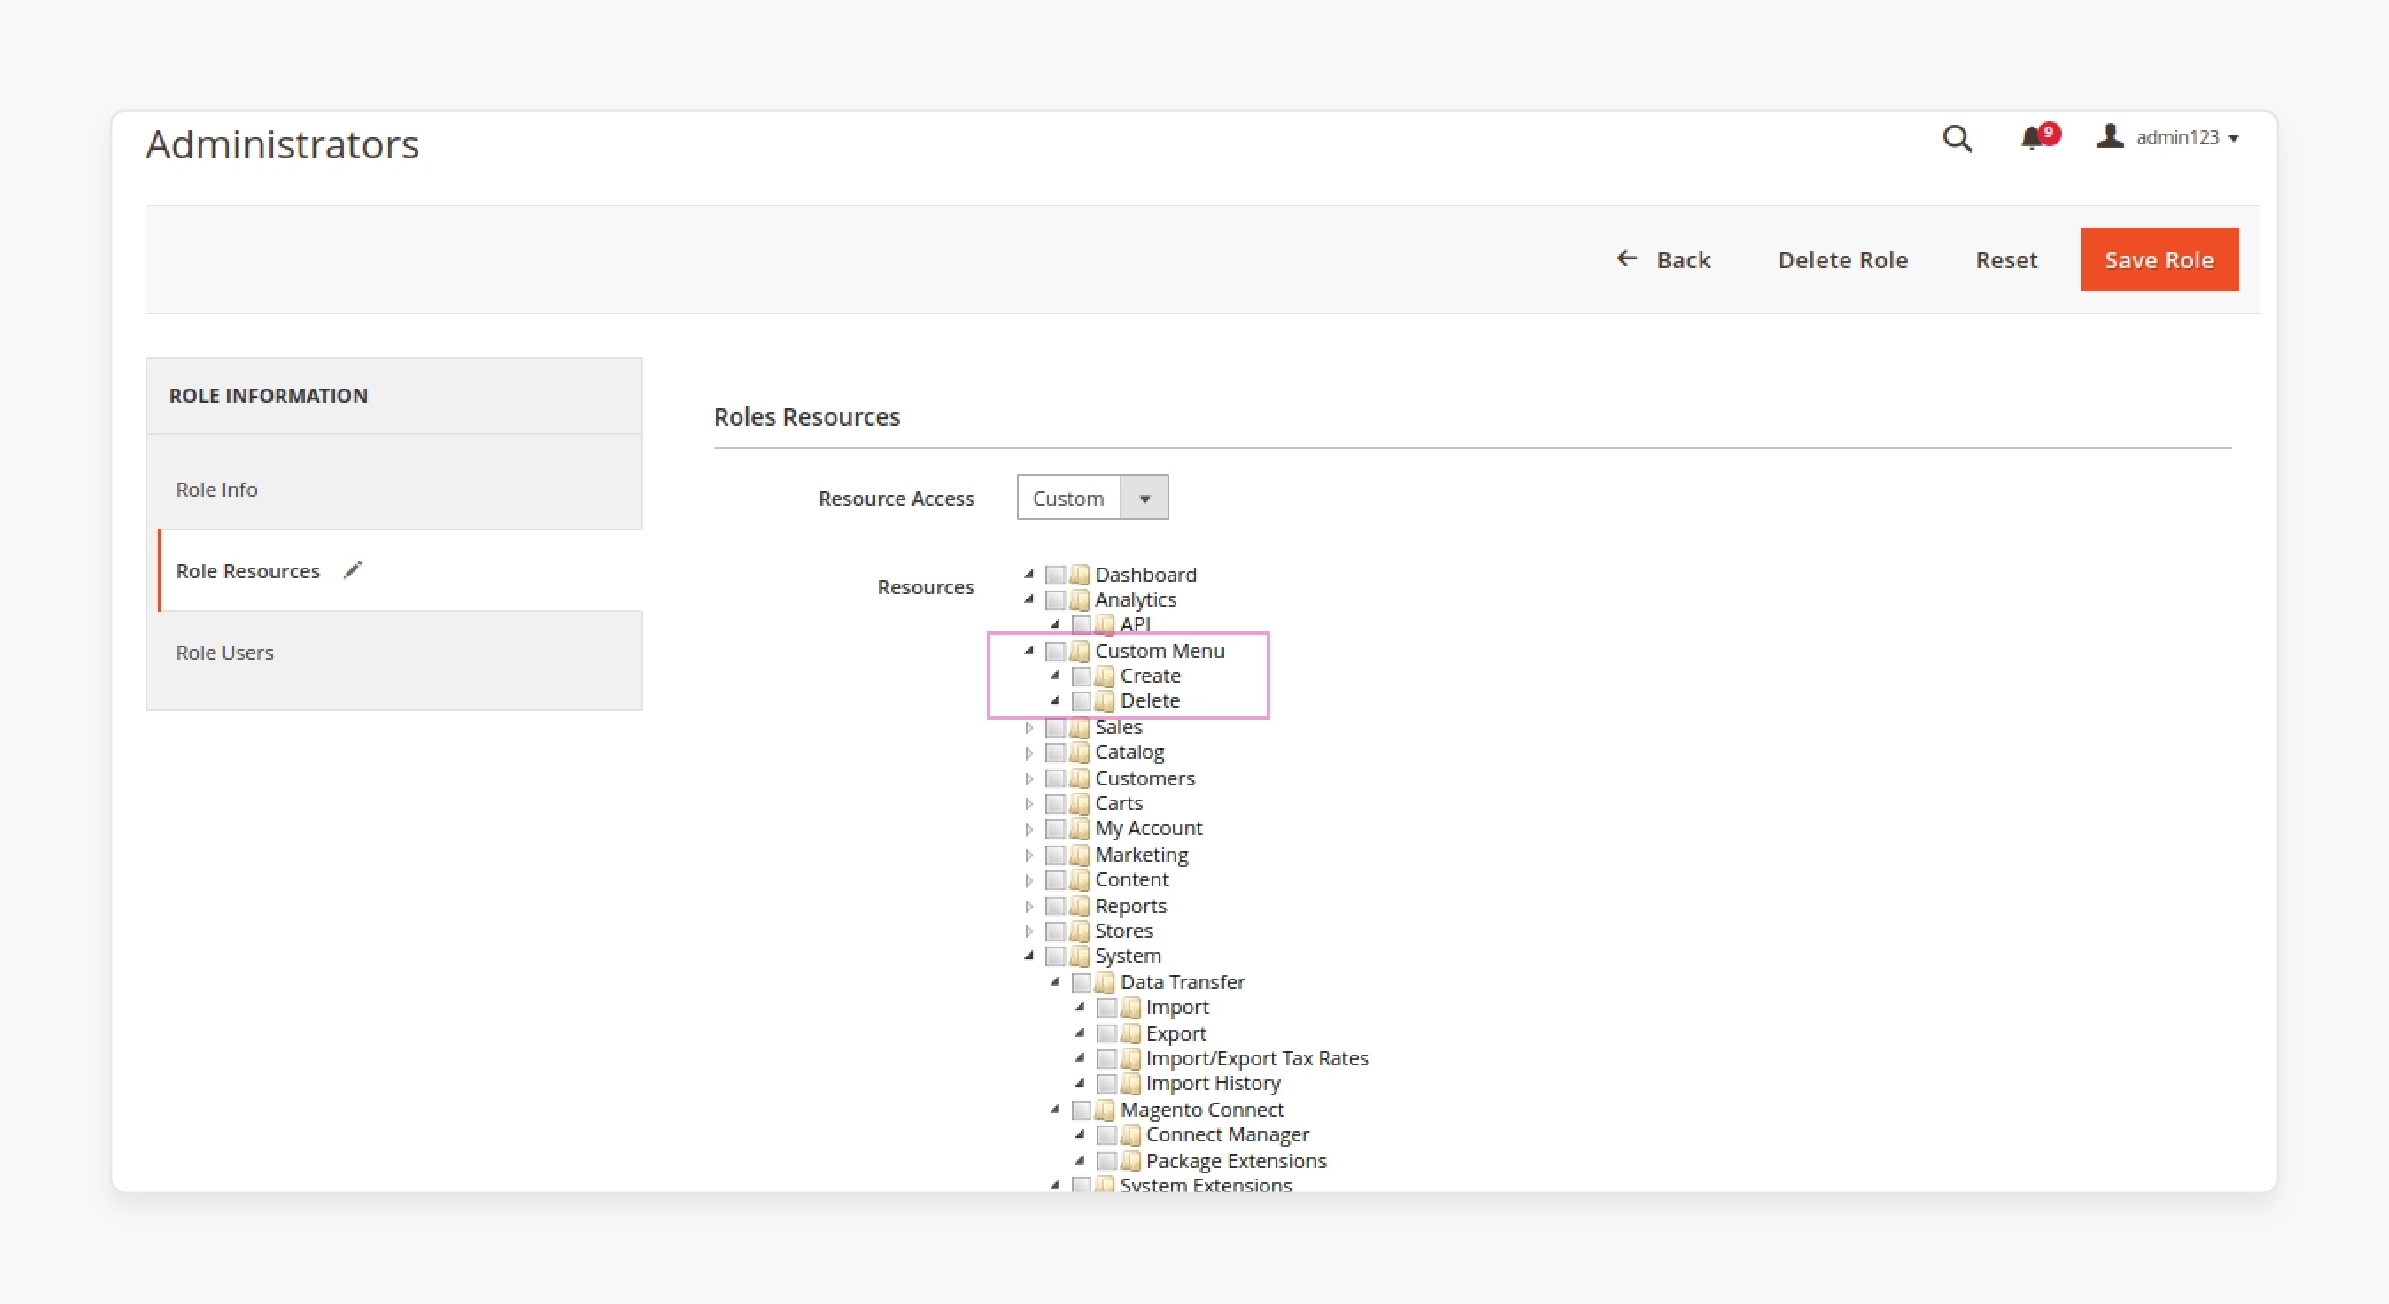
- Select the 'Custom Menu', 'Create', and 'Delete' resources and save the role.
Step 2: Restrict Access for Admin Users
- Create the
etc/adminhtml/menu.xmlfile in your module to define a menu hidden from unauthorized users.
File: app/code/Vendor/MyModule/etc/adminhtml/menu.xml
- To refresh the Magento cache, execute the code below:
bin/magento cache:clean
The menu will display as follows:
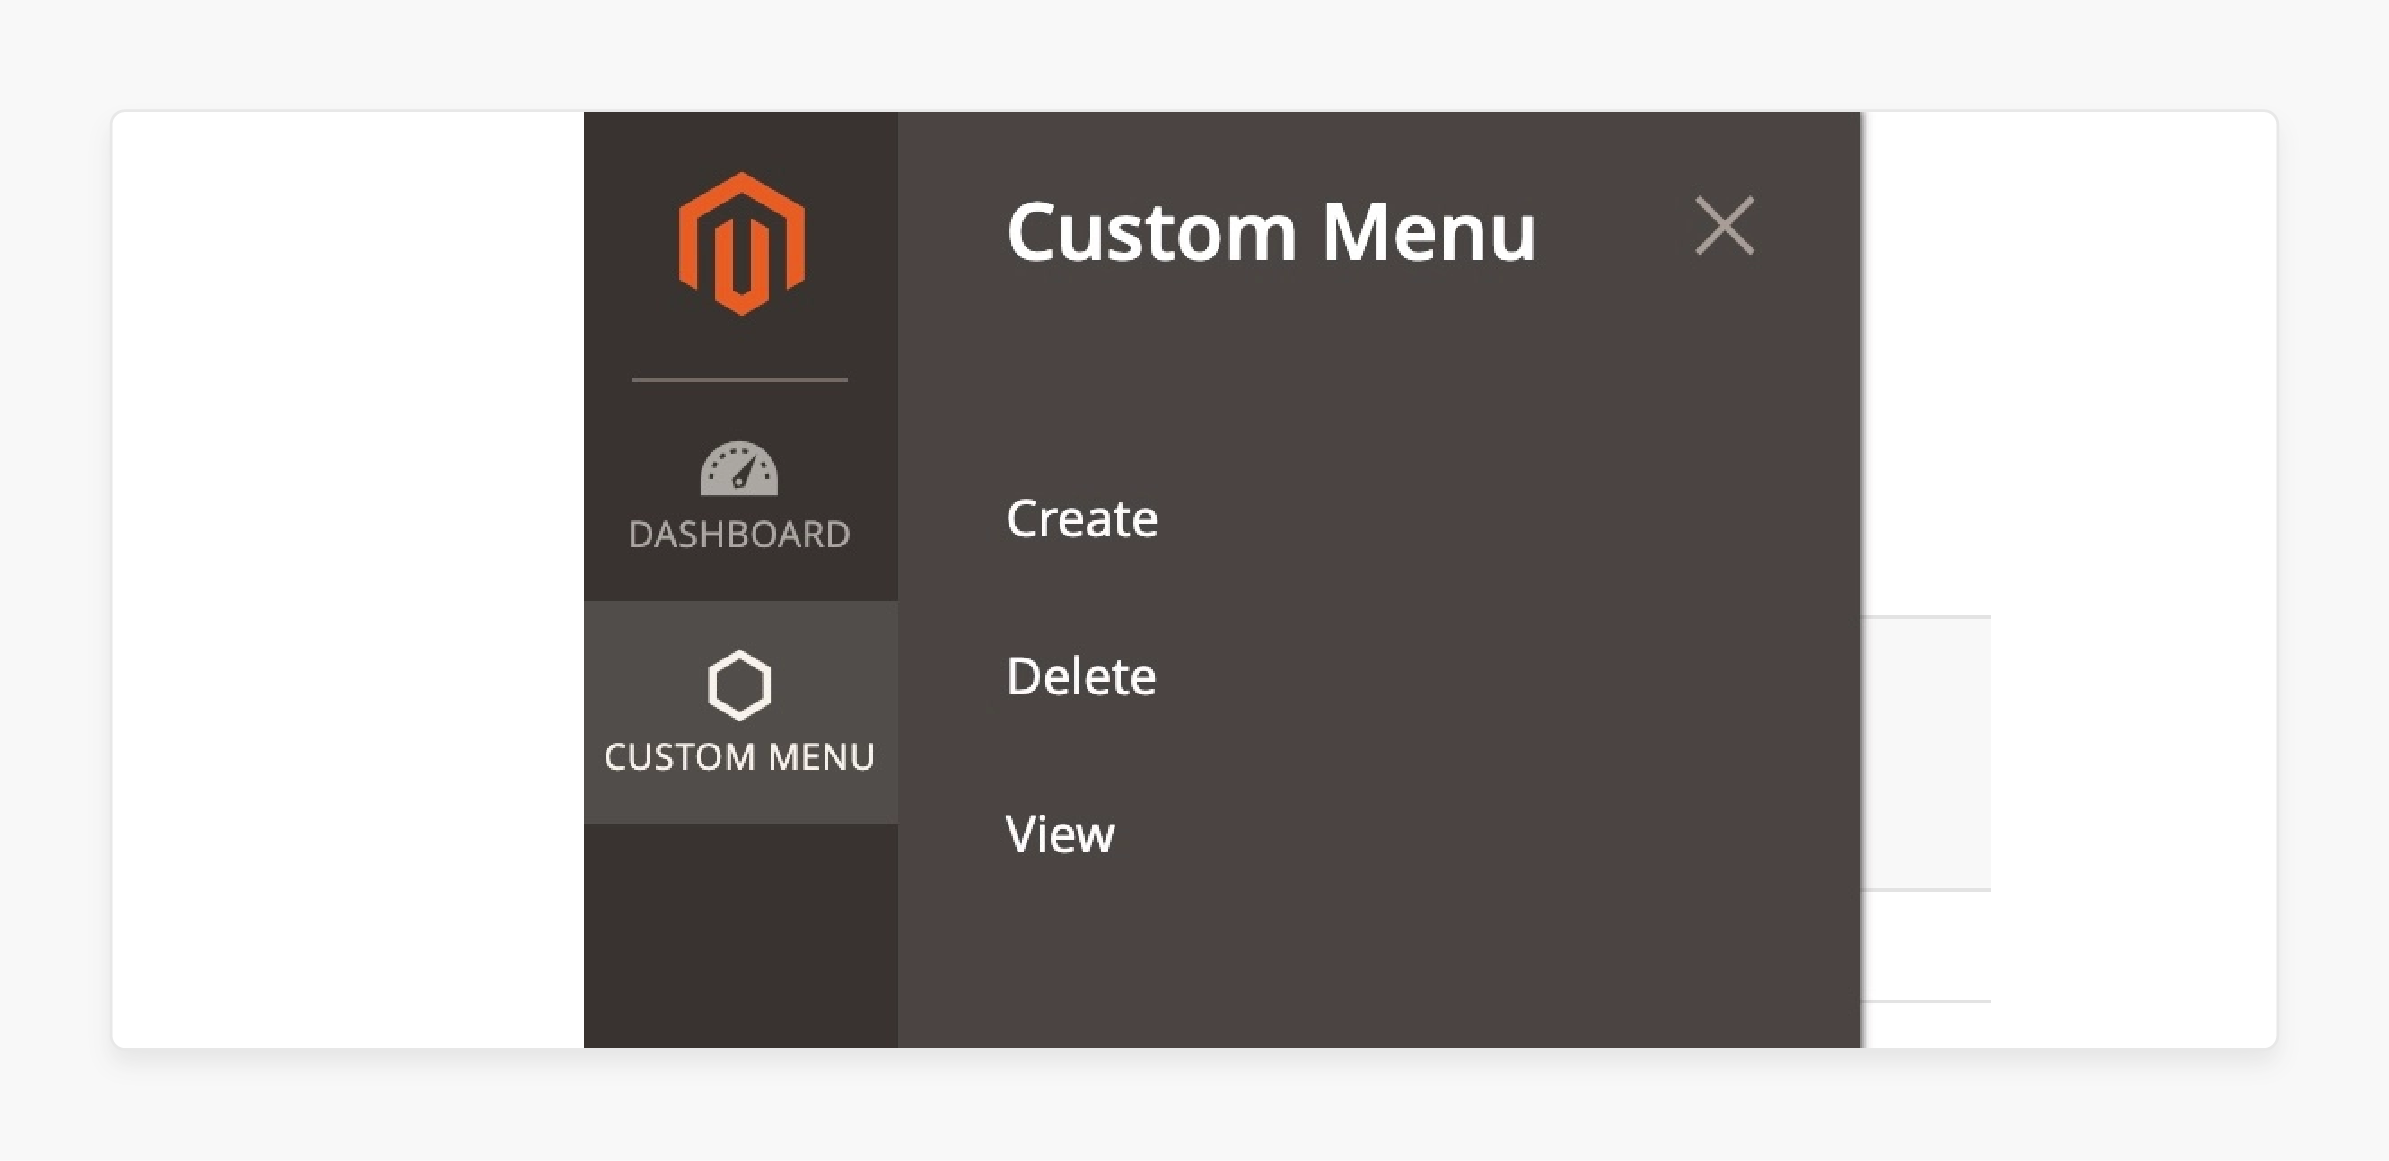
1. Restrict Admin Controllers
Set the ADMIN_RESOURCE constant to restrict access to admin controllers.
File: Controller/Adminhtml/Create/Index.php
Add the following code to the above file:
const ADMIN_RESOURCE = 'Vendor_MyModule::create';
File: Controller/Adminhtml/Delete/Index.php
Add the following code to the above file:
const ADMIN_RESOURCE = 'Vendor_MyModule::delete';
If the user lacks permission, an "Access Denied" message appears.
2. Content Restrictions for Admin Users
Render layout blocks dynamically based on ACL.
Check the example code given below:
<block class="Vendor\MyModule\Block\Adminhtml\Type" name="block.example" aclResource="Vendor_MyModule::view_additional">
<!-- ... -->
</block>
File: ``view/adminhtml/layout/custommenu_view_index.xml\
When the ACL resource for ``Vendor_ModuleName::view_additional\ is enabled, the full content displays. Otherwise, limited content appears.
Step 3: Restrict Web API Access
- Create a Web API configuration file (``etc/webapi.xml
\).
File: ``app/code/Vendor/MyModule/etc/webapi.xml\
Note: With this, you can restrict users from accessing API endpoints using ACL rules.
5 Steps To Add New Role ACL Actions In Magento 2
- Create a
menu.xmlfile inside theapp/code/Vendor/CustomModule/etc/adminhtmldirectory`. - Create an
acl.xmlfile inside theVendor/Module/etc/directory. - Create the action controller
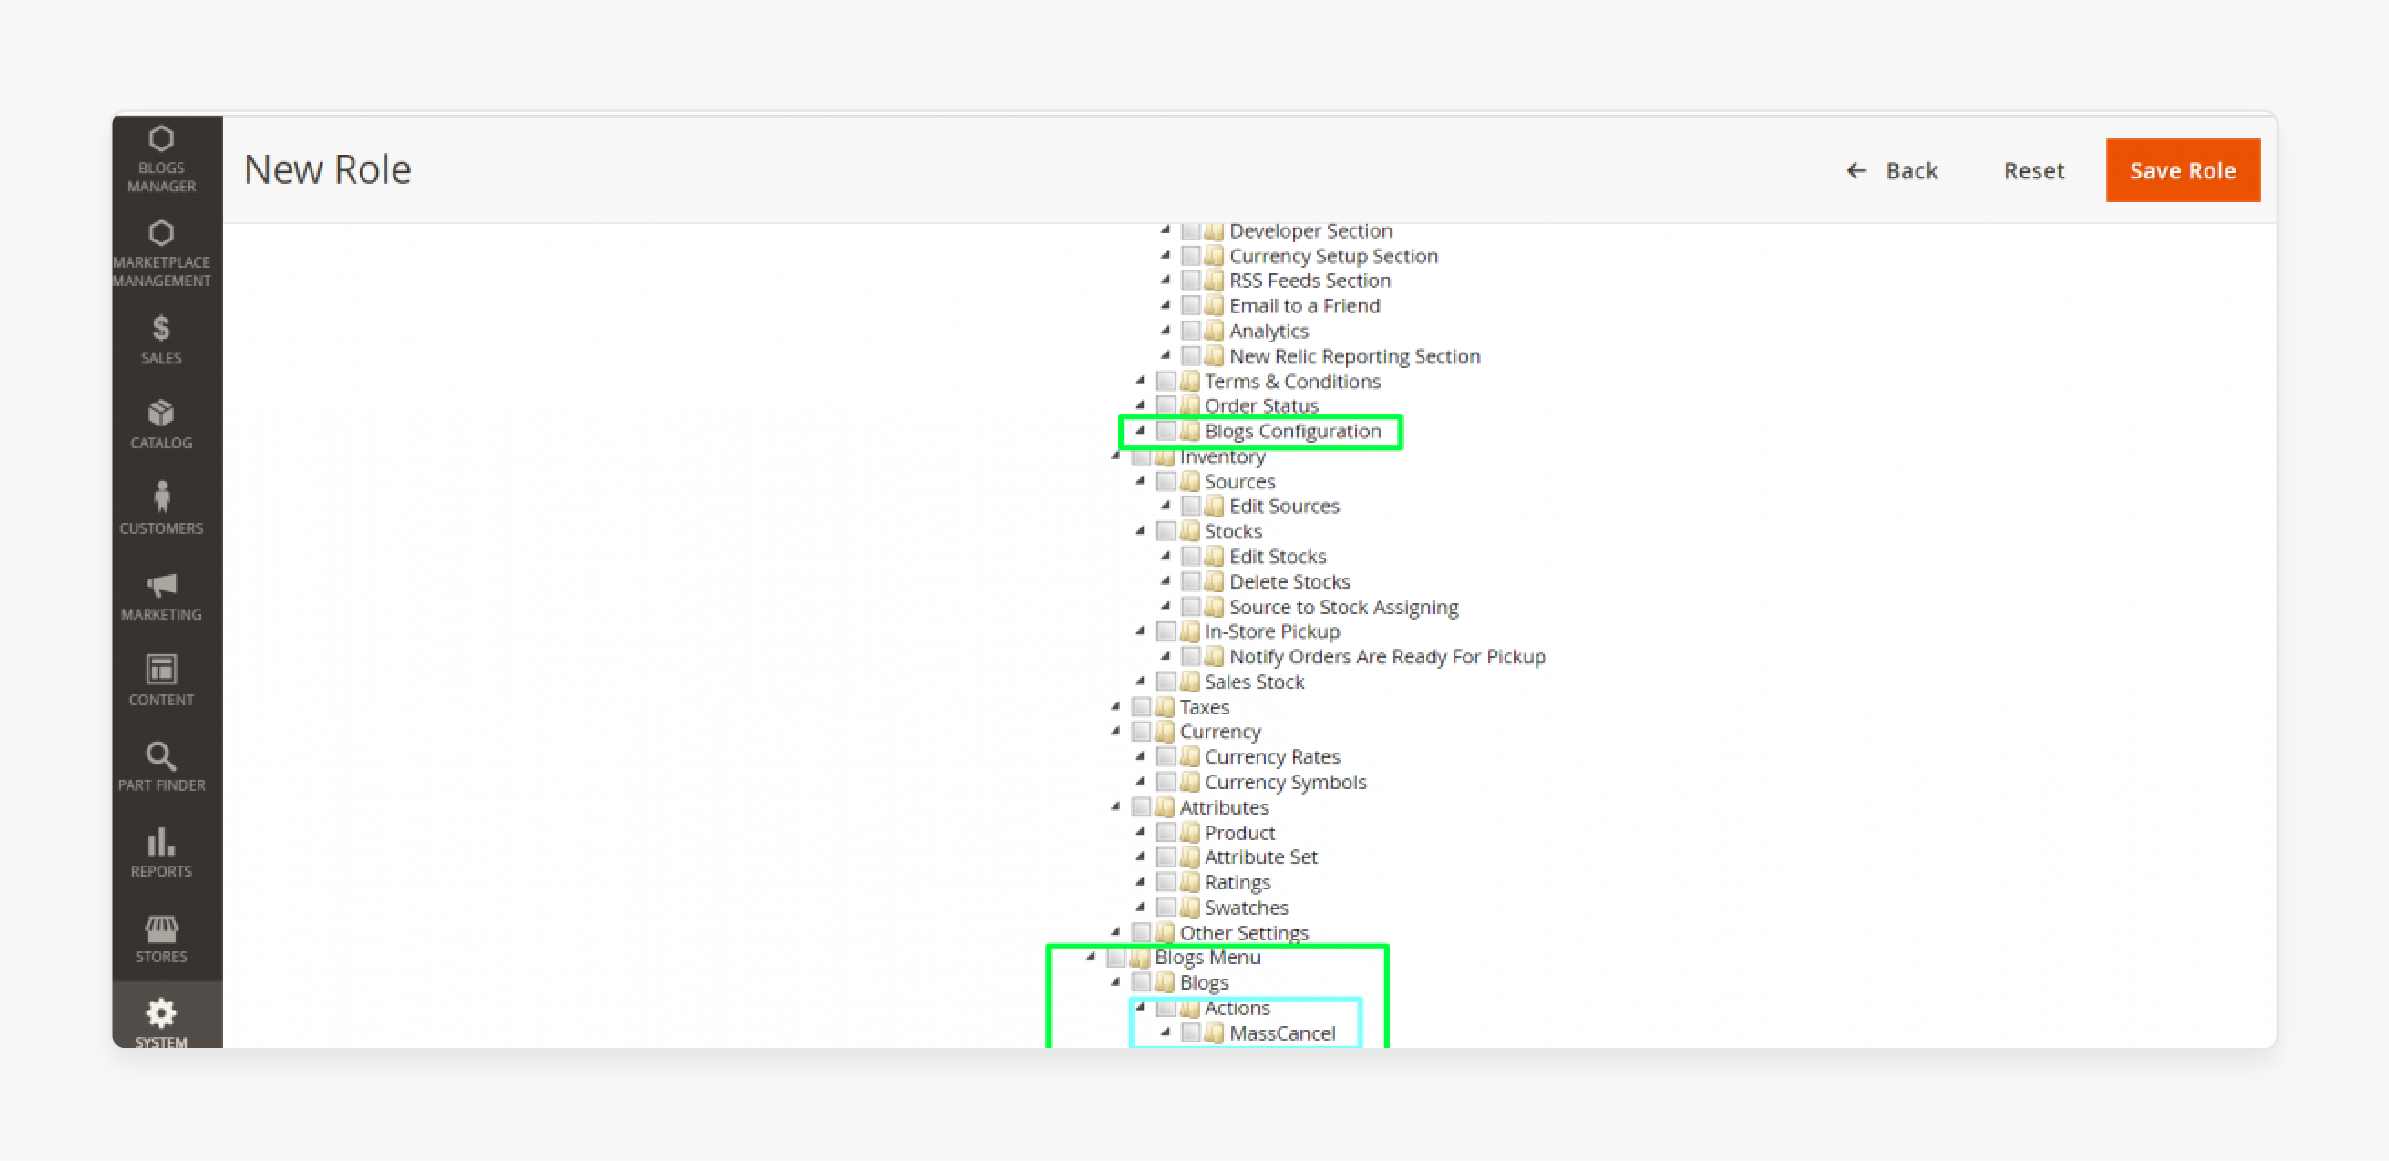
MassAction.phpfile inside theapp/code/Vendor/Module/Controller/Adminhtml/Index/directory. - Navigate to Blogs Manager > Blogs > Blogs Configuration.
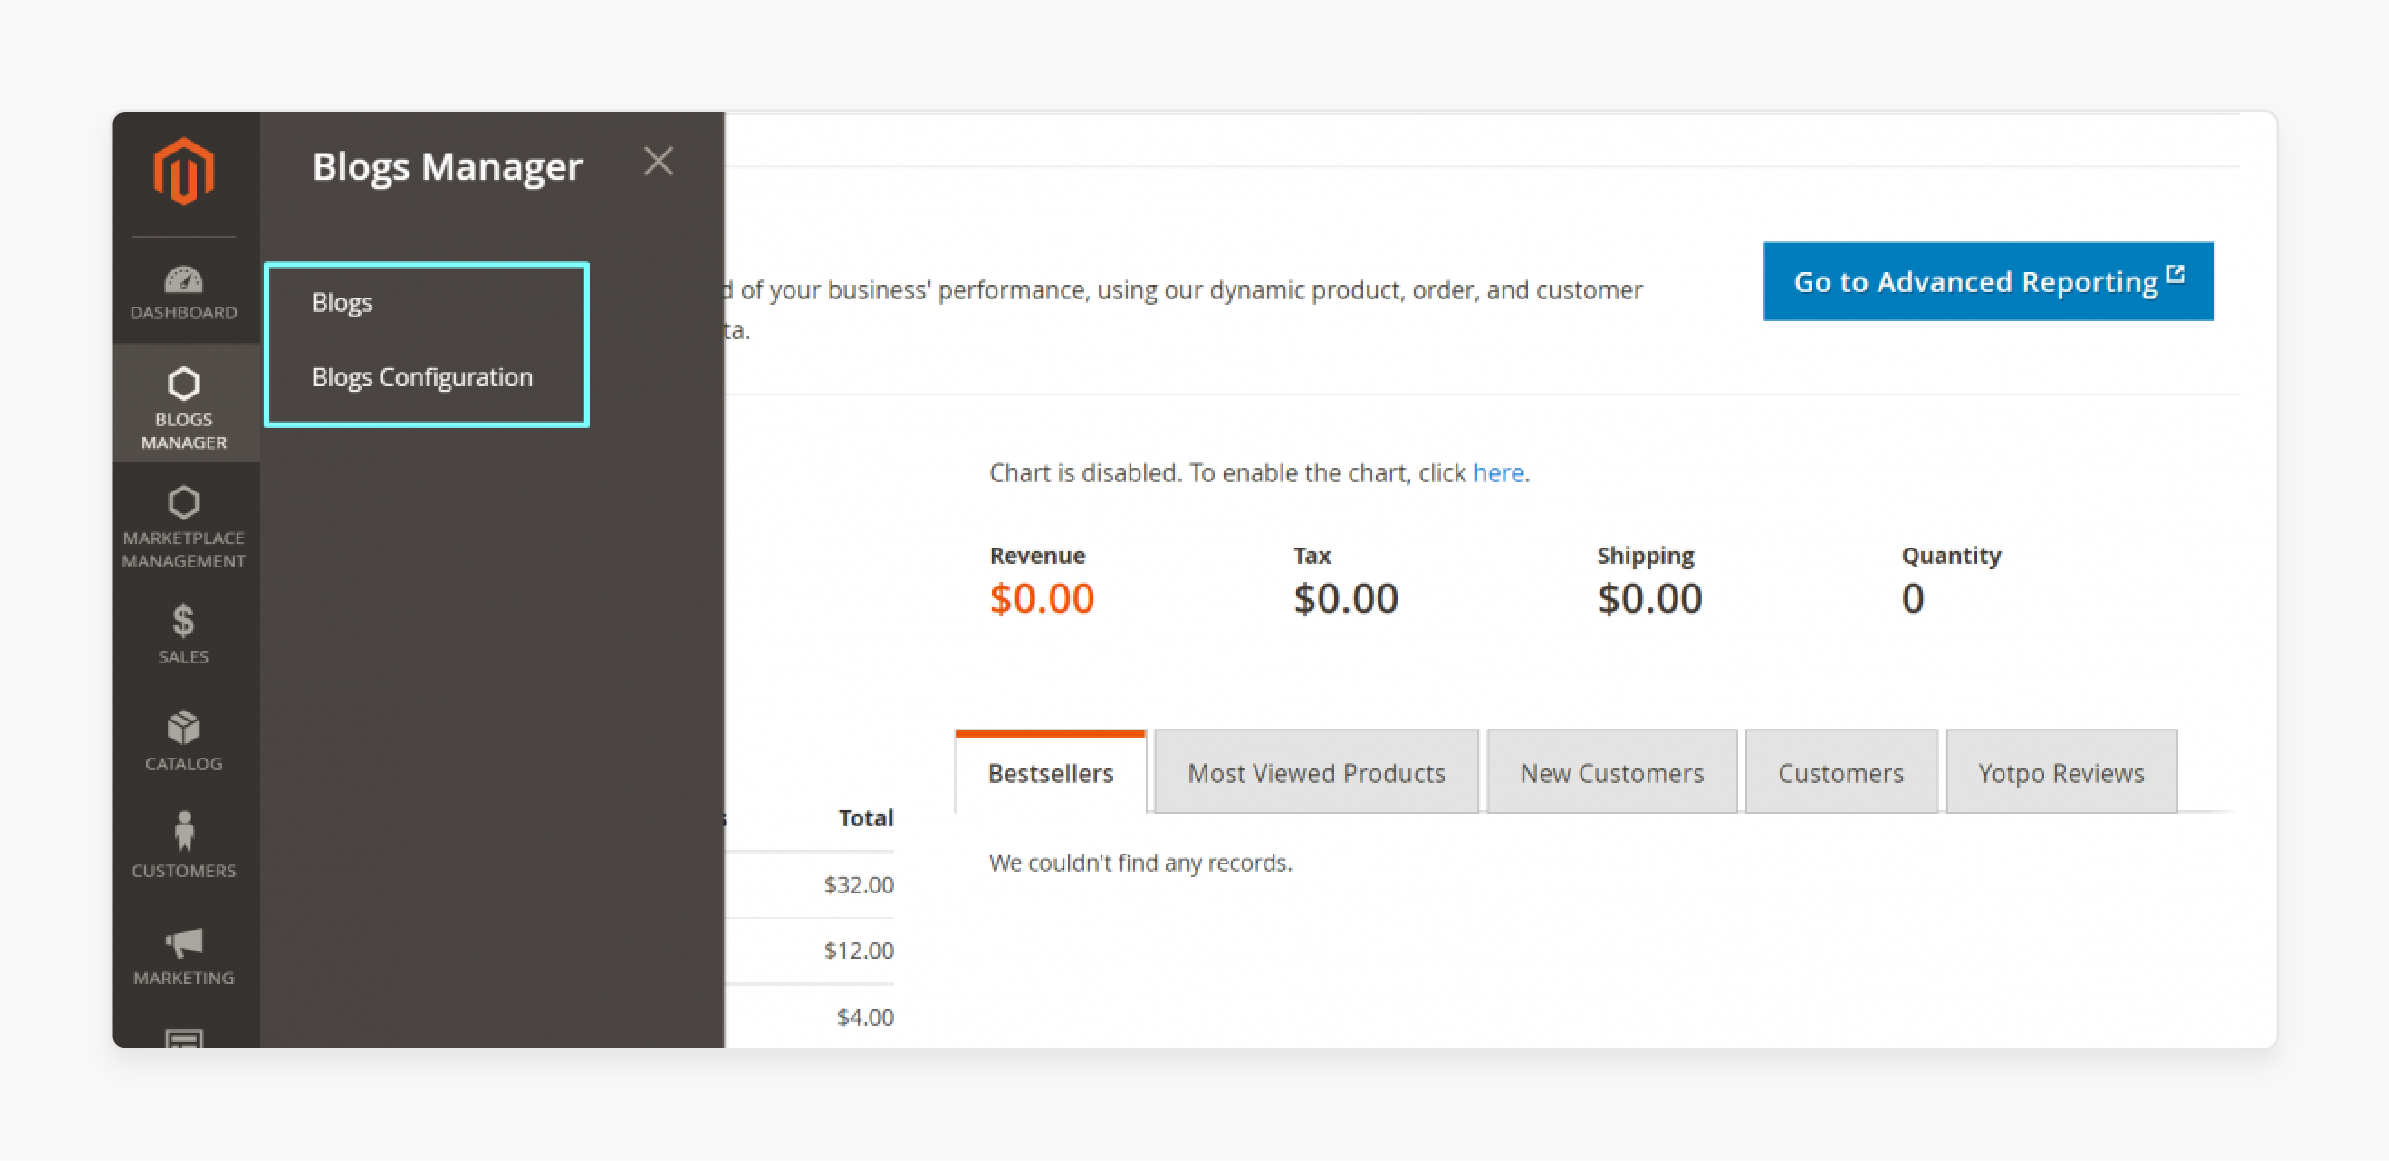
- After logging into the admin section, the result will be as shown as:
Best Practices For Accessing Control Rules With New ACL Rules
| Best practices | Description |
|---|---|
| Use specific ACL rules | Use specific ACL rules to control access to sensitive resources. |
| Keep ACL rules up to date | - Regularly review and update ACL rules. - Ensure they align with changing business needs. |
| Use ACL to control access to Web API endpoints | - Use ACL to control access to Web API endpoints. - Ensure API users have the necessary permissions. |
| Follow the Principle of Least Privilege | Give users only the permissions they need. |
| Regularly Review and Update Roles | Keep permissions up-to-date as responsibilities change. |
| Use Descriptive Names | Make role and resource names clear and understandable. |
| Document Your ACL Structure | Maintain documentation of your ACL setup for easier management. |
Troubleshooting Common Magento 2 ACL Issues
Issue 1: User Can't Access a Section They Should Have Permission For
- Ensure the user is assigned to the correct role and that the role has the necessary permissions.
- Double-check the role's permissions to ensure they align with the user's needs.
- Clear the cache to resolve issues related to outdated permission data.
- Verify that the ACL resource is correctly defined in the module and that it's properly configured.
Issue 2: New Custom Module Not Appearing in ACL
- Ensure the acl.xml file is in the correct location and that it's properly formatted.
- Review the XML code for any syntax errors that could be preventing the module from appearing in ACL.
- Clear the cache can resolve issues related to outdated module data.
- Run this command to help update the Magento configuration.
- Ensure the module is properly registered.
FAQs
1. How do I programmatically check if a user has permission to access a specific resource?
You can inject the \Magento\Framework\AuthorizationInterface into your class and call the ``isAllowed()\ method. You can do this by passing the resource identifier as an argument. It will return a boolean indicating whether the current user has access to that resource.
2. Can I use ACL to control access to custom API endpoints in Magento 2?
Yes, you can use ACL to control access to custom API endpoints. You can define ACL resources for your API methods in acl.xml. You can then use the @see annotation in your API interface to link the method to the ACL resource.
3. Can a user have different roles for different store views in Magento 2?
By default, Magento 2 doesn't support assigning different roles to a user for multiple store views. However, you can achieve similar functionality. You can create custom roles with specific permissions for each store view. You can then assign users accordingly.
4. How can an admin limit the permissions of users in Magento 2?
The role resources tab allows an admin to limit the permissions. They need to create custom roles with restricted access to specific resources. Navigate to System > User Roles in the admin panel. Create a new role or edit an existing one. To do so, they need to select only the necessary permissions.
5. How can I add some additional ACL rules to my custom module in Magento 2?
Update your module's acl.xml file with new resource definitions. Then, use these new resources in your module's controllers, blocks, or templates to control access.
6. What is the significance of the 'id' attribute in ACL resource definitions?
The id is a unique attribute for each resource in ACL resource definitions is a unique identifier. It's used to reference the resource when checking permissions. It must be unique across all modules to avoid conflicts.
7. In Magento 2, how does ACL work to restrict access when you call an object?
In Magento 2, ACL works seamlessly in the background to restrict access when you call an object. When a protected resource is accessed, Magento's authorization system checks the current user's permissions against the ACL rules. If the user lacks the necessary permissions, access to the object or its methods is denied. This process happens automatically. It ensures that even if an unauthorized user attempts to call a restricted object, the system will prevent the action. It maintains security and integrity across the platform.
Summary
ACL in Magento 2 ensures that admin users have the right permissions to perform their tasks. Using the ACL rules allows an admin to:
- Assign specific roles and appropriate permissions.
- Ensure proper configuration of acl.xml and regular updates to roles and permissions.
- Protect your store and streamline admin operations.
- Ensure that each admin user has the right level of access.
- Control access to different parts of the Magento 2 admin panel
Maintain security and control admin user access in your Magento 2 store with managed Magento hosting.


