Magento 2 GTM: Add Google Tag Manager For Ecommerce
Want to streamline your e-commerce tracking? Magento 2 GTM simplifies the integration of Google Tag Manager (GTM) with Magento 2 stores.
This tutorial will cover the Magento 2 Google Tag Manager Extension configuration developed by Google Enhanced Architecture.
Key Takeaways
- Features and benefits of Magento 2 GTM.
- Steps how to set up and configure Google Tag Manager extension.
- Overview of how to use Magento 2 Google Analytics with Magento 2 GA4.
- Insights into how Google Tag Manager and Google Analytics work together with Magento 2.
- Enable Google Tag Manager with Google API Tag Manager code.
- Free tag management tools according to the Google Recommendations section of your Magento 2.
How Does Google Tag Manager Work?
The Google Tag Manager operates in three phases, such as:
- Tag: In this phase, GTM detects events on your website. These tags monitor the activities on your page.
- Trigger: When an action occurs, the tags are activated. GTM records the action along with the necessary information.
- Variable: This phase is more specific. It provides detailed information about the particular actions taken on the site.
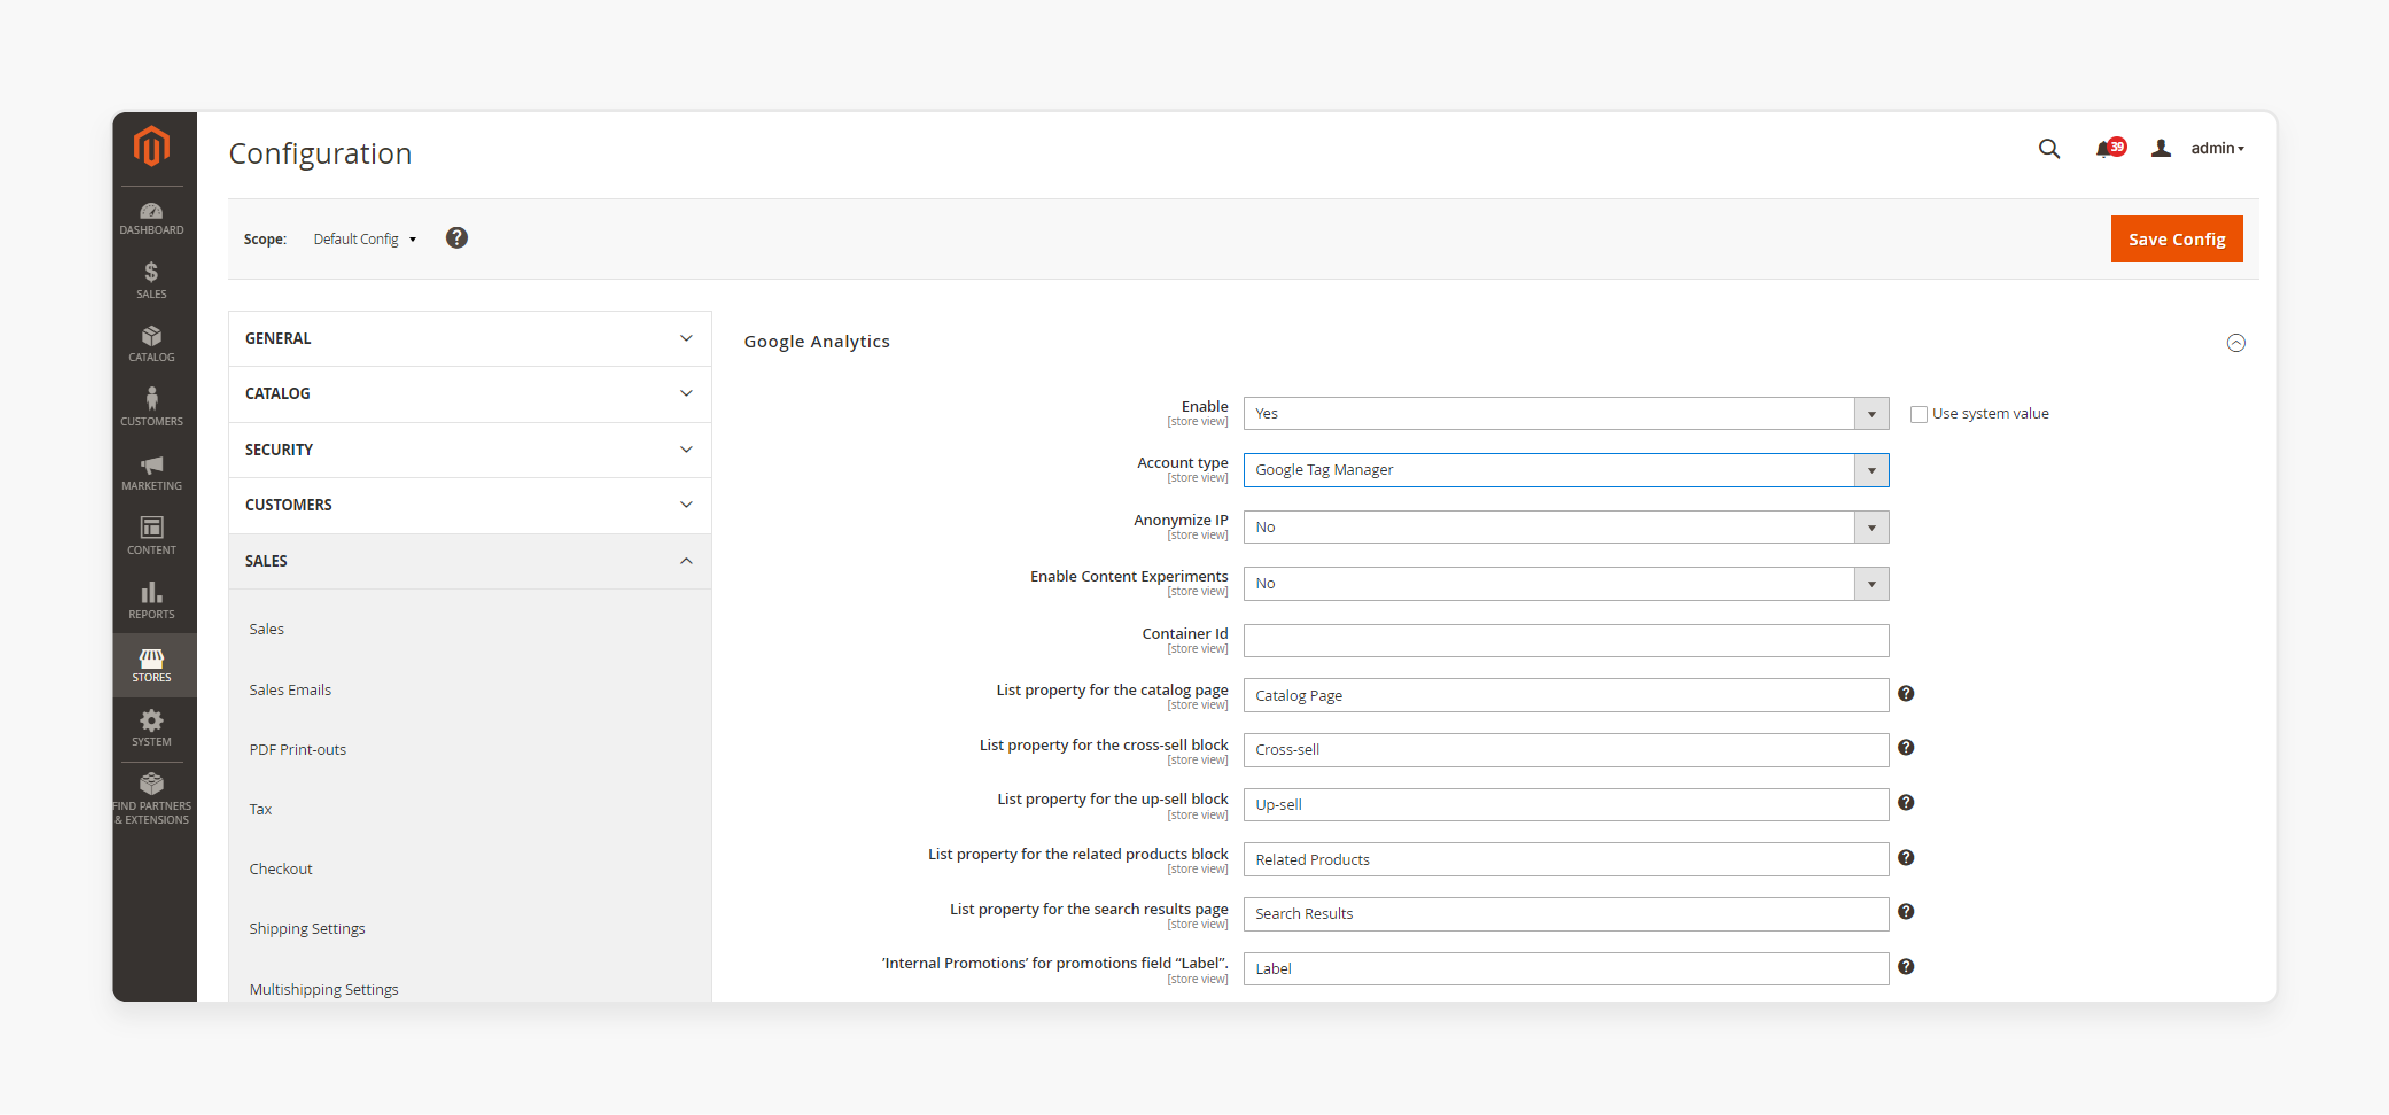
GTM Tags For GTM Setup Fields
| Field | Scope | What It Does |
|---|---|---|
| Enable GTM | Store View | Turns on or off Google Analytics Enhanced Ecommerce. |
| Account Type | Store View | Picks your tracking method- Google Analytics or Google Tag Manager. |
| Anonymize IP | Store View | Strips identifying info from IPs in Google Analytics. |
| Enable Content Experiments | Store View | Lets you decide whether to A/B test up to 10-page versions. |
| Container ID | Store View | Contains your GTM container ID. This usually auto-fills if GTM is already set up. |
| Catalog Page List Property | Store View | Tags catalog pages. By default, it is "Catalog Page". |
| Cross-sell Block List Property | Store View | Tags cross-sell sections. It has "Cross-sell" as the default value. |
| Up-sell Block List Property | Store View | Tags up-sell sections. Here, the default value is "Up-sell". |
| Related Products Block List Property | Store View | Tags related product sections. "Related Products" is the default value. |
| Search Results Page List Property | Store View | Tags search results. Here, the default value is set to "Search Results". |
| Internal Promotions Label Property | Store View | Tags promo labels. The default value is set to "Label". |
4 Steps To Set Up Google Tag Manager In Magento
Step 1: Configure Google Analytics Account
- Set Up Google Analytics.
- Log in to your Google Analytics account.
1. Enable Internal Site Search Tracking
- Go to Select View > View Settings.
- Set 'Site Search Tracking' to "On".
- Set 'Query parameter' to
q. - Save the settings.
2. Enable Display Features
- Go to Property Settings.
- Navigate to Advertising Features.
- Set 'Enable Demographics and Interest Reports' to On.
- Save the settings.
3. Enable Ecommerce Tracking
-
Go to Select View > Ecommerce Settings.
-
Set 'Enable Ecommerce' to On.
-
Set 'Enable Enhanced Ecommerce Reporting' to On.
-
Save the settings.
-
Reload the page and ensure all settings are On.
Note: If any settings are not On, repeat the steps above, save, and reload until all settings are enabled.
Step 2: Configure a New Container with Basic Settings Using a sample Composer file
- Download GTM_M2_Config_json.txt.
- Open the linked file in an editor.
- Save it as GTM_M2_Config.json.
- Upload the JSON file directly to Google Tag Manager and follow the steps below:
- Navigate to Admin > Container > Import Container.
- Click on 'Choose container file' and select the JSON file.
- Under 'Choose workspace', click on New.
- Enter a title and description, then click Save.
- To import the file, select one of the following actions:
- Select 'Overwrite' for a new container.
- Select 'Merge' if you are using an existing container.
- Click on 'Preview' to review the tags, triggers, and variables.
- To edit the Google Analytics ID referenced in variables, follow the steps below:
- Navigate to Variables > User-Defined Variables.
- Choose 'Google Analytics'.
- Update the placeholder (UA-xxxxxx-x) with your own GA ID.
- Follow Google’s instructions for adding tags, triggers, and variables to the new container.
Note: If you have settings in another container that you want to use, they can be moved to the new container.
- Click on 'Confirm' when complete.
- Follow Google’s instructions to publish the new container.
Note: Refer to Google’s guide on Container export and import to import a sample JSON file into a new container. It is recommended to create a new container rather than modifying an existing one.
Step 3: Configure your Magento store
- Log in to the Magento Admin panel of your Commerce store.
- On the Admin sidebar, navigate to Stores > Settings > Configuration.
- Expand 'Sales' and choose 'Google API' in the left panel.
- Expand the 'Google Analytics' section.
Check the example below for general configuration:
- Enable: Set this option to 'Yes'.
- Account type: Set this option to 'Google Tag Manager'.
- Container ID: Enter your GTM ID (GTM-xxxxxx).
- Enable Content Experiments: Set this option to 'Yes', if you are using Google Analytics for content experiments.
- Use the default values for the remaining fields.

- When complete, click on 'Save Config'.
- Test and verify your Google Tag Manager settings.
Note: Each container is associated with one website. You only need one container per account. You will need separate containers for each site if you have a multi-site Commerce instance.
Step 4: Add the GTM Code to your Adobe Commerce store
- Navigate to Admin > Install Google Tag Manager to copy the GTM code.
Note: There are two GTM code snippets to add to your Commerce site: one for the <head> tag and one for the <body> tag.
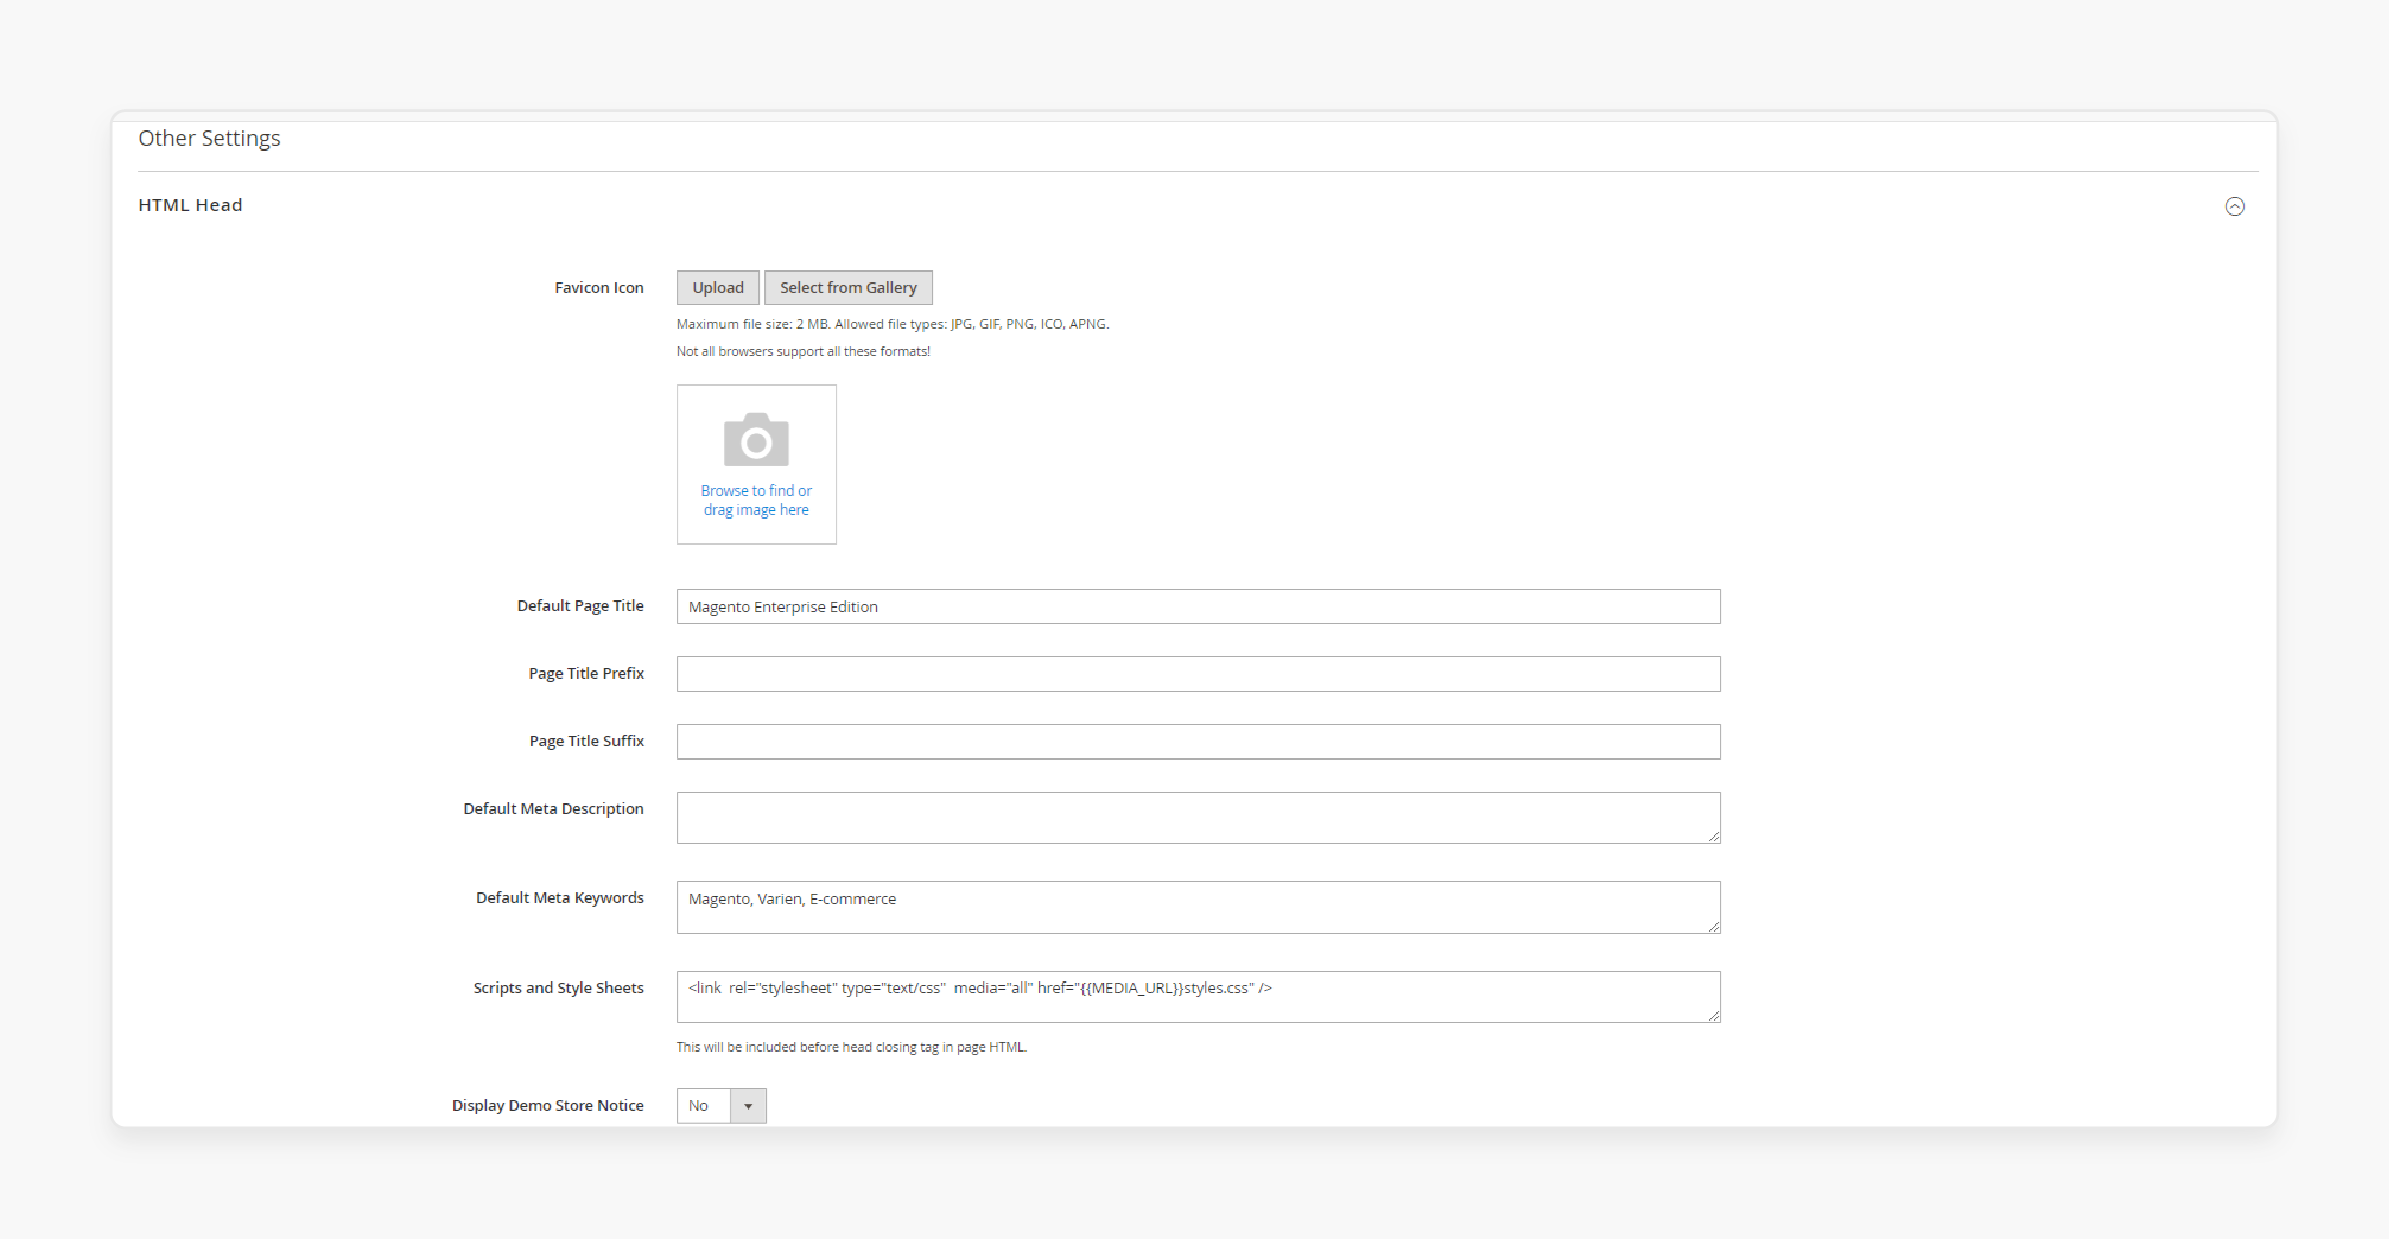
- Navigate to Content > Design > Configuration in the Commerce Admin.
- Open the store view in edit mode.
- Under 'Other Settings', expand 'HTML Head'.
- Paste the GTM code for the ``` ` `` tag into the 'Scripts and Style Sheets' field.

- Expand the 'Footer' section.
- Paste the GTM code for the ``` ` `` tag into the Miscellaneous HTML field.

- When complete, click on 'Save Configuration'.
Advanced Magento 2 Techniques Using Google Tag Manager
| Technique | Implementation | Benefits |
|---|---|---|
| Custom Data Layer Events | - Push custom events to the data layer - For stores with product videos, track play, pause, and completion rates - Example: track add-to-wishlist |
- Capture unique user actions and when customers save items for later - Enhance tracking granularity |
| Enhanced Ecommerce Tracking | - Use GTM for GA4-enhanced ecommerce - Track product cart impressions, clicks, and purchases |
- Detailed product performance insights - Optimize product placement and marketing |
| Form Interaction Tracking | - Monitor form submissions and abandonments - Use GTM triggers for form data |
- Improve form completion rates - Identify user pain points |
| Scroll Depth Tracking | - Measure scroll depth on product pages - Set GTM triggers based on scroll % |
- Understand content engagement - Optimize page layouts |
| Video Engagement Tracking | - Track video plays, pauses, completions - Implement YouTube tracking via GTM |
- Measure video content effectiveness - Inform video marketing strategy |
| Facebook Pixel Integration | - Implement FB pixel without touching Magento 2 code - Track conversions and build audiences |
- Power up FB ad campaigns - Improve ad targeting |
| Hotjar Heatmaps | Set up Hotjar tracking via GTM | - Gain visual user behavior insights - Identify UX improvement areas |
| Criteo Retargeting | Implement Criteo tags through GTM | - Boost retargeting campaigns - Increase return visitor conversions |
| Klaviyo Email Marketing | Send ecommerce data to Klaviyo via GTM | - Enhance email marketing personalization - Improve email campaign ROI |
| Trustpilot Reviews | Implement Trustpilot collection via GTM | - Boost social proof - Increase customer trust |
| Checkout Step Tracking | Track each step of the checkout process | - Identify drop-off points - Optimize checkout flow |
| Google Ads Remarketing | Show targeted ads to previous visitors | - Re-engage potential customers - Increase conversion rates |
| Conversion Tracking | Set up conversion tracking for Google Ads | - Measure ad campaign effectiveness - Optimize ad spend |
2 Steps For Creating A Tag Using Conversions For Tracking In Magento
Step 1: Configure your Google Tag Manager Module
- Sign in to your Google Tag Manager account.
- Select the container created for your store.
- In the 'New Tag' box, click on 'Add a new tag'.
Obtain the following information from your Google AdWords account:
- Conversion ID
- Conversion Label
Note: For assistance, visit Google’s support site.
- Go to the 'Google Tag Manager' dashboard.
- Click on 'Google AdWords' and follow these steps:
- Click the title placeholder and enter a name for the new tag.
- Under 'Choose Product', select Google AdWords.
- Under 'Choose a Tag Type', select 'AdWords Conversion Tracking'.
- Click on 'Continue'.
- From your Google AdWords Remarketing account, enter the 'Conversion ID' and 'Conversion Label'.
- Click on 'Continue'.
Step 2: Create a rule for your GTM Account
- Under 'Fire On', click on 'Some Pages'.
- In the 'Choose Pages' section, complete the following settings:
- Name: Enter a name for the page description.
-
Variable:
url -
Operation:
matches RegEx
Note: Follow Regex and CSS selector operators in the Google Tag Manager Help.
-
Value:
checkout/success.*
- Select the green checkbox and click on 'Save'.
Note: The trigger you set up appears as a blue button in the Fire On section.
- When complete, click on 'Save Tag'.
- Preview the tag.
Note: Each time the tag is previewed, a snapshot of the version is saved.
- Navigate to the version you want to use.
- Click on 'Publish'.
Best Practices For Implementing GTM In Magento 2 Store
| Category | Best Practice | Why It Matters |
|---|---|---|
| Performance | - Use GTM's built-in tag-firing priorities - Implement custom HTML tags sparingly - Utilize GTM's native tag templates |
- Ensures critical tags fire first, speeding up page load - Reduces unnecessary code bloat - Optimized for performance out of the box |
| Security | - Use strong, unique passwords for the GTM account - Implement two-factor authentication - Regularly audit user access to GTM |
- Prevents unauthorized access to your Magento 2 data - Adds an extra layer of security to your GTM setup - Ensures only authorized personnel can make changes |
| Integration | - Use Magento 2's native GTM module - Implement data layer consistently - Test thoroughly in GTM preview mode |
- Seamless integration with enhanced ecommerce features - Ensures accurate data collection across your Magento 2 store - Catches issues before they impact your live store |
| Maintenance | - Measure scroll depth on product pages - Set GTM triggers based on scroll % |
- Understand Google content engagement - Optimize page layouts |
2 Best Google Tag Manager Extensions For Magento 2
1. Google Tag Manager For Magento 2 Extension by Magefan

Magefan Google Tag Manager for Magento 2 Extension allows you to add measurement codes and tracking pixels to your store. Use this extension to make data-driven decisions and refine your marketing strategy using insightful data reports.
Features
- Over 13 eCommerce events
- Client-side and server-side tracking
- Pre-configured JSON files
- GTM script optimized for speed
- No need for code editing or technical expertise
Pricing
Free
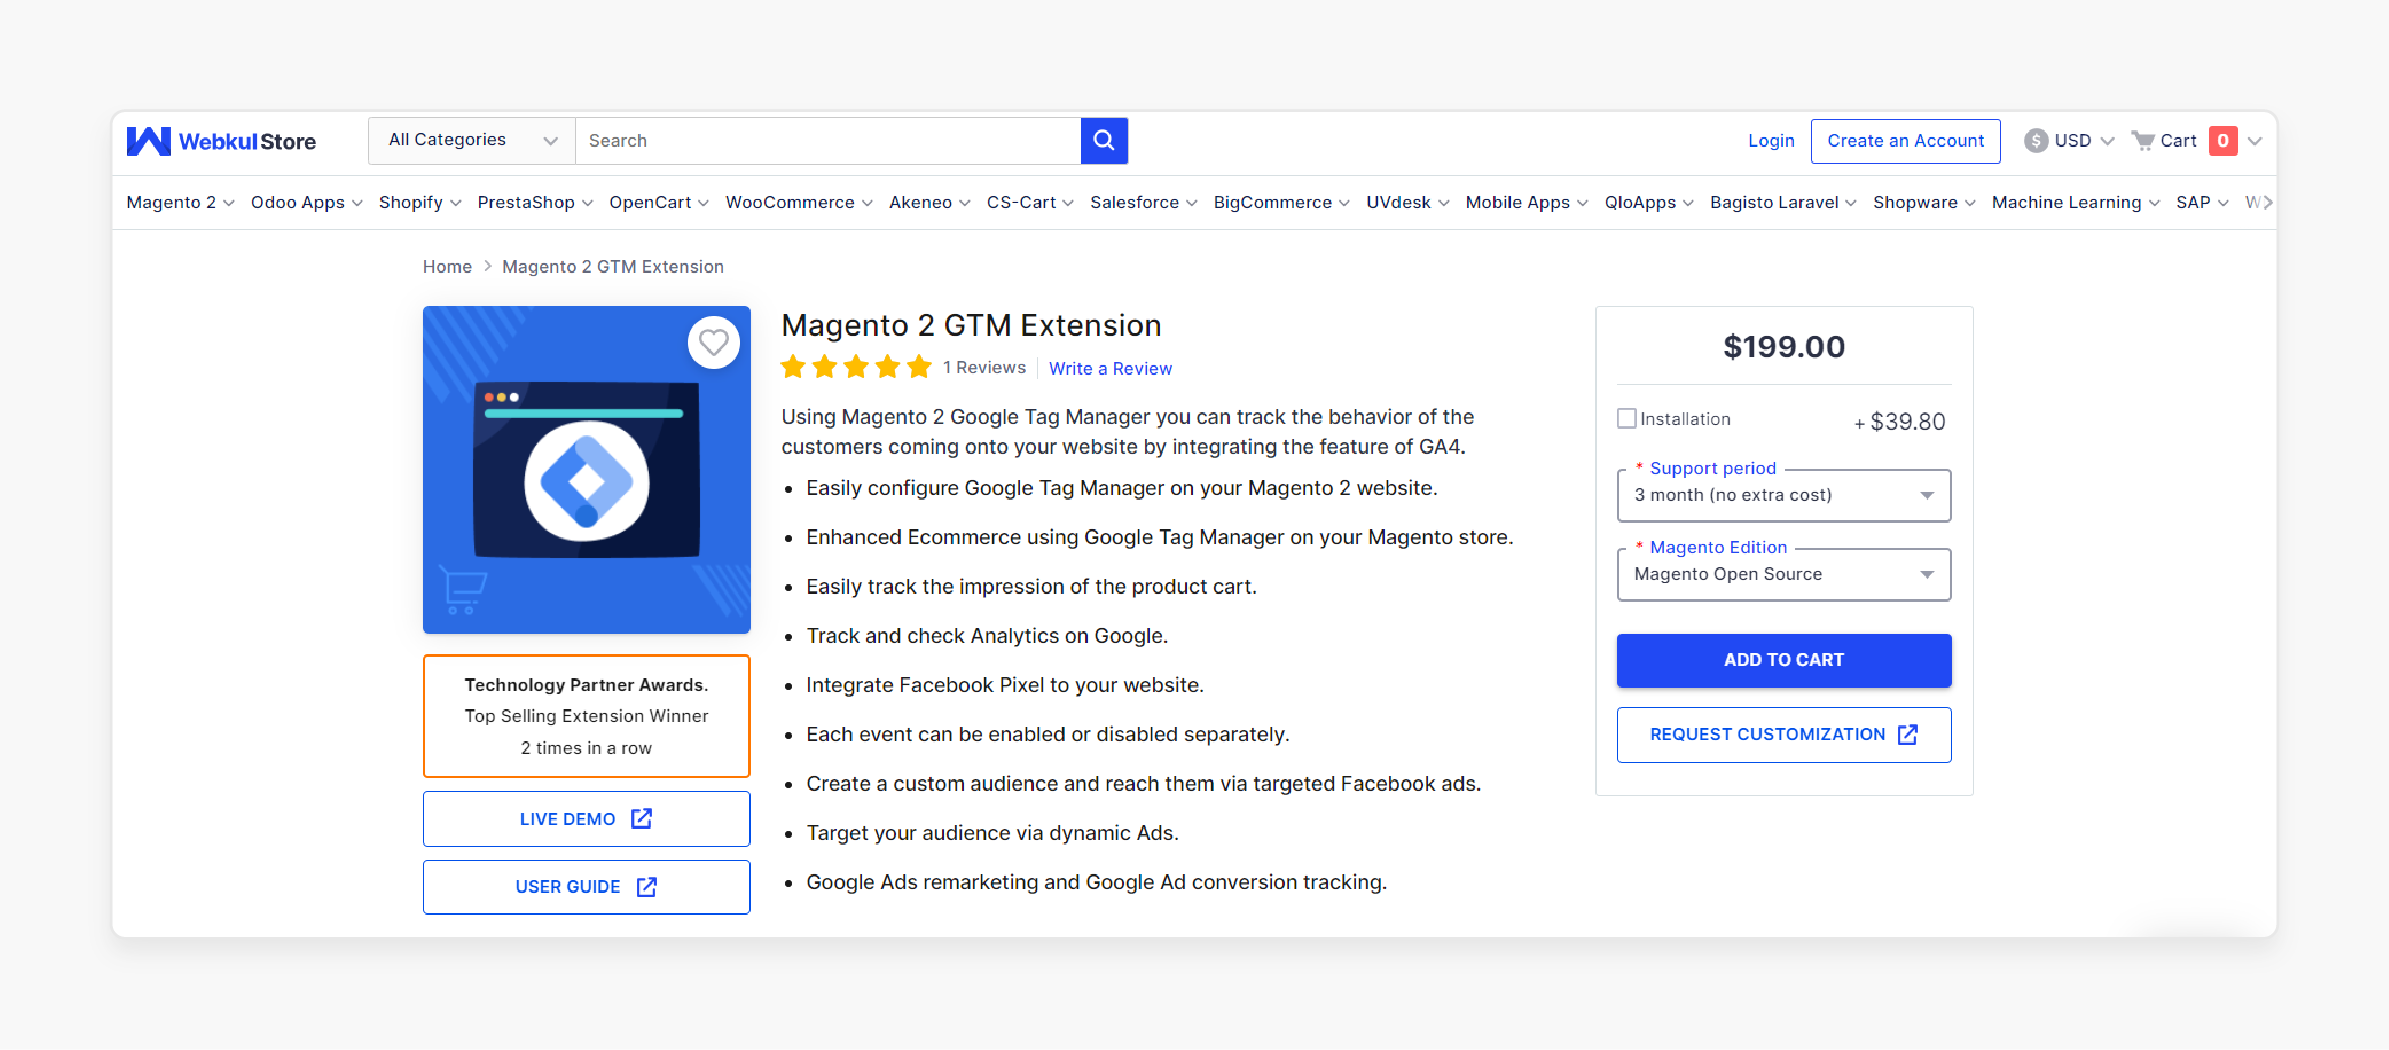
2. Magento Google Analytics 4 Extension by Webkul

Webkul Magento Google Analytics 4 Extension enables you to monitor customer behavior on your Magento 2 website. This extension provides advanced integration with Google Analytics 4 (GA4).
Features
- Utilize Enhanced Ecommerce with Google Tag Manager on your Magento store.
- Integrate Facebook Pixel into your website.
- Enable or disable each event individually.
- Create a custom audience for targeted Facebook ads.
- Implement Google Ads remarketing and conversion tracking.
Pricing
- Magento Open Source Edition + Free 3-Month Support + Installation- $238.80
- Adobe Commerce (on-premise) Edition + 6-Month Support + Installation- $636.80
- Adobe Commerce (cloud) Edition + 12-Month Support + Installation- $676.60
Testing & Troubleshooting Magento 2 GTM Account Setup
| Step | Description | Details |
|---|---|---|
| Using GTM Preview Mode | Fire up GTM Preview Mode | - Navigate your Magento 2 store - Watch for tag firings and data layer pushes |
| Common Issues and Solutions | - GTM container not loading - Data layer not populating - Tags not firing - Incorrect data in GA4 |
- Check your container ID in Magento 2 config - Verify Magento 2 GA4 extension settings with GTM - Review trigger conditions in GTM - Double-check variable mappings in GTM |
| Key Areas to Monitor | - Container implementation - Data layer consistency - Tag configurations - Trigger accuracy |
- Seamless integration with enhanced ecommerce features - Ensures accurate data collection across your Magento online store - Catches issues before they impact your live store |
| Advanced Troubleshooting | - Use browser developer tools - Enable GTM debug mode - Cross-reference GTM data |
- Ensure the GTM integration remains effective - Allow for timely adjustments through proactive monitoring - Accommodate changes in your e-commerce environment |
FAQs
1. How does Magento 2 GTM handle "add to cart" tracking?
Magento 2 GTM allows you to track "add to cart" events easily. It sends this data to your Google Tag Manager. Also, it enables detailed analysis of customer behavior.
2. How does Magento 2 GTM identify the tag manager property associated with my store?
During setup, Magento 2 GTM asks for your Google Tag Manager account details. It then identifies the tag manager property associated with your account automatically.
3. Does Magento 2 GTM support custom GTM loaders and GTM JavaScript?
Yes, Magento 2 GTM supports custom GTM loaders and GTM JavaScript. It allows for advanced customization of your tracking setup directly in your Google Analytics.
4. How does Magento 2 GTM handle data protection?
Magento 2 GTM adheres to data protection standards. It allows you to control what data is collected and shared, in line with privacy regulations.
5. Can I use Magento 2 GTM with third-party analytics solutions?
Google Tag Manager offers Google functionality for Google's tools. Google Tag Manager to Magento 2 works with third-party analytics solutions. It expands your tracking options. Integrate with services like Hotjar to visualize user behavior on your site. Connect with tools such as Optimizely to run and analyze split tests effortlessly. Link with Zendesk to track support interactions and measure their impact on sales.
6. How does installing Magento 2 GTM differ between Magento Commerce and default Magento?
Install the extension as with tag manager, you can track both tag management systems. However, Magento Commerce may offer additional features or integrations with the Magento 2 GTM extension.
Summary
Magento 2 GTM helps manage and deploy marketing tags without modifying the code. It allows online store owners to:
- Manage marketing tags and analytics efficiently.
- Enhance data collection and marketing efforts.
- Simplify tag management and ensure optimal performance.
- Support both web and server containers.
- Reach their audience with dynamic ads.
Consider managed Magento hosting to enhance your eCommerce tracking and analytics with Google Tag Manager.


